background image

Chapter 2  Operator Panel Operation
  2.3  Library Information Display

FUJITSU Storage ETERNUS LT270 S2 Tape Library User’s Guide -Panel Operation-

Copyright 2020 FUJITSU LIMITED

P3AM-6932-06ENZ0

30

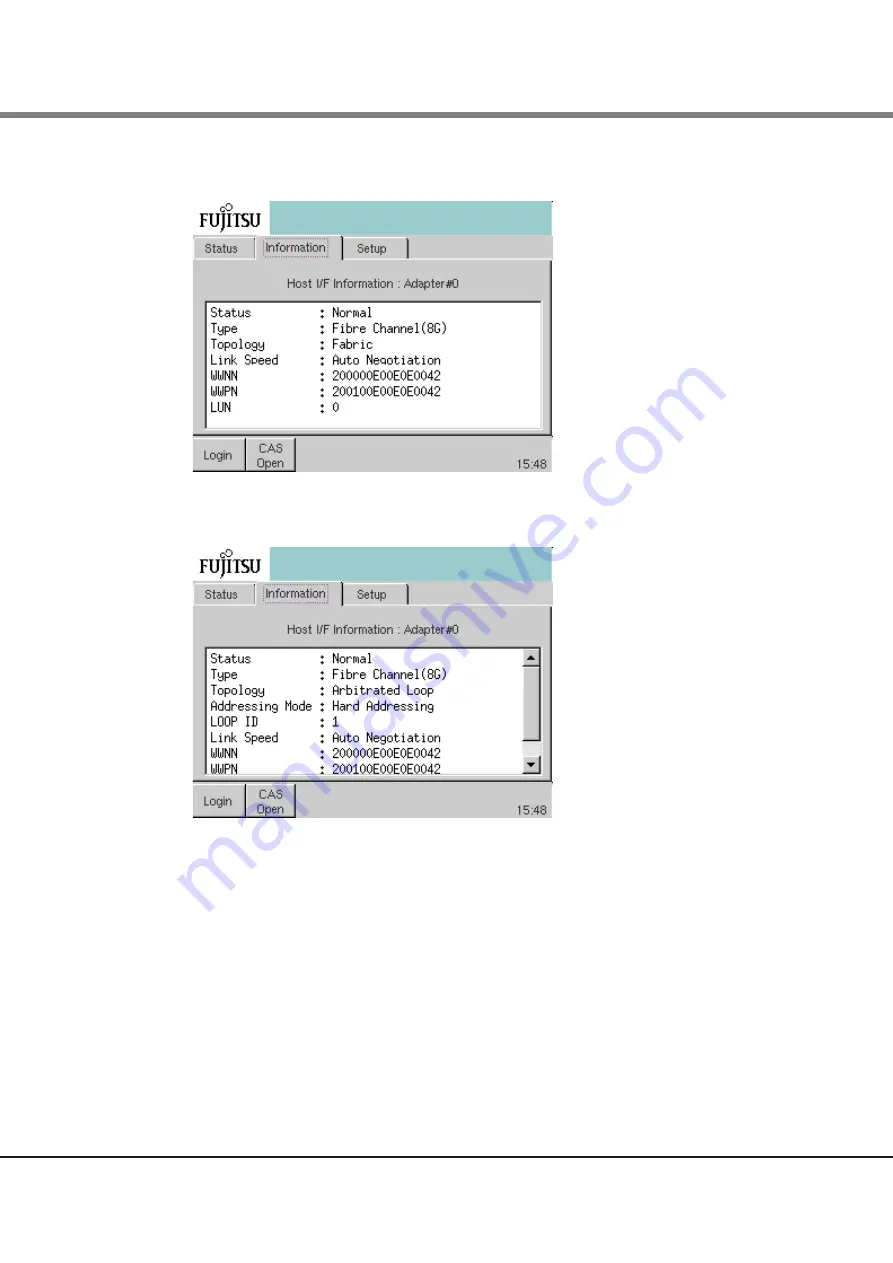
Figure 2.5   Host interface information reference window 

(When fabric connection is set)

Figure 2.6   Host interface information reference window 

(When AL connection and Hard Address are set)

Содержание ETERNUS LT270 S2

Страница 1: ...FUJITSU Storage ETERNUS LT270 S2 Tape Library User s Guide Panel Operation P3AM 6932 06ENZ0 ...

Страница 2: ...This page is intentionally left blank ...

Страница 3: ...n Japan Please carefully review the information outlined in this manual Sixth Edition June 2020 LTO Linear Tape Open and Ultrium are registered trademarks of Hewlett Packard Enterprise L P IBM Corporation and Quantum Corporation All SPARC trademarks are used under license and are trademarks or registered trademarks of SPARC International Inc in the United States and other countries Microsoft Windo...

Страница 4: ...owing three chapters Chapter 1 Overview This chapter provides an overview of the operator panel and the remote panel Chapter 2 Operator Panel Operation This chapter provides information about various operations that can be performed with the operator panel Chapter 3 Remote Panel Operation This chapter provides information about various operations that can be performed with the remote panel ...

Страница 5: ...properly CAUTION This symbol indicates the possibility of minor or moderate personal injury as well as damage to the ETERNUS LT270 S2 Tape Library and or to other users and their property if the ETERNUS LT270 S2 Tape Library is not used properly This symbol indicates IMPORTANT information for the user to note when using the ETERNUS LT270 S2 Tape Library Electric Shock The triangle emphasizes the u...

Страница 6: ...the ETERNUS LT270 S2 Tape Library Trademark symbols such as and are omitted in this manual Warning Level Indicator Warning Type Indicator Warning Details To avoid damaging the ETERNUS LT270 S2 Tape Library pay attention to the following points when cleaning the ETERNUS LT270 S2 Tape Library Make sure to disconnect the power when cleaning Be careful that no liquid seeps into the ETERNUS LT270 S2 Ta...

Страница 7: ...Panel Operation 23 2 1 Login 23 2 2 Status Display 25 2 2 1 Library Status 25 2 2 2 Drive Tape Cartridge Status 26 2 3 Library Information Display 27 2 3 1 CAS Tape Cartridge Information 27 2 3 2 Host Interface Information 29 2 3 3 Library Setting Information 31 2 3 4 Drive Information 32 2 3 5 Network Setup Information 34 2 4 Error Information Display 36 2 4 1 Library Hardware Error Information 3...

Страница 8: ...ng the Tape Cartridge from the Trash Cell 67 2 17 Setting Up the Operator Account 68 Chapter 3 Remote Panel Operation 71 3 1 Login 71 3 2 Library Drive Status 75 3 2 1 Library Statuses 76 3 2 2 Cabinet Status 77 3 2 3 Drive Status 77 3 3 Library Information 78 3 3 1 Tape Cartridge Information 78 3 3 2 Host Interface Setup Information 89 3 3 3 Library Setup Information 91 3 3 4 Drive Setup Informat...

Страница 9: ... 11 7 Setting the SNMP Agent 125 3 11 8 Executing an SNMP Trap Test 128 3 11 9 Downloading an MIB File 132 3 11 10 Changing the Password 135 3 12 Operating the Library 137 3 12 1 Opening the CAS Door 137 3 12 2 Cleaning the Drive Manually 138 3 12 3 Inserting ejecting a Cleaning Cartridge 140 3 12 4 Loading Cartridges 145 3 12 5 Ejecting Tape Cartridges 146 3 12 6 Releasing a Hardware Error of the...

Страница 10: ...work information reference window When IPv4 is disabled and IPv6 is enabled 35 Figure 2 13 Hardware error information display window of the library 37 Figure 2 14 Hardware error information display window of the drive 38 Figure 2 15 Display of the Alarm button 38 Figure 2 16 Alarm information display window 39 Figure 2 17 Illumination of the Sign Information button 40 Figure 2 18 Information list ...

Страница 11: ...nformation display window 91 Figure 3 20 Drive setup information display window 93 Figure 3 21 Network setup information display window 94 Figure 3 22 Error history display window 96 Figure 3 23 Statistical information display window 97 Figure 3 24 Window that displays tape cartridge statistics 98 Figure 3 25 Window that displays robot statistics 99 Figure 3 26 Window that displays drive statistic...

Страница 12: ... been downloaded 154 Figure 3 63 Window that is displayed after downloading of the library drive setup information is complete 155 Figure 3 64 Reboot confirmation window 156 Figure 3 65 Reboot window 157 Figure 3 66 Trace type selection window 158 Figure 3 67 Library trace preparation window 159 Figure 3 68 Window for starting the library trace download 160 Figure 3 69 Window for selecting the dri...

Страница 13: ...hange cells 85 Table 3 12 Information for tape cartridges that are nearing their replacement time 86 Table 3 13 Information for a tape cartridge that needs to be replaced 87 Table 3 14 Host interface setup information 90 Table 3 15 Library setup information 92 Table 3 16 Drive setup information 93 Table 3 17 Network setup information 95 Table 3 18 Error history information 96 Table 3 19 Explanatio...

Страница 14: ...sitioned on the center of the front external door It is possible to perform operations such as referencing setting the library and drive status and opening the magazine door of the CAS from the operator panel By selecting the buttons on the operator panel operations such as window transition function selection and setup value input can be performed The windows on the operator panel can be roughly ...

Страница 15: ... network settings need to be performed on the operator panel to enable the IP address the subnet mask and the gateway so that the remote panel can be used Restart the LT270 S2 and specify the following URL on a Web browser after performing the settings or The recommended operating environment for the remote panel is as follows OS Windows 7 Windows 8 Windows 10 Web browser Microsoft Internet Explor...

Страница 16: ... Operations FUJITSU Storage ETERNUS LT270 S2 Tape Library User s Guide Panel Operation Copyright 2020 FUJITSU LIMITED P3AM 6932 06ENZ0 16 The following window is displayed when the LT270 S2 is connected Figure 1 3 Remote panel starting window ...

Страница 17: ...window of the operator panel consists of five areas Figure 1 4 Operator panel Area configuration Logo area The Fujitsu logo is displayed Message area The message Remote panel operating is displayed during the remote panel operation It displays the logical library unique name being used for the current operation This applies only when the logical library configuration is used Logo area Message area...

Страница 18: ...e performed Using an administrator password is required to log in Operation tab Library operation Settings such as drive loading settings manual injection settings and manual cleaning settings can be performed Using an administrator password is required to log in Icon Name Function Library Error icon This icon goes on if a library hardware error occurs CAS Opened icon This icon goes on when the ma...

Страница 19: ...t button Performs login to logout from the administrator window For the login password refer to 2 7 4 Password Setup page 51 CAS Open button Moves by taking a shortcut to the menu for opening the CAS door Back button Returns to the previous window from the menu window Next Back button Moves to the next or previous window for operation in the menu window OK button Starts executing the operation spe...

Страница 20: ... Window Layout The configuration of the menu frame and main frame on the remote panel window has the following appearance Figure 1 5 Remote panel Frame layout Menu Frame A menu that shows the library drive status setup and operations is displayed Main Frame A window in which settings and operations that are selected from Menu Frame can be performed is displayed Menu Frame Main Frame ...

Страница 21: ...ect Trash Eject Power Off Inventory CAS Map Logical Library Library Library Drive Drive Host I F Network Network Screen Saver Time Brightness Error Log Version Unit Status Target ID Vendor ID Product ID IP Address Subnet Mask Gateway Target ID LUN Host WWPN Library F W Rev Drive F W Rev LCT Robot DCT Cluster PSU Shelf Fan Robot PSU The administrator account default admin is required to log in Vend...

Страница 22: ...ntory Logical Library Drive Topology Host I F Target ID Host WWPN Network IP Address Subnet Mask Gateway E mail SNMP Date Time Password Information Status Library Adaptor Drive Status Cell Map Cell CAS Drive Library Vendor ID Product ID Auto Clean Logical Library Drive Host I F Target ID Host WWN Network Error Log SCSI Log Statistics Log Version Unit Status Vendor ID Product ID Auto Clean The admi...

Страница 23: ...og in to the operator panel Two login accounts are available administrator and operator Each login account has its own password The login procedure is not required when a general user account is used An operator account can be used when the operator mode is enabled For more details on operator account settings refer to 2 17 Setting Up the Operator Account page 68 Procedure 1 Click the Login button...

Страница 24: ... is admin The default password for the operator account is operate When a login operation is complete the Logout button appears in the common button area Figure 2 2 Login window password input End of procedure The available operation menu on the operator panel depends on the login account type Table 2 1 Operation menu for each account operator panel Login account Available menu Password General us...

Страница 25: ...hen logical libraries are configured the unique name of each logical library is displayed with the drive cluster number Status name Description Initializing Indicates that the library is being initialized Idle Indicates that the library has stopped normally Moving Indicates that the robot is in operation Checking Inventory Indicates that the library is taking inventory of the CAS or cells Front Do...

Страница 26: ...tridge is being erased Locating Indicates that the tape cartridge is being located Unloading Indicates that the drive is being unloaded Unloaded Indicates that the unloading is completed Cleaning Indicates that cleaning is under way after a cleaning cartridge is loaded Required Clean Indicates that the drive requires cleaning Need Clean Indicates that the drive requires cleaning In this state only...

Страница 27: ... drive setup information To open the Information menu click the Information tab in the main area of the Menu window Figure 2 3 Selecting the Information tab 2 3 1 CAS Tape Cartridge Information CAS cartridge information that can be viewed includes the cell addresses label names and tape cartridge types Procedure 1 Click the CAS Map button on the information menu 2 Select the CAS for which informat...

Страница 28: ... Cartridge information Figure 2 4 Reference window for the CAS cell tape cartridge information End of procedure Status Description Normal The cartridge can be used Media Error The cartridge cannot be used due to a media error Unusable Cell A CIC sensor error occurred in the CAS selected Invalid The tape cartridge cannot be recognized due to a barcode error or the tape cartridge is not supported Ce...

Страница 29: ...the host Type Interface type and card type Indicates Fibre Channel and the card type 1G 2G 4G or 8G Topology Topology setting status The status indicates fabric connection or arbitrated loop connection direct connection Addressing Mode Addressing mode only for arbitrated loop connection The status indicates either the Hard Address mode or the Soft Address mode LOOP ID Loop ID of the library The lo...

Страница 30: ...NUS LT270 S2 Tape Library User s Guide Panel Operation Copyright 2020 FUJITSU LIMITED P3AM 6932 06ENZ0 30 Figure 2 5 Host interface information reference window When fabric connection is set Figure 2 6 Host interface information reference window When AL connection and Hard Address are set ...

Страница 31: ...rmation is displayed Temperature Humidity Temperature humidity in the library Configuration information Installed Clusters Number of drive clusters Installed Drives Number of installed drives Installed CASs Number of available CASs Installed Cells Number of user cells excluding special cells such as cleaning cells Library setup information Vendor ID Product ID Library Vendor ID Product ID When log...

Страница 32: ...e Model name Check Code Device specific code set by remote maintenance function Device name Unique library name set by SNMP trap notification function via the remote panel Figure 2 8 Library information reference window End of procedure 2 3 4 Drive Information It is possible to reference the topology setting Vendor ID Product ID and WWPN WWNN Procedure 1 Click the Drive button from the INFORMATION...

Страница 33: ...ve Addressing Mode Addressing mode only on Arbitrated Loop Either Hard Address or Soft Address is displayed Drive LOOP ID Loop ID of the drive Displayed only in Hard Address mode Drive Link Speed Displays the Drive Link Speed settings Auto Negotiation 1Gbps 2Gbps 4Gbps 8Gbps Displayed only in Hard Address mode Drive Type Displays the host interface type of the drive Drive Vendor ID Product ID Driv...

Страница 34: ...the Hard Address is set End of procedure 2 3 5 Network Setup Information Network setup information can be referenced Procedure 1 Click the Network button from the INFORMATION menu 2 The following setup address information about the network is displayed IPv4 IPv4 Enable Disable When IPv4 is enabled the following items and addresses are also displayed DHCP Enable Disable IP Address Subnet Mask Gatew...

Страница 35: ...IPv6 IPv6 Enable Disable When IPv6 is enabled the following items and addresses are also displayed INPUT Auto Manual Link Local Address Global Address Length of Subnet Prefix Gateway NTP Server Address Figure 2 11 Network information reference window When both IPv4 and IPv6 are enabled Figure 2 12 Network information reference window When IPv4 is disabled and IPv6 is enabled End of procedure ...

Страница 36: ...rence error information such as the date time of occurrence and error code of the library click the Library button There is possibility that the alarm information I2C Error Alarm will be displayed when lightning strikes If I2C Error Alarm is displayed the update for the power consumption information that is displayed on the remote panel will stop However this does not affect the main functions of ...

Страница 37: ...rary End of procedure 2 4 2 Drive Hardware Error Information Information about hardware errors that occur in the drives is displayed Procedure 1 Click the Error Log button from the INFORMATION menu 2 To reference error information such as the date time of occurrence and error code of the drive click the Drive button INFORMATION menu Error Log INFORMATION menu Error Log Drive The 20 most recent err...

Страница 38: ...SU LIMITED P3AM 6932 06ENZ0 38 Figure 2 14 Hardware error information display window of the drive End of procedure 2 4 3 Alarm Event Information Alarm event information is displayed Procedure 1 If an alarm event occurs the Alarm button is shown in the icon area The Alarm button is hidden when no alarm event has occurred Figure 2 15 Display of the Alarm button ...

Страница 39: ...vent Figure 2 16 Alarm information display window End of procedure 2 4 4 Sign Information Information about events that occur is displayed Procedure 1 When an event occurs the Sign Information button is shown in the icon area This button is hidden when no event has occurred For details of the alarm information refer to Library alarm error in 7 12 1 2 Error Type of the Library of FUJITSU Storage ET...

Страница 40: ...Figure 2 17 Illumination of the Sign Information button 2 When the Sign Information button is clicked information about what has occurred is displayed Figure 2 18 Information list window End of procedure For details of information displayed refer to Library information in 7 12 1 2 Error Type of the Library of FUJITSU Storage ETERNUS LT270 S2 Tape Library User s Guide Installation Operation ...

Страница 41: ...rocedure 1 Click the Version button from the INFORMATION menu 2 The following library drive information is displayed Library Version of Overall Library Version of Boot Loader Version of Library Control Firmware Version of Library Servo Firmware Version of Library Control Hardware Version of Library Servo Hardware Old Area Version of Overall Library Drive module Version of Overall Drive Module Vers...

Страница 42: ... standby Offline The unit is disconnected in offline status Error The unit is in error status Power Off The unit is in power off status Not Installed The unit is not installed Drive Cluster n DCI 0 1 Active The unit is active Error The unit is in error status Power Off The unit is in power off status Not Installed The unit is not installed Drive Cluster n Cluster PSU 0 1 Active The unit is active ...

Страница 43: ... Operation 2 6 Unit Information Display FUJITSU Storage ETERNUS LT270 S2 Tape Library User s Guide Panel Operation Copyright 2020 FUJITSU LIMITED P3AM 6932 06ENZ0 43 Figure 2 20 Unit information display window End of procedure ...

Страница 44: ...P protocol communication function Remote panel function You can reference or set up the library or drive in the Web browser E mailing function If the robot or drive detects a hardware error fault information is reported by e mail REMCS function REMote Customer Support system This function links the customer and the maintenance management system of Fujitsu to provide support such items as recognizi...

Страница 45: ...Click the Network button from the Setup menu and then click IPv4 2 Click the list button and then select Enable for IPv4 3 Click the list button and then select Disable or Enable for DHCP When Disable is selected to disable DHCP use the numeric keypad buttons to enter the values of IP Address Subnet Mask Gateway and NTP Server Address if necessary After making the entries click the Next button Fig...

Страница 46: ...d then select Enable for IPv6 3 Click the list button and then select Auto or Manual for INPUT When Manual is selected to input values manually use the numeric keypad buttons to enter the values for Link Local Address Global Address Length of Subnet Prefix Gateway and NTP Server Address if required The window to enter these values consists of two pages To switch between the pages press the Next bu...

Страница 47: ...ation Copyright 2020 FUJITSU LIMITED P3AM 6932 06ENZ0 47 Figure 2 24 IPv6 network setup window 2 2 4 A confirmation window is displayed Click the OK button if it is OK to proceed 5 A message indicating that the process is in progress is displayed The Setup menu is displayed again when the setting is complete normally End of procedure ...

Страница 48: ...pad to enter the values of Date year month and day and Time hour and minute If the entries are completed click the Next button 3 Use the up arrow or down arrow button or to set the time zone Table 2 7 lists the values used to specify world time zones Figure 2 25 Date and time setting window 4 A confirmation window is displayed Click the OK button to proceed Changing the time zone requires a librar...

Страница 49: ... Bangkok Jakarta Hanoi 06 30 Yangon Rangoon 06 00 Almaty Dacca 05 30 Mumbai Bombay Kolkata Calcutta Chennai Madras New Delhi Colombo 05 00 Islamabad Karachi Ekaterinburg Tashkent 04 30 Kabul 04 00 Abu Dhabi Muscat Tbilisi 03 30 Tehran 03 00 Baghdad Kuwait Nairobi Riyadh Moscow St Petersburg Kazan 02 00 Athens Helsinki Istanbul Cairo East Europe Harare Israel Pretoria 01 00 Berlin Stockholm Rome Be...

Страница 50: ...enu 2 For the time minutes in which the screen saver activates select the numeric keypad button and make an entry using the numeric keypad When the entry is complete click the Next button Figure 2 26 Setup window for screen saver starting time 3 A confirmation window is displayed Click the OK button if it is OK to proceed 4 A message indicating that the process is in progress is displayed The Setu...

Страница 51: ...min Password button on the Setup menu 2 Click the numeric keypad button and enter the new password and reenter the password for confirmation After making the entries click the OK button Figure 2 27 Password setting window 3 When password setting is completed the Setup menu is displayed in the window End of procedure SETUP menu Password The default administrator password is admin When you log in as...

Страница 52: ...cedure 1 Click the Brightness button on the Setup menu 2 Click the list button and then select the brightness Click the Next button after selecting the brightness setting Figure 2 28 Brightness setting window 3 A confirmation window is displayed click the OK button if it is OK to proceed 4 If these settings complete successfully the Setup menu appears again End of procedure SETUP menu Brightness O...

Страница 53: ...ssigning the CAS to the logical library in operation For use from the operator panel the CAS assignment must also be changed Procedure 1 In the Operation menu click the CAS Assignment button Figure 2 29 Operation menu window 2 A confirmation window is displayed Click the OK button if it is OK to proceed 3 When the end message appears the CAS assignment is complete End of procedure If the CAS has a...

Страница 54: ...on area If the door is closed after inserting a magazine the library automatically performs an inventory operation and reads the label data for the tape cartridges inserted Procedure 1 Click the CAS Open button in the common button area in the home window Figure 2 30 Selecting the CAS Open button 2 Select the CAS to open by clicking the CAS number button Depending on the backup software type the d...

Страница 55: ...S door is faulty The CAS door could not be opened but opening can be retried Y Opened The CAS door is already open N Checking Inventory The CAS cell inventory operation is in progress N In Use The CAS cell tape cartridge is being accessed N Prevent The CAS is reserved by the host N WARNING Do Data loss A drive that is being used in a load operation can no longer be accessed by the backup software ...

Страница 56: ... menu Figure 2 31 Selecting the Load button 2 Select a CAS 3 Specify a tape cartridge inside the specified magazine using a CAS cell number 4 Specify a drive to be loaded 5 A confirmation window is displayed Click the OK button if it is OK to proceed OPERATION menu Load CAS 0 CAS 1 More than one tape cartridge may be specified You can specify as many drives as the tape cartridges specified above O...

Страница 57: ... 1 Click the Manual Eject button from the Operation menu Figure 2 32 Selecting the Manual Eject button When an eject operation is performed the drive goes offline temporarily When the eject operation is complete the drive automatically returns on line Normally the tape cartridges from which data has been successfully backed up are ejected to their home cells by the backup software However if host ...

Страница 58: ...ed in a cleaning cell More than one drive can be specified OPERATION menu Manual Eject DRV 01 DRV 02 Cleaning cannot be done if no dedicated cleaning cartridge for the drive to be cleaned is contained in the cleaning cell To add a cleaning cartridge to the cleaning cell refer to 2 13 1 Inserting a Cleaning Cartridge page 60 Also cleaning cannot be carried out if the expiration dates of all dedicat...

Страница 59: ...gure 2 33 Selecting Clean button 2 Click the Manual Clean button 3 Specify the drive to be cleaned using the Drive number button 4 A confirmation window is displayed Click the OK button if it is OK to proceed 5 A message indicating that the process is in progress is displayed 6 If the display changes to an end message cleaning of the specified drive is completed End of procedure OPERATION menu Cle...

Страница 60: ...rtridge which is now unusable and replace it with a new cleaning cartridge If loading or ejection is attempted while the backup software is accessing the library a message is displayed stating that the library is busy Retry loading or ejection when the library is no longer busy The cleaning cell is divided into two areas One area is exclusively used for the lower robot the other area exclusively u...

Страница 61: ... button 2 Click the Insert Clean Tape button 3 Specify the number of the CAS containing a cleaning cartridge 4 Specify the cleaning cartridge to be loaded into the cleaning cell with the CAS cell number button Click the Next button when specifying the cleaning cartridge to be loaded is complete Operation MENU Clean Insert Clean Tape Operation MENU Clean Insert Clean Tape CAS 0 More than one cleani...

Страница 62: ...progress message window also displays the number of cleaning cartridges to load and number of cleaning cartridges that have been loaded 7 Cleaning cartridge loading is complete when an end message is displayed End of procedure 2 13 2 Ejecting a Cleaning Cartridge A cleaning cartridge in the cleaning cell is ejected into the CAS Procedure 1 Click the Clean button from the Operation menu Figure 2 35...

Страница 63: ...ed 6 Cleaning cartridge ejection is complete when an end message is displayed End of procedure More than one cleaning cartridge can be selected No Barcode Label Type Count Status 00 CLNI05L1 LTO C 0 50 Normal 01 CLNI04L1 LTO C 0 50 Normal 02 CLNI03L1 LTO C 10 50 Normal 03 CLNI02L1 LTO C 50 50 Limit 04 CLNI01L1 LTO C 40 50 Media ERR Status Description Normal The cartridge can be used Limit The usag...

Страница 64: ...d of the Status menu To recover the drive from the hardware error use the Status menu to perform recovery operation Figure 2 36 Home window displaying a drive hardware error The library remains off line during library error recovery The backup software cannot access the drives until the recovery operation is complete If you perform recovery operation while the library is being used by the backup s...

Страница 65: ...plete when an end message is displayed End of procedure 2 15 Inventory The cartridge management information for the user cell and CAS cell is updated The library goes off line while inventory is being taken Automatic inventory is not performed if the auto inventory function is disabled when the library is turned on If you replace or change the position of a tape cartridge execute the Inventory ope...

Страница 66: ...tton if it is OK to proceed 3 If the inventory operation is completed an end message window is displayed completing the update of tape cartridge management information If the Invalid CELL Information window shows it means that the cell contains an invalid tape cartridge Check the relevant information before removing the tape cartridge End of procedure For information on handling invalid tape cartr...

Страница 67: ...that has ejected to the trash from the trash cell to the CAS Procedure 1 Click the Trash Eject button on the Operation menu Figure 2 39 Selecting the Trash Eject button 2 A confirmation window is displayed Click the OK button if it is OK to proceed 3 A message indicating that the process is in progress is displayed 4 An end message appears when ejection of the tape cartridge is completed End of pr...

Страница 68: ...able and disable the operator account Procedure 1 Log in to the administrator account and then click the Operator Mode button from the Setup menu Figure 2 40 Selecting the Operator Mode button If the operator account is enabled logging in to the operator account in order to perform CAS operations is required If performing CAS operations without logging in to the operator account are not desired du...

Страница 69: ...Operator Mode to Enable the default is Disable click the Next button and then click the OK button Figure 2 41 Selecting the operator mode The following figures show the drive status when the operator mode is enabled and disabled When Operator Mode is Disabled For general users The CAS Open button and reference information are available for use Figure 2 42 Drive status when the operator mode is dis...

Страница 70: ... 70 When Operator Mode is Enabled For general users Only reference information is displayed The CAS Open button is not displayed Figure 2 43 Drive status when the operator mode is enabled Operator login The CAS Open button and reference information are available for use The display is the same as that for general users when operator mode is disabled Figure 2 44 Operator login End of procedure ...

Страница 71: ...Specify one of the following URLs on a Web browser to display the start window of the remote panel or Click the Start button in the start window of the remote panel The following login window is displayed http IP address specified for the LT270 S2 https IP address specified for the LT270 S2 Use the https URL to connect to the remote panel for the LT270 S2 in which the Key Management Function Optio...

Страница 72: ...ion menu of the remote panel is restricted Table 3 1 Operation menu for each account remote panel The general user account allows simultaneous logins whereas the administrator account does not Two login accounts are available General user and Administrator Each login account has its own login name and password Login account Operable menu Login password General user Status reference only user user ...

Страница 73: ... Copyright 2020 FUJITSU LIMITED P3AM 6932 06ENZ0 73 3 If the entered login name and password are correct the home window is displayed If the login is fails the following window is displayed Figure 3 2 Window displayed when the login fails Click Go to LOGIN window to return to the login window Enter the correct values ...

Страница 74: ...logging off when the administrator account was last used including restart following forced termination due to a browser error the following window is displayed Figure 3 3 Window displayed for duplicate login To forcibly log off after checking the message contents click the Yes button After returning to the login window log in again If the Yes button is clicked operations from the remote panel to ...

Страница 75: ...D P3AM 6932 06ENZ0 75 3 2 Library Drive Status If logged in normally from the login window of the remote panel the home window is displayed so that the status of the library adapter drive and temperature and humidity in the library can be referenced Figure 3 4 Status reference window of the library drive The home window is automatically updated every 10 seconds ...

Страница 76: ...igure 3 5 Normal window display no errors upper frame Figure 3 6 Window display when there is an error upper frame Status Explanation Initializing Indicates that the library is being initialized Idle Indicates that the library has stopped normally Moving Indicates that the robot is operating Checking Inventory Indicates that the library is taking inventory of the CAS or cells Front Door Opened Ind...

Страница 77: ...n Indicates that the cabinet is normal Indicates that a cabinet has alarm information or a drive that is installed in the cabinet has alarm information Indicates that the cabinet is in error status Indicates that the cabinet is turned off Icon Explanation Indicates that the drive is normal Indicates that the drive requires cleaning the drive is turned off a cartridge error has occurred or the driv...

Страница 78: ... information 3 3 1 Tape Cartridge Information Tape cartridge information that can be referred to includes the cell addresses label names and tape cartridge types of user cell CAS cell drive special cells cleaning cells trash cells exchange cells and diagnostics cells Clicking the Cell Map button displayed under Information displays the configuration diagram of each cabinet Select a target cabinet ...

Страница 79: ...Guide Panel Operation Copyright 2020 FUJITSU LIMITED P3AM 6932 06ENZ0 79 3 3 1 1 Referencing the User Cell Procedure 1 Click the User Cell button and then the OK button to display a cabinet configuration diagram Select the cabinet drawer or back cell you want to reference Figure 3 8 Cabinet configuration window ...

Страница 80: ...opyright 2020 FUJITSU LIMITED P3AM 6932 06ENZ0 80 2 The window lists the cells in the cabinet or back cell selected Figure 3 9 Cabinet cell list display window 3 Select a cell number button to display information about the tape cartridge loaded in the corresponding cell Figure 3 10 User cell tape cartridge information display window ...

Страница 81: ...ayed In such case Media type is not displayed Status For more details refer to Table 3 6 below Media Type Indicates the tape cartridge type If the tape cartridge cannot be identified Unknown is displayed Display item Explanation Normal Indicates that the tape cartridge is normal Forbidden Indicates that the tape cartridge is not the one to be stored in the cell Cell Error Indicates that the cell h...

Страница 82: ... CAS cell information Display item Explanation Cell No Indicates a physical CAS cell number SCSI Address Indicates an address of the element used with SCSI Barcode Label The barcode label of the tape cartridge stored in the cell is displayed If the barcode label cannot be identified or no barcode label is affixed No_Label is displayed If there is no tape cartridge in the CAS No_Tape is displayed I...

Страница 83: ... cell tape cartridge information display window Table 3 8 Drive cell information Display item Explanation Drive No Indicates a drive number SCSI Address Indicates an address of the element used with SCSI Barcode Label The barcode label of the tape cartridges stored in the cell is displayed If the barcode label cannot be identified or no barcode label is affixed No_Label is displayed If there is no...

Страница 84: ...cial Cells Click the Special Cell button and then click the OK button to display special cell tape cartridge information Special cells are grouped into the four kinds listed below Of these cleaning cells hold cleaning cartridges and diagnostic cells house diagnostic tape cartridges Cleaning cells Trash cells Exchange cells Diagnostic cells Figure 3 13 Special cell tape cartridge information displa...

Страница 85: ...age count has reached its limit Replace with a new cleaning cartridge For more details refer to Table 3 6 Media type Indicates the tape cartridge type which is normally displayed as LTO C If the tape cartridge type is unknown Unknown is displayed Display item Explanation Cell No Indicates a diagnostic cell number Barcode Label Indicates the barcode label of the tape cartridge housed in the cell No...

Страница 86: ...mation can only be viewed when a general user account is used to log in Display item Description Cell No Identifies the cell containing the tape cartridge Barcode Label Indicates the tape cartridge label name Thread Count Indicates how many times the tape cartridge has been loaded to the drive Write Retry Rate Indicates the write error rate per gigabyte Read Retry Rate Indicates the read error rat...

Страница 87: ...ion can only be viewed when a general user account is used to log in Display item Description Cell No Identifies the cell containing the tape cartridge Barcode Label Indicates the tape cartridge label name Thread Count Indicates how many times the tape cartridge has been loaded to the drive Write Retry Rate Indicates the write error rate per gigabyte Read Retry Rate Indicates the read error rate p...

Страница 88: ... Label In the input box of the cell map window enter the barcode label of a tape cartridge that you want to find and click the Search button The column and cell number indicating where the tape cartridge is stored is displayed in another window To find a tape cartridge with a barcode label that the library does not recognize leave the input box blank and click the Search button Figure 3 16 Barcode...

Страница 89: ...Example of result of barcode label search 3 3 2 Host Interface Setup Information By clicking the Host I F button displayed under Information setup information for the host interface such as the LOOP ID adapter WWPN and host WWPN can be referenced When logical libraries are created the information on only the adapters assigned to the selected logical library at a login is displayed Not Assigned is ...

Страница 90: ...stalled Not Installed is displayed Status Indicates the status of host interface If operating normally Normal is displayed If the FC cable is disconnected Not Connect is displayed If an error occurred Error is displayed I F Type Indicates the interface type and card type Topology Displays the connection form Fabric or FC_AL Addressing Mode Displays the addressing mode Hard or Soft If Topology is F...

Страница 91: ...3 Library Setup Information By clicking the Library button displayed under Information setup information for the library such as the number of elements cell drive magazine and the Vendor ID and Product ID can be referenced Figure 3 19 Library setup information display window The displayed items for physical library configuration are different from those for logical library configuration ...

Страница 92: ...sabled Disable is displayed Fast Load Indicates the fast load function If the fast load function is enabled Enable is displayed If the fast load function is disabled Disable is displayed Host Feature Displays the Host Feature setting value Barcode Label Length Displays the number of characters in the barcode label for a host response Installed Expansion Cabinets Displays the number of configured c...

Страница 93: ...ive setup information display window Table 3 16 Drive setup information Display item Explanation Drive I F Type Displays the host interface type of the drive Topology Displays the connection type Fabric or FC AL Addressing Mode Displays the addressing mode Hard or Soft Drive Link Speed Displays the Link Speed settings of the drive 1 Gbps 2 Gbps 4 Gbps 8Gbps Auto Negotiation World Wide Node Name Di...

Страница 94: ...3 5 Network Setup Information By clicking the Network button displayed under Information setup information for the network such as the IP address subnet mask gateway and MAC address can be referenced Figure 3 21 Network setup information display window Drive Product ID Displays the Product ID of the drive Drive Serial No Displays the serial number of the drive Display item Explanation ...

Страница 95: ...drive history is displayed Display item Explanation IPv4 Displays whether IPv4 is enabled or disabled DHCP Displays whether the DHCP is enabled or disabled IP Address Displays the IP address Subnet Mask Displays the subnet mask address Gateway Displays the gateway address NTP Server Displays the NTP server address DNS Server Displays the DNS server address IPv6 Displays whether IPv6 is enabled or ...

Страница 96: ...ode Sense Key Displays the sense key of SCSI ASC ASCQ Displays ASC ASCQ of SCSI FRU Displays the name of unit in which an error occurred Host ID Displays LOOP ID of the host in which an error occurred Target ID Displays the LOOP ID of the library where an error occurred Command Code Displays the SCSI command code in which an error occurred Source Address Displays the source address if an error occ...

Страница 97: ...tistics about the tape cartridges robots and drives contained in the library unit When you click the Statistics Log button under Information statistical values are displayed Select the target cabinet from the drop down list Figure 3 23 Statistical information display window This information can only be viewed when a general user account is used to log in The drop down list is not displayed when on...

Страница 98: ...the window displays statistical information on the tape cartridge on each CAS cell Figure 3 24 Window that displays tape cartridge statistics Cartridge statistics comprise information on the top 30 tape cartridges in a thread count The Thread Count cell of a cartridge that has reached its near replacement or replacement threshold is displayed in pale yellow indicating near replacement threshold re...

Страница 99: ...ates the tape cartridge label name Cell No Identifies the cell containing the tape cartridge Thread Count Indicates how many times the tape cartridge has been loaded to the drive Write Retry Rate Indicates the write error rate per gigabyte Read Retry Rate Indicates the read error rate per gigabyte Suspend Write Rate Indicates the suspend write error rate per gigabyte Write Data Sets Indicates the ...

Страница 100: ... in normal state without having reached its near replacement or replacement threshold Near The robot needs to be replaced in the near future Reach The robot needs to be replaced immediately X Motor Move Count Indicates the number of X direction moves S Motor Move Count Indicates the number of swivel moves P Motor Move Count Indicates the number of picker moves Y Motor Move Count Indicates the numb...

Страница 101: ...its near replacement or replacement threshold Normal The drive is in normal state without having reached its near replacement or replacement threshold Near The drive needs to be replaced in the near future Reach The drive needs to be replaced immediately Thread Count Indicates how many times the tape cartridge has been loaded to the drive Write Retry Rate Indicates the write error rate per gigabyt...

Страница 102: ...rary User s Guide Panel Operation Copyright 2020 FUJITSU LIMITED P3AM 6932 06ENZ0 102 3 6 Firmware Version Number of the Library and the Drive By clicking the Version button displayed under Information the version number of the library firmware and drive firmware can be referenced Figure 3 27 Firmware version number display window ...

Страница 103: ... information display window Display item Explanation Overall Library Displays the total version number of library firmware Library Control Firmware Displays the version number of library firmware Library Control Hardware Displays the version number of library hardware Library Boot Firmware Displays the version number of boot loader Library Servo Firmware Displays the version number of Servo firmwa...

Страница 104: ...es the barcode label used when an error occurred Host ID 01 Indicates LOOP ID of the host or switch Target ID 125 Indicates LOOP ID of the library Logical Unit Number 00 Indicates the Logical Unit number of the library Command code a5 Indicates the SCSI command when an error occurred Source Address 1000 Indicates the source cell address Destination Address 500 Indicates the destination cell addres...

Страница 105: ...ed when an error occurred Library Serial Number 0001 Indicates the serial number of the library Overall Library 01 01 Indicates the total version number of the controller Boot Loader Version R1_1_0 050701 Indicates the firmware version number of the boot loader Library Control Firmware R1_1_0 050701 Indicates the firmware version number of the controller Library Control Hardware Board 0 FPGA 4 Ind...

Страница 106: ...munity Displays communities up to five communities User Info Displays following user information up to five communities User Name Authentication Authentication Mode Encryption and Encryption Mode Trap Destination Address Displays IP Addresses for Trap destinations up to 10 destination addresses Also displays SNMP Version Community and User Name for Traps that are to be sent Send Trap Displays whet...

Страница 107: ...ight 2020 FUJITSU LIMITED P3AM 6932 06ENZ0 107 3 9 Status of Various Units Click the Unit Status button displayed under Information to reference each unit status Figure 3 30 Unit status window When logical libraries are created the information of only clusters and DCIs that are assigned to the logical library selected at a login is displayed ...

Страница 108: ...r Off The unit is in power off status Error The unit is in error status Operator Panel Active The unit is active Operating The library is being operated from the operator panel Calibration The unit is in calibration status Power Off The unit is in power off status Not Installed The unit is not installed Drive Cluster n DCS Active The unit is active Error The unit is in error status Power Off The u...

Страница 109: ...the host Procedure 1 Click the Drive button displayed under Setup in the menu frame A window for drive settings will be displayed If the drive settings are already made its values are displayed Figure 3 31 Drive setup window If there are tape cartridges in the drives and there is no drive that can be set the message All drives are initializing powered off or holding cartridges is displayed Only dr...

Страница 110: ...system displays a confirmation window showing the input contents Click the OK button if it is OK to proceed To make entries again click the Back button 5 If processing is completed the system displays a window showing the processing results This completes the settings End of procedure Setting item Explanation Topology Select from Fabric or FC_AL Addressing Mode This item is enabled if FC_AL is sel...

Страница 111: ... the settings for the interface Target ID and security for connecting the LT270 S2 to the host Procedure 1 Click the Host I F button displayed under Setup in the menu frame A window for selecting the adapter will be displayed Select the adapter to be set and then click the OK button Figure 3 32 Adapter selection window If there is no adapter that can be set due for example to adapter errors the me...

Страница 112: ...the conditions before the settings click the Reset button 5 After clicking the OK button the system displays a confirmation window showing the input contents Click the OK button if it is OK to proceed To make entries again click the Back button 6 If processing is completed the system displays a window showing the processing results To continue settings of the host interface repeat the above proced...

Страница 113: ...LT270 S2 is restarted End of procedure 3 11 2 Setting Information about the Library This section explains how to set information such as the auto cleaning mode the auto inventory function the fast load function and the number of usable cells Procedure 1 Click the Library button displayed under Setup in the menu frame The library setting window will be displayed If the library settings are already ...

Страница 114: ...bel Length Specify the number of characters in the barcode label for response to the host 6 characters The count is set to 6 characters default 8 characters The count is set to 8 characters When configuring the logical library the barcode label character count is set for each logical library separately Usable Cells Specify the number of usable cells if you want to restrict the number of the cells ...

Страница 115: ...Click the Network button displayed under Setup in the menu frame The network setting window will be displayed If the network settings are already made its values are displayed Use Protocol Specify the protocol to use when accessing to the LT Remote Panel HTTP http is used to connect to the LT remote panel Default HTTPS https is used to connect to the LT remote panel This setting is available only ...

Страница 116: ...tings for IPv4 or IPv6 must be enabled When the IP address setting in IPv4 format is disabled the settings related to IPv4 are also disabled Enable DHCP Specify whether the DHCP is enabled or disabled When the DHCP is enabled all fields other than the NTP Server field are automatically set and cannot be entered IP Address Enter the IP address of the LT270 S2 in IPv4 format Only numeric characters ...

Страница 117: ...configuration method of the IPv6 network When Auto is selected all fields other than the NTP Server field and the NTP Server field are automatically set and become unavailable Link Local Address Enter the link local address of the LT270 S2 The first 4 bits FE80 are fixed Global Address Enter the global address of the LT270 S2 Length of Subnet Prefix Enter the length of the prefix 64 is normally en...

Страница 118: ...t the date and time for the LT270 S2 Procedure 1 Click the Date Time button displayed under Setup in the menu frame to display the date time setting window If the date time are already set their values are displayed Figure 3 36 Date time setting window If Time Zone is changed the library needs to be rebooted When the library cannot be rebooted click the Back button and cancel the setting Then make...

Страница 119: ...lains how to set the e mail function This function makes it possible to receive from the LT270 S2 e mail notification about errors To use the e mail function it is necessary to set the source e mail address destination e mail address and SMTP server address Procedure 1 Click the E mail button displayed under Setup in the menu frame to display the e mail setting window If the e mail function is alr...

Страница 120: ...Panel Operation 3 11 Setting Library Information FUJITSU Storage ETERNUS LT270 S2 Tape Library User s Guide Panel Operation Copyright 2020 FUJITSU LIMITED P3AM 6932 06ENZ0 120 Figure 3 37 E mail function setting window ...

Страница 121: ...red are alphanumeric characters and symbols _ To remove a mail address already set from the Recipient address delete the relevant mail address Sender address From Set as the source mail address an address registered in the IP address of the SMTP server to be set in the next item Up to 64 characters can be entered in the text area Characters that can be entered are alphanumeric characters and symbo...

Страница 122: ...11 6 Executing a Send E mail Test After setting up e mail the Send E mail test can be executed to check whether a test e mail message is delivered to the specified mail address Procedure 1 Click the E mail button displayed under Setup to display the following window Figure 3 38 E mail function setting window sending test The e mail settings must be completed before running the Send E mail test ...

Страница 123: ...Storage ETERNUS LT270 S2 Tape Library User s Guide Panel Operation Copyright 2020 FUJITSU LIMITED P3AM 6932 06ENZ0 123 2 Click the Email Test button The following window is displayed Figure 3 39 Window for starting the Send E mail test 3 To start the Send E mail test click OK ...

Страница 124: ... Library User s Guide Panel Operation Copyright 2020 FUJITSU LIMITED P3AM 6932 06ENZ0 124 4 After the mail delivery is completed the following window is displayed Verify that the test e mail has been delivered to the specified e mail address Figure 3 40 The Send E mail test result window End of procedure ...

Страница 125: ...932 06ENZ0 125 3 11 7 Setting the SNMP Agent The following explains how to set the SNMP agent required for communication with the SNMP manager The SNMP server address needs to be specified Procedure 1 Click the SNMP button displayed under Setup The following window will be displayed If the SNMP agent is already set its values are displayed Figure 3 41 SNMP agent setting window ...

Страница 126: ...ther SHA or MD5 can be selected as the authentication method Authentication Password Register a password for authentication From 8 to 32 characters can be entered Characters that can be entered are alphanumeric characters and symbols _ Authentication Password Retype Enter the password for authentication again From 8 to 32 characters can be entered Characters that can be entered are alphanumeric ch...

Страница 127: ... Set whether only USER Port or both USER Port and REMCS Port will be subject to SNMP monitoring If REMCS Port monitoring is enabled the LT270 S2 may be displayed in blue in Node monitoring with Systemwalker Centric Manager For precise monitoring with Systemwalker Centric Manager Fujitsu recommends keeping this setting to USER Port Only Enable Send Trap If checked Traps will be sent to the IP addre...

Страница 128: ...Copyright 2020 FUJITSU LIMITED P3AM 6932 06ENZ0 128 3 11 8 Executing an SNMP Trap Test After setting up SNMP a trap test can be executed to confirm that a trap is transmitted to the LT270 S2 with the specified IP address The following trap is test transmitted Trap for test The SNMP settings must be completed before running the SNMP Trap Test ...

Страница 129: ... FUJITSU Storage ETERNUS LT270 S2 Tape Library User s Guide Panel Operation Copyright 2020 FUJITSU LIMITED P3AM 6932 06ENZ0 129 Procedure 1 Click the SNMP button displayed under Setup to display the following window Figure 3 42 SNMP agent setting window sending test ...

Страница 130: ...FUJITSU Storage ETERNUS LT270 S2 Tape Library User s Guide Panel Operation Copyright 2020 FUJITSU LIMITED P3AM 6932 06ENZ0 130 2 Click the Trap Test button The following window will be displayed Figure 3 43 SNMP trap test start window 3 To start the trap test click OK ...

Страница 131: ... User s Guide Panel Operation Copyright 2020 FUJITSU LIMITED P3AM 6932 06ENZ0 131 4 After transmission is completed the following window is displayed Verify that the trap is transmitted to the device having the specified destination IP address Figure 3 44 SNMP trap transmission completion window End of procedure ...

Страница 132: ...Library User s Guide Panel Operation Copyright 2020 FUJITSU LIMITED P3AM 6932 06ENZ0 132 3 11 9 Downloading an MIB File MIB files that are registered in the LT270 S2 can be downloaded Procedure 1 Click the SNMP button on the Setup menu The window shown below is displayed Figure 3 45 SNMP trap setup window ...

Страница 133: ...FUJITSU Storage ETERNUS LT270 S2 Tape Library User s Guide Panel Operation Copyright 2020 FUJITSU LIMITED P3AM 6932 06ENZ0 133 2 Scroll down the window and click the Download button that is located at the very bottom of the page Figure 3 46 SNMP setup window download ...

Страница 134: ...er s Guide Panel Operation Copyright 2020 FUJITSU LIMITED P3AM 6932 06ENZ0 134 3 Select the file to be downloaded from MIB File and Trap File and then click the OK button Figure 3 47 MIB trap file download window 4 Follow the instructions displayed in the dialog boxes to download and save the file End of procedure ...

Страница 135: ...ow is displayed Figure 3 48 Password change window 2 Set each item Table 3 35 Password setup items Display item Explanation Login name Select the login name whose password you want to change Current password Enter the current password one to eight characters Characters that can be entered are lowercase alphabetic characters numeric characters and the period symbol New password Enter a new password...

Страница 136: ...yright 2020 FUJITSU LIMITED P3AM 6932 06ENZ0 136 3 Click the OK button if you want to proceed If the settings were completed the system displays a window showing the processing result End of procedure Responsibility for the new password is the user s Do not forget the password If you forget the current password contact the maintenance engineer ...

Страница 137: ...AS Door This section explains how to open the CAS magazine insertion door If the door is closed after inserting a magazine the library automatically performs an inventory operation and reads the information for the tape cartridges inserted Procedure 1 Select the CAS Open button displayed under Operation The following window is displayed Figure 3 49 CAS Open window 2 Use the drop down list to selec...

Страница 138: ...ly This section explains how to manually clean drives Procedure 1 Click the Clean button displayed under Operation to display the following window Figure 3 50 Clean menu window Cleaning cannot be carried out if the cleaning cell of the drive to be cleaned contains no cleaning cartridge the maximum usage count of all contained cleaning cartridges has been reached or all of them are in error In thes...

Страница 139: ... is reported Required Clean display Drives that require cleaning Need Clean display Drives that are not loaded with cartridges No_Tape display 3 Use the drop down list to select the target cabinet Information about the selected drives and cleaning cartridges is displayed 4 Check the drive to be cleaned and then click the OK button Only one drive can be specified 5 The selected drive is displayed i...

Страница 140: ... operator panel If this icon is lit eject the cleaning cartridge which is now unusable and replace it with a new cleaning cartridge If loading or ejection is attempted while the backup software is accessing the library a message is displayed stating that the library is busy Retry loading or ejection when the library is no longer busy The cleaning cell is divided into two areas One area is exclusiv...

Страница 141: ...ibrary FUJITSU Storage ETERNUS LT270 S2 Tape Library User s Guide Panel Operation Copyright 2020 FUJITSU LIMITED P3AM 6932 06ENZ0 141 Procedure 1 Click Clean button displayed under Operation The following window is displayed Figure 3 52 Clean menu window ...

Страница 142: ... display the cell map of the CAS for the selected cabinet Check the cleaning cartridges that are to be used for cleaning cells 4 Use the drop down list on the To side to select the cleaning cartridge that is to be loaded 5 Click the OK button A confirmation window is displayed Click the OK button to proceed 6 A message indicating that the process is in progress is displayed A separate window showi...

Страница 143: ...ry User s Guide Panel Operation Copyright 2020 FUJITSU LIMITED P3AM 6932 06ENZ0 143 Ejecting a cleaning cartridge A cleaning cartridge in the cleaning cell is ejected into the CAS Procedure 1 Click the Clean button displayed under Operation The following window is displayed Figure 3 54 Clean menu window ...

Страница 144: ...indow 3 Use the drop down list on the From side to display the cell map of the CAS for the selected cabinet For each cleaning cartridge the label name Barcode Label usage count available count Count status Status and tape cartridge type Media Type are displayed Specify the cleaning cartridge in the cleaning cell 4 Use the drop down list on the To side to select the cabinet that contains the cleani...

Страница 145: ...ow showing the progress of processing displays the number of cleaning cartridges to be ejected and the number of cleaning cartridges that have been ejected 7 Cleaning cartridge ejection is complete when an end message is displayed End of procedure 3 12 4 Loading Cartridges This section explains how to load a tape cartridge from a CAS into a drive Procedure 1 Select the Manual Load button displayed...

Страница 146: ... cartridges have been loaded 7 Loading into the selected drive is complete when an end message is displayed End of procedure 3 12 5 Ejecting Tape Cartridges This section explains how to eject tape cartridges that are loaded in drives to their home cells Cartridges can be ejected from the following drives Drives containing cartridges from a CAS Drives containing cartridges from the host When an eje...

Страница 147: ...e from which to eject cartridges Use the drop down list to display the drives for the selected cabinet 3 Click the OK button A confirmation window is displayed Click the OK button to proceed 4 A message indicating that the process is in progress is displayed A separate window showing the progress of processing displays the number of drives from which to eject cartridges and the number of drives fr...

Страница 148: ...error of the drive occurs error code is displayed in the Status window Procedure 1 Click the Drive Reset button displayed under Operation The following window is displayed Figure 3 58 Drive reset window During recovery of a drive error only that drive remains off line The backup software cannot access the drive until the recovery operation is complete If recovery of a drive error is attempted whil...

Страница 149: ... the OK button if it is OK to proceed 4 A message indicating that the process is in progress is displayed and an attempt is made to release all errors A separate window showing the progress of processing displays the number of drives to be recovered from errors and the number of drives that have been recovered from errors 5 Recovery is complete when an end message is displayed End of procedure Cab...

Страница 150: ...re 3 59 Inventory window The library goes off line while inventory is being taken Automatic inventory is not performed if the auto inventory function is disabled when the library is turned on If you replace or change the position of a tape cartridge execute the Inventory operation from the operator panel to take inventory and update the library s cartridge management information If an inventory op...

Страница 151: ...to proceed 4 When inventory operation is completed an end message window is displayed If the Invalid CELL Information window is displayed on the operator panel the cell contains an invalid tape cartridge In such case check the information in the Invalid CELL Information window and then remove the invalid tape cartridge End of procedure The drop down list is not displayed when only a single base ca...

Страница 152: ...d is stopped and the trace of a new trace file is started If the host cannot recognize the library or drive or if the host cannot access the library or drive perform a trace file operation that forcibly stores the trace information Procedure 1 Click the Trace button displayed under Operation to display the following window Figure 3 60 Trace file operation window 2 To store the trace information cl...

Страница 153: ...P3AM 6932 06ENZ0 153 3 12 9 Saving Setup Information for the Library drive You can save the current library setup and drive setup information in text format as a file and reference a list of saved setup information Procedure 1 Click the Save setup button displayed under Operation to display the following window Figure 3 61 Library drive setup information save window ...

Страница 154: ...k the OK button to open the window shown below Figure 3 62 Confirming that library drive setup information has been downloaded 3 Click the Save button in the dialog box 4 Select the download destination directory enter the file name for saving and then click the Save button The download will start The above window is a window of IE6 0 The display depends on the browser version number and type ...

Страница 155: ...3AM 6932 06ENZ0 155 5 The download is complete when the following window is displayed Figure 3 63 Window that is displayed after downloading of the library drive setup information is complete End of procedure The window above may not be displayed Whether the above window is displayed depends on the Web browser settings the Web browser version and the Web browser type ...

Страница 156: ...12 10 Rebooting the Library and Drive Units This section explains how to reboot the library and the drive units from the remote panel Procedure 1 Click the Reboot button displayed under Operation to display the following window Figure 3 64 Reboot confirmation window 2 To start rebooting of the units click OK All cabinets need to be offline before rebooting the library and the drive units ...

Страница 157: ... Copyright 2020 FUJITSU LIMITED P3AM 6932 06ENZ0 157 3 After OK is clicked the following window is displayed Rebooting of the library and drive units starts Figure 3 65 Reboot window 4 When rebooting starts the remote panel is disconnected from the Web browser Reconnect to the Web browser to use the remote panel again End of procedure ...

Страница 158: ... P3AM 6932 06ENZ0 158 3 13 Downloading the Traces Logs of the Library To download the traces logs of the library click the Support button in the menu frame 3 13 1 Downloading Traces Clicking the Trace Download button displayed under Support displays the window for selecting the trace type to download Figure 3 66 Trace type selection window This function is available in V30L11 and later ...

Страница 159: ... Operation Copyright 2020 FUJITSU LIMITED P3AM 6932 06ENZ0 159 3 13 1 1 Downloading Library Traces Procedure 1 For library traces clicking the Download button next to Library Trace displays the window for starting the download preparations Click the OK button Figure 3 67 Library trace preparation window Preparations for the download are started ...

Страница 160: ... FUJITSU LIMITED P3AM 6932 06ENZ0 160 2 When the preparations are completed the massage Starts to download the trace data Are you sure is displayed in the window Click the OK button A download notification bar is displayed at the bottom of the window Save the trace file to your desired location Figure 3 68 Window for starting the library trace download End of procedure ...

Страница 161: ...ED P3AM 6932 06ENZ0 161 3 13 1 2 Downloading Drive Traces Procedure 1 For drive traces clicking the Download button next to Drive Trace displays the window for selecting the drive from which the trace is collected Select the drive and click the OK but ton Figure 3 69 Window for selecting the drive to download the trace The confirmation window for downloading drive traces is displayed ...

Страница 162: ...06ENZ0 162 2 When the OK button is clicked the drive trace download is started The download time varies depending on the drive generation The time required for the download is displayed on the window Figure 3 70 Confirmation window for starting the drive trace download 3 The execution window is displayed while the drive trace is downloaded Figure 3 71 Execution window for the drive trace download ...

Страница 163: ...el Operation Copyright 2020 FUJITSU LIMITED P3AM 6932 06ENZ0 163 4 When the drive trace download is completed the completion window is displayed and a download notification bar is displayed at the bottom of the window Save the drive trace file to your desired location Figure 3 72 Completion window for the drive trace download End of procedure ...

Страница 164: ...US LT270 S2 Tape Library User s Guide Panel Operation Copyright 2020 FUJITSU LIMITED P3AM 6932 06ENZ0 164 3 13 2 Downloading Logs Procedure 1 Clicking the Log button displayed under Support displays the window to select the logs Click the Download button next to All Logs Figure 3 73 Log selection window ...

Страница 165: ...er s Guide Panel Operation Copyright 2020 FUJITSU LIMITED P3AM 6932 06ENZ0 165 2 The window for starting the log download is displayed Click the OK button Figure 3 74 Window for starting the log download 3 When the log download is started the download execution window is displayed Figure 3 75 Execution window for the log download ...

Страница 166: ...right 2020 FUJITSU LIMITED P3AM 6932 06ENZ0 166 4 When the download is completed the completion window is displayed Waiting for a while after the completion window has been displayed a download notification bar is displayed at the bottom of the window Save the log file to your desired location Figure 3 76 Completion window for the log download End of procedure ...

Страница 167: ...th the utmost attention to detail However Fujitsu shall assume no responsibility for any operational problems as the result of errors omissions or the use of information in this manual Fujitsu assumes no liability for damages to third party copyrights or other rights arising from the use of any information in this manual The content of this manual may not be reproduced or distributed in part or in...

Страница 168: ......

Отзывы: