Fujitsu Siemens Computers AMILO Xa 1526 Скачать руководство пользователя страница 65

Removing and installing components during servicing

Memory: expansion

Main memory

Memory upgrade

System expansion

System expansion

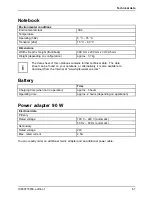
Your notebook is equipped with 256 MB – 2 GB or 4 GB of main memory, depending on the upgrade
level. The notebook will not start without memory modules, as no

fi

xed main memory is installed.

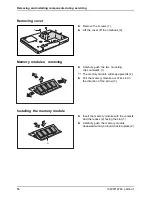
Installing and removing the memory expansion

Memory module

If you are asked by the Hotline/Help Desk to remove and install the memory
extension yourself, proceed as follows:

Please observe the safety information in

"Important notes", Page 4

.

The notebook must be switched off when installing/removing the memory
modules, it must not be in Suspend mode.

Only use memory upgrades which are approved for your notebook. 256, 512
MB, 1 GB and 2 GB modules DDR2-533 SO DIMM (PC2-4200) or 256, 512 MB,
1 GB and 2 GB modules DDR2-667 SO DIMM (PC2-5300).

Never use force when installing or removing memory modules.

Make sure that foreign objects do not fall into the memory expansion compartment.

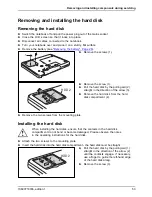
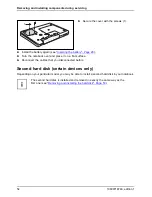
The memory modules are located underneath the service compartment. You must open the
service compartment to remove or install a memory module. Once you have removed the cover,
the various components are exposed. These components should be removed and replaced
only by authorised specialists. Therefore, be sure to observe the following:

Individual components (e.g. the processor heat sink) can become very hot
during operation. Therefore, we recommend that you wait one hour after
switching off the notebook before removing or installing the memory modules.
Otherwise, there is a risk of suffering burns!

As some components with ESDs are exposed, please read the section

"Notes on

installing and removing boards and components", Page 52

in

"Important notes", Page 4

.

Switch your notebook off.

Close the LCD screen so that it locks into place.

Unplug the mains plug of the mains adapter from the mains socket.

Disconnect all cables connected to the notebook.

Place the notebook upside down on a

fl

at surface.

Remove the battery (see

"Removing the battery", Page 26

).

10600718746, edition 1

55

Содержание AMILO Xa 1526

Страница 1: ...Notebook English EasyGuide AMILO Xa Series...

Страница 2: ...ww fujitsu siemens com helpdesk Your sales partner Your sales office Additional information is contained in the Help Desk list and the Warranty manual The Warranty manual can be found on your notebook...

Страница 3: ......

Страница 4: ...This manual was produced by Xerox Global Services Published by Fujitsu Siemens Computers GmbH AG 10 06 Edition1 Order No 10600718746 Order No 440 N30762...

Страница 5: ...your notebook for the first time 8 Working with the notebook 11 Security functions 42 Connecting external devices 46 Removing and installing components during servicing 52 Settings in BIOS Setup Utili...

Страница 6: ...tronics Inc All other trademarks referenced are trademarks or registered trademarks of their respective owners whose protected rights are acknowledged Copyright Fujitsu Siemens Computers GmbH 2006 All...

Страница 7: ...the Notebook 11 Status indicators 13 Keyboard 15 Separate numeric keypad 16 Key combination 17 Country and keyboard settings 18 Easy Launch keys 20 Touchpad and touchpad buttons 21 Using the touchpad...

Страница 8: ...ernal devices 46 Ports 47 Connecting an external monitor 47 Setting the refresh rate for your external monitor 48 USB devices connecting 48 Connecting FireWire devices 49 Connecting external audio dev...

Страница 9: ...age is unstable 62 The notebook cannot be started 62 The notebook stops working 63 DVD film playback stops 64 The printer does not print 65 The radio connection to a network does not work 65 Technical...

Страница 10: ...Contents 10600718746 edition 1...

Страница 11: ...sk certain models only which allows you to run your notebook with two hard drives an S Video Out socket for connecting your notebook to your television a FireWire port for connecting high speed device...

Страница 12: ...launch a program start netscape exe This style is used for information which is output by a program onto the screen e g Installation is complete This style identifies Terms and text in a software int...

Страница 13: ...ts Please familiarise yourself with these components before you start to work with your notebook 14 6 9 1 2 3 5 4 22 21 20 25 26 27 19 30 29 28 31 24 23 6 7 8 18 13 11 10 15 16 17 12 1 USB port 2 Fire...

Страница 14: ...he additional safety precautions for devices with wireless components in the Safety manual This notebook complies with the relevant safety regulations for data processing equipment If you have questio...

Страница 15: ...Detailed instructions for startup operation and technical information Wireless LAN manual PDF file Detailed instructions for using wireless LAN and technical information Warranty manual PDF file Gene...

Страница 16: ...ible If this is not the case buy a power cable that matches the local conditions Do not use a connection adapter for electrical devices to connect the notebook Enquire with the corresponding governmen...

Страница 17: ...play is very sensitive to scratching Only clean the display surface with a very soft slightly damp cloth Switch the notebook off Cleaning Notes Notebook Keyboard Touchpad LCD screen Crystal View displ...

Страница 18: ...runs on its built in battery You can increase the battery s life by enabling the system s energy saving functions When you use your notebook in your home or office we recommend you use the mains adapt...

Страница 19: ...tilation Never cover the ventilation slots of the notebook or the mains adapter Do not expose the notebook to extreme environmental conditions Protect the notebook against dust humidity and heat Power...

Страница 20: ...ebooted when you are requested to do so Your operating system is pre installed on the hard disk to facilitate the procedure when you use your notebook for the first time Switch the notebook on see Swi...

Страница 21: ...to the notes in Important notes Page 4 Switching on the Notebook 2 1 Slide the release button in the direction of the arrow 1 and unfold the LCD screen upward 2 Notebook 1 Press the ON OFF switch 1 to...

Страница 22: ...Working with the notebook 1 Close the LCD screen 1 so that it locks into place 12 10600718746 edition 1...

Страница 23: ...er supply the drives and the keyboard functions These indicators are not visible when the notebook is closed Power indicator Wireless LAN Bluetooth indicator Battery indicator Caps Lock indicator Sile...

Страница 24: ...ocessor fan is running in normal operation The processor and the graphics are operating at full power Whisper mode Easy Launch key Silent Mode Easy Launch key Drive indicator Indicator lights up One o...

Страница 25: ...functions supported by the keys are described in the relevant manuals supplied with your application programs The figure below shows how to access the different characters on keys with overlaid funct...

Страница 26: ...e Key combination Page 17 The keyboard of your notebook has a separate numeric keypad on the right hand side Illustration example of German keyboard layout If the external keyboard does not feature a...

Страница 27: ...ess and hold the first key in the combination While holding the first key down press the other key or keys in the combination If the external keyboard does not feature a Fn key you can simultane ously...

Страница 28: ...key combination raises the volume of the integrated loudspeakers Key Fn F11 Volume Switch between open applications With this key combination you can switch between several open applications Alt Tab A...

Страница 29: ...Select the country settings you want to use Click on Apply Click on the Details button in the Languages tab Click on Add to add other keyboard layouts to the selection In the Default input language fi...

Страница 30: ...Multimedia Easy Launch key E mail Use this button to start the standard e mail programme for your system E mail Easy Launch key Silent Mode whisper mode This key reduces the speed of the fan When the...

Страница 31: ...hpad buttons allow you to select and execute commands They correspond to the buttons on a conventional mouse Using the touchpad buttons Moving the pointer Move your finger on the touchpad Touchpad The...

Страница 32: ...left button and drag the object to the desired position with the finger on the touchpad The item will be moved You can press the key combination Fn F5 to switch off the touchpad so that you do not acc...

Страница 33: ...1200 The screen resolution of the LCD screen of your notebook is optimally set at the factory Permanently unlit or lit pixels The standard of production techniques today cannot guarantee an absolutely...

Страница 34: ...ng the display on the LCD screen and an external monitor LCD screen Screen Synchronisation screen display Your notebook supports the simultaneous display on the LCD screen and an external monitor Pres...

Страница 35: ...cally switch off Information on the battery charging time can be found in Technical data Page 66 Monitoring the battery charging level Battery Battery status meter Windows also has a Battery status me...

Страница 36: ...turdy flat surface If necessary lay an anti slip cloth on this surface to prevent the notebook from being scratched 1 2 3 Push the battery lock in direction of the arrow 1 Slide the battery release 2...

Страница 37: ...onnection When not using the notebook for long periods of time first end the energy saving mode then switch off the notebook Never turn off your notebook while it is in an energy saving mode If the no...

Страница 38: ...se force when installing or removing an ExpressCard Make sure that no foreign objects enter the ExpressCard slot Inserting the ExpressCard 1 2 Press the placeholder for the ExpressCard 1 so that it ju...

Страница 39: ...he ExpressCard using the symbol in the task bar Left click on the icon Select the ExpressCard you want to stop and remove Press the Enter key Wait for the dialogue box which tells you that it is now s...

Страница 40: ...ns Memory Card Inserting the memory card Carefully push the memory card into the slot The label should be facing upward Memory card The memory card may protrude by one to several millimetres depending...

Страница 41: ...VD DVD ROM and DVD video DVD video DVD ROM DVD Abbreviation for Digital Versatile Disc or Digital Video Disc A DVD is an optical data storage medium that can contain a maximum of 17 GBytes of data The...

Страница 42: ...guidelines when handling CD DVDs Avoid touching the surface of a CD DVD Hold CDs DVDs by their edges CD DVD Always store CDs DVDs in their cases This will protect them from dust scratches and other d...

Страница 43: ...ptical data storage media named above You can also write CD Rs CD RWs DVD Rs DVD RWs DVD R DLs DVD Rs DVD RWs DVD R DLs and DVD RAMs The Label Flash function can only be used with suitable Label Flash...

Страница 44: ...th East Pacific Central and South America and the Caribbean Regional code 5 Africa except South Africa India and the former Soviet states Regional code 6 China The DVD drive of your notebook supports...

Страница 45: ...you want to change and click it with the right hand mouse or touchpad button A context menu appears Click on Properties Click on the AutoPlay tab Adjust the AutoPlay function to meet your needs Pleas...

Страница 46: ...bass loudspeaker is used to produce the bass tones As these bass tones are not perceived directionally only one bass loudspeaker is necessary and the installation location is not important underside...

Страница 47: ...k Germany Finland France Greece Great Britain Holland Ireland Iceland Italy Luxembourg Norway Austria Portugal Sweden Switzerland and Spain Pulse dialling Belgium France Holland and Italy Also in Pola...

Страница 48: ...her the wireless LAN module is activated deactivated in the installed wireless LAN software Wireless LAN Bluetooth Wireless LAN Bluetooth Move the slider to the ON position to activate the wireless LA...

Страница 49: ...nal Remote control USB receiver Your notebook is equipped with a Media Center remote control and a USB receiver You can use the remote control to operate the Windows XP Media Center Edition For more i...

Страница 50: ...umps slightly out of the slot Pull the remote control 2 out of the slot Remote control Using the remote control Remote control 1 2 5 7m 30 The remote control 2 must be in the effective range horizonta...

Страница 51: ...plications Stop This button ends the current playback VOL Increase decrease volume This button increases or decreases the volume Jump back This button starts the playback of the previous track or prev...

Страница 52: ...ds you will need to contact the help desk Passwords are not covered by your warranty and a charge will be made for assistance Brief overview of security functions Security functions Type of protection...

Страница 53: ...case sensitive for upper and lower case characters Protecting BIOS Setup Utility supervisor and user password If you have opened these operating instructions on the screen we recommend that you print...

Страница 54: ...upervisor or user password You can only change the Supervisor password if you have logged into the BIOS Setup Utility using the existing Supervisor password Password Supervisor password User password...

Страница 55: ...u will be prompted to enter your password the supervisor password Deactivating system protection Call up the BIOS Setup Utility and go to the Security menu Operating system Select the Password on Boot...

Страница 56: ...ng devices to the notebook 1 Turn off your notebook and all external devices 2 Unplug your notebook and all devices from the mains sockets 3 Connect the cables for your external devices following the...

Страница 57: ...re port 9 S Video out socket 10 DVI I monitor port Connecting an external monitor An external monitor can be connected to the notebook Monitor VGA connector Screen port Monitor port Switch off the not...

Страница 58: ...Adjust the refresh rate and click Apply USB devices connecting USB ports On the USB ports you can connect external devices that also have a USB port e g a printer a scanner or a modem USB devices are...

Страница 59: ...dditional information is provided in the documentation of the FireWire devices Connect the data cable of the external devices to the FireWire port of the notebook Plug the power cable of the external...

Страница 60: ...ok Connect the data cable to the external device Connect the data cable to the headphones SPDIF port of the notebook If you connect headphones or external loudspeakers the built in loudspeakers are di...

Страница 61: ...Switch off the notebook and the external device Connect the external device to the S Video Out socket of your notebook First switch the external device on and then the notebook If you purchase a cable...

Страница 62: ...care when you use the locking mechanisms on the battery and any other component Never use sharp objects such as screwdrivers scissors or knives as leverage to remove covers Notes Board ESD Boards wit...

Страница 63: ...he direction of the arrow 3 Remove the hard disk from the hard disk compartment 4 Remove the two screws from the mounting plate Installing the hard disk When installing the hard disk ensure that the c...

Страница 64: ...t surface Reconnect the cables that you disconnected before Second hard disk certain devices only Second hard disk Additional hard disk Depending on your particular model you may be able to install a...

Страница 65: ...eign objects do not fall into the memory expansion compartment The memory modules are located underneath the service compartment You must open the service compartment to remove or install a memory mod...

Страница 66: ...outwards 1 Memory expansion Memory module The memory module will snap upwards 2 Pull the memory module out of its slot in the direction of the arrow 3 Installing the memory module 2 a 1 Insert the me...

Страница 67: ...tach the cover in the direction of the arrow 1 Cover Secure the cover with the screws 2 Install the battery again see Inserting the battery Page 26 Turn the notebook over and place it on a flat surfac...

Страница 68: ...he following menus Main System settings such as time and date Info Displays information relating to the BIOS processor and notebook Advanced Advanced system settings Security Password settings and sec...

Страница 69: ...it the BIOS Setup Utility To save the current settings and exit the BIOS Setup Utility select Save Changes and Exit and Yes The notebook is rebooted and the new settings come into effect Discard Chang...

Страница 70: ...ected to your system Your sales contract Our notebooks have been designed primarily with mobile applications in mind This means that considerable effort has been made to optimise components and equipm...

Страница 71: ...s outlet or our hotline helpdesk A beep sounds at a rate of one per second A beep sounds every second Cause Troubleshooting The battery is almost flat Charge the battery The notebook s LCD screen rema...

Страница 72: ...as been selected or the wrong screen resolution has been set for the application program End the application program under Windows by pressing Alt F4 If the fault continues to occur after ending the p...

Страница 73: ...the notebook on The notebook stops working Notebook Disabling Standby mode Suspend mode Cause Troubleshooting The notebook is in Standby or Suspend mode Disable Standby mode press a key or Suspend mod...

Страница 74: ...Nero Essentials If PowerDVD or WinDVD is installed on your notebook Wait for the program to start Press the right mouse button or touchpad key A context menu appears Click on Configuration and then on...

Страница 75: ...printer documentation The radio connection to a network does not work The radio connection to a network does not work Cause Troubleshooting The ON OFF switch for the wireless LAN Bluetooth module is...

Страница 76: ...603 4 819 098 4 907 093 5 315 448 and 6 516 132 4 631 603 4 819 098 4 907 093 5 315 448 and 6 516 132 Contains Lithium Battery Must be Recycled or Disposed of Properly Contains Lithium Battery Must be...

Страница 77: ...ta sheet can be found on your notebook or alternatively it is also available to download from the Internet at www fujitsu siemens com Battery Technical data Time Charging time when not in operation ap...

Страница 78: ...tial requirements and other relevant provisions of Directive 1999 5 EC Copyright protected technology Copyright protected technology This product incorporates copyright protection technology that is p...

Страница 79: ...Equipment and mutual recognition of conformity This equipment can be used in the following countries Belgium Denmark Germany Estonia Finland France Greece UK Ireland Iceland Italy Latvia Liechtenstei...

Страница 80: ...mergency removal 34 handling 32 inserting 33 overview 31 removing 33 CD DVD drive 3 33 AutoPlay function 34 CD R 31 CD ROM 31 CD RW 31 CE marking 69 Changing the font size 24 Charging capacity battery...

Страница 81: ...xpressCard slot 3 F Fault correction 60 FireWire port 3 49 Fn key 16 Fn F1 17 Fn F10 18 Fn F3 17 Fn F5 18 Fn F6 18 Fn F8 18 Fn F9 18 G Getting started 8 H Hard disk 3 30 installing 53 removing 53 Hard...

Страница 82: ...iMediaCard 30 N Notebook before you travel 6 cannot be started 62 cleaning 7 getting started 8 ON OFF switch 3 setting up 9 stops working 63 switching off 11 switching on 11 transporting 6 using 11 No...

Страница 83: ...L LF 33 Supervisor password cancelling 44 changing 44 entering 44 Survey security functions 42 Suspend mode disabling 17 63 enabling 17 Switching between screen outputs 17 Switching on for the first t...

Страница 84: ...sing 18 increasing 18 W Warm restart 18 Whisper mode Easy Launch key 14 20 Wireless LAN 38 ON OFF switch 3 Wireless LAN indicator 14 Wireless LAN Bluetooth switching the module off 38 switching the mo...

Отзывы: