background image

2-2

2. Disassembly

FinePix S9100/S9600 Service Manual

1

1

2

3

4

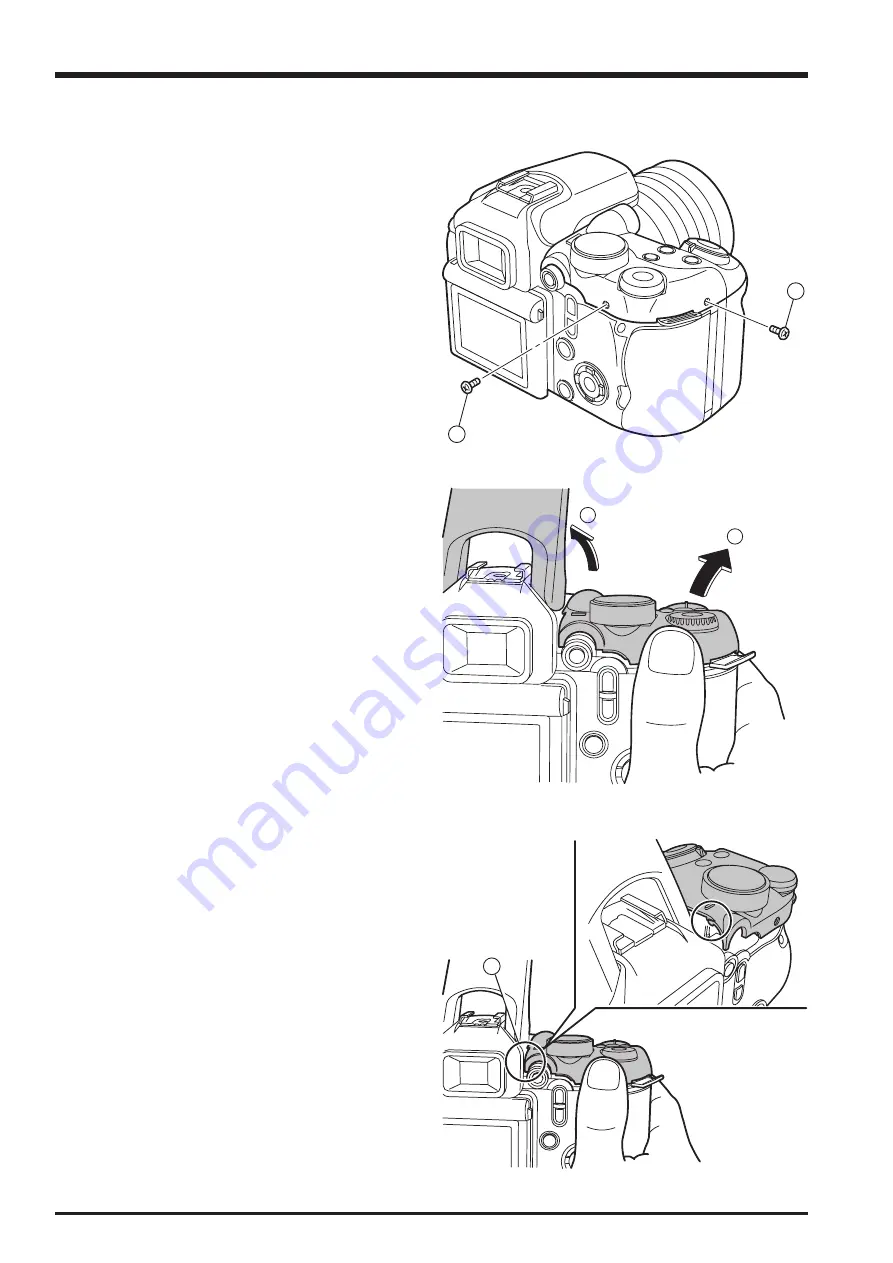
2-2. Removing the CONST CASE TOP

(1) Remove the 2 screws (M1.7 x 5.0).

(2) Press BUTTON FLASH to open the flash.

(3) Place your thumb on the bottom of the DIAL

COMMAND on the CONST CASE TOP and push it up
in the direction indicated by the arrow.

(4) Release the catch on the left side of the LEVER AE.

Содержание FinePix FinePix S9600

Страница 1: ...CIFIED IT MAY RESULT IN A FIRE AND AN ELECTRICAL SHOCK FUJI PHOTO FILM CO LTD Ref No ZM00654 102 Printed in Japan 2007 01 DIGITAL CAMERA FinePix S9100 S9600 US EU EG EE AS CH JP Model SERVICE MANUAL W...

Страница 2: ...ldered connections Check the entire board surface for solder splasher and bridges 2 Check the interboard wiring to ensure that no wires are pinched or contact high wattage resistors 3 Look for unautho...

Страница 3: ...pairs use a designated lead free solder bearing in mind the differing work practices for conventional solder eutectic and lead free solder Differences in the soldering work for lead free and eutectic...

Страница 4: ...re The correct bonding temperature refers not to the temperature of the heat source but to the bonding temperature that will give the best bond strength Precautions when soldering with lead free solde...

Страница 5: ...symbol SnAgCu Solder wire thread Use the lead free solders specified below Solder type Sn96 5Ag3Cu0 5 Displayed symbol SnAgCu Wire diameter 0 6 0 8 or 1 0 mm Sample Flux Conventional flux can be used...

Страница 6: ...TAPE onto the LCD FPC 2 24 2 11 8 Sticking K TAPE onto the SHEET EMI FRAME 2 24 2 11 9 Sticking the SHEET EMI FRAME to the FRAME PWB CCD plate 2 25 2 11 10 Sticking the SHEET GRAPHITE to the HOLDER L...

Страница 7: ...Shading compensation adjustment 4 35 4 14 F6 AF Adjustment 4 40 4 15 F7 Flash Adjustment 4 43 4 16 F1 Battery Voltage Adjustment 4 45 4 17 F2 Mode Dial Adjustment 4 49 4 18 F11 Video Adjustment 4 51...

Страница 8: ...8 FinePix S9100 S9600 Service Manual MEMO...

Страница 9: ...le approx 40 cm 1 3 ft to infinity In High speed shooting mode approx 2 m 6 6 ft to infinity Telephoto approx 2 m 6 6 ft to infinity In High speed shooting mode approx 4 m 13 1 ft to infinity Macro Wi...

Страница 10: ...rately AC Power Adapter AC 5VX sold separately According to the CIPA Camera Imaging Products Association standard procedure for measuring digital still camera battery consumption extract When using al...

Страница 11: ...n used media is 4GB or more a movie up to 60 minutes long at the setting or 120 minutes long at the setting can be recorded Visit website for information on available Microdrive CompactFlash card http...

Страница 12: ...The higher the compression rate the greater the loss of quality in the decompressed restored image Memory effect If an Ni MH battery is repeatedly charged without first being fully discharged its per...

Страница 13: ...Focus check button Hot shoe Synchronizing terminal AE L AE lock button Strap mount Indicator lamp Photometry selector dial DISP BACK button Slot cover CF Microdrive eject button CF Microdrive slot xD...

Страница 14: ...ood Macro button Flash pop up button Zoom ring Focus ring INFO information check button Strap mount USB socket mini B Speaker Microphone A V OUT Audio Visual output socket Terminal cover One touch AF...

Страница 15: ...nents FLASH CONST EVF UNIT CONST HINGE CONST MAIN PWB ASSY KEY PWB ASSY DCST PWB ASSY MIC ASSY SPEAKER ASSY FRAME PWB FRAME BATT BASE TRI POD COVER JACK ASSY CASE F ASSY CASE R UNIT BATT HOLDER BATTER...

Страница 16: ...the CONST CASE TOP 1 Remove the 2 screws M1 7 x 5 0 2 Press BUTTON FLASH to open the flash 3 Place your thumb on the bottom of the DIAL COMMAND on the CONST CASE TOP and push it up in the direction i...

Страница 17: ...CONST CASE TOP up in the direction of the arrow releases the catch on the front 6 This releases the catch on the WINDOW AF side at the same time 7 Remove the TOP FPC in the direction of the arrow Ass...

Страница 18: ...E TOP 1 Remove the 4 screws M1 7 x 3 0 2 Remove the TOP FPC CONST in the direction of the arrow Assembly Assemble by performing the disassembly procedure in reverse order Notes on assembly Assemble wi...

Страница 19: ...S9100 S9600 Service Manual 1 2 3 4 4 5 2 4 Removing the CASE R CONST 1 Remove the screw M1 7 x 5 0 2 Remove the screw M1 7 x 3 5 3 Remove the 2 screws M1 7 x 4 0 4 Remove the 6 screws M1 7 x 3 5 5 Re...

Страница 20: ...S9100 S9600 Service Manual 6 7 6 8 9 6 Release the PLATE REAR catch and the catch inside the left side 7 Slowly pull off the CASE R CONST to the rear 8 Remove the SPEAKER ASSY connector 9 Remove the S...

Страница 21: ...the LCD FPC and KEY MAIN FPC 11 Remove the COVER JACK Assembly Assemble by performing the disassembly procedure in reverse order Notes on assembly 1 Ensure that the harness is not pinched in the PLATE...

Страница 22: ...EMI 4 Take out the SPEAKER ASSY in the direction of the arrow Do not pull the harness 5 Remove the KEY PWB ASSY 6 Remove the PLATE REAR 7 Remove the HINGE CONST 8 Remove the BUTTON REAR in the directi...

Страница 23: ...S9600 Service Manual Notes on assembly Ensure that the COVER CARD is open when assembling the KEY PWB This prevents damage to SW752 Notes on assembly Run the SHOE CONST leads along the PLATE REAR as s...

Страница 24: ...0 2 Remove the 5 screws M1 7 x 2 0 3 Run the LCD FPC to the inside 4 Pull the COVER FPC off in the direction of the arrow 5 Squeeze the catches on the CASE LCD F in the directions indicated by the ar...

Страница 25: ...y performing the disassembly procedure in reverse order Notes on assembly To attach the UNIT HINGE to the CASE LCD R 1 Engage the catches 2 Fit the flexible cable onto the catches 3 Use the bosses to...

Страница 26: ...the arrow 4 Remove the AF SENSOR FPC 5 Remove the SW UNIT FPC 6 Remove the 2 screws M1 7 x 2 5 7 Remove the PLATE GND 8 Remove the CCD FPC If you are removing the WIRE HARNESS for the FLASH take care...

Страница 27: ...care not to touch the main capacitor terminal as this could result in an electric shock 15 Discharge the main capacitor To prevent electric shock check that it is fully discharged 16 Remove the conne...

Страница 28: ...SY DCST PWB ASSY If the screw holes in the DC JACK and FRAME are misaligned as shown in the figure below the PWB is out of position If this is the case lifting the DCST PWB ASSY at point 1 will produc...

Страница 29: ...NST 1 To ensure that the harness is not pinched when the FLASH TOP opens and closes arrange the wires so that they form a 4 strand twisted cable 2 Twist the harness 2 turns to the left from the correc...

Страница 30: ...screws M2 0 x 8 0 2 Pull off the LENS CONST to the front 3 Open the BATTERY LID 4 Remove the screw M1 7 x 4 0 5 Widen the gap between the CASE F and the BATT HOLDER 6 Pull the UNIT BATT HOLDER off in...

Страница 31: ...move the 2 screws M1 4 x 4 0 16 Pull the SW UNIT off in the direction of the arrow 17 Remove the solder on the red SYNCHRO TERMINAL lead and loosen the lock nut 18 Remove the lock nut and base plate i...

Страница 32: ...TTON FLASH is upwards when assembled 2 When assembling the SW UNIT set the LEVER FOCUS to S and assemble with the SW UNIT lever set to the center position 3 Run the SYNCHRO TERMINAL harness facing upw...

Страница 33: ...inePix S9100 S9600 Service Manual 4 Ensure that the SYNCHRO TERMINAL harness is not pinched between the CASE F rib and the BATT HOLDER 5 Run the 2 WIRE HARNESS pairs through the BATT HOLDER catches as...

Страница 34: ...Removing the AF SENSOR UNIT Notes Hold the base of the AF SENSOR UNIT when working on it Do not touch the sensor or adjuster 1 Remove the 2 screws M1 7 x 4 0 2 Pull the unit off in the direction of t...

Страница 35: ...op sheet should be aligned with the left edge of the bottom plate and should not protrude 2 11 Location specifications for sticking on sheets 2 11 1 Sticking the SHEET CF to the MAIN PWB ASSY Stick th...

Страница 36: ...that the sheet does not protrude beyond either of the metal plates BB17885 100 Adhesion location Front back The corner where the plate begins Left right The edge of the notch in the plate 2 11 3 Stick...

Страница 37: ...section of ZS00116 100 and apply Fold this section over Make the section exposed to GND as large as possible Ensure that it does not protrude onto the backing section K TAPE Apply the tape in a positi...

Страница 38: ...edge of the metal plate Up down The corner where the plate begins Stick as much of the tape as possible to the backing plate also so that it covers the screw heads The tape must not go any further lef...

Страница 39: ...m BB17892 100 Apply the K TAPE 19 x 17 mm so that the conducting sheet in this section is completely covered and hidden Secure this section with adhesive 2 11 9 Sticking the SHEET EMI FRAME to the FRA...

Страница 40: ...he frame protrusions Ensure that the SHEET does not overlap the main capacitor receptacle In this area push the SHEET in so that it goes behind the relay PWB 2 11 10 Sticking the SHEET GRAPHITE to the...

Страница 41: ...TAPE 19 x 19 mm so that these 3 components are all covered and hidden Apply the tape so that it is aligned with the PLATE GND corner Stick the tape down firmly so that there is no looseness in this se...

Страница 42: ...2 28 2 Disassembly FinePix S9100 S9600 Service Manual MEMO...

Страница 43: ...ed resistors are not displayed 3 2 Basic Block Names and Functions Part name Block name Function LENS CONST CCD FPC BLOCK CCD Output IC800 MAIN PWB ASSY CAMERA BLOCK CCD Output A D Conversion IC103 MO...

Страница 44: ...this LSI and the image data for one frame 3488 x 2616 pix is stored temporarily in SD RAM It is also integrated in the AUTO operation section using the 32 bit the signal processing LSI YCS IC204 image...

Страница 45: ...64inch 9 2millon pixels IC800 BCS MAIN PWB DCST PWB IC103 AD9996 3 3V Operation CDS ADC 14bit TG Programble Cont Pulses V H Zoom position Manual Focus AF assist Light X Terminal STRB Focus HP INT EXT1...

Страница 46: ...3 4 3 Schematics FinePix S9100 S9600 Service Manual 3 5 Overall connection Diagram...

Страница 47: ...3 5 3 Schematics FinePix S9100 S9600 Service Manual 3 6 Circuit Diagrams 3 6 1 CAMERA BLOCK...

Страница 48: ...3 6 3 Schematics FinePix S9100 S9600 Service Manual 3 6 2 DCDC BLOCK...

Страница 49: ...3 7 3 Schematics FinePix S9100 S9600 Service Manual 3 6 3 KEY BLOCK...

Страница 50: ...3 8 3 Schematics FinePix S9100 S9600 Service Manual 3 6 4 LCD EVF BLOCK...

Страница 51: ...3 9 3 Schematics FinePix S9100 S9600 Service Manual 3 6 5 PROCESS BLOCK...

Страница 52: ...3 10 3 Schematics FinePix S9100 S9600 Service Manual MEMO...

Страница 53: ...3 11 3 Schematics FinePix S9100 S9600 Service Manual 3 6 6 AUDIO BLOCK...

Страница 54: ...3 12 3 Schematics FinePix S9100 S9600 Service Manual 3 6 7 CCD FPC BLOCK...

Страница 55: ...3 13 3 Schematics FinePix S9100 S9600 Service Manual 3 6 8 IPS2 BLOCK...

Страница 56: ...3 14 3 Schematics FinePix S9100 S9600 Service Manual 3 6 9 MAIN I F BLOCK...

Страница 57: ...3 15 3 Schematics FinePix S9100 S9600 Service Manual 3 6 10 MOTOR BLOCK...

Страница 58: ...3 16 3 Schematics FinePix S9100 S9600 Service Manual 3 6 11 STRB BLOCK 3 6 12 LCD CITI BLOCK...

Страница 59: ...3 17 3 Schematics FinePix S9100 S9600 Service Manual 3 6 13 TOP FPC BLOCK...

Страница 60: ...3 18 3 Schematics FinePix S9100 S9600 Service Manual 3 6 14 ML FPC BLOCK 3 6 15 STSW BLOCK 3 6 16 TRG BLOCK...

Страница 61: ...3 19 3 Schematics FinePix S9100 S9600 Service Manual 3 7 Mounted Parts Diagrams 3 7 1 CCD PWB ASSY...

Страница 62: ...3 20 3 Schematics FinePix S9100 S9600 Service Manual 3 7 2 KEY PWB ASSY SIDE A...

Страница 63: ...3 21 3 Schematics FinePix S9100 S9600 Service Manual SIDE B...

Страница 64: ...3 22 3 Schematics FinePix S9100 S9600 Service Manual 3 7 3 LED PWB ASSY SIDE A SIDE B...

Страница 65: ...3 23 3 Schematics FinePix S9100 S9600 Service Manual 3 7 4 ML PWB ASSY 3 7 5 TRG PWB ASSY...

Страница 66: ...3 24 3 Schematics FinePix S9100 S9600 Service Manual 3 7 6 STSW PWB ASSY 3 7 7 TOP PWB ASSY...

Страница 67: ...3 25 3 Schematics FinePix S9100 S9600 Service Manual 3 7 8 DCST PWB ASSY 1 F E D C B A 2 3 4 5 6 7 8 9...

Страница 68: ...3 26 3 Schematics FinePix S9100 S9600 Service Manual 3 7 9 MAIN PWB ASSY 1 F E D C B A 2 3 4 5 6 7 8 9...

Страница 69: ...ndition 1 Hardware recommendation CPU Pentium4 2 4GHz or better RAM 512MB or more It might make an error of the adjustment when the performance of PC is low 2 Video Jig must be installed 2 Download it...

Страница 70: ...o adjustment Common with the FinePix A310 FZ03983 100 AC Cable For EG Use with Video adjustment jig Common with the FinePix A310 2 FZ03982 100 AC Cable For EU Use with Video adjustment jig Common with...

Страница 71: ...t softwares are in a specified Web server and both of these are the compression of ZIP form files Therefore after downloading these compression files from the Web server the decompression of the file...

Страница 72: ...en foldername is changed 4 5 2 Installation of DSC jig driver Since this camera uses the USB for communications with the personal computer in order to start the PC adjustment software the DSC jig driv...

Страница 73: ...ewritten the adjustment software will not startup Step 1 Double click on the FFW exe execute file of the adjustment software to open the FinePixS9100_9600_W Adjustment Software Startup screen Fig 4 6...

Страница 74: ...en Fig 4 6 4 is set to OFF the PC screen displays OK if adjustment is OK and NG if adjustment is NG either setting is OK Step 5 Select the Hardware tab 1 in Fig 4 6 5 in the Customize dialog box that...

Страница 75: ...nnected leave the Define F field blank If the AUTO setting is used an error occurs when the calibration software is launched Step 7 Select the Compile tab 1 in Fig 4 6 6 in the Customize dialog box th...

Страница 76: ...e been described to the service manual besides the above mentioned and advance the adjustment after it refers Press the Enter key to proceed to the Jig Mode Setup screen Fig 4 7 2 FinePix S9100_9600_W...

Страница 77: ...ftware Camera Jig Mode Setup Procedure 1 Set the mode to the AUTO mode 2 Open the Card cover 3 Connect the USB cable 4 Supply 5 0 0 1V to the camera using the DC Jack cable as appropriate for the adju...

Страница 78: ...f the screen indicates the version number of the adjustment software 2 After running firmware download other adjustments may be required depending on the content of the download software In such cases...

Страница 79: ...ssful completion of the adjustments In some cases the camera may be completely disabled If this occurs set the camera to jig mode again and then reset the flash memory Step 1 In the adjustment item se...

Страница 80: ...MAIN PWB ASSY has not been replaced all the adjusted data reverts to the default settings In this event adjust all the settings Excludes firmware downloading Enter RESET from the PC keyboard R E S E...

Страница 81: ...radius 20 to 21 7mm radius 9 This completes preparations for AF Sensor Adjustment Environmental Settings for AF Sensor Adjustment 1 Set up the conversion lens f 900 mm and the two types of AF Sensor c...

Страница 82: ...sed switch camera power OFF wait and perform the adjustment again Purpose Mechanical adjustment in the horizontal and vertical directions of the AF Sensor passive in relation to the optical axis of th...

Страница 83: ...measure distance from the front face of the Focus ring AF Sensor vertical Adjustment 1 Place the S9000 S9500 AF 1mV Chart at a distance of 1005 5mm from the Zoom Ring edge 2 Don t set the conversion...

Страница 84: ...s are complete press the Enter key The AF Sensor vertical Adjustment Screen Fig 4 9 4 appears AF Sensor vertical Adjustment Adjustment preparation Confirm Red circle of the AF 1mV Chart displayed in t...

Страница 85: ...ftware Turn the adjustment screw while viewing the WAVE No 0 screen to increase the speed of adjustment AF Sensor vertical Adjustment THRE1 146 MAX 195 MAX 195 MIN 130 MIN 133 Turn the AF Sensor verti...

Страница 86: ...HRE1 146 MAX 195 MAX 195 MIN 129 MIN 132 Turn the AF Sensor vertical adjustment screw Press the Enter of PC when the adjustment is completed OK Press 0 key of PC when you cannot complete the adjustmen...

Страница 87: ...speed of adjustment WAVE No 0 screen Position of AF Sensor Adjustment Screw Right Left AF Sensor horizontal adjustment THRE1 137 MAX 194 MAX 194 MIN 109 MIN 116 Turn the AF Sensor horizontal adjustmen...

Страница 88: ...0Ev to 9 0Ev Press the Enter key The AF Sensor Linearity adjustment Screen Fig 4 9 10 appears AF Sensor horizontal Adjustment THRE1 139 MAX 195 MAX 195 MIN 111 MIN 145 Turn the AF Sensor horizontal ad...

Страница 89: ...s the Enter key The AF Sensor Linearity adjustment 900mm Fig 4 9 11 appears AF Sensor Linearity adjustment 1 Change the S9000 S9500 AF 1mH Chart at a distance of 1005 5mm from the Zoom Ring edge 2 Don...

Страница 90: ...ance 7 0Ev to 9 0Ev Press the Enter key Write the adjustment data to the flash ROM when adjustment has been completed correctly The AF Assist light adjustment complete Screen Fig 4 9 13 appears AF Sen...

Страница 91: ...4 23 4 Adjustments FinePix S9100 S9600 Service Manual Step 12 The AF Sensor adjustment is completed Press the Enter key to return to the Adjustment Item selection Screen Fig 4 9 13...

Страница 92: ...tions 1 The CCD defect data file extension is dat Depending upon Windows settings this extension may not be displayed In this case change the settings to ensure that it is displayed 2 In addition to n...

Страница 93: ...he floppy disk in the A drive floppy disk drive on the PC When preparations 1 2 are complete press the Enter key on the PC Or click on the OK button 50010179 Fig 4 10 2 Adjustment Step 1 Select F4 CCD...

Страница 94: ...justment cannot be completed unless the pattern box is calibrated correctly Step 1 Select F5 Camera Adjustment on the Adjustment Items Select screen The Camera Adjustment Preparation screen appears St...

Страница 95: ...er is not placed in front of the lens When preparations are complete press the Enter key LB140 filter 40mm or less 30mm or less Center Center Pattern box PTB450 CAMERA Setup for Camera Adjustment Fig...

Страница 96: ...t placed in front of the lens When preparations are complete press the Enter key LB140 filter 40mm or less 30mm or less Center Center Pattern box PTB450 CAMERA Setup for Camera Adjustment Fig 4 11 4 W...

Страница 97: ...om front of the lens When preparations are complete press the Enter key LB140 filter 40mm or less 30mm or less Center Center Pattern box PTB450 CAMERA Setup for Camera Adjustment Fig 4 11 6 WB adjustm...

Страница 98: ...nt without filter avobe ISO800 1 Set the distance between the camera and pattern box 2 Remove the LB140 filter from front of the lens When preparations are complete press the Enter key LB140 filter 40...

Страница 99: ...Adjustment After Camera adjustment and CCD data input are complete this adjustment is done Adjustment Step 1 Select C CCD line defect adjustment on the Adjustment Items Select screen The CCD line defe...

Страница 100: ...f this camera 4 Set the zoom position to the side of the WIDE edge When preparations 1 4 are complete press the Enter key on the PC Fig 4 12 1 Taking a picture complete CCD Line defect Adjustment Prep...

Страница 101: ...From 100_FUJI to MS3931 MS3931 C FinePixS9100_9600_W MS3931 MS3931 FinePixS9100_9600_W MS3931 DPC R1 PC for adjustments and checks USB DC JACK USB cable Power supply cable jig Digital Voltmeter Regura...

Страница 102: ...nt is completed Press the Enter key to return to the Adjustment Item Selection Screen Fig 4 12 4 CCD Line defect adjustment Preparations 1 Enter the 8 digit ccdserial number in the CCD Data Input dial...

Страница 103: ...rforming the adjustment Step 1 Select S Shading compensation Adjustment on the Adjustment Items Select screen The Shading Compensation Adjustment Preparation screen appears The Zoom setting of 1 posit...

Страница 104: ...f 12 position screen appears Step 3 The Zoom setting of 21 position screen appears Set the zoom position in 1 Zoom position 1 Darken the surrounding and press enter key of PC Fig 4 13 2 Set the zoom p...

Страница 105: ...ng of 27 position screen appears Step 5 The Zoom setting of 31 position screen appears Set the zoom position in 21 Zoom position 12 Out of alignment to the zoom position Fig 4 13 4 Set the zoom positi...

Страница 106: ...ing of 1 position screen appears Step 7 The Zoom setting of 31 position screen appears Set the zoom position in 31 Zoom position 27 Out of alignment to the zoom position Fig 4 13 6 Set the zoom positi...

Страница 107: ...ment has been completed correctly The Shading compensation adjustment Complete screen appears Step 8 Set the zoom position in 31 Zoom position 1 Out of alignment to the zoom position Fig 4 13 8 Shadin...

Страница 108: ...V Check that the aperture is set to F2 8 at the wide angle zoom setting 4 Set the conversion lens on the base Step 1 Select F6 AF Adjustment on the Adjustment Items Select screen The AF Adjustment Pre...

Страница 109: ...e adjustment data to the flash ROM when adjustment has been completed correctly AF Adjustment INF 1 Set FOCUS MODE to the position of S AF 2 Set the zoom position to the side of the WIDE edge 3 Place...

Страница 110: ...Adjustment Complete screen appears Step 5 AF Adjustment 900mm 1 Remove the conversion lens 2 Adjust the position of the camera so that the center of the S9100 S9600 Multi stripe chart is displayed in...

Страница 111: ...Adjustment 1 As flash adjustment is readily affected by external light ensure that the vicinity of the gray chart is very dark 2 Ensure that distance is measured from the front of the camera during fl...

Страница 112: ...1 Adjust brightness so that the periphery of the gray chart is as dark as possible 2 Adjust the camera so that the entire chart is shown on the LCD monitor When preparations 1 and 2 are complete pres...

Страница 113: ...st the stabilized power supply to ensure that the voltage is not reduced excessively from the measured point The adjustment software may produce an error if communication between the adjustment softwa...

Страница 114: ...stment 1 Supply 4 50V 0 02V 0 00V When preparations are complete press the Enter key Fig 4 16 2 Battery Voltage Adjustment Preparations 1 Check that the Power Cable Jig and the camera are connected If...

Страница 115: ...are complete press the Enter key Result 60 2 Supply 4 00V 0 02V 0 00V When preparations are complete press the Enter key Result 46 3 Supply 7 20V 0 02V 0 00V When preparations are complete press the E...

Страница 116: ...s completed Press the Enter key to return to the Adjustment Item selection Screen Fig 4 16 5 Battery Voltage Adjustment 1 Supply 4 50V 0 02V 0 00V When preparations are complete press the Enter key Re...

Страница 117: ...he stabilized power supply to ensure that the voltage is not reduced excessively from the measured point The adjustment software may produce an error if communication between the adjustment software a...

Страница 118: ...Screen Fig 4 17 1 Mode Dial Adjustment 1 Set the mode dial to AUTO 2 Please input 5 00 0 01V from DC IN Jack Press the Enter key of PC after setting the camera Press 1 key to PC when not proceeding to...

Страница 119: ...waveform of the brightness signal Y or color signal C does not appear in the WAVE No 0 window during adjustments check the connections of the video adjustment jig Step 1 Select F11 Video Adjustment o...

Страница 120: ...screen appears Step 3 Video adjustment is completed 1 Disconnect Video cable from camera 2 Close the WAVE No 0 window by close button Press the Enter key to return to the Adjustment Item selection Scr...

Страница 121: ...1 Select F8 Firmware Download on the Adjustment Items Select screen The Download Complete screen appears if download is successful FinePix S9100 S9600 AC Power Adapter USB cable PC for adjustment and...

Страница 122: ...the DC Jack cable from the camera 2 Turn off power lever switch 3 Reconnect DC Jack cable 4 Switch camera power ON while pressing the shutter button 5 Press the Enter key after green LED lights on The...

Страница 123: ...0 S9600 be unique throughout the world For this reason each device has a unique ID as determined by the USB standard If multiple devices with the same USB ID are connected to a single PC the PC will b...

Страница 124: ...ollowing screen therefore appears The US Model selected screen appears Destination setting The destination is selected from an undermentioned list according to third character from left side of the se...

Страница 125: ...The third character A FinePix S9100 J model 0 to 9 B FinePix S9100 US model A to H J K C FinePix S9600 EU EG EE AS model L to N P to V D FinePix S9600 CH model W to Z Selected FinePix S9100 US model...

Страница 126: ...justment End screen appears Step 7 USB ID Selected U S A Press the Enter key Fig 4 20 5 Fig 4 20 6 FinePix S9100_9600 Adjustment is completed 1 Remove USB cable from the camera 2 Press the Enter key T...

Страница 127: ...ith adjustment JIG ZJ00580 100 xD Picture card For general use Macro Chart Resolution confirmation ZJ00525 100 TV Monitor TV monitor minimum resolution 600 lines LCD INSPECTION DATA Download and use Z...

Страница 128: ...the EVF LCD button 8 Turn the dioptric adjustment dial up and down 9 Check for blemishes in the CCD live image 1 Apply a shock to the camera 1 Check for damage to the outer casing 2 Check for problem...

Страница 129: ...he Focus mode selector switch to AF 1 Turn the command dial left and right 2 Press the Macro button once Check that the Macro icon tulip appears on the LCD monitor 3 Check that the flash icon A appear...

Страница 130: ...on the LCD monitor 2 Check that movie audio recording begins Check that REC appears on the LCD monitor 3 Check that movie audio recording ends and that the data is recorded on the card 2 Check that t...

Страница 131: ...stains bright spots on the screen 3 Check that there are no noticeable dust flecks or stains smears flashing points etc on the screen 4 Play the above 2 frames and perform the same checks 1 Connect a...

Страница 132: ...ore turning the camera off 14 15 Sequemnce Item Mode Preparations for adjustment measurement points subject other Method of adjustment VRs waveforms required values Measuring equipmentandjigs Measurem...

Страница 133: ...nt VRs waveforms required values Measuring equipmentandjigs Measurement points VRs positions Setting and clearing date 1 Connect the USB cablefrom the PC to the camera ensure that the PC isswitched ON...

Страница 134: ...A mode 2 Select Fine and 9M 3488 x 2616 mode 3 Set the flash to OFF 4 Set the aperture for WIDE F2 8 TELE F4 9 5 Select ISO 200 6 Set the focusing mode to S 7 Adjust so that the angle of view is the...

Страница 135: ...Fig 5 4 2 3 The peripherally enlarged image is normal if a resolution of 1000 lines can be confirmed Check location Service resolution value Center horizontal vertical 1400 Peripheral horizontal vert...

Страница 136: ...5 10 5 Inspection FinePix S9100 S9600 Service Manual MEMO...

Страница 137: ...FZ06706 100 AV CABLE A108 FZ06705 100 USB CABLE W A109 BB13161 200 SHOULDER BELT A110 FZ06312 100 HOOD A111 FZ06487 100 ALKALINE BATTERY A112 AZF0000 101 LDPE BAG NO 10 A113 BB12402 100 LENSCAP HOLDER...

Страница 138: ...FZ06187 100 SHEET MOLD A104 FZ06713 100 PARTITION PAD A105 BB12943 100 BAR CODE LABEL BLANK A106 AZF0000 321 HDPE BAG NO 12 A107 FZ06706 100 AV CABLE A108 FZ06704 100 USB CABLE J A109 BB13161 200 SHO...

Страница 139: ...Y A112 AZF0000 101 LDPE BAG NO 10 A113 BB12402 100 LENSCAP HOLDER A114 FZ06311 101 LENS CAP A115 FZ06522 200 CD ROM A116 FZ05614 500 CD ROM HS V2 A117 BB18002 100 CERTIFICATION SEAL A118 N S MANUAL E...

Страница 140: ...100 AV CABLE A108 FZ06705 100 USB CABLE W A109 BB13161 200 SHOULDER BELT A110 FZ06312 100 HOOD A111 FZ06487 100 ALKALINE BATTERY A112 AZF0000 101 LDPE BAG NO 10 A113 BB12402 100 LENSCAP HOLDER A114 F...

Страница 141: ...6706 100 AV CABLE A108 FZ06705 100 USB CABLE W A109 BB13161 200 SHOULDER BELT A110 FZ06312 100 HOOD A111 FZ06487 100 ALKALINE BATTERY A112 AZF0000 101 LDPE BAG NO 10 A113 BB12402 100 LENSCAP HOLDER A1...

Страница 142: ...6706 100 AV CABLE A108 FZ06705 100 USB CABLE W A109 BB13161 200 SHOULDER BELT A110 FZ06312 100 HOOD A111 FZ06487 100 ALKALINE BATTERY A112 AZF0000 101 LDPE BAG NO 10 A113 BB12402 100 LENSCAP HOLDER A1...

Страница 143: ...12 A107 FZ06706 100 AV CABLE A108 FZ06705 100 USB CABLE W A109 BB13161 200 SHOULDER BELT A110 FZ06312 100 HOOD A111 FZ06487 100 ALKALINE BATTERY A112 AZF0000 101 LDPE BAG NO 10 A113 BB12402 100 LENSCA...

Страница 144: ...TH DATA M217 BB19087 G00 MS0M2 0X8 0BN M218 FZ06302 100 SW UNIT M219 FZ06347 100 MIC ASSY M220 FZ05848 100 UNIT BATT HOLDER M221 FZ06466 100 SHEET GRAPHITE M222 BB17793 100 FRAME BATT M223 BB17794 100...

Страница 145: ...0B M208 BB17790 101 STRAP LEFT M209 BB17788 100 COVER JACK M210 FZ06350 100 SYNCHRO TERMINAL M211 FZ06351 100 WIRE HARNESS M212 BB17818 100 COVER SYNCHRO M213 BB17791 100 HOLDER LENS M214 BB17837 100...

Страница 146: ...7790 101 STRAP LEFT M209 BB17788 100 COVER JACK M210 FZ06350 100 SYNCHRO TERMINAL M211 FZ06351 100 WIRE HARNESS M212 BB17818 100 COVER SYNCHRO M213 BB17791 100 HOLDER LENS M214 BB17837 100 CUSHION M21...

Страница 147: ...M209 BB17788 100 COVER JACK M210 FZ06350 100 SYNCHRO TERMINAL M211 FZ06351 100 WIRE HARNESS M212 BB17818 100 COVER SYNCHRO M213 BB17791 100 HOLDER LENS M214 BB17837 100 CUSHION M215 BB17681 600 BT2M1...

Страница 148: ...JECTOR M304 BB17349 100 MSWM1 7X2 5 M305 CB1679 B100 DCST PWB ASSY M306 BB17796 100 TUBE CONDENSER M307 BB17866 100 CHEET CF M308 BB17335 400 BT2M1 7X4 0B M309 BF05116 300 FLASH CONST M310 FZ06247 100...

Страница 149: ...R M304 BB17349 100 MSWM1 7X2 5 M305 CB1679 B100 DCST PWB ASSY M306 BB17796 100 TUBE CONDENSER M307 BB17866 100 CHEET CF M308 BB17335 400 BT2M1 7X4 0B M309 BF05116 400 FLASH CONST M310 FZ06247 100 LIGH...

Страница 150: ...M407 BB17828 100 SHEET SW M408 BB17829 100 SHOE M409 BB17830 101 COVER SHOE M410 BB19685 100 PLATE EMI M411 BB19078 H00 MS2M1 7X6 5N M412 BB17335 600 BT2M1 7X5 0B M413 BB17834 100 FRAME FINDER M414 C...

Страница 151: ...05 200 BACKUP ELEC PAPTS DCST PWB ASSY FUSE F600 FP00039 253 FUSE B 8 F601 FP00043 253 FUSE E 2 F602 FP00039 253 FUSE A 6 F605 FP00042 752 FUSE E 2 CONNECTOR CN600 FGA169 0021 CONNECTOR CN601 FGA162 0...

Страница 152: ...6 16 6 Parts List FinePix S9100 S9600 Service Manual MEMO...

Страница 153: ...is performed accuratety keep a record here of the technical updates issued that cover this device Technical Update No Date Title Details Other 2006 116 24 Oct 2006 Parts list correction and Service m...

Страница 154: ...26 30 Nishiazabu 2 chome Minato ku Tokyo 106 8620 Japan FUJI PHOTO FILM CO LTD...

Отзывы: