


77
EN
-U
S
Course mode
Explanation
In course mode, you can easily adapt or configure courses with varying levels of difficulty.
The courses and the underlying curricula are easy to access. The results are comparable
with the help of ranking lists, which allows for a precise response to the needs of the trainee
welder.
The course mode is used for training:
-
Different courses can be assigned to individual terminals
-
The results of the individual users can be compared in ranking lists
-
For more information, see section
Ranking list description, exporting course
.
-
For more information on creating users, see section
from page
In course mode, the following functions are available:
-
Training (practical welding tasks)
-
Theory (learning content)
-
Knowledge check (review of knowledge learned)
-
Ranking list - for more information, see
Ranking list description, exporting course
-
Profile - for more information, see
Activating course
mode
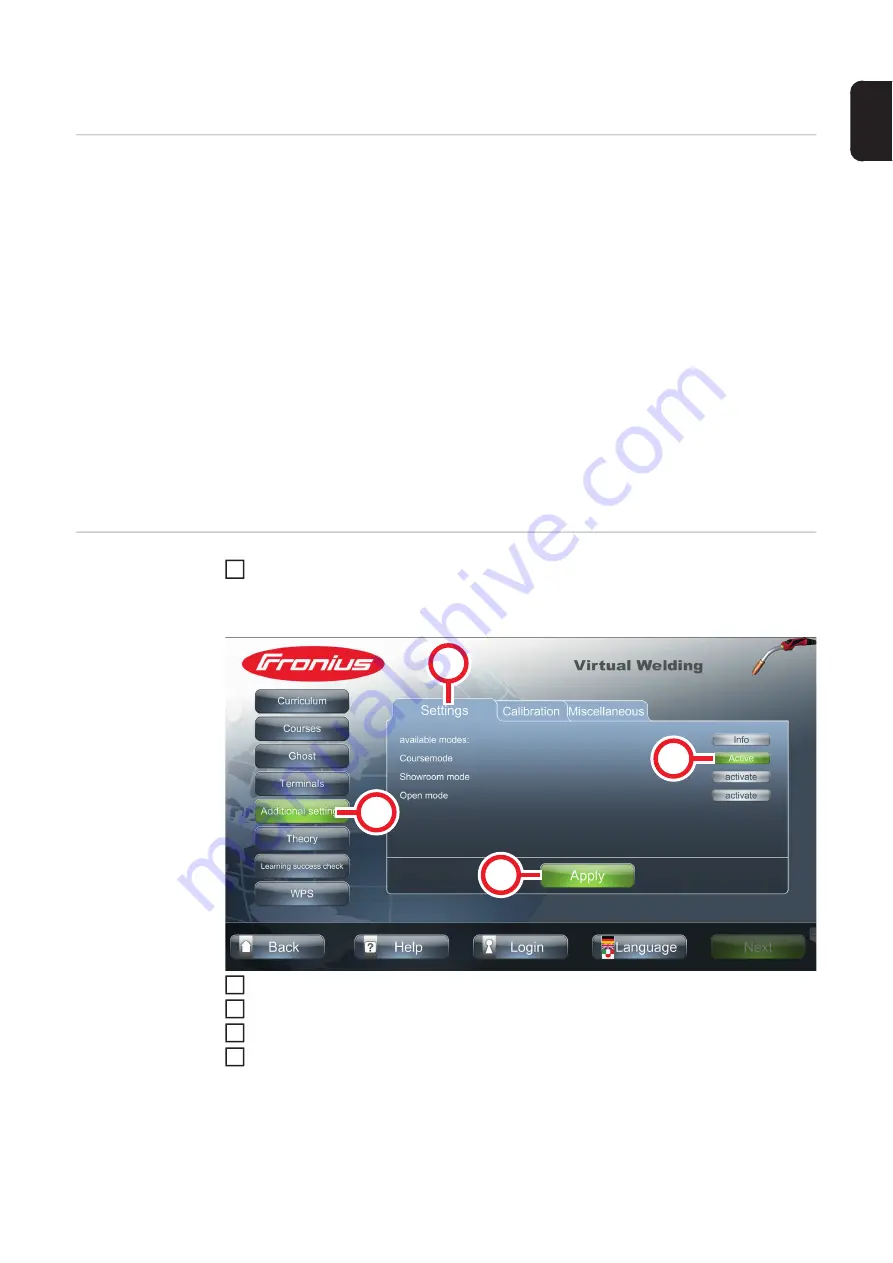
With the NFC key, touch the sensor on the Virtual Welding system to open terminal
management
-
For the position of the sensor, see section
Select button (1)
Select tab (2)
Select button (3) to activate course mode
Select button (4) to save the entries
-
The system is now ready
-
Refer to the following section for the necessary settings to allow users to begin
the exercises
1
(3)
(1)
(2)
(4)
2
3
4
5
Содержание Virtual Welding 2.0
Страница 2: ...2...
Страница 6: ...6...
Страница 13: ...General information...
Страница 14: ......
Страница 20: ...20 Robotics function package MMA function package...
Страница 21: ...Operating controls connections and mechanical components...
Страница 22: ......
Страница 28: ...28 2 Ventilation openings at the rear of the device 2 2 2...
Страница 29: ...Installation...
Страница 30: ......
Страница 34: ...34 Top of StandUp Terminal side view 2 mounting bracket 3 screws with washers 2 3 3 3 3 2...
Страница 45: ...Commissioning...
Страница 46: ......
Страница 62: ...62 Give the curriculum a name Select button 21 The new curriculum is displayed in the overview 22 21 25 26 22...
Страница 69: ...Ghost...
Страница 70: ......
Страница 72: ...72 Use the arrow keys to make the desired settings Select button 4 Select button 5 4 4 5 5 6...
Страница 74: ...74...
Страница 75: ...Available modes on the Virtual Weld ing system...
Страница 76: ......
Страница 84: ...84...
Страница 85: ...Calibration...
Страница 86: ......
Страница 90: ...90 Select tab 3 Select button 4 Follow the instructions on the touch screen glasses 4 5 6...
Страница 92: ...92 Follow the instructions on the touch screen 6...
Страница 94: ...94 Follow the on screen instructions 6...
Страница 95: ...Other settings...
Страница 96: ......
Страница 103: ...103 EN US Select button 3 Select tab 4 Select button 5 Select and import the desired file 5 5 4 6 7 8...
Страница 104: ...104...
Страница 105: ...Setup Menu...
Страница 106: ......
Страница 127: ...127 EN US Make the desired settings Select button 2 2 3 4...
Страница 128: ...128...
Страница 129: ...Troubleshooting maintenance and disposal...
Страница 130: ......
Страница 135: ...Update...
Страница 136: ......
Страница 138: ...138 Use button 3 to select the iso file that is located in the update folder 3 VWUPDATE 10...
Страница 139: ...139 EN US Select GPT with button 4 4 VWUPDATE 11...
Страница 140: ...140 Select UEFI or BIOS with button 5 Depending on the system one of the two options is available 5 VWUPDATE 12...
Страница 141: ...141 EN US Enter VWUPDATE in field 6 6 VWUPDATE 13...
Страница 142: ...142 Select Large FAT32 Default with button 7 select 32 kilobites default with but ton 8 VWUPDATE 7 8 14...
Страница 143: ...143 EN US Select Checkbox 9 and 10 VWUPDATE 9 10 15...
Страница 144: ...144 Select button 11 VWUPDATE 11 16...
Страница 147: ...147 EN US BIOS menu Use the arrow keys on the keyboard to select the Save Exit menu item 1 1 5 2...
Страница 149: ...Technical data...
Страница 150: ......


