20
21
4. Carefully pour a small amount of oil from the suction
stub of the defective compressor into a clean
container.
5. Using an acid test kit (one shot or conventional kit),
test the oil for acid content according to the instructions
with the kit.
6. If any evidence of a burnout is found, no matter how
slight, the system will need to be cleaned up following
proper procedures.
7. Install the replacement compressor.
8. Pressurize with a combination of R-22 and nitrogen
and leak test all connections with an electronic or
Halide leak detector. Recover refrigerant and repair
any leaks found.
Repeat Step 8 to insure no more leaks are present.
9. Evacuate the system with a good vacuum pump
capable of a final vacuum of 300 microns or less.
The system should be evacuated through both liquid
line and suction line gauge ports. While the unit is
being evacuated, seal all openings on the defective
compressor. Compressor manufacturers will void
warranties on units received not properly sealed. Do
not distort the manufacturers tube connections.
10. Recharge the system with the correct amount of
refrigerant. The proper refrigerant charge will be
found on the unit rating plate. The use of an accurate
measuring device, such as a charging cylinder,
electronic scales or similar device is necessary.
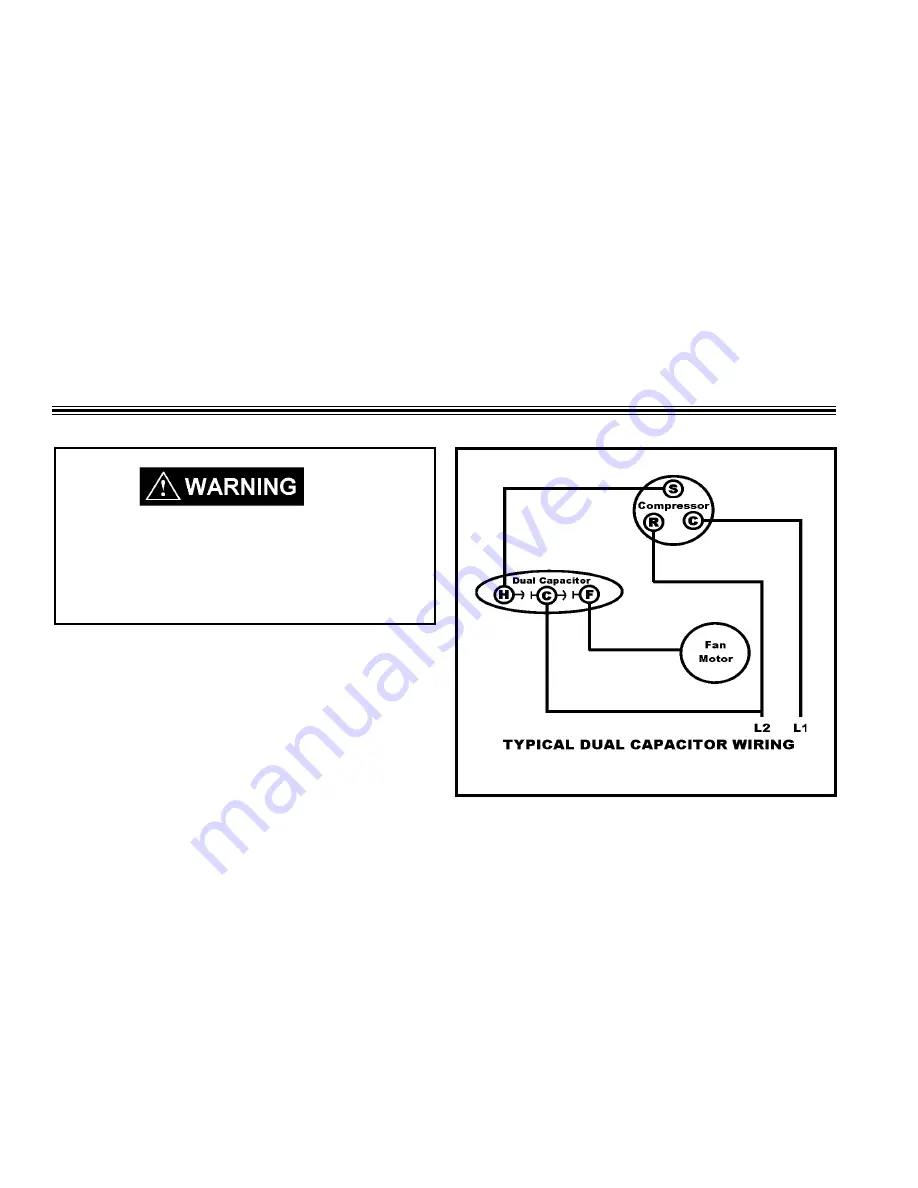
CAPACITORS
Many motor capacitors are internally fused. Shorting the
terminals will blow the fuse, ruining the capacitor. A 20,000
ohm 2 watt resistor can be used to discharge capacitors
safely. Remove wires from capacitor and place resistor
across terminals. When checking a dual capacitor with
a capacitor analyzer or ohmmeter, both sides must be
tested.
Capacitor Check With Capacitor
Analyzer
The capacitor analyzer will show whether the capacitor is
"open" or "shorted." It will tell whether the capacitor is within
its microfarads rating and it will show whether the capacitor
is operating at the proper power-factor percentage. The
instrument will automatically discharge the capacitor when
the test switch is released
Capacitor Connections
The starting winding of a motor can be damaged by a
shorted and grounded running capacitor. This damage
usually can be avoided by proper connection of the running
capacitor terminals.
Hazard of shock and electrocution. A capacitor can
hold a charge for long periods of time. A service
technician who touches these terminals can be
injured. Never discharge the capacitor by shorting
across the terminals with a screwdriver.
From the supply line on a typical 230 volt circuit, a 115 volt
potential exists from the "R" terminal to ground through a
possible short in the capacitor. However, from the "S" or start
terminal, a much higher potential, possibly as high as 400
volts, exists because of the counter EMF generated in the
start winding. Therefore, the possibility of capacitor failure
is much greater when the identified terminal is connected
to the “S" or start terminal. The identified terminal should
always be connected to the supply line, or "R" terminal,
never to the "S" terminal.
When connected properly, a shorted or grounded
running-capacitor will result in a direct short to ground
from the "R" terminal and will blow the line fuse. The motor
protector will protect the main winding from excessive
temperature.
Содержание WallMaster PE07K
Страница 28: ...28 Wiring Diagram PTAC Models PE 07 09 12 15 KOOSA 1 Wiring Diagram PTAC Models PH 07 09 12 15 K 2 3 5 SA 1...
Страница 29: ...29 Wiring Diagram PTAC Models PH 07 09 12 15 KOOSA 1 Wiring Diagram PTAC Models PE 07 09 12 15 K 2 3 5 SA 1...
Страница 31: ...31 Wiring Diagram PTAC Models PE 07 09 12 15 KOORA 1 Wiring Diagram PTAC Models PE 07 09 12 15 R00SA 1...


