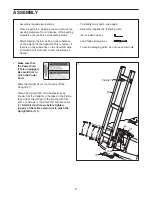
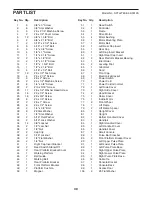
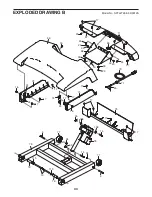
Freemotion SFTL27808.3 Скачать руководство пользователя страница 21

21

HOW TO USE A HEART RATE WORKOUT
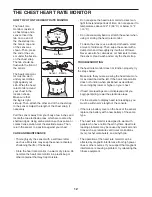
 1.  

Put on the chest heart rate monitor. 

    To use a heart rate workout, you must wear the 

chest heart rate monitor or use the handgrip heart 

rate monitor. Note: For best results, you should 

wear the chest heart rate monitor.


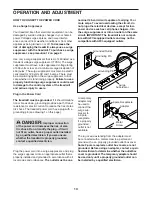
2.    Insert the key into the console. 

  See step 1 on page 15. 

3.  

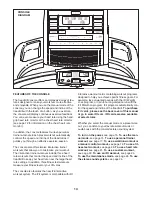
Select one of the heart rate workouts.

   To select a heart rate workout, press the Heart 

Rate Control button repeatedly until the desired 

workout appears in the display. Press the Enter 

button to select the desired workout. 

   Select your age and then your weight using the 

increase and decrease buttons next to the Enter 

button. Press the Enter button after each selec-

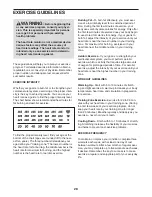
tion. Note: To use the constant heart rate and 

variable heart rate workouts, you must also enter 

your target maximum heart rate. If the target 

maximum heart rate setting is changed, the inten-

sity level of the entire workout will change. Note: 

To calculate your target maximum heart rate see 

EXERCISE INTENSITY on page 28.

  4.   Press the Start/Stop button to start the  

workout.

     A moment after the Start/Stop button is pressed, 

the walking belt will begin to move and the treadmill 

will automatically adjust to the first speed and 

incline settings of the workout. Hold the handrails 

and begin walking.

    The heart rate workouts are divided into several 

one-minute segments. One target heart rate setting 

is programmed for each segment. The same target 

heart rate setting may be programmed for consecu-

tive segments. For a shorter workout, simply stop 

the workout before it ends.


During all heart rate workouts, the console will 

regularly compare your heart rate to the target 

heart rate setting. If your heart rate is too far below 

or above the target heart rate setting for the current 

segment, the speed of the walking belt will auto-

matically increase or decrease to bring your heart 

rate closer to the target heart rate setting.

   If the speed or incline setting is too high or too low 

at any time during the workout, you can adjust the 

setting with the Speed or Incline buttons. However, 

each time the console compares your heart rate to 

the target heart rate setting, the speed of the tread-

mill may automatically change to bring your heart 

rate closer to the target heart rate setting.

    To stop or restart the workout at any time, press 

the Start/Stop button. 

5.  

Select a display mode and monitor your prog-

ress with the display. 

   See step 4 on page 18. 

6.  Turn on the fan if desired.

  See step 7 on page 17.

7.   When you are finished exercising, remove the 

key from the console.

   See step 8 on page 17.

    CAUTION:

 If you have heart 

problems, or if you are over 60 years of age 

and have been inactive, do not use the heart 

rate workouts. If you are taking medication 

regularly, consult your physician to find out 

whether the medication will affect your exercise 

heart rate.

Содержание SFTL27808.3

Страница 1: ...Model No SFTL27808 3 Serial No Write the serial number in the space above for reference www freemotionfitness com QUESTIONS If you have questions or if parts are damaged or missing CONTACT THE STORE WHERE YOU PURCHASED THIS PRODUCT If you are unable to contact the store see HOW TO CONTACT CUSTOMER CARE on the back cover of this manual USER S MANUAL ...

Страница 2: ...T LIST 30 EXPLODED DRAWING 32 HOW TO CONTACT CUSTOMER CARE Back Cover LIMITED WARRANTY Back Cover These drawings show the locations of the warning decals If a decal is missing or illegible see the back cover of this manual and request a free replacement decal Apply the decal in the location shown Note The decals may not be shown at actual size 272078 WARNING DECAL PLACEMENT FREEMOTION is a registe...

Страница 3: ...he surge suppressor or into an outlet on the same circuit 12 Use only a surge suppressor that meets all of the specifications described on page 13 To purchase a surge suppressor see your local FREEMOTION dealer call the telephone number on the front cover of this manual or see your local electronics store 13 Failure to use a properly functioning surge suppressor could result in damage to the contr...

Страница 4: ...f the treadmill regularly 24 Never insert or drop any object into any opening on the treadmill 25 DANGER Always unplug the power cord immediately after use before clean ing the treadmill and before performing the maintenance and adjustment procedures described in this manual Never remove the motor hood unless instructed to do so by an authorized service representative Servicing other than the proc...

Страница 5: ... cover of this manual To help us assist you note the product model number and serial number before contacting us The model number and the location of the serial number decal are shown on the front cover of this manual Before reading further please review the drawing below and familiarize yourself with the labeled parts BEFORE YOU BEGIN Handrail Console Key Clip Power Switch Walking Belt Power Cord...

Страница 6: ...T Use the drawings below to identify small parts used for assembly The number in parentheses below each draw ing is the key number of the part from the PART LIST near the end of this manual The number following the key number is the quantity used for assembly Note If a part is not in the hardware kit check to see if it is preat tached Extra hardware may be included ...

Страница 7: ...h the Upright Wire 111 111 1 1 2 2 Plastic Tie 1 70 Tabs Assembly requires two persons Place all parts in a cleared area and remove the packing materials Do not dispose of the packing materials until you finish all assembly steps After shipping there may be an oily substance on the exterior of the treadmill This is normal If there is an oily substance on the treadmill wipe it off with a soft cloth...

Страница 8: ...ng 111 80 3 81 2 Insert the end of the Upright Wire 111 through the looped plastic tie at the top of the Upright 81 Make sure that the Upright Wire is behind the crossbars on the Upright Then gently pull upward on the Upright Wire as you tighten the plastic tie around the Upright Wire 111 2 Plastic Tie 81 Crossbar Crossbar Crossbar ...

Страница 9: ...the excess wires downward into the Upright Cover 80 Set the Console 101 on the handrail assembly Be careful not to pinch any wires 80 101 111 6 Console Wires 111 Console Wire Handrail Assembly Handrail Wires Handrail Wire 5 Have a second person hold the handrail assem bly near the Upright 81 Insert the Upright Wire 111 up through the cen ter of the handrail assembly Slide the bracket on the handra...

Страница 10: ... Teeth 80 1 102 9 Tighten the two 3 8 x 3 Screws 1 9 8 128 128 7 Align the holes in the Console 101 with the holes in the handrail assembly and the holes in the Upright 81 Attach the Console and the handrail assembly to the Upright with two 3 8 x 3 Screws 1 and two 3 8 Star Washers 2 Do not tighten the Screws yet Note It may be helpful to press the indicated bracket against the Upright and to pres...

Страница 11: ...stic on the treadmill decals remove the plastic To protect the floor or carpet place a mat under the tread mill Note Extra hardware may be included Keep the included hex key in a secure place the hex key is used to adjust the walking belt see page 27 36 11 Tighten two 8 x 1 2 Cover Screws 4 into the bottom of the handrail assembly Be careful not to overtighten the Cover Screws See step 10 Tighten ...

Страница 12: ...atures above 122 F 50 C or below 14 F 10 C Do not excessively bend or stretch the sensor when using or storing the heart rate monitor To clean the sensor use a damp cloth and a small amount of mild soap Then wipe the sensor with a damp cloth and thoroughly dry it with a soft towel Never use alcohol abrasives or chemicals to clean the sensor Hand wash and air dry the chest strap TROUBLESHOOTING If ...

Страница 13: ...d into a surge suppressor and plug the surge suppressor into an appropriate outlet that is properly installed and grounded in accordance with all local codes and ordinances The outlet must be on a nominal 120 volt circuit capable of carrying 15 or more amps To avoid overloading the circuit do not plug other electrical devices except for low power devices such as cell phone chargers into the surge ...

Страница 14: ...ss test workouts measure your fitness level or your VO2 max The console also features the new iFit interactive workout system The iFit system is compatible with iFit interactive workout cards containing workout programs designed to help you achieve specific fitness goals For example lose unwanted pounds with the iFit Weight Loss program or train for a long distance run with the iFit Marathon progr...

Страница 15: ...SE THE MANUAL MODE 1 Insert the key into the console See HOW TO TURN ON THE POWER at the left The incline will automatically rise to the maximum incline level and then return to the minimum incline level 2 Select the manual mode Each time the key is inserted the manual mode will be selected If you have selected a workout press any of the workout buttons repeatedly until zeros appear in the display...

Страница 16: ...ing pace in minutes per mile or minutes per kilometer Regardless of which display mode you select the speed or incline setting will appear in the display for a few seconds each time you change the setting The lower right and lower left displays will show the speed of the walking belt and incline of the treadmill As you switch between workouts and the manual mode the console will keep track of the ...

Страница 17: ...ersonal trainer workouts To select a per sonal trainer workout press the Interval Workouts button the Terrain Workouts button or the Random Workouts button repeatedly until the name of the desired workout appears in the display Interval workouts use speed settings to provide a personalized workout Terrain workouts use speed and incline settings to simulate an actual walking experience Random worko...

Страница 18: ... If the speed or incline setting is too high or too low at any time during the workout you can manually override the setting by pressing the Speed or Incline buttons however when the next segment of the workout begins the treadmill will automatically adjust to the speed and incline settings for the next segment Note If you use an Interval workout the incline will not adjust automatically To stop o...

Страница 19: ...e cross country workouts you must also enter your distance goal To use a manual control workout enter your time distance or calorie goal 3 Press the Start Stop button to start the workout A moment after you press the Start Stop button the treadmill will begin moving Hold the handrails and begin walking During the workout the profile will show the speed of the walking belt As you exercise change th...

Страница 20: ...Press the Enter button after each selec tion Note To use the Ebbeling Fitness Test you must also enter your gender 4 Press the Start Stop button to start the workout A moment after you press the Start Stop but ton the treadmill will automatically adjust to the first speed and incline settings of the fitness test Begin walking on the treadmill Note For the most accurate results do not hold the hand...

Страница 21: ... several one minute segments One target heart rate setting is programmed for each segment The same target heart rate setting may be programmed for consecu tive segments For a shorter workout simply stop the workout before it ends During all heart rate workouts the console will regularly compare your heart rate to the target heart rate setting If your heart rate is too far below or above the target...

Страница 22: ...e height of the flashing segment indicates the incline setting for the current segment At the end of each segment a series of tones will sound and the next segment of the profile will begin to flash If a new speed or incline setting is pro grammed for the next segment of the workout the speed or incline setting will appear at the top of the display for a few moments to alert you The workout will c...

Страница 23: ...rkout Hold the handrails and begin walking A personal trainer will guide you through the workout At the end of each segment a series of tones will sound If a new speed or incline setting is pro grammed for the next segment of the workout the speed or incline setting will appear at the top of the display for a few moments to alert you If the speed or incline setting for the current seg ment is too ...

Страница 24: ...ay button to move to the next screen You may be able to select one of five languages for the displays If desired select a lan guage for the displays 3 Create a custom workout If desired create a custom workout Press the Display button until the desired custom workout is highlighted Then press the Enter button Program a speed setting and an incline setting for the first one minute segment by pressi...

Страница 25: ... lift the treadmill by the handrail Carefully roll the treadmill on the wheels to the desired location and then lower it to the level position CAUTION To reduce the risk of injury use extreme caution while moving the treadmill Do not attempt to move the treadmill over uneven surfaces After the treadmill is placed in the location where it will be used make sure that the leveling feet rest firmly on...

Страница 26: ...r switch wait for five minutes and then press the switch back in SYMPTOM The power turns off during use a Check the power switch see the drawing at the left If the switch has tripped wait for five minutes and then press the switch back in b Make sure that the power cord is plugged in If the power cord is plugged in unplug it wait for five minutes and then plug it back in c Remove the key from the ...

Страница 27: ... the walking belt needs more lubricant see the front cover of this manual d If the walking belt still slows when walked on see the front cover of this manual SYMPTOM The walking belt is off center or slips when walked on a If the walking belt is off center first remove the key and UNPLUG THE POWER CORD If the walking belt has shifted to the left use the hex key to turn the left idler roller screw ...

Страница 28: ...ic Exercise If your goal is to strengthen your cardiovascular system you must perform aerobic exercise which is activity that requires large amounts of oxygen for prolonged periods of time For aerobic exercise adjust the intensity of your exercise until your heart rate is near the highest number in your training zone WORKOUT GUIDELINES Warming Up Start with 5 to 10 minutes of stretch ing and light...

Страница 29: ...illes Stretch With one leg in front of the other reach forward and place your hands against a wall Keep your back leg straight and your back foot flat on the floor Bend your front leg lean forward and move your hips toward the wall Hold for 15 counts then relax Repeat 3 times for each leg To cause further stretching of the achilles tendons bend your back leg as well Stretches Calves achilles tendo...

Страница 30: ...Guide 46 1 Walking Belt 47 1 Rear Platform Bracket 48 1 Front Platform Bracket 49 2 Platform Cushion 50 1 Magnet 51 1 Reed Switch 52 1 Controller 53 1 Frame 54 1 Drive Motor 55 4 Motor Bushing 56 1 Motor Mounting Plate 57 1 Motor Belt 58 1 Left Rear Cap Insert 59 1 Rear Cap 60 1 Left Cap Insert Bracket 61 1 Right Rear Cap Insert 62 2 Rear Platform Bracket Bearing 63 1 Idler Roller 64 2 Leveling Fo...

Страница 31: ...8 1 Large French Warning Decal 119 2 Caution Decal 120 1 Voltage Warning Decal 121 2 English Warning Decal 122 1 French Warning Decal 123 1 Motor Bracket 124 2 5 16 x 3 8 Washer Head Screw 125 2 4 Console Ground Wire 126 2 M4 x 13mm Screw 127 4 Platform Bracket Bushing 128 2 6 x 5 8 Machine Screw 129 4 8 x 5 8 Machine Screw 130 2 8 x 1 2 Machine Screw 131 2 Console Wire Tie 132 6 5 16 x 5 8 Screw ...

Страница 32: ...51 50 52 64 64 63 53 49 49 62 22 22 36 36 42 10 34 34 34 34 34 34 23 24 24 62 89 43 45 65 112 119 119 120 89 127 127 114 114 100 8 8 54 57 56 55 55 124 123 118 132 59 117 60 126 9 132 41 129 129 130 58 61 126 132 130 129 129 132 132 9 9 9 132 7 33 32 8 EXPLODED DRAWING A Model No SFTL27808 3 R0312A ...

Страница 33: ... 16 16 17 17 17 17 17 17 23 23 23 23 24 24 34 34 66 67 17 69 68 70 71 72 74 16 73 74 16 75 17 76 77 77 78 79 79 23 30 30 30 30 24 24 17 37 37 17 17 115 115 35 35 108 108 EXPLODED DRAWING B Model No SFTL27808 3 R0312A ...

Страница 34: ... 19 116 85 24 92 91 90 86 87 88 25 93 94 95 84 24 83 87 25 82 80 18 3 81 3 18 18 3 26 26 26 30 30 25 25 25 23 19 19 19 19 19 4 4 3 25 96 111 116 116 121 121 122 128 128 25 EXPLODED DRAWING C Model No SFTL27808 3 R0312A ...

Страница 35: ...5 28 28 28 28 26 26 23 23 23 23 27 27 107 101 106 102 99 97 98 25 25 25 25 24 1 1 23 23 24 24 24 2 2 25 25 29 39 40 40 103 104 105 106 109 110 125 25 25 131 EXPLODED DRAWING D Model No SFTL27808 3 R0312A ...

Страница 36: ...onsible for a minimal handling charge This warranty does not extend to any damage to a product caused by or attributable to freight damage abuse misuse improper or abnormal usage or repairs not provided by a FreeMotion Fitness authorized service provider products used for commercial or rental purposes or products used as store display models No other warranty beyond that specifically set forth abo...

Отзывы: