background image

38

NT630Plus ABS & Airbag Reset Tool Manual_English_V1.02

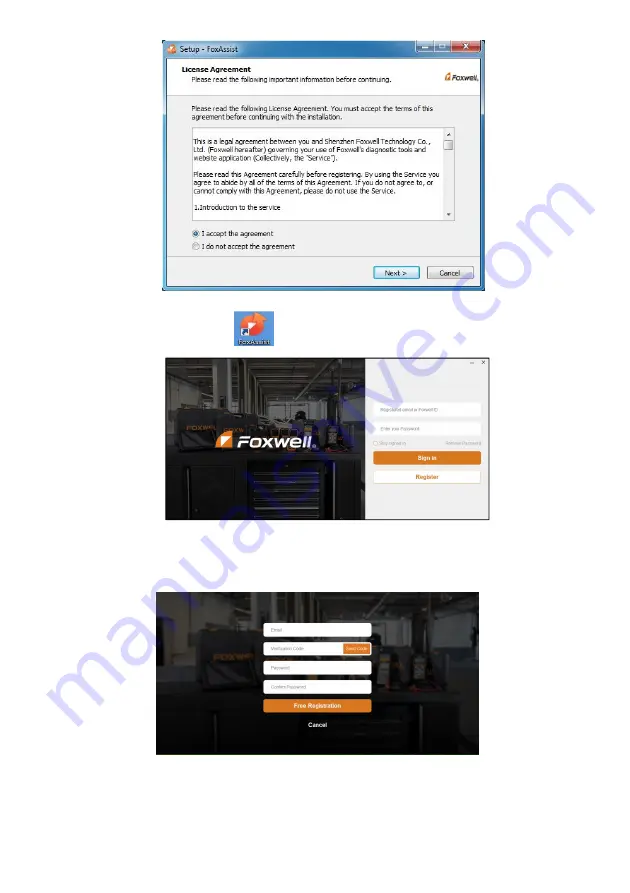
Figure 8-10 Sample FoxAssist Installation Screen

3. Double click the desktop icon

to launch the application.

Figure 8-11 Sample FoxAssist Main Screen

4. Click

Register

button, a

Register

window will pop up. Enter your own email address and click

“Send code” to find the verification code in your mailbox . Create a unique password, confirm

password and then click

“Free registration”

to complete.

Figure 8-12 Sample Register Screen

5. A

Registered account is successful

message will appear if you registered successfully.

Содержание NT630Plus

Страница 1: ...lders Copyright Information 2019 Shenzhen Foxwell Technology Co Ltd All rights reserved Disclaimer The information specifications and illustrations in this manual are based on the latest information available at the time of printing Foxwell reserves the right to make changes at any time without notice Visit our website at www foxwelltech us For Technical Assistance send us email at support foxwell...

Страница 2: ...ompletion of service under this limited warranty 4 FOXWELL does not warrant uninterrupted or error free operation of the product If a problem develops during the limited warranty period the consumer shall take the following step by step procedure a The customer shall return the product to the place of purchase for repair or replacement processing contact your local FOXWELL distributor or visit our...

Страница 3: ...EGAL OR EQUITABLE THEORY EVEN IF FOXWELL KNEW OF THE LIKELIHOOD OF SUCH DAMAGES FOXWELL SHALL NOT BE LIABLE FOR DELAY IN RENDERING SERVICE UNDER THE LIMITED WARRANTY OR LOSS OF USE DURING THE PERIOD THAT THE PRODUCT IS BEING REPAIRED 6 Some states do not allow limitation of how long an implied warranty lasts so the one year warranty limitation may not apply to you the Consumer Some states do not a...

Страница 4: ...n a manner that would interfere with driving controls Do not exceed voltage limits between inputs specified in this user s manual Always wear ANSI approved goggles to protect your eyes from propelled objects as well as hot or caustic liquids Fuel oil vapors hot steam hot toxic exhaust gases acid refrigerant and other debris produced by a malfunction engine can cause serious injury or death Do not ...

Страница 5: ...TTING STARTED 9 3 1 PROVIDING POWER TO SCANNER 9 3 1 1 Connecting to Vehicle Power 9 3 1 2 Connecting to Computer with USB Cable 9 3 2 APPLICATION OVERVIEW 9 3 3 INPUT DIALOG BOX 10 4 VEHICLE IDENTIFICATION 11 4 1 AUTO VIN 12 4 1 1 Automatic VIN Acquisition 12 4 1 2 Manual VIN Entry 13 4 2 MANUAL VEHICLE SELECTION 14 4 2 1 Smart VIN 15 4 2 2 Manual Selection 16 5 DIAGNOSTIC OPERATIONS 17 5 1 CONTR...

Страница 6: ... 30 8 1 SELECT LANGUAGE 30 8 2 CHANGE UNITS 30 8 3 CONFIGURE SHORTCUT KEYS 31 8 4 DISPLAY TEST 32 8 5 KEYPAD TEST 33 8 6 TOOL INFORMATION 33 8 UPDATE 34 8 1 CREATE A FOXWELL ID 34 8 1 1 Register through Website 34 8 1 2 Register with FoxAssist 37 8 2 REGISTER YOUR SCANNER 39 8 2 1 Register Through Website 39 8 2 2 Register With FoxAssist 40 8 3 UPDATE THE SCANNER 41 ...

Страница 7: ...vailable options displays Menu options include Language Unit Shortcuts Display Test Keypad Test About 1 2 2 Arrow Icon An arrow icon indicates a procedure Example To change menu language 1 Scroll with the arrow keys to highlight Language on the menu 2 Press the ENTER button to select 1 2 3 Note and Important Message Note A NOTE provides helpful information such as additional explanations tips and ...

Страница 8: ...ect an option or scroll through a screen of data or text 5 ENTER Key executes a selected option and generally goes to the next screen 6 BACK Key exits a screen and generally returns to previous screen 7 HELP Key displays helpful information 8 USB Port provides USB power connection between the scanner and PC laptop 9 TF Card Port holds the TF memory card for data backup and software update IMPORTAN...

Страница 9: ...vehicle power 1 Locate the data link connector DLC The DLC is generally located under the dash on the driver side of the vehicle 2 Attached the Diagnostic cable to the scanner and tighten the captive screws to ensure good connection 3 Connect a correct adapter to the data cable according to the vehicle being serviced and plug it into the vehicle DLC 4 Switch the ignition key to the ON position 5 T...

Страница 10: ...ers such as VIN number channel number test values and DTC number Typically you may be required to input letters or numbers when you are doing any of the following operations VIN entry input channel number set adaptation value enter block number enter login code key matching look up DTCs The scan tool provides 4 different types of keyboard to meet your specific needs Depending on the needs of text ...

Страница 11: ...ons of the vehicle under test The vehicle identification information presented is provided by the ECM of the vehicle being tested Therefore certain attributes of the test vehicle must be entered into the scan tool to ensure the data displays correctly The vehicle identification sequence is menu driven you simply follow the screen prompts and make a series of choices Each selection you make advance...

Страница 12: ...fy a vehicle by automatically reading the vehicle identification number VIN To identify a vehicle automatic VIN reading 1 Scroll with the arrow keys to highlight Auto VIN from the main menu and press the ENTER key Figure 4 1 Sample Main Menu Screen 2 Select Automatic VIN Acquisition from the menu and press the ENTER key Figure 4 2 Sample VIN Reading Screen 3 The scan tool starts to communicate wit...

Страница 13: ...lly Figure 4 4 Sample Manual VIN Entry Screen 5 If it takes too long to get the VIN code press Cancel to stop and input the VIN manually Or if failed to identify the VIN please input the VIN manually or click Cancel to quit Figure 4 5 Sample Manual Entry Screen 4 1 2 Manual VIN Entry Manual VIN Entry identifies a vehicle by manually inputting a 17 digit VIN code To identify a vehicle by manual VIN...

Страница 14: ... 3 Press the function key Keyboard and a virtual keyboard opens for VIN entry Figure 4 8 Sample Manual VIN Entry Screen 5 Input a valid VIN code and use the function key Completed to confirm The scan tool starts to identify the vehicle 4 2 Manual Vehicle Selection Select vehicle brand you are to test and two ways of getting to the diagnostic operations are available SmartVIN Manual Selection ...

Страница 15: ...u have the application assigned to one of the function keys at the bottom of the screen you can alternatively press the function key to start the application Figure 4 9 Sample Main Menu Screen 2 A screen with vehicle manufacturer areas displays Select the area where the car brand is originated A list of vehicle makes display Figure 4 10 Sample Vehicle Manufacturer Area Selection Screen 3 Select th...

Страница 16: ...mple Automatic VIN Reading Screen 6 Answer YES if the Vehicle Specification or VIN code is correct and a menu of controller selection displays Answer NO if incorrect and you are required to enter the correct VIN number manually Figure 4 14 Sample Manual VIN Entry Screen 4 2 2 Manual Selection Manual Selection identifies a vehicle by making several selections according to certain VIN characters suc...

Страница 17: ... the data readings 5 1 Control Module Selection When you completed the identification of vehicle you have to identify the control modules installed in the vehicle There are two ways to identify the controllers installed in a car Quick Scan Control Modules 5 1 1 Quick Scan Quick Scan performs an automatic system test to determine which control modules are installed on the vehicle and provides diagn...

Страница 18: ...creen 4 If there is diagnostic trouble code s detected in a control unit press the function key corresponding with Report on the screen to view details of code information Or press the function key Erase to clear them Figure 5 4 Sample DTC Screen 5 Press function key F1 to save the trouble code information 6 Select the system you would like to test and press the ENTER key When the scanner has esta...

Страница 19: ... not mean that they are installed on the vehicle To select a system for testing 1 Scroll with the arrow keys to highlight Control Modules from the menu and press the ENTER key A controller menu displays Figure 5 6 Sample Control Module Menu Screen 2 Select the system you would like to test When the scanner has established connection with the vehicle the Function Menu displays Figure 5 7 Sample Con...

Страница 20: ... 2 1 ECU Information ECU Information screen displays the identification data of the control module under test such as the control module identification string the control module coding and Work Shop Code To read ECU information 1 Select ECU Information from the menu and press the ENTER key Figure 5 8 Sample Function Menu Screen 2 A screen with detailed information of the selected control module di...

Страница 21: ...memory If a fault occurs a specific number of times the code matures into a DTC and the MIL illuminates or blinks History codes are also referred to as past codes that indicate intermittent DTCs that are not currently active To read codes from a vehicle 1 Scroll with the arrow keys to highlight Read Codes from Function Menu and press the ENTER key A code list including code number and its descript...

Страница 22: ...red DTCs from a selected control module Also it erases all temporary ECU information including freeze frame So make sure that the selected system is completely checked and serviced by technicians and no vital information will be lost before clearing codes NOTE To clear codes make sure that the ignition key is switched to ON with the engine off Clear Codes does not fix the problem that caused the f...

Страница 23: ... a selected vehicle electronic control module Menu options typically include Complete List Custom List 5 2 4 1 Complete Data List Complete List menu lets you view all live PID data from a selected system To view live PID data 1 Scroll with the arrow keys to highlight Live Data from the menu and press the ENTER key Figure 5 15 Sample Function Menu Screen 2 Select the Complete List from the menu and...

Страница 24: ...e the Start key to resume collecting data To record data to memory of the scanner use the function key SAVE and press Stop Saving to stop recording at any time Figure 5 17 Sample Live Data Screen 4 Use up and down arrow key to select line If Graph is highlighted it indicates graphing is available for the selected line Press the function key Graph to display the PID graph Figure 5 18 Sample PID Gra...

Страница 25: ... affect each other Figure 5 20 Sample Merge Graph Screen 7 Press the Back key to return to the previous menu 5 2 4 2 Custom List Custom List menu lets you to minimize the number of PIDs on the data list and focus on any suspicious or symptom specific data parameters To create a custom data list 1 Select Custom List from the menu and press the ENTER key Figure 5 21 Sample Live Data Menu Screen ...

Страница 26: ...em or component and when you exit the test the system component returns to normal operation Some tests display a command to the operator For example if Press Brake Pedal displays the operator has to press and hold the brake pedal and then continue The number and type of tests will vary for each vehicle year and components Typical special test options include ABS Manual Control Tests allows to manu...

Страница 27: ...e ABS or TCS warning or indicatorlamps Motor Rehome Test prepares the brake lines for bleeding by clearing air from the modulator The test returns all ABS motors to their home positions Pump Motor Tests allows to manually control the pump motor Relay Test allows to manually engage and disengage either the ABS or TCS relays in order to test relay operation Requested Torque Test allows to manually c...

Страница 28: ...rn to previous screens NOTE Not all function options listed above are applicable to all vehicles Available options may vary by the year model and make of the test vehicle 6 Steering Angle Sensor SAS Calibration SAS Calibration menu lets you perform calibration of the steering angle sensor which permanently stores the current steering wheel position as straight ahead in the sensor EEPROM On success...

Страница 29: ...Service 07 request emission related diagnostic trouble codes detected during currentor last completed driving cycle Service 08 request control of on board system test or component Service 09 request Vehicle Information When OBDII EOBD application is selected from Home screen the scanner starts to detect the communication protocol automatically Once the connection has established a menu that lists ...

Страница 30: ...pens a screen that allows you to choose system language The scan tool is set to display English menus by default To configure system language 1 Scroll with the arrow keys to highlight Language from Settings menu and press ENTER key Figure 8 1 Sample Settings Screen 2 Press left and right arrow key select a language and press the ENTER key to confirm Press the Back key to exit and return Figure 8 2...

Страница 31: ...an item and press the ENTER key to save and return Figure 8 4 Sample Unit Selection Screen 8 3 Configure Shortcut Keys Selecting Shortcuts option lets you to change the functionality of the shortcut buttons To assign a function to a shortcut button 1 Scroll with the arrow keys to highlight Shortcuts from Settings menu and press the ENTER key A screen with available shortcut keys displays Figure 8 ...

Страница 32: ...ght an application and press the ENTER key to assign the application to the shortcut key Figure 8 7 Sample Shortcuts Screen 8 4 Display Test Selecting Display Test option opens a screen that allows you to check the functionality of the display To test the display 1 Scroll with the arrow keys to highlight Display Test from Settings menu and press the ENTER key to start test Check if there are any m...

Страница 33: ...ple Settings Screen 2 Press any key to start test The virtue key corresponding with the key you pressed will be highlighted on the screen if it works correctly Figure 8 10 Sample Keypad Test Screen 3 To quit the test press Back key twice 8 6 Tool Information Selecting About option opens a screen that shows information about your scan tool such as serial number which may be required for product reg...

Страница 34: ...w the three steps as below Step1 Obtain an FOXWELL ID Step2 Register the product with the product serial number Step3 Update the product by the update application FoxAssist For step 1 and 2 you can also go to our site with the link below Step 1 http www foxwelltech us support detail 216 html Step 2 http www foxwelltech us support detail 621 html 8 1 Create a Foxwell ID 8 1 1 Register through Websi...

Страница 35: ...onfirm password and then click Free registration to complete When your ID has been created you are allowed to view all programs associated with your tool download updates edit your profile submit feedback and join our community to share your ideas and your stories about our products Note Please always remember your FOXWELL ID and Password as it s important for your to manage your product and updat...

Страница 36: ...gure 8 5 Sample Member Center Screen 6 If you forget your password just click Sign in at the top right of the website then click Forget password You are required to input your registered email address verification code new password and confirmed password click Reset password Figure 8 6 Sample User ID and or Password Retrieve Screen IMPORTANT Before enter new password or confirm password please ent...

Страница 37: ...d email or Foxwell ID will appear under SEARCH RESULT Figure 8 9 Sample FOXWELL Search Result Screen 8 1 2 Register with FoxAssist You are also allowed to register and create a Foxwell ID with the update client FoxAssist To register through website 1 Visit our site www foxwelltech us and go the Product page Find your product model and click it to view the product profile Or Find the update tool un...

Страница 38: ...e FoxAssist Main Screen 4 Click Register button a Register window will pop up Enter your own email address and click Send code to find the verification code in your mailbox Create a unique password confirm password and then click Free registration to complete Figure 8 12 Sample Register Screen 5 A Registered account is successful message will appear if you registered successfully ...

Страница 39: ...register a scanner you can either register on www foxwelltech us or by the update PC application FoxAssist 8 2 1 Register Through Website 1 Open www foxwelltech us main page and click Sign in Input your FOXWELL ID registered email and password Figure 8 15 Sample Sign in Screen 2 When log in successfully the Member Center will show as below This platform enables you to review the registered product...

Страница 40: ...e serial number of a device please boot it up and select Setting About The serial number is right on the About page You can also find the serial number on the back of main unit or Warranty Card 8 2 2 Register With FoxAssist To register with FoxAssist 1 Launch the PC application FoxAssist Sign in with your Foxwell ID registered email and password Figure 8 18 Sample Sign in Screen 2 Select Activate ...

Страница 41: ...with USB ports Internet service To be able to use update tool PC or laptop must meet the following minimum requirements Operation System Windows 7 Windows 8 and Windows 10 CPU Intel PⅢ or better RAM 64MB or better Hard Disk Space 30MB or better Display 800 600 pixel 16 byte true color display or better Internet Explorer 4 0 or newer NOTE Before updating please make sure your network works correctl...

Страница 42: ...es applicable to your scanner display Figure 8 21 Sample Download Screen 5 Click the check box es in front of the software s you wish to update and then click the Upgrade button on the top of the software s to download Figure 8 22 Sample Upgrade Check Screen 6 When Upgrade button is clicked it begins to download And you can check the Current Status If the Current Status shows Downloading please do...

Страница 43: ...g Screen 7 When all the items are updated an All software downloads are successfully installed message displays Please click OK to confirm Figure 8 24 Sample Update Completed Screen 8 Please click Return to review all the software status Figure 8 25 Sample Software Management Screen ...

Страница 44: ...sistance 9 Should you have any questions regarding the product please click Complaint fill in all required information and click Submit to send us your issue Figure 8 26 Sample Complaint Screen 10 To uninstall a software or all software select them on the Uninstall tab and click the Uninstall button And the uninstalled items can be found in the Uninstall screen Figure 8 27 Sample Software Uninstal...

Страница 45: ... click User Information to view your personal information To modify your personal information just click the Edit and type in the message box and click Confirm To help us provide better sales please make sure that the telephone email and country are correctly entered Figure 8 29 Sample User Information Screen ...

Отзывы: