background image

14 

Instructions for connecting various devices to the auxiliary jack are beyond the scope of this 

manual.  You are urged to seek help from a knowledgeable professional before connecting any 

unapproved devices to the jack.  Keep in mind that any damage to the KRAKATOA II as a result 

of improper use of the auxiliary jack is not covered by the warranty, nor will FOXPRO be liable 

for damage to any connected devices 

3-3 Batteries and Charging 

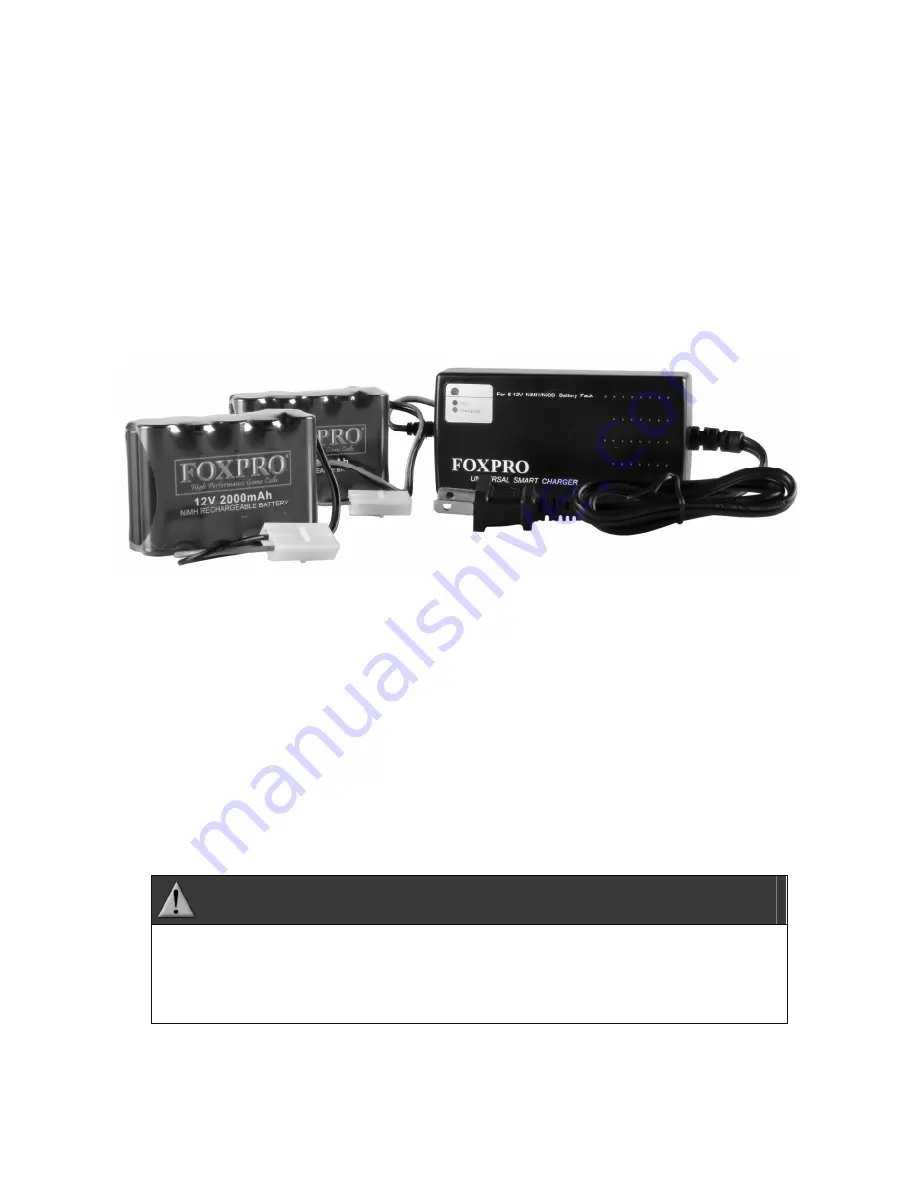
The KRAKATOA II is equipped with dual rechargeable NiMH battery packs and a smart fast 

charger (see image below). During operation, if the pilot lamp begins blinking, this is indicating 

that the batteries are starting to get low and need recharged.  


To Charge the Batteries 

1.


Disconnect one of the sealed battery packs from the Krakatoa II and remove it from 

the battery pouch. 

2.


Connect the power cable from the sealed battery pack to the connector on the 

charger. 

3.


Plug the wall adapter into a 110VAC wall outlet. 

4.


The charger has an LED which glows red while charging and switches to green when 

the charge is complete. 

5.


When one pack is finished charging, place it back into its pouch and repeat these 

steps for the second pack. 


WARNING 


Never attempt to charge batteries that are not intended to be recharged!

  The 

resulting damage can be serious and will not be covered by the warranty. For 

maximum charge efficiency, we recommend charging your KRAKATOA II in 

temperatures ranging from 40°F to 85°F (5°C to 30°C). 


Содержание Krakatoa 2

Страница 1: ......

Страница 2: ...s of Operation Monday Friday 8AM 5PM EST Contact Us Customer Service 717 248 2507 Toll Free Orders Only 866 463 6977 General Inquiry E mail sales gofoxpro com Stay up to date with the latest sounds by visiting our online sound library Watch for new products and upgrades from FOXPRO Visit us online www gofoxpro com This manual the animal sounds stored in your caller and animal sounds purchased from...

Страница 3: ... 3 KRAKATOA II Detailed Overview 13 3 1 External Speaker Jack Information 13 3 2 Auxiliary Device Jack 13 3 3 Batteries and Charging 14 3 4 USB Port 15 3 5 Setting the Channel of Operation 15 3 6 Setting the Battery Chemistry 16 4 KRAKATOA II Remote Control Detailed Overview 17 4 1 What are FOX FEATURES 17 4 2 Turning on the KRAKATOA II Remote 17 4 3 Navigating the KRAKATOA II Remote 18 4 4 Unders...

Страница 4: ...XDATA 26 5 6 FOXGRIP 28 6 Sound Settings 29 6 1 Volume Step 29 6 2 Pri Mode 29 6 3 Spk Mode Speaker Mode 29 6 4 Main Speaker 30 6 5 Ext Speaker 30 6 6 Preset Mute Override 30 7 Display Power 30 7 1 Brightness 30 7 2 Keypad 30 7 3 Theme 31 7 4 Display Timeout 31 7 5 Auto Off 32 8 Date Time r 32 8 1 Stand Timer Timer Reset 32 8 2 Alarm 33 8 3 Time 33 ...

Страница 5: ...ATA File 38 11 Programming the KRAKATOA II 39 11 1 Requirements 39 11 2 Connecting to a Computer 39 11 3 Manual Programming Process 40 11 4 Indexing the Files 40 11 5 Using the FOXPRO Programming Utility 41 11 6 Editing the Categories Manually 42 11 7 Editing the Categories with FOXPRO Utility 44 11 8 Updating the Remote Playlist 44 12 Creating FOXCAST Sequence Files 44 12 1 Creating FOXCAST Seque...

Страница 6: ...ne 47 12 5 Synchronizing the KRAKATOA II Remote 47 13 Firmware Updates 47 13 1 KRAKATOA II TX1000 Remote 47 14 Product Care Maintenance 48 15 Troubleshooting 49 16 Maximizing Remote Range 50 17 FCC IC Information 51 18 Warranty Statement 53 ...

Страница 7: ...call system A digital copy of this file can be downloaded from http www gofoxpro com resources manuals Krakatoa_2 pdf 1 1 What s in the Box Included with the box you should find the following items 1 Krakatoa II digital game call 2 Krakatoa II remote control 3 Operators manual 4 Warranty registration card 5 USB cord 6 2 rechargeable NiMH battery packs 7 Fast charger 1 2 Krakatoa II First Glance Th...

Страница 8: ...m a charging cycle prior to any field use To install the battery packs 1 Open the cover to one of the battery pouches one located on either side 2 Locate the power cable The cable has a white connector on the end That end connects to the power cable found on the battery pack itself 3 Connect the battery pack to the battery cable 4 Place the battery into the pouch and secure the cover ...

Страница 9: ...o the chart defining that particular element Number Description Number Description 1 Quick access preset buttons 11 Recall button 2 FOXDATA button 12 Auxiliary button 3 Power on off button 13 Mute button 4 Scroll up button 14 Volume up button 5 Volume down button 15 Back menu button 6 Play select button 16 FOXFUSION button unused 7 Scroll down button 17 Mini USB Port 8 FOXPITCH unused 9 USER butto...

Страница 10: ... capabilities and get the most out of the product 2 1 Powering On the Krakatoa II The Krakatoa II is powered on by moving the power switch to the on position When powered on the orange LED pilot lamp will blinks rapidly several times and then illuminates solidly signaling that it is ready to be operated from the remote control 2 2 KRAKATOA II Remote Setup After installing batteries or changing bat...

Страница 11: ...ou can choose from depending upon your personal preference They are month day year year month day and day month year Configuring Date Format 1 Access the Date Time r menu and select Date Format 2 Use the scroll buttons to cycle through the options When your desired date format is shown push Play Select to lock it in 2 3 Playing Sounds Make sure that you have properly installed batteries in both th...

Страница 12: ...A II remote will have no presets established The following instructions will describe how to setup a preset To Create a Preset Favorite 1 From the main screen select the Favorites Presets menu item 2 Select one of the 50 preset slots Notice that the screen will indicate Preset Recording The first step is to select the sound 3 Use the scroll buttons to highlight the sound you want to establish for ...

Страница 13: ... is powered off before connecting an external speaker 2 Connect the plug from the external speaker to the external speaker jack 3 Turn on the Krakatoa II and begin playing a sound to hear the external speaker in action 3 2 Auxiliary Device Jack The KRAKATOA II is equipped with an auxiliary jack labeled AUX This jack is located on the back of the KRAKATOA II The purpose of this jack is to allow for...

Страница 14: ...that the batteries are starting to get low and need recharged To Charge the Batteries 1 Disconnect one of the sealed battery packs from the Krakatoa II and remove it from the battery pouch 2 Connect the power cable from the sealed battery pack to the connector on the charger 3 Plug the wall adapter into a 110VAC wall outlet 4 The charger has an LED which glows red while charging and switches to gr...

Страница 15: ...B port in the KRAKATOA II 3 Connect the other end of the USB cable to a USB port on your computer 4 On most major operating systems you will hear an alert as well as see visual notification on the screen that a new device has been attached After connecting the KRAKATOA II to your computer there are a number of things you can do To work on sound programming please go to Chapter 11 To learn about ch...

Страница 16: ...ange the position of the switches The following chart shows the possible switch positions for the various channels CH 1 2 3 0 OFF OFF OFF 1 ON OFF OFF 2 OFF ON OFF 3 ON ON OFF 4 OFF OFF ON 5 ON OFF ON 6 OFF ON ON 7 ON ON ON 4 Remember if you change the channel of operation of the KRAKATOA II you must also change the channel of operation for the TX1000 See chapter 9 section 1 for more information 3...

Страница 17: ...te is TX1000 In this manual we tend to refer to the remote as KRAKATOA II Remote but you will encounter TX1000 later on as it referenced in specific menu options IMPORTANT NOTE The Krakatoa II remote control is not intended to operate the caller at distances shorter than 1 meter 3 feet If the remote is located too close to the caller proper operation cannot be ensured 4 1 What are FOX FEATURES Thr...

Страница 18: ...e static meaning they will always be present The primary display area is dynamic and will change upon what operation you are performing Top Status Line Overview Name Details FM FOXMOTION status indicator Displays either On or Off FB FOXBANG status indicator FOXGRIP status indicator Displays FB if FOXBANG is activated Displays FG if FOXGRIP is activated Displays FB FG if both FOXBANG and FOXGRIP ar...

Страница 19: ...de Directly beneath FoxCast begins the category listings If using sound list mode you will then see Sound List as the third option Bottom Status Line Overview Name Details MT Mute status indicator When the sound is muted a letter M will appear VOL Volume level indicator Ranges 0 40 BATT Battery level indicator TIME R Displays either stand timer or real time clock When an alarm is indicated the bac...

Страница 20: ...ssigning a function to the USER button Theme FOXBANG Preset 5 FOXMOTION Auto Volume Time r Toggle Timer Reset Backlight FoxGrip Turn FoxGrip on or off Off On Button 1 Assign FoxGrip button 1 Feature Preset 1 Preset 2 Preset 3 Preset 4 Preset 5 Aux Mute FOXDATA Button 2 Assign FoxGrip button 2 Feature Preset 1 Preset 2 Preset 3 Preset 4 Preset 5 Aux Mute FOXDATA FoxGrip Unit ID Displays the FoxGrip...

Страница 21: ... 5 minutes Auto Off Set the time delay before the remote shuts off 30 minutes 45 minutes 1 hour 2 hours 4 hours Date Time r Menu This menu item provides access to date time alarm and associated format configurations Menu Item Description Values Stand Timer Turns the stand timer on or off Off on Timer Reset Resets the stand timer to 0 00 Alarm min Set the duration for the alarm 1 minute 60 minutes ...

Страница 22: ...e only difference By default the KRAKATOA II remote is setup to display the sounds by categories To change how the sounds are displayed access the TX1000 Settings menu and locate the menu item titled View Highlight View and the push the Play Select button a single time Use the scroll buttons to cycle through either Sound List or Categories When you decide which option you would prefer to use push ...

Страница 23: ... Sound Settings The available stepping values are 1 2 3 and 5 By default the KRAKATOA II remote is set for a volume stepping value of 2 Volume can be controlled automatically by a feature called Auto Volume 4 8 Presets Favorites You can store up to 50 favorites or presets in your remote control A favorite or preset is essentially a shortcut to a specific sound number and volume level These can be ...

Страница 24: ...ode and FOXCAST but as soon as it is switched to a different sound that feature will be turned off 5 1 FOXMOTION FOXMOTION is a unique feature that allows you to move the sound between the internal speaker and an external speaker at varying rates to portray an effect of the sound animal moving There are 5 different rates or speeds at which you can have FOXMOTION operate The lower the setting the m...

Страница 25: ...ote In order for it to detect the gunshot the remote needs to be relatively close to the firearm It is assumed that most hunters will have the remote on a lanyard around their neck An unintended and unavoidable consequence of adjusting the FOXBANG sensitivity to the highest level is that handling noises such as the banging of the transmitter case on your firearm stock may cause unexpected activati...

Страница 26: ...gh the available options 3 When the desired option has been set push Play Select to lock it in If you selected FOXMOTION as your USER button feature please be aware that it will actually toggle the state of FOXMOTION For example if FOXMOTION is turned off when you push the USER button it will automatically turn on FOXMOTION and take you straight to the configuration screen If you have FOXMOTION on...

Страница 27: ... a hunt before you start calling push and hold the FOXDATA button for 1 2 seconds This button is located on the side of the KRAKATOA II remote 2 Select Hunt Started After selecting this option FOXDATA recording begins To check whether other not FOXDATA is actively recording access the FOXDATA menu screen The title bar will display R FoxData Comment where the R is the active recording indicator 3 O...

Страница 28: ...e not weather proof or weather resistant Proactive measures should be taken prior to using the devices in adverse weather conditions Placing the caller in a protective container or case rather than leaving it out in the elements will help prevent damages that are not covered under the warranty terms IMPORTANT NOTE If you are performing a factory reset on the KRAKATOA II remote be aware that it wil...

Страница 29: ...of volumes from 0 40 Increasing the volume in the field by increments of 1 may be too slow for some and therefore this stepping value is configurable You can choose from 1 2 3 and 5 The factory default setting is 2 Changing the Volume Step Value 1 Access the Sound Settings menu and select Volume Step 2 Use the scroll buttons to adjust the value up or down 3 When the desired value is set push the P...

Страница 30: ...set sound This is especially important for FOXBANG operation By having preset mute override turned on FOXBANG activation will result in the KRAKATOA II being un muted if it is muted when the activation occurs Turning on Preset Mute Override 1 Access the Sound Settings menu and select Preset Mt O R 2 Use the scroll buttons to cycle between on or off 3 When set push the Play Select button to lock it...

Страница 31: ... black This theme is very good for night hunting Changing Themes 1 Access the Display Power menu and select Theme 2 Use the scroll buttons to cycle through the available themes 3 When set to the desired theme push Play Select to lock it in 7 4 Display Timeout After being idle for an established period of time the on screen display will go blank The KRAKATOA II remote will not power off completely ...

Страница 32: ...ct Auto Off 2 Use the scroll buttons to cycle through the available time spans 3 When set to the desired time push Play Select to lock it in 8 Date Time r The Date Time r menu provides access to the date and time configuration stand timer configuration and the stand alarm 8 1 Stand Timer Timer Reset When activated the far right indicator on the bottom status line will begin keeping time that has e...

Страница 33: ...eout occurs prior to the alarm going off it will turn back on when the alarm goes off Setting the Alarm 1 Access the Date Time r menu and select Alarm 2 Use the scroll buttons to select the desired amount of time in minutes To shut off the alarm simply change the value to off 3 Push Play Select to set the alarm 8 3 Time The KRAKATOA II remote has a real time clock This clock must be set when you f...

Страница 34: ...ts that you can choose from depending upon your personal preference They are month day year year month day and day month year Configuring Date Format 1 Access the Date Time r menu and select Date Format 2 Use the scroll buttons to cycle through the options 3 When your desired date format is shown push Play Select to lock it in 9 TX1000 Settings The TX1000 Settings menu allows you to change the rad...

Страница 35: ...r products and their specific requirements is not maintained by FOXPRO You will need to check with the equipment manufacturer to determine if it is compatible and what the requirements are 9 3 View The KRAKATOA II remote control can display your sounds either by general listing or by category listing Sound categories are the best route to go if you have a large number of sounds Configuring Sounds ...

Страница 36: ...and select Elevation 2 Cycle through the options until you find the closest match for your location 3 When the appropriate value is displayed push the Play Select button to lock it in There are many online resources that can assist you in determining your elevation above sea level Performing an online search will provide you with ample results featuring maps or other tools to determine the elevati...

Страница 37: ...ur operating system will then detect the device and take the necessary steps to make it accessible for you Windows users will see a new drive letter appear named TX1000 Mac users will see a new icon appear on their desktop called TX1000 IMPORTANT NOTE Depending upon your computer setup and operating system the exact details of what will happen when you connect the device may vary slightly In gener...

Страница 38: ...d by a comma and subsequent rows contain relative data for those defined fields At first glance the file may seem confusing and not very useful FOXPRO has developed an online FOXDATA extension that allows you to create an account on our website upload your foxdata csv file and have that file turned into easy to read charts graphs and table Let s say you have 3 months of hunts recorded in your KRAK...

Страница 39: ...ine connection FOXPRO sounds and software are distributed online from the FOXPRO website In order to access the sounds and software an online connection is required 11 2 Connecting to a Computer 1 Make sure the KRAKATOA II is turned off 2 Locate the USB port inside of the speaker cap of the KRAKATOA II and connect one end of the USB cable to this jack 3 Connect the other end of the USB cable to a ...

Страница 40: ...with a specific position within the sound list but doing so can help make the task of creating sequences and category files much simpler The next section of the manual discusses file indexing The files are sorted based upon the individual names of the sound files For example a sound file labeled Aggressive Bobcat would appear before a sound labeled Bobcat in Heat After placing the sound files into...

Страница 41: ...our website at the following link http www gofoxpro com programming Locate the Software Links heading and select the FOXPRO Programming Utility link When the page is loaded locate the Product Information box This box displays current version number publication date and MD5 and SHA1 information for validating the installation file as being genuine The last item in the box contains the official down...

Страница 42: ... library storage point is located under your Documents or My Documents folder FOXPRO Sounds By clicking on the Browse Library button you can browse the sounds stored at that location Your sound library will probably be empty by default You need to obtain sounds and place them into your library folder in order to install them into your FOXPRO game call 1 Connect your FOXPRO device to your PC 2 Laun...

Страница 43: ...refixed to the sound name by the KRAKATOA II remote Let s say you want to create a raccoon category Look through your sound list and find your raccoon sounds For this example let s say that you encounter 5 raccoon sounds in your sound list on sounds 090 094 Open the categories txt file and add the following Example categories txt File Raccoon Sounds 090 091 092 093 094 Save the file and exit You h...

Страница 44: ...FOXPRO Sound Programming Utility There are two versions of this utility available the regular Windows version and a Java version that is compatible with Windows and Mac In order to update the KRAKATOA II remote you must use one of the two versions of the utility Any time you modify the sound list sequences or categories on the KRAKATOA II the remote control must be updated to reflect those changes...

Страница 45: ...ate decoy J n a Denotes Jukebox Mode for this FOXCAST File R n a Denotes Repeat Mode for this FOXCAST File Q n a Denotes Single Play Mode for this FOXCAST File A typical FOXCAST sequence file may look something similar to the following example Example FOXCAST Sequence File Layout V 20 S 15 4 D 1 P 90 V 35 D 0 S 22 V 30 S 20 3 Q The previous example is interpreted as follows Set volume to level 20 ...

Страница 46: ...epad is all that you will need to successfully build a sequence file Mac users would use something such as Textedit which is a standard application IMPORTANT NOTE FOXCAST sequence files are expected to run for long durations It may be necessary to turn off the Auto Shutdown feature on the KRAKATOA II to prevent any interruptions 12 2 Enabling File Extensions in Windows The Windows operating system...

Страница 47: ...e call and remote you have prior to performing any of the update procedures 13 1 KRAKATOA II TX1000 Remote The Krakatoa II TX1000 remote features a mini USB port Make sure you have the appropriate mini USB type A B cable for connecting the remote to your PC The update software is only compatible with PC s running Microsoft Windows XP and newer You can download the installation program from the fol...

Страница 48: ...aged and out of warranty This type of damage is preventable For example if you are operating in rainy wet conditions it is recommended that you place the unit inside of a large plastic freezer storage bag or use a water weatherproof deployment bag to keep water from getting to it When storing the unit for prolonged periods be sure that you keep it in a dry location not susceptible to drawing moist...

Страница 49: ...an help prevent cancellation of trips and potential disappointment 15 Troubleshooting This section covers the troubleshooting aspects for the KRAKATOA II and KRAKATOA II remote control The most common problems are battery related Before performing anything else try installing fresh batteries When your batteries get low in either the KRAKATOA II or the KRAKATOA II remote unexpected operation can oc...

Страница 50: ...wing points be observed Always use high quality alkaline or lithium cell batteries in the remote Always maintain clear line of sight between the remote control and the KRAKATOA II Any obstructions no matter how significant or insignificant can adversely affect the radio signal Try to keep the remote control approximately six inches away from your body gun barrel and metal shooting sticks as these ...

Страница 51: ...ons 1 this device may not cause harmful interference and 2 this device must accept any interference received including interference that may cause undesired operation of this device Modifications not expressly approved by the manufacturer could void the user s authority to operate the equipment under FCC rules RF Exposure Safety Notice The TX1000 transmitter is not intended to be operated closer t...

Страница 52: ...luding interference that may cause undesirable operation of the device Le présent appareil est conforme aux CNR d Industrie Canada applicable aux appareils radio exempts de licence L exploitation est autorisée aux deux conditions suivantes 1 l appareil ne doit pas produire de brouilage et 2 l utilisateur de l appareil doit accepter tout brouillage radioélectrique subi même si le brouillage est sus...

Страница 53: ... This limited warranty is void if the unit is physically damaged used in a manner contrary to intended use or otherwise abused either intentionally or unintentionally Also specifically excluded are batteries and damage caused by attempts to charge batteries not intended to be recharged and water damage FOXPRO 14 Fox Hollow Drive Lewistown PA 17044 Online Warranty Registration You can register your...

Отзывы: