background image

40

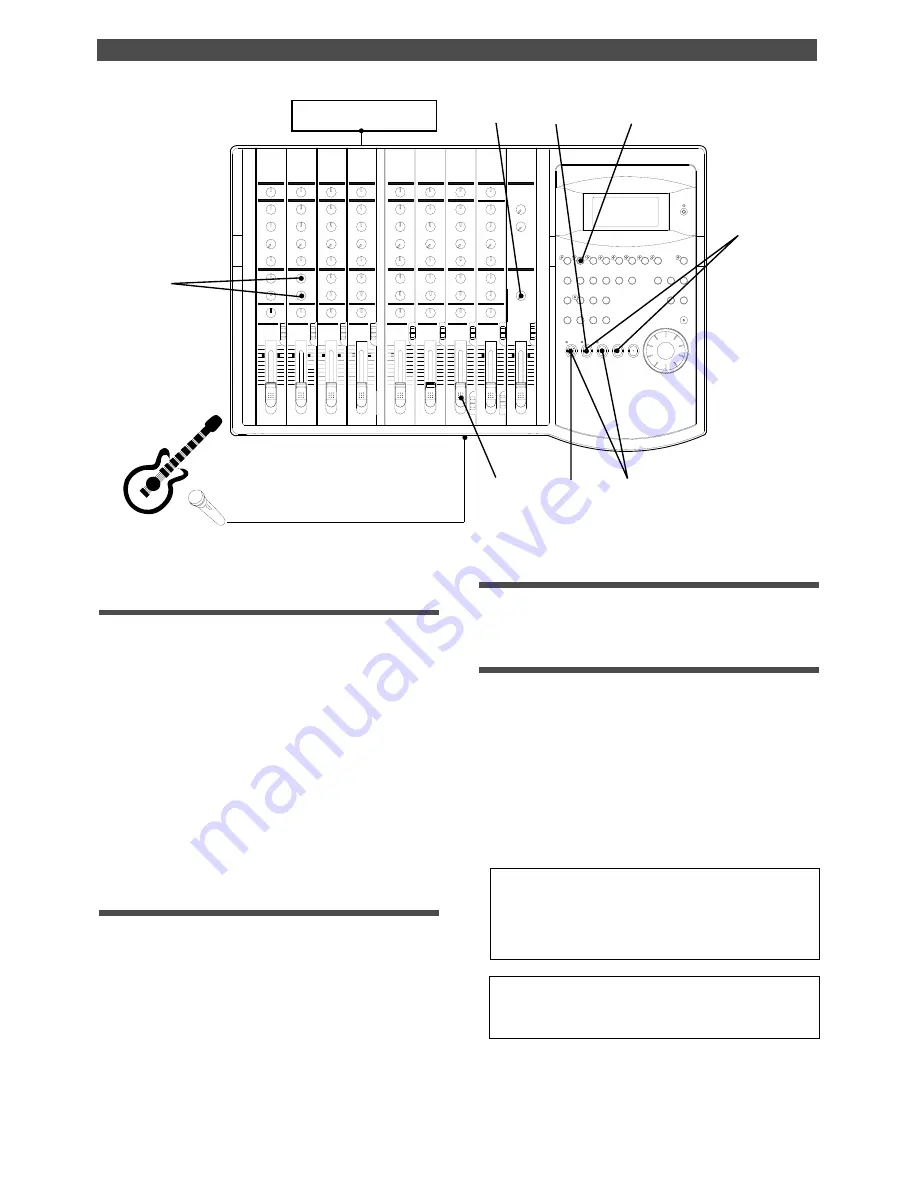
Recording to a Metronome Sound

9

1

3, 11

5, 13

6, 12

7

2, 8

Compressor/Limiter

4

Monitoring the guitar sound and
adjusting the recording level

1. Press the RECORD button.

Track 2 enters input monitoring mode.

2. Play the guitar.

3. Adjust the recording level of the guitar sound using

the channel 7 input fader.

As you raise the input fader, level meter 2 will respond.

4. Adjust the output level on the compressor/limiter.

5. Adjust the guitar monitoring level using the channel

2 MON mix section.

Use the channel 2 MON knob to adjust the level, and use
the MON PAN knob to adjust the stereo image.

Starting recording

6. Locate the top of the Program.

7. Hold down the RECORD button and press the PLAY

button to start recording.

8. Play the guitar in time with the metronome.

The guitar sound is recorded at the recording level
adjusted in step 3.

Quitting recording

9. Press the STOP button to stop the recorder.

Checking the recorded sound

10. Set the RECORD TRACK select key 2/R to off.

11. Lower channel 7 input fader.

12. Locate the top of the Program and start playback.

13. Turn the channel 2 MON knob to the left to check

the recorded guitar sound.

Since the Metronome function still remains on, you can
hear the metronome sound during playback as you turn
the channel 8 MON knob.

Note: 

When you finish using the Metronome function, turn the

function off in SETUP mode.

Note: 

When the Metronome function is on, you cannot record

data on track 8, nor can you play data recorded on track 8.

If you wish to re-record the sound, use the Undo/Redo
function to re-start recording as explained in the “Basic
Recording”. Refer to “Quick Operation Guide.”

10

5, 13

Содержание FD-8

Страница 1: ...HIGH LOW PAN INPUT TRK 7 AUX2 AUX1 MID GAIN HIGH LOW PAN INPUT TRK 8 AUX2 AUX1 MID GAIN HIGH LOW PAN 10 0 1 10 0 2 10 0 MASTER 0 0 0 0 0 0 0 0 0 0 0 0 0 0 0 0 AUX RTN 0 0 0 0 MON R MON L MON R MON L MON R MON L MON R MON L INPUT OFF TRK 5 10 10 LEVEL L M H 10 5 0 5 0 5 0 LEVEL L M H 5 10 0 TRK 6 INPUT OFF TRK 7 INPUT OFF TRK 8 INPUT OFF SELECTOR L R L R MON MON 10 5 0 DIGITAL MULTITRACKER PLAY STO...

Страница 2: ... period of time 15 Object and Liquid Entry Care should be taken so that objects do not fall and liquids are not spilled into the enclosure through openings 16 DamageRequiringService Theapplianceshouldbeserviced by qualified service personnel when A The power supply cord or the plug has been damaged or B Objects have fallen or liquid has been spilled into the appliance or C The appliance has been e...

Страница 3: ...the REWIND and F FWD button 63 DigitalscrubbingusingSCRUBmode 64 Cue ReviewfunctionusingtheSHUTTLEfeature 65 StoringaLocatePoint EditPoint 67 Storing and editing the locate points to the memory key 67 Storinginreal time 67 Editingandstoringlocatedata 68 Editingandstoringdata 68 Editing the data stored in the LOCATE key 69 LocateFunction 70 Direct Locate 70 Auto Play 70 Auto Return 71 Auto Repeat 7...

Страница 4: ...u to input S P DIF or adat digital signals and record them on any two tracks or all eight tracks The FD 8 has a digital output track setup function that enables you to output digital data as S P DIF or adat digital signals and record them on an external digital device DAT MD adat etc You can also use the DATA IN OUT jacks to mix down digital signals to an external DAT or adat and to save and load ...

Страница 5: ...urn off the power to the unit while the hard disk is accessing data the HD ACCESS LED is lit or flashing Otherwise not only will you lose recorded data but you may damage to the unit FOSTEX is not responsible for the data lost during operation of the unit Before you change the location of the FD 8 pack the unit in the shipping carton or an impact resistant case Make sure that the unit is kept free...

Страница 6: ... 200 SHIFT 300 900 2k MID INPUT TRK 5 5k AUX2 200 AUX1 SHIFT MID GAIN 300 900 2k HIGH LOW PAN INPUT TRK 6 AUX2 AUX1 MID GAIN HIGH LOW PAN INPUT TRK 7 AUX2 AUX1 MID GAIN HIGH LOW PAN INPUT TRK 8 AUX2 AUX1 MID GAIN HIGH LOW PAN 10 0 1 10 0 2 10 0 MASTER 0 0 0 0 0 0 0 0 0 0 0 0 0 0 0 0 AUX RTN 0 0 0 0 MON R MON L MON R MON L MON R MON L MON R MON L INPUT OFF TRK 5 10 10 LEVEL L M H 10 5 0 5 0 5 0 LEV...

Страница 7: ...Turn the knobs all the way to L or R If you turn the knob to L the corresponding channel signal is recorded toTracks 1 3 5 and 7 If you turn the knob to R the corresponding channel signal is recorded to Tracks 2 4 6 and 8 For mixdown use these knobs to determine the stereo image of the playback sound of Tracks 1 8 Turn the knobs to the desired position Control Panel Mixer Section Letters in bracke...

Страница 8: ... MID GAIN The frequency range selected via the MID SHIFT knob 200Hz 5kHz will be boosted cut up to 15dB MID SHIFT Use this setting to select a frequency range to boost or cutusingtheMIDGAINknob Youcansetthefrequency in the range of 200Hz 5kHz LOW Signals with a frequency of 80Hz will be boosted cut up to 15dB 9 Monitormasterknob MONITORSECTION MASTER This knob allows you to adjust the final level ...

Страница 9: ... two tracks by setting them to READY mode track Over appears and READY mode will be cancelled Refertopage25formoreinformationonplaybackmonitoring and input monitoring 14 LCD The LCD indicates signal levels and various settings Refer to Display Section on page 17 for more information on the display 15 Contrast adjustment knob Use this knob to adjust the contrast of the LCD Turning this knob clockwi...

Страница 10: ... up or flashes Otherwise you may lose data on the hard disk connected to the unit 23 JOG dial JOG SHUTTLE When the FD 8 is stopped use the JOG dial to perform a jog operation forward or reverse for audio scrubbing without pitch change You can also use this dial to increase and decrease the numeric values or input alphabetical characters in edit mode Rotating the JOG dial while holding down the SHI...

Страница 11: ...RD PLAY operation plays back data on the clipboard If the clipboard does not contain any data the display shows Void Data and nothing happens During this operation the display indicates the type of the data Copy Clip for copy data and Move Clip for move data and the duration The indicator of the copy source or move source track flashes In this way you will know which track the currently playing da...

Страница 12: ...ed on The FD 8 will play the part between theAUTO RTN START point and theAUTO RTN END point repeatedly This mode is also effective only if the AUTO RTN START point and the AUTO RTN END point have already been specified Refer to page 70 for more information on each mode Refer to page 66 for more information on editing memory Refer to page 33 for more information on the Program Select function If yo...

Страница 13: ...s obtained before you pressed the UNDO REDO key the first time When you undo the operation Undo appears When you redo the operation Redo appears on the display for a short moment Note The Undo Redo function is enabled only when the FD 8 is stopped Refer to pages 44 47 58 60 and Quick operation guide for more information on the Undo Redo function 36 Edit key EDIT Pressing this key causes the FD 8 t...

Страница 14: ...y stored data which you can edit After editing the data press the STORE key then press the AUTO PUNCH IN PREVIEW key to store the edited data in this key The stored data can be used as locate data If you press the AUTO PUNCH IN PREVIEW key while holding down the SHIFT key when the recorder is stopped you can preview the fade out part at the stored AUTO PUNCH IN point Refer to page 66 for more info...

Страница 15: ...7 and 8 on the front panel have priority If you connect sound sources to these jacks the balanced XLR jacks for input channels 7 and 8 on the rear panel will be disabled 2 Headphone jack PHONES Connector stereo TRS phone Connect headphones here You can adjust the headphone volume using the MASTER knob in the monitor section 1 Input jacks 1 2 3 4 5 6 7 8 Connector phone Connect sound sources such a...

Страница 16: ... enables you to use only the recorder section bypassing the mixer section Signals input from these jacks are recorded to the tracks selected by the RECORD TRACK select keys 3 AUX Send jacks 1 2 AUX SEND 1 2 Connector phone Connect these jacks to the input of an effect unit The AUX SEND jacks send out signals selected and adjusted by the AUX send knobs to the connected effect unit 4 AUX Return jack...

Страница 17: ...sage display shows various messages required to operate the FD 8 and offers interactive operation Thissectiondescribesdisplayfunctionsalongwithexamples Display when the power is turned on When you turn on the power to the FD 8 and the connected external SCSI drive a formatted removable disk or hard disk the display shows the Initial message Current Dr the name of the connected current drive then r...

Страница 18: ...vice Lights up when the FD 8 receives MTC MIDITime Code from an external device Lights up when the FD 8 enters Vari Pitch data edit mode Indicates available disk space on the disk in megabytes when the REMAIN indicator appears LightsuptoindicateatimevaluewhenABSorMTC is used as Time Base Lights up to indicate a bar beat clock value when BAR BEAT CLK is selected as Time Base Indicates a Program tit...

Страница 19: ...This number indicates available recording space on the disk for recording on a track This number indicates available recording time on the diskforrecordingonatrack Forexample ifyourecord on eight tracks one eighth of the indicated duration is the available recording time for each track The REMAIN display The REMAIN display usually shows available recording space and time on the disk calculated bas...

Страница 20: ...ton Note Any sound data recorded up to this point on the disk will be lost DRIVE AUTO A PUNCH SYNC OUT CLK SCSI Track Over message This message appears when trying to record more than 2 tracks of signals simultaneously using a MO drive disk as a Current Drive CLK SYNC OUT DRIVE SCSI AUTO A PUNCH Acc Error message This message indicates that an error occurs when accessing the disk With this message...

Страница 21: ...isk MTC indicates a relative time that is obtained by adding a certain value MTC offset value to the ABS value BAR BEAT CLK indicates the position in a song created in the internal Tempo Map according to MIDI clock and Song Position Pointer The following diagrams depict the relationship among these three types of the Time Base This chapter describes some basic items that you need to know before yo...

Страница 22: ... minutes The disk space actually used for recording is five minutes 3 minutes 2 minutes That is the area between three minutes and ten minutes that corresponds to 25 minutes of recording space in terms of ABS time is still unrecorded When you try to play or fast forward this unrecorded area the time counter on the display will count but the FD 8 will not access the disk However MTC will be output ...

Страница 23: ... any data in other Programs As described in Managing the song by Program the FD 8 can set up as many as 99 Programs on the disk Setting up a Program requires a small amount of disk space In other words disk space is used not only for storing recorded data but also for storing all setup data Therefore make sure that you have enough space on the disk before you start recording to avoid running out o...

Страница 24: ...n twenty four mono tracks You can also swap data between Real tracks and Additional tracks in units of eight tracks Note You cannot record data on Additional tracks in real time Also you cannot play back data on Additional tracks as is in real time If you wish to play back data on an Additional track first use the Track Exchange function to move the data to a Real track Also you need to move the d...

Страница 25: ...he RECORD TRACK select key to set the track READY then press only the RECORD button Pressing the RECORD button again will cause the FD 8 to enter playback monitoring mode Under this condition only the READY track enters input monitoring mode on stand by for recording The following example shows track 5 in Input Monitoring mode and other tracks in Playback Monitoring mode This example shows overdub...

Страница 26: ...If you set the PAN knob in the center signals are sent equally to Stereo Bus L and R At the same time Stereo Bus L signals are finally sent to Real tracks 1 3 5 and 7 and Stereo Bus R signals are sent to Real tracks 2 4 6 and 8 Recording tracks are selected via the RECORD RACK select keys For example if you input three sound sources guitar vocal and keyboard set the channel PAN knobs as shown belo...

Страница 27: ...crease The number of events does not affect usual music production However if a small amount of single track data is written in many different sections on the disk the maximum number of events may be reached To avoid this event number overflow you need to check the number of events for each track The FD 8 provides an event check menu in Setup mode for this purpose Audio file and event About an aud...

Страница 28: ...two tracks Save load is possible only with external SCSI drives Save load is not possible with DATand adat Save load is possible only with external SCSI drive DAT or adat Note You can format only a fixed disk or an optional 2 5 inch internal hard disk in Mastering or Normal modes The optional 2 5 inch internal hard disk must have its SCSI ID number set to any number except 6 To use a removable typ...

Страница 29: ...e SURE message appears then press the EX ECUTE YES key The FD 8 displays Pls Wait then immediately displays the recording mode menu with Normal Normal mode and SURE flashing Turn the JOG dial to select the desired recording mode Turning the JOG dial toggles between Normal and Mas ter If you wish to format another removable disk insert the disk and repeat the procedure described above Press and hol...

Страница 30: ...When formatting is complete COMPLETED lights up on the display and the FD 8 stops spinning the disk Press the EXIT NO key or the STOP button to exit SETUP mode Formatting will automatically create one Program 1 on the disk and the Time Base will change to ABS 0 Press the DISP SEL key to change to the REMAIN display and check the available recording time Press the DISP SEL key again to return to th...

Страница 31: ...ess the EXIT NO key or the STOP button The display will change from the REMAIN indication for the backup disk to the Time Base indication for the cur rent drive Formatting a current drive disk 2 5 inch hard disk If you have ordered an optional 2 5 inch IDE internal hard disk the Fostex service department will format the disk in Master mode and install it in the FD 8 before delivery You do not have...

Страница 32: ... 6 message appears and SURE flashes A different message appears depending on the type of format used by the disk as shown below If you turn the JOG dial Eject appears and pressing the EXECUTE YES key ejects the disk Press and hold the RECORD button and press the EXECUTE YES key The FD 8 starts formatting REMAIN lights up on the display and the negative value of the unformatted disk area will count...

Страница 33: ...tion of the Before Starting chapter You can create up to 99 Programs can be created as long as the disk space allows When you format a disk one Program will be automatically created Follow the steps below to create a new Program in addition to the Program created on the disk during the format operation 6 Press the EXECUTE YES key again A default title 0002 appears on the display with and SURE flas...

Страница 34: ... to select a Program Note You cannot use the Program Change function when the FD 8 is in SETUP mode 2 Turn the JOG dial to select the desired Program number flashing Rotating the JOG dial counter clockwise decreases the number and rotating it clockwise increases the number If you turn the JOG dial clockwise all the way New PGM will be selected Select New PGM to create a new Program as mentioned in...

Страница 35: ...a will move in the same way Therefore it will appear that PGM 07 has been deleted If you delete the last Program PGM 07 in this example PGM 07 will be completely deleted If you try to deleted PGM 05 only the data of PGM 05 will be deleted and the data of PGM 06 will move into PGM 05 1 Press the SETUP key while the FD 8 is stopped The FD 8 enters SETUP mode and displays the first hierarchy of the S...

Страница 36: ...TUP menu that was selected before you turned off the power 2 Turn the JOG dial to select the first hierarchy level of the Title Edit t and flash alternately menu The currently selected Program number also appears You can also use the HOLD key the REWIND button or the F FWD button to select the first hierarchy level display 3 Press the EXECUTE YES key The currently selected Program title appears wi...

Страница 37: ... off and the VARI PITCH indicator is turned off under the following conditions You have turned on the power to the FD 8 The pitch data will be reset to 0 0 You have set Slave mode setting in SETUP mode to ON The pitch data previously set will be maintained You have specified a track for Digital input track setting in SETUP mode and DIGITAL lights up on the display The pitch data previously set is ...

Страница 38: ... using a compressor limiter Initialize the FD 8 before the operation If multiple Programs exist first select the desired Program Connecting a sound source and a effect unit 1 Connect a microphone to input jack 7 If the microphone has a balanced XLR connector use INPUT 7 XLR jack on the rear panel 2 Connect a compressor limiter to INSERT jack 7 on the rear panel The compressor limiter will be appli...

Страница 39: ...o perform Auto Punch In Out recording you need to specify the Auto Punch In point recording start point and the Auto Punch Out point recording end point Storing the edit points 1 Refer to Storing the edit points to set the Auto Punch In Out points Store the Auto Punch In point to the AUTO PUNCH IN key and the Auto Punch Out point to the AUTO PUNCH OUT key Refer to page 66 for more information on s...

Страница 40: ...and some instruments require an input level adjustment Connect these to input jacks 7 and 8 unbalanced jacks on the front panel or balanced connectors on the rear panel that are equipped with the LEVEL switches Setting the mixer section 2 Set up the mixer section as follows A B C E F G H INPUT SEL switch Input fader Channel 1 PAN knob MON knob MON PAN knob MON SELECTOR Master fader L R Channel 1 I...

Страница 41: ...D button while holding down the SHIFT key The RHSL indicator flashes in the A PUNCH mode indication area of the display This means that Auto Punch mode is turned on 2 Set the track for Auto Punch In Out to READY Press the RECORD RACK select key 3 L to set track 3 to READY 3 Start playback on the FD 8 from a point slightly before the Auto Punch In point Rehearsal starts and the FD 8 operates as fol...

Страница 42: ...ke In Auto Punch Out point Take Out Track 1 Track 2 Track 3 Track 4 This part is changed Playback start point Playback end point The FD 8 punches in automatically at the Auto Punch In point The FD 8 punches out automatically at the Auto Punch Out point All tracks are in playback monitoring mode All tracks are in playback monitoring mode Only track 3 in input monitoring and data will be recorded Th...

Страница 43: ... the mixer control section as explained in the Auto Punch In Out section Connecting the instrument and a foot switch 1 Connect the guitar to input jack 1 2 Connect an optional foot switch Model 8051 to the PUNCH IN OUT jack on the rear panel 1 Press the foot switch while holding down the STOP button The FD 8 displays Rehsl On for a second and enters Rehearsal mode RHSL flashes in the A PUNCH displ...

Страница 44: ...ke You can proceed to record if you are satisfied with the recording level foot switch timing and rehearsal Note You cannot record a second take during the Manual Punch In Out operation without stopping the FD 8 That is the FD 8 will continue playing after you finish recording a take but you cannot record another take by pressing the foot switch 1 Confirm that Rehearsal mode is cancelled and start...

Страница 45: ...nch In Out Undo Redo Manual Punch In Out recording You can undo or redo Manual Punch In Out recording Press the UNDO REDO key after recording is complete to restore the conditions that existed prior to the recording Press the UNDO REDO key again to restore the conditions that existed after the recording Follow the notes below Note 1 The Undo Redo function is effective only when the FD 8 is stopped...

Страница 46: ...ETUP mode Refer to the Setting a tempo section on page 100 Turning the Metronome function on 9 Turn the Metronome function on using the Setting the Metronome function menu in SETUP mode Refer to the Setting the Metronome function section onpage 101 Checking the metronome sound 10 Select the BAR BEAT CLK Time Base using the TIME BASE SEL switch 11 Start playback from the beginning of the Program Ev...

Страница 47: ...ing 8 Play the guitar in time with the metronome The guitar sound is recorded at the recording level adjusted in step 3 Quitting recording 9 Press the STOP button to stop the recorder Checking the recorded sound 10 Set the RECORD TRACK select key 2 R to off 11 Lower channel 7 input fader 12 Locate the top of the Program and start playback 13 Turn the channel 2 MON knob to the left to check the rec...

Страница 48: ...P mode be sure to press the EXIT NO key or the STOP key to exit SETUP mode 2 Press the RECORD TRACK select key of the assigned track to set the track to READY Starting and quitting recording 1 Locate the top of the Program 2 Make sure that DIGITAL lights up on the display Hold down the RECORD button and press the PLAY button to start recording on the FD 8 3 Start playback on the external digital d...

Страница 49: ...vice 3 Press the PLAYbutton on the FD 8 to start playback Digital data is output from the selected track and recorded on the external digital device 4 When recording is complete stop the FD 8 and the digital device Selecting a Program to record If multiple Programs exist first select the desired Program using the Program Change function Setting a digital output track 1 Select the desired track usi...

Страница 50: ...nnect effect units Assigning output tracks Use the Setting digital output tracks menu in SETUP mode to select L r as output tracks Refer to Setting digital output tracks of the Changing the Initial Settings SETUP Mode chapter Connecting an external digital device Connect the DATA OUT jack of the FD 8 with the OPTICAL IN jack of an external digital device using an optical cable Input and output of ...

Страница 51: ...nel faders to adjust the track playback levels while monitoring the sound At this time check the level meters L and R and adjust the faders so that the OL section of the meter will not light up with the maximum level 8 When you obtain a satisfactory balance use the master fader L R to adjust the final output level Also adjust the input level on the master recorder Settings for the effect units 9 T...

Страница 52: ...nputs L and R and two analog signals on four tracks This section explains how to record S P DIF digital signals from CD MD or DAT to tracks 1 and 2 and record analog signals from a guitar and vocal to tracks 3 and 4 Before recording initialize the FD 8 Note This type of recording is possible on removable disks such as an EZ disk zip disk fixed disk or optional 2 5 inch internal hard disk You canno...

Страница 53: ...ly At this time turn channel 1 MON PAN knob all the way to L and channel 2 MON PAN knob all the way to R Adjusting the recording level accord ing to the digital input 8 While observing the level meter and monitoring the digital input sound adjust the recording level of the musical instrument and vocal As you raise channels 1 and 7 input faders gradually the level meters 3 and 4 will respond At thi...

Страница 54: ...nal and the stereo bus L R signals are both simultaneously output from MON OUT L R and input to RECORDER IN L R As shown in the drawing below an external MIDI sound source is input to INPUT jacks 1 8 and then each channel INPUT fader is raised and performances recorded on tracks 1 8 are applied to each channel MON mix section and played back using MIDI sync of both performances With this method a ...

Страница 55: ... 8 side sound can be monitored using the MON mix section of the channel corresponding to each track More applications for using RECORDER IN If an external sound source is connected to both L and R of RECORDER IN recording cannot be done via the INPUT fader If only one jack L or R is connected the track corresponding to the jack not connected can be recorded simultaneously via the INPUT fader For e...

Страница 56: ... the edit operation Otherwise you may lose or incorrectly edit another Program Copy Paste Using the Copy Paste function enables you to copy a specific range of data from a specific track to the clipboard as shown below this is called Copy Clip operation on the FD 8 then paste the data at a specific point in a specific track The number of copy source tracks and the number of destination tracks are ...

Страница 57: ... point fade out at the CLIPBOARD OUT point and fade out at AUTO PUNCH IN point 2 Trim the edit point while previewing Refer to Preview Function on page 74 for more information Executing Copy or Move 1 Press the RECORD TRACK select key of the copy or move source track to set it READY Select from mono tracks or adjacent odd even tracks 1 2 3 4 5 6 7 8 2 Press the EDIT key repeatedly until Copy Clip ...

Страница 58: ...ing the EXECUTE YES key when the disk has insufficient free space Over appears on the display and edit mode is cancelled In this case you need to delete unnecessary data or Programs Refer to the following section Erase and to Deleting a Program on page 35 for more information on erasing 8 Press the STOP button or the EXIT NO key The FD 8 exits edit mode and displays the previous Time Base indicati...

Страница 59: ...t of recording is not affected The erased area is replaced with silence As a result the REMAIN time and space will increase You will have more recordable space on the disk Erasing data from a specified point to REC END You may erase all data in the range from a specified point to REC END in the currently selected Program You can erase data on a mono real track or multiple real tracks To erase data...

Страница 60: ... EXECUTE YES key The flashing Erase message lights up steadily and SURE flashes 4 Press the EXECUTE YES key again The FD 8 starts erasing the data and Erase flashes When the erase operation is completed COMPLETED lights up 5 Press the STOP button or the EXIT NO key The FD 8 exits edit mode and displays the previous Time Base indication To cancel the erase operation press the STOP button or the EXI...

Страница 61: ...ity lets you use tracks more flexibly You need to move data on an Additional track back to a Real track to audition the data since data on an Additional track cannot be played in real time You can also use this function when you wish to check the REC END point of an Additional track as described in the Erase section Swapping mono track data between Real tracks Addi tional tracks or between a Real ...

Страница 62: ...G dial allows you to select a mono track from 1 2 3 4 24 in the left column The right column continues a mono track For example if you select 4 in the left column the display indicates 4 1 meaning you can swap data between tracks 4 and 1 2 To select a number in the right column press the HOLD key the REWIND button or the F FWD button to move the flashing cursor to the right column then use the JOG...

Страница 63: ...ack speed This chapter explains how to use the Cue Review function with the REWIND button the F FWD button and the JOG SHUTTLE feature and also explains digital Scrubbing with the scrub mode function Using this function enables you to fast forward or rewind at different speeds while the recorder section is playing or stopped During a cue and review operation you will hear the sound recorded on the...

Страница 64: ... FD 8 enters Scrub mode and displays Select TRK instructing you to select the desired track 2 Press the desired RECORD TRACK select key to select a track for digital scrubbing The screen changes indicating that the recorder is in STILL status Scrub mode is still The selected RECORD RACK key s LED flashes Note You can select one track at a time If you try to select two or more RECORD TRACK select k...

Страница 65: ...view speed which you can select from normal two times four times eight times 16 times 32 times and 64 times speed As long as you are holding down the SHIFT key playback continues at the selected speed Display of 32 times cue 3 To adjust the monitor sound use the corresponding channel MON mix section 4 Release the SHIFT key to cancel the cue and review operation The recorder resumes playback at the...

Страница 66: ...RD OUT point Copy end point for copying or moving data to the clipboard during the Copy Paste or Move Paste operation AUTO RTN START key Locating the AUTO RTN START point Locate end point from AUTO RTN END in Auto Return or Auto Repeat modes AUTO RTN END key Locating the AUTO RTN END point Locate start point to AUTO RTN START in Auto Return or Auto Repeat modes Note on storing the locate point Whe...

Страница 67: ...wish to store is reached press the HOLD key The time value or bar beat clock value of the point is captured The FD 8 enters data edit mode 3 Press the STORE key The STORE LED lights up 4 Press the desired memory key The STORE LED turns off The captured time value or bar beat clock value is stored in the memory key After the data is stored the FD 8 displays the previous Time Base and continues play...

Страница 68: ...he HOLD key REWIND button or the F FWD button to move the flashing cursor on the time value digit and use the JOG dial to increase or decrease the value 3 Press the STORE key The STORE LED lights up 4 Press the desired memory key The STORE LED turns off The input time value or bar beat clock value is stored in the corresponding memory key Editing and storing data You can recall data stored in the ...

Страница 69: ... and 59 for more information on Copy Paste Move Paste and Erase Refer to page 70 for more information on Auto Return and Auto Repeat You can also use the Preview function to edit the stored locate points edit points Refer to Preview Function on page 74 for more information 1 Press the SHIFT and LOCATE keys simultaneously while the FD 8 is stopped The last located point stored in the LOCATE key app...

Страница 70: ... F FWD button while holding down the STOP button The FD 8 will immediately locate the end point of the currently selected Program Locate the position stored in one of the memory keys Press the desired memory key then press the LOCATE key The FD 8 will locate the point edit point stored in the corresponding memory key immediately Locate a specified point Refer to Editing and storing locate data in ...

Страница 71: ...shown in the diagram below To enable this function AUTO RTN mode should be on and the AUTO RTN START point and AUTO RTN END point should already be set You can set a preroll time in the Preroll menu in SETUP mode so that the FD 8 will start playback preroll time before the locate point You can set the preroll time from 0 to 10 seconds Refer to the chapter Changing the Initial Settings SETUP Mode o...

Страница 72: ...efore the locate point You can set the preroll time from 0 to 10 seconds Refer to the chapter Changing the Initial Settings SETUP Mode on page 102 Auto Repeat The Auto Repeat function allows the FD 8 to repeat playback up to the AUTO RTN END point automatically locate the AUTO RTN START point then play up to the AUTO RTN END point until you cancel the function by pressing the STOP button To enable...

Страница 73: ... preroll time before the locate point You can set the preroll time from 0 to 10 seconds Refer to the chapter Changing the Initial Settings SETUP Mode on page 102 Hint You can make repeated Auto Punch In Out rehearsal much easier and quicker by using the Auto Repeat function Set the AUTO RTN START point prior to the AUTO PUNCH IN point and set the AUTO RTN END point after the AUTO PUNCH OUT point T...

Страница 74: ...8 is stopped Preview Function The FD 8 repeats playback of the fall sound at the locate point edit point As shown in the diagram one second of data prior to the locate point is played back then muted fade out at the locate point The muted playback continues for one second The FD 8 will repeat this operation until you quit the Preview function The FD 8 repeats playback the rise sound at the locate ...

Страница 75: ... point using the JOG dial while you preview the sound At this time you can also adjust the size of the trimming steps the amount of offset controlled by the JOG dial Trimming allows you to fine tune the position of the locate point stored in the memory keys while previewing the sound Use this function to change the Auto Punch In Out points the start point of Copy Paste and Move Paste and the start...

Страница 76: ...screen For example value of SF sub frame flashes if ABS Time Base or MTC Time Base is selected CLK clock flashes if BAR BEAT CLK is selected The flashing value also indicates the position you can trim Example Time Base is ABS value of SF flashes Flash Example Time Base is BAR BEAT CLK CLK flashes 3 To change the unit of trimming press the HOLD key the REWIND button or the F FWD button These button...

Страница 77: ...ack of the MIDI sequencer 2 Set the MIDI sequencer to MIDI clock slave mode and connect the MIDI sound source played automatically to the input jack of the FD 8 3 Connect the effect units if desired Setting MIDI SYNC OUT 1 In the Setting MIDI sync output signal menu in SETUP mode select MIDI clock Clk for the MIDI sync signal output If you wish to use the Metronome function turn the Setting the me...

Страница 78: ...d sources as virtual tracks synchronize them to the FD 8 and mix down digital signals while applying effects 6 Use the input channel faders and the PAN knobs to adjust the playback levels and stereo image of tracks 1 8 Turn the MON knob in the MON mix section of the corresponding channels toward INPUT to adjust the input level of the MIDI sound sources and use the MON PAN knob to adjust the stereo...

Страница 79: ...esired MTC frame rate 3 Connect the MIDI sound sources and effect units accordingly in the manner as explained in the MIDI clock sync system section Setting MIDI SYNC OUT 1 Set the MIDI sync signal to be output to MTC Mtc in the Setting MIDI sync output signal menu in SETUP mode At this time select Mtc for Time Base for convenience Refer to page 103 for more information on SETUP mode Setting MTC O...

Страница 80: ...Then if MIDI data is sent from the sequencer to the FD 8 the MMC command recorded in the sequence data will cause the FD 8 to enter record mode Please read this About MMC REC Out function If you use the MMC REC Out function operating the FD 8 will cause the MIDI OUT connector to output the MMC command that corresponds to the operation For example pressing the PLAY button while pressing the RECORD ...

Страница 81: ...al MIDI device that is able to output MTC as a master device Setting the FD 8 1 Set the frame rate of the sequence software as described in the Setting an MTC frame rate menu in SETUP mode See Setting an MTC frame rate on page 104 for more information 2 Set an offset time value in the Setting an MTC offset value menu in SETUP mode See Setting an MTC offset value on page 104 for more information 3 ...

Страница 82: ... software signals Note The FD 8 can chase and lock to MTC only when the speed variation of MTC sent from the master device computer is within 5 6 Within this range the FD 8 will use the Vari Pitch function internally to chase MTC If this range is exceeded the FD 8 cannot chase and lock If the speed variation of the master device is large play the sequencer before recording so that the FD 8 will le...

Страница 83: ...ode on page 104 for the operation and more information 2 Select a desired mode for MTC offset mode setting in the Setup mode Refer to MTC Offset mode setting in Setup mode on page 105 for the operation and more information 3 MTC offset time setting in Setup mode allows you to set the MTC time to start the Chase lock operation Refer to MTC Offset time setting in Setup mode on page 104 for the opera...

Страница 84: ...FD 8 ABS time will lock from 23H 40M 00S 00SF and if the frame rate setting is 30 frame lock will disengage temporarily at 23H 29M 59S 29SF Later on it will lock again at ABS time in the vicinity of 00H 00M 03S This is an indication that the ABS time 24H is set as access maximum time in the FD 8 and that return to 0 is not continuous Should no overshooting of 24H occur in the ABS time overshooting...

Страница 85: ...nternal hard disk and a SCSI drive Transferring data between a 2 5 inch internal hard disk and a DAT See Note Transferring data between a 2 5 inch internal hard disk and an adat See Note Note You can save and load data to and from a DAT or adat only when the current drive has been formatted in Mastering mode You cannot perform the save load operation if the disk has been formatted in Normal mode H...

Страница 86: ...e Using a SCSI disk Saving loading individual Program data in any mode All Real track data and Additional track data is output simultaneously to a SCSI disk as shown in black in the diagram Therefore saving and loading a Program takes much less time relative to a DAT or adat No pilot signal or beep is recorded If the available disk space is smaller than the song data size you may use multiple disk...

Страница 87: ...to a disk in Mastering mode SCSI drive connection and preparation Title of data to be saved to a backup SCSI disk Data recorded in the current drive has a name such as Program 1 or Program 2 These titles appear abbreviated such as P01 P02 On the other hand a backup disk manages data using dif ferent titles such as Backup 1 or Backup 2 These appear abbreviated such as B01 or B02 on the display For ...

Страница 88: ...will count down as the format operation progresses When the formatting operation is completed COMPLETED lights up SCSi id 6 flashes then the FD 8 displays the following This example shows that the data to be saved is Program 1 on the current drive If the current drive has multiple Programs use the JOG dial to select the desired Program 7 Use the JOG dial to select the desired Program and press the...

Страница 89: ...YES key Load Device appears DIGITAL lights up and the se lected input signal option flashes dAT flashes Load PGM menu Input signal options AdAt dAT SCSi id 6 Program options P01 P99 an individual Program Track options When using an adat or DAT tracks 1 8 tracks 1 16 Tracks 1 24 When using a SCSI disk All tracks will be automatically selected 3 Turn the JOG dial to select a flashing SCSi id 6 to lo...

Страница 90: ...Confirm that this message appears and execute the load operation When data in the first disk is loaded the FD 8 automatically ejects the disk and displays Inst Disk 2 meaning Please insert the second disk Insert the sec ond disk and continue the load operation Note Make sure that you insert the disks in the correct order If you insert the wrong disk the FD 8 displays Wrong disk and ejects the disk...

Страница 91: ...rent drive disk should be formatted in Mastering mode to enable you to save data to a DAT or adat DAT or adat connection and preparation Note Depending on whether you use a DAT or an adat you need to switch between S P DIF digital signal OPTI CAL and adat digital signal for the DATA IN OUT jacks These signals are completely different although they use the same jack configuration Connect DATA OUT f...

Страница 92: ... Use the JOG dial to select a Program to save If multiple Programs exists in the current drive disk turn the JOG dial to change the Program number 6 Press the EXECUTE YES key The FD 8 displays the total time of the selected Program You can edit this total time value That is you can shorten the time required for the save operation For example if the duration of the Program is 8 minutes 25 seconds y...

Страница 93: ...signal output to a DAT Level meters 1 8 indicate the level of signal output to an adat When the save operation is completed COMPLETED lights up and the FD 8 stops Stop recording on the DAT or adat 12 Press the EXIT NO key or the STOP button The FD 8 exits SETUP mode and COMPLETED disappears The FD 8 displays the Time Base ABS 00m 00s 00f of the saved Program Before the value starts counting down t...

Страница 94: ...before you execute the load operation If multiple Programs exist in the current drive disk turn the JOG dial to select a Program from these Programs plus one new Program 6 Press the EXECUTE YES key The FD 8 displays the track selection screen You can change the value of a flashing number Flashing 7 Use the JOG dial to select the desired tracks Options are Tr 1 8 Tr 1 16 Real track 1 8 and Addition...

Страница 95: ...ive ID 6 to the SCSI connector on the 2 5 inch hard disk in the FD 8 as shown below Note on connections Be sure to connect a SCSI backup drive to the SCSI connector Make sure that the ID number for the SCSI backup drive is set to 6 SCSI OUT IN DATA PUNCH IN OUT DATA MONO L 8 INSERT 7 INPUT 8 INPUT 7 R RECORDER IN L IN MIDI OUT MIDI Note As shown in the drawing when the SCSI drive assigned for the ...

Страница 96: ...Insert another backup disk in the drive The FD 8 displays the following during the save operation using a SCSI backup drive Quick Troubleshooting If you are stuck in one of the following situations refer to the explanations below for corrective actions The FD 8 recognizes that the backup disk cannot be used in its current condition There are two reasons for this You inserted a disk that was used f...

Страница 97: ...using the JOG dial then press the EXECUTE YES key The FD 8 displays the second hierarchy level of the selected SETUP menu where you can set parameters Refer to the next page for more information To exit SETUP mode press the STOP button or the EXIT NO key Each time you press one of these keys the FD 8 returns to the previous hierarchy level of the menu and finally exits SETUP mode This indicates th...

Страница 98: ...external sequencer Initial setting 4 4 for bar 001 not specified for 002 and later Setting range of measures 001 999 Setting range of time signatures 1 4 2 4 3 4 4 4 5 4 1 8 3 8 5 8 6 8 7 8 8 8 delete Max setting points 64 points You can set time signatures for each Program individually The settings can be saved and loaded as part of the song data The settings are maintained after you turn off the...

Страница 99: ... of the menu and finally exits SETUP mode Modifying or deleting stored time signatures 1 Repeat steps 1 3 described in the Storing a time signature section to display Sign Edit 2 Press the HOLD key the REWIND button or the F FWD button so that the flashing cursor is on the time signature value 3 Use the JOG dial to enter a new value Entering deletes the existing data Note that you cannot enter for...

Страница 100: ...e JOG dial to select the Tempo Set menu then press the EXECUTE YES key Indication on the display changes as shown below and the current tempo appears The initial setting is 001 BAR 1 TEMPO 120 This means that a tempo for the first beat of the first measure is set to 120 2 Rotate the JOG dial clockwise You can view the current tempo values in sequence Tempo value BAR TEMPO means that no tempo value...

Страница 101: ... 6 Press the STOP button or the EXIT NO key repeatedly to exit SETUP mode Setting the Metronome function Click menu Setting the Metronome function menu allows you to determine whether or not the FD 8 outputs a metronome sound from Real track 8 during playback or recording Turning the Metronome function on enables you to record your performance while playing the instrument accompanying the metronom...

Страница 102: ...ly before the locate point Initial setting 00 second Setting range of preroll time 00 10 seconds in one second steps You can set the value for each Program individually The settings can be saved and loaded as part of the song data The settings are maintained after you turn off the power to the unit Preroll time before the locate point can be set between 00 and 10 seconds Setting a preroll time 1 W...

Страница 103: ...G dial to select Sync Out flashes then press the EXECUTE YES key The currently selected MIDI sync signal type appears on the display Press the EXECUTE YES key to turn off the flashing indication The MIDI sync signal type indication flashes and the indicator flashes indicating the SYNC OUT setting The initial setting is cLk as shown below 3 Turn the JOG dial to select the desired MIDI sync signal S...

Страница 104: ...ays available frame rates as an alternative 4 Press the EXECUTE YES key The selected frame rate is stored and the display returns to the indication with a flashing that appeared in step 2 Setting an MTC offset value Mtc Offset menu The Setting an MTC offset value menu enables you to specify an offset time value the difference between the time of MTC output from the FD 8 and the ABS 00m 00s 00f 00s...

Страница 105: ... Base Setting Offset mode Ofset Mode menu If you have selected MTC in the Setting Offset mode menu you need to select MTC Offset mode This menu enables you to determine whether the specified MTC is output at ABS 00H 00M 00S 00F or at 001 BAR 1 00 CLK bar beat of the Tempo Map Note For example if you set MTC Offset mode to ABS see the next section and you wish to start the song from MTC s 01H 00M 0...

Страница 106: ...ress one of these keys the FD 8 returns to the previous hierarchy level of the menu and finally exits SETUP mode and displays the previous Time Base Setting the Slave mode Slave Mode menu The Setting the Slave mode menu allows you to set Slave mode of the FD 8 to on and off When Slave mode is turned on the FD 8 will lock to MTC input from the master device The FD 8 can also sync to the selected ex...

Страница 107: ...MTC SP di F The FD 8 locks to MTC then synchronizes to incoming S PDIF digital signals Ad At The FD 8 locks to MTC then synchronizes to incoming adat digital signals Fr EE The FD 8 locks to MTC then synchronizes to the internal clock You can set the parameter for each Program individually The settings can be saved and loaded as part of the song data The settings are maintained after you turn off t...

Страница 108: ...gnal approximately two seconds of the sound in the entire system will be muted when the FD 8 locks or unlocks to clock Make sure to input a stable digital signal source To cancel the operation or to restore the setting obtained prior to the EXECUTE YES key press press the STOP button or the EXIT NO key Each time you press one of these keys the FD 8 returns to the previous hierarchy level of the me...

Страница 109: ...nel to 2 and press the EXECUTE YES key Lchannel will be set to L and R channel will be set to r 2 Note If DIGITAL flashes on the display check the connection with the external device and the settings on the FD 8 and the external device To cancel the operation or to restore the setting obtained prior to the EXECUTE YES key press press the STOP button or the EXIT NO key Each time you press one of th...

Страница 110: ...t input Initial setting L r Stereo Out L R output s Assignable tracks L channel 1 8 Stereo Out L or AdAt R channel 1 8 or Stereo Out R This setting is shared by all Programs in the same disk The settings cannot be saved and loaded as part of the song data The settings are maintained after you turn off the power to the unit 3 Press the HOLD key the REWIND button or the F FWD button to select a chan...

Страница 111: ...of 46 will be rounded off 002BAR4 51 CLK 003BAR1 00 CLK A CLK value of 51 will be rounded up Initial setting o FF Options on or o FF This setting is shared by all Programs in the same disk The settings cannot be saved and loaded as part of the song data The settings are maintained after you turn off the power to the unit Setting BAR BEAT resolution mode 1 While the FD 8 is stopped press the SETUP ...

Страница 112: ...er clockwise decrements the value 4 Press the EXECUTE YES key The MIDI device ID number is stored and flashes To cancel the operation or to restore the setting obtained prior to the EXECUTE YES key press press the STOP button or the EXIT NO key Each time you press one of these keys the FD 8 returns to the previous hierarchy level of the menu and finally exits SETUP mode and displays the previous T...

Страница 113: ...lows indicating the number of events on track 1 In this example track 1 includes eight events 3 Use the JOG dial to select another 01 24 to check the number of events on the corresponding track 4 Press the EXIT NO key or the STOP button repeatedly to exit SETUP mode To cancel the operation or to restore the setting obtained prior to the EXECUTE YES key press press the STOP button or the EXIT NO ke...

Страница 114: ...essage Local ON OFF All Notes OFF Reset Active Sense Notes rem 1 MMC Device ID 00 99 127 MTC Identity reply FOSTEX Exclusive rem 2 MMC Device ID 00 99 127 MTC Inquiry FOSTEX Exclusive Mode 1 OMNI ON POLY Mode 2 OMNI ON MONO Mode 3 OMNI OFF POLY Mode 4 OMNI OFF MONO rem 1 rem 2 X X X rem 3 X X X X X X X X X X X X X X X X X X X X X X X X X X X X X X X X X X X No Yes Version V1 00 Date Model FD 8 MID...

Страница 115: ...d List MMC Response Information Field List Command 01 SELECTED TIME CODE READ WRITE MOVE ADD SUBTRACT 03 REQUESTED OFFSET READ WRITE 04 ACTUAL OFFSET READ 08 GP 0 READ WRITE MOVE ADD SUBTRACT 09 GP 1 READ WRITE MOVE ADD SUBTRACT 0A GP 2 READ WRITE MOVE ADD SUBTRACT 0B GP 3 READ WRITE MOVE ADD SUBTRACT 0C GP 4 READ WRITE MOVE ADD SUBTRACT 0D GP 5 READ WRITE MOVE ADD SUBTRACT 0E GP 6 READ WRITE MOVE...

Страница 116: ...0dBV STEREO OUT L R Connector RCA pin jack x 2 Load Impedance 10k or higher Reference Output Level 10dBV MONITOR OUT L R Connector 6mm Phone jack x 2 Load Impedance 10k or higher Reference Output Level 10dBV PHONES OUT Connector 6mm Stereo Phone jack Load Impedance 16 or higher Maximum output 50mW at 50 Equalizer HI 12kHz 15dB Shelving type MID 200Hz 5kHz 15dB Parametric type LO 80Hz 15dB Shelving...

Страница 117: ...1 or 2 depending on setup MIDI IN OUT Connector DIN 5 PIN x2 Format MIDI PUNCH IN OUT Connector 6mm phone jack x1 For using optional Model 8051 foot switch SCSI Connector D SUB 25 PIN x1 Protocol SCSI 2 unbalanced transmission line Type of transmission Asynchronous transmission Connectable number of units 2 SCSI ID Automatic recognition General Dimensions mm 552 W x 110 H x 355 D Including highest...

Страница 118: ...DER INPUT MON TRK 1 INPUT 2 LO GAIN MID GAIN SHIFT HI GAIN PAN L R AUX 1 MON L MON R TRK 1 REC MUTE 1 TRK 2 REC MUTE 2 DATA OUT PAN L AUX 1 AUX 2 MON L MON R TRK 7 REC MUTE 7 HI GAIN MID GAIN SHIFT LO GAIN MON TRK 7 INPUT INPUT SEL INPUT OFF TRK 7 INPUT 7 50dBV 10dBV BAL TRIM INPUT 7 INPUT 8 L MONO 20dBV AUX RTN AUX RTN 1 AUX RTN 2 TRK 8 L R L EQ AUX 2 R EQ R REC MUTE 8 R INPUT FADER INSERT 7 TRK ...

Страница 119: ...ction 70 Loading song data 85 M MON knob 8 MONMASTERknob 8 Masterfader 8 Monitor select switch 8 MONOUTjack 15 MIDI IN OUT jack 16 76 MTCtime 21 Masteringmode 28 Metronome function 38 101 Manual punch in out 45 47 Move Paste 56 Moveclip 57 Move start end point 57 MIDIsyncfunction 77 Master FM message 32 MIDI sync signal 103 MTC frame rate 104 MTC offset time 104 MTCoffsetmode 105 Mixdown 50 78 80 ...

Страница 120: ...C PRINTED IN JAPAN OCT 1998 8288 419 100 FX FOSTEX CORPORATION 3 2 35 Musashino Akishima shi Tokyo 196 0021 Japan FOSTEX CORPORATION OF AMERICA 15431 BlackburnAve Norwalk CA 90650 U S A ...

Страница 121: ...ll be given priority automatically and SCSI will be shown in the display lower right indication Therefore when both an external SCSI drive current drive and an internal hard disk are used the external SCSI drive should not be connected to the SCSI connector if the internal hard disk is to be used to record playback or when it is to be formatted Maker Drive name Disk Capacity Recording mode of the ...

Отзывы: