be exclusively replaced by the manufacturer or
his service agent or a similar qualified person in
order to avoid a hazard.
∙The safety of this fixture is only guaranteed if
the following instructions have been observed
so they have to be kept for future reference.
∙While the lamp is on and until it has cooled,
there is a risk of burns from the lamp and adja-
cent elements.
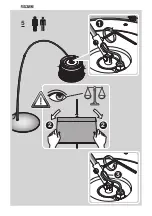
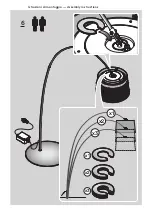
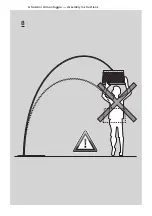
∙Assembly and maintenance of fixture must be per-
formed carefully so as not to damage components.
∙Fixture must not be installed in any position other
than that shown in instructions.
∙The light source contained in this luminaire shall
only be replaced by the manufacturer or his ser-
vice agent or a similar qualified person.
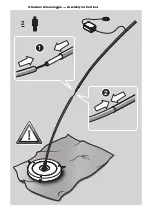
∙The lamp can maintain isolation rate IP65 only if
it is sourced by connecting the supplied clamp to
a double insulated external cable type H05RN-F
min. 2x1mm
2
, diameter bet. 6 and 7.5mm.
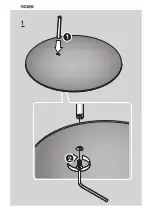
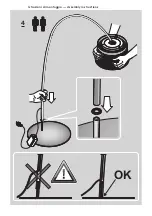
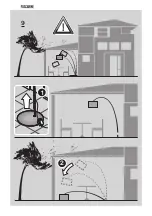
∙In case of strong wind, pull the rod from the pin
on the base and place it on the ground as indicat-
ed in the instructions.
Foscarini
will replace merchandise with manu-
facturing defects only if it is returned to the retailer
from which it was purchase and any way only after
assessing the defect. The appliance may in no way
be modified or tampered with, any modification
may compromise safety causing the appliance to
become dangerous. Foscarini declines all respon-
sibility for products that are modified. If exposed
to direct sunlight, the materials used in this pro-
duct may show a natural chromatic variation.
Cleaning instructions: do not use alcohol or
other solvents. Use only a soft cloth to clean the
lamp, dampened with water and soap or mild
cleanser if needed for resistant dirt.
It certifies the conformity of the product to
the european community low voltage directive.
Appliance with double insulation.
EAC is a certification mark that confirms
the compliance of goods with the Eurasian Cus-
toms Union standards.
Unit totally protected against dust,
wire access and water.
Unit protected against the penetration
of solid objects greater than 1 mm and protec-
ted against splashing water.
WEEE Symbol (Waste Electrical and Elec-
tronic Equipment). The use of the WEEE symbol
indicates that this product may not be treated
as household waste. By ensuring this product
is disposed of correctly, you will help protect
the environment. For more detailed information
about the recycling of this product, please con-
tact your local authority, your household waste
disposal service provider or the shop where you
purchased the product.
FR → Instructions
∙L’installation et l’entretien de l’appareil doivent
être faits exclusivement par du personnel qualifié.
∙Avant de procéder à l’installation de l’appareil,
ainsi qu’avant toute opération d’entretien, il est
nécessaire de couper le courant au disjoncteur.
∙Afin d’éviter tout risque, si le câble électrique de
cet appareil est endommagé il doit être remplacé
exclusivement par le fabricant, son service après
vente ou par du personnel qualifié équivalent.
∙La sûreté de l’appareil n’est garantie qu’en suivant
scrupuleusement les instructions ces.
∙Il est donc nécessarie de les conserver.
∙Lorsque la lampe est allumée et jusqu’à son refroi-
dissement après débranchement, il y a un risque
de brûlure sur la lampe et les éléments proches.
∙Le montage et les manipulations de l’appareil
devront être exécutés avec la plus grande at-
tention pour ne pas abîmer ses composants.
∙L’appareil ne peut pas être installé dans une
autre position que celle indiquée dans les ins-
tructions de montage.
∙La source lumineuse de cet appareil doit
être remplacée uniquement par les soins du
constructeur, par son service après-vente ou
bien par le personnel qualifié équivalent.
∙La lampe maintient la classe d’isolement IP65
seulement si la borne est connectée à un
Twiggy Grid
terra,
f oor
l
Содержание Twiggy Grid
Страница 1: ...Foscarini terra f oor l Twiggy Grid Marc Sadler 2017 ...
Страница 2: ...1 1 2 ...
Страница 3: ...Istruzioni di montaggio Assembly instructions Istruzioni di montaggio Assembly instructions 2 1 2 ...
Страница 4: ...3 1 1 2 ...
Страница 5: ...Istruzioni di montaggio Assembly instructions 4 OK ...
Страница 6: ...5 1 2 2 3 ...
Страница 7: ...Istruzioni di montaggio Assembly instructions 6 X3 x2 x3 x1 x2 x3 x1 ...
Страница 8: ...7 ...
Страница 9: ...Istruzioni di montaggio Assembly instructions 8 ...
Страница 10: ...9 1 2 ...
Страница 11: ...10 Istruzioni di montaggio Assembly instructions 1 2 3 IP44 IP65 A B ...
Страница 19: ......


