background image

Hardware Install Guide for FortiScan

16

http://docs.fortinet.com/

 • 

Document feedback

Locate the components for installing the CMA assembly:

cable management arm tray (1)

cable management arm (2)

nylon cable tie wraps (3)

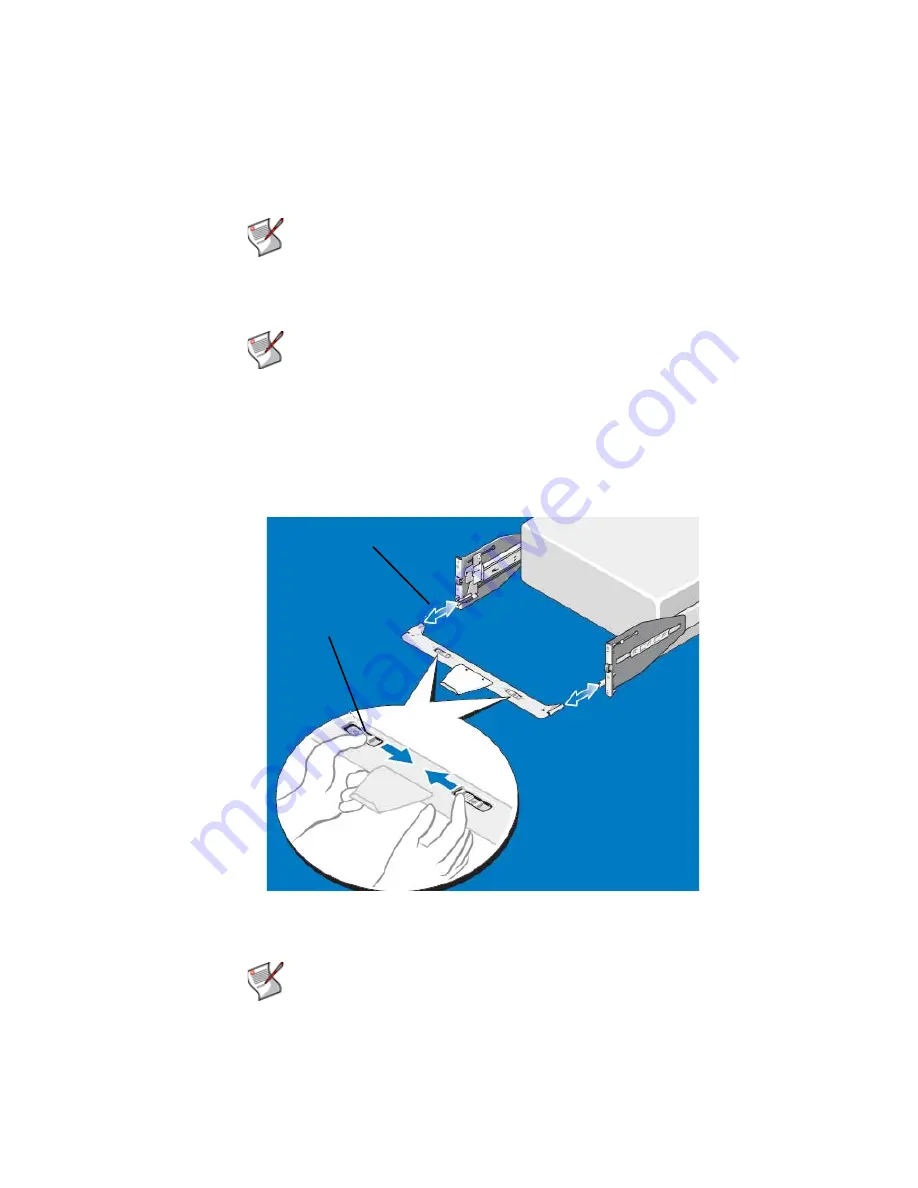
To install or remove the cable management arm tray

1

Align and engage each side of the tray with the receiver brackets on the inner edges of 
the rails and push forward until the tray clicks into place (1). 

Figure 9:

Installing and removing the cable management arm tray

2

To remove the tray, squeeze the latch-release buttons on both sides toward the center 
and pull the tray out of the receiver brackets (2).

Note: 

To secure the CMA for shipment in the rack, loop the tie wraps around both 

baskets and tray and cinch them firmly. For larger CMAs, the tie wraps can be 
threaded through the inner and outer baskets and around the tray to secure them. 
Securing the CMA in this manner will also secure your system in unstable 
environments.

Note: 

The CMA tray provides support and acts as a retainer for the CMA.

1

2

Note: 

You can attach the CMA to either the right or left mounting rail, depending 

on how you intend to route cables from the system. Mounting the CMA on the side 
opposite of the power supplies is recommended; otherwise, the CMA must be 
disconnected in order to remove the outer power supply. You 

must

 remove the 

tray before removing the power supplies.

Содержание FortiScan-1000C

Страница 1: ...Hardware Install Guide for FortiScan Donghai Zhao...

Страница 2: ...disposal 6 Restricted access location 6 Grounding 6 Rack mounting 6 Environmental specifications 7 Mounting the FortiScan appliance 7 FortiScan 1000C 8 Removing the system from the rack 15 Installing...

Страница 3: ...ppliances provide ready to deploy fixes and enforcement actions which can change host configurations to mitigate weak settings and patch applications This frees your time to focus on zero day vulnerab...

Страница 4: ...t s examples it would be shown as a non Internet routable IP such as 10 0 0 1 192 168 0 1 or 172 16 0 1 Cautions notes tips This document uses the following guidance and styles for cautions notes and...

Страница 5: ...LE Firewall Authentication TITLE HEAD BODY H4 You must authenticate to use this service H4 Hyperlink https support fortinet com Keyboard entry Type a name for the remote VPN peer or client such as Cen...

Страница 6: ...d access location Grounding Ensure the FortiScan appliance is connected and properly grounded to a lightning and surge protector WAN or LAN connections that enter the premises from outside the buildin...

Страница 7: ...maintained Particular attention should be given to supply connections other than direct connections to the branch circuit e g use of power strips If required to fit into a rack appliance remove the ru...

Страница 8: ...nents in a rack never pull more than one component out of the rack on its slide assemblies at one time The weight of more than one extended component could cause the rack to tip over and may result in...

Страница 9: ...oms holes of the first U 2 4 Engage the back end of the rail until it fully seats on the vertical rack flange and the second tooth on the latch locks in place Repeat these steps to position and seat t...

Страница 10: ...each end piece in the front holes of the vertical rack flanges 1 3 Align each end piece to seat the pegs in the top and bottom holes of the first U 2 4 Engage the back end of the rail until it fully s...

Страница 11: ...ssis rail members with the corresponding pins on the system 1 Figure 3 Installing the chassis rail members 2 Slide the chassis rail members towards the back of the system until each one locks into pla...

Страница 12: ...rs are locked into the slide rails on both sides Pull the sliding rails out of the rack until they lock into place 1 Figure 4 Installing the system in the rack 2 Align and insert the ends of the chass...

Страница 13: ...age automatically as the system is pushed into the rack and are released by pulling up on the latches 2 3 To secure the system for shipment in the rack or for other unstable environments locate the ha...

Страница 14: ...lide rail and push the bracket forward until it locks into place Repeat the same process for the CMA attachment bracket marked B Figure 6 Installing the CMA attachment brackets To route the cables 1 B...

Страница 15: ...s 2 on the sides of the chassis rail members 1 3 Pull the tabs towards the front of the system to release the chassis rail members from the rails Continue pulling the system until the chassis rail mem...

Страница 16: ...tray out of the receiver brackets 2 Note To secure the CMA for shipment in the rack loop the tie wraps around both baskets and tray and cinch them firmly For larger CMAs the tie wraps can be threaded...

Страница 17: ...end of the CMA on the innermost bracket of the slide assembly until the latch engages 1 Figure 10 Installing and removing the cable management arm 2 Fit the other latch on the end of the outermost bra...

Страница 18: ...e tie wraps provided bundle the cables together as they enter and exit the baskets so they do not interfere with adjacent systems 1 2 With the CMA in the service position route the cable bundle throug...

Страница 19: ...e power button optical drive and hard drives The LCD panel and navigation buttons are accessible through the front bezel To remove the front bezel 1 Using the system key unlock the bezel 2 Pull up on...

Страница 20: ...re 13 Installing the power cord retention bracket 4 Plug the other end of the power cables into a grounded electrical outlet or a separate power source such as an uninterrupted power supply UPS or a p...

Страница 21: ...holes of the first U 4 5 Engage the back end of the rail until it fully seats on the vertical rack flange and the second tooth on the latch locks in place Repeat these steps to position and seat the...

Страница 22: ...rail until it fully seats on the vertical rack flange and the first tooth on the latch locks in place Repeat these steps to position and seat the front end piece on the vertical flange 3 5 To remove...

Страница 23: ...slots 3 Figure 16 Installing the system on the rack 4 Push the system inward until the front release latch clicks into place Press the slide release lock buttons on both rails and slide the system in...

Страница 24: ...To route the cables 1 Locate the inner and outer CMA brackets on the interior sides of both rack flanges 1 Figure 18 Routing the cables 2 Bundle the cables gently pulling them clear of the system con...

Страница 25: ...e management arm tray 1 cable management arm 2 nylon cable tie wraps 3 Use the instructions below to install the CMA 1 3 2 Note To secure the CMA for shipment in the rack loop the tie wraps around bot...

Страница 26: ...he receiver brackets on the inner edges of the rails and push forward until the tray clicks into place 1 Figure 20 Installing and removing the cable management arm tray 2 To remove the tray squeeze th...

Страница 27: ...e CMA away from the CMA tray 1 The CMA can be pulled away from the system and extended away from the tray for access and service 1 2 At the hinged end lift the CMA up and off of the tray to unseat it...

Страница 28: ...ets so they do not interfere with adjacent systems 1 2 With the CMA in the service position route the cable bundle through the inner and outer baskets 2 3 Use the pre installed Velcro straps on either...

Страница 29: ...e power button optical drive and hard drives The LCD panel and navigation buttons are accessible through the front bezel To remove the front bezel 1 Using the system key unlock the bezel 2 Pull up on...

Страница 30: ...the power cables to the system 2 Bend the system power cable into a loop and secure the cable to the bracket using the provided strap Figure 24 Securing the power cord 3 Plug the other end of the powe...

Страница 31: ...on conventions 3 E earthing 7 Ethernet 6 exploit 3 F federal desktop core configuration FDCC 3 Fortinet Technical Documentation conventions 3 H Health Insurance Portability and Accountability Act HIPA...

Страница 32: ...inet com Document feedback square hole racks 20 storage temperature 7 supply wiring 7 T temperature 6 7 tips 4 troubleshooting 4 U United States government configuration baseline USGCB 3 unshielded tw...

Страница 33: ...express or implied except to the extent Fortinet enters a binding written contract signed by Fortinet s General Counsel with a purchaser that expressly warrants that the identified product will perfo...

Отзывы: