


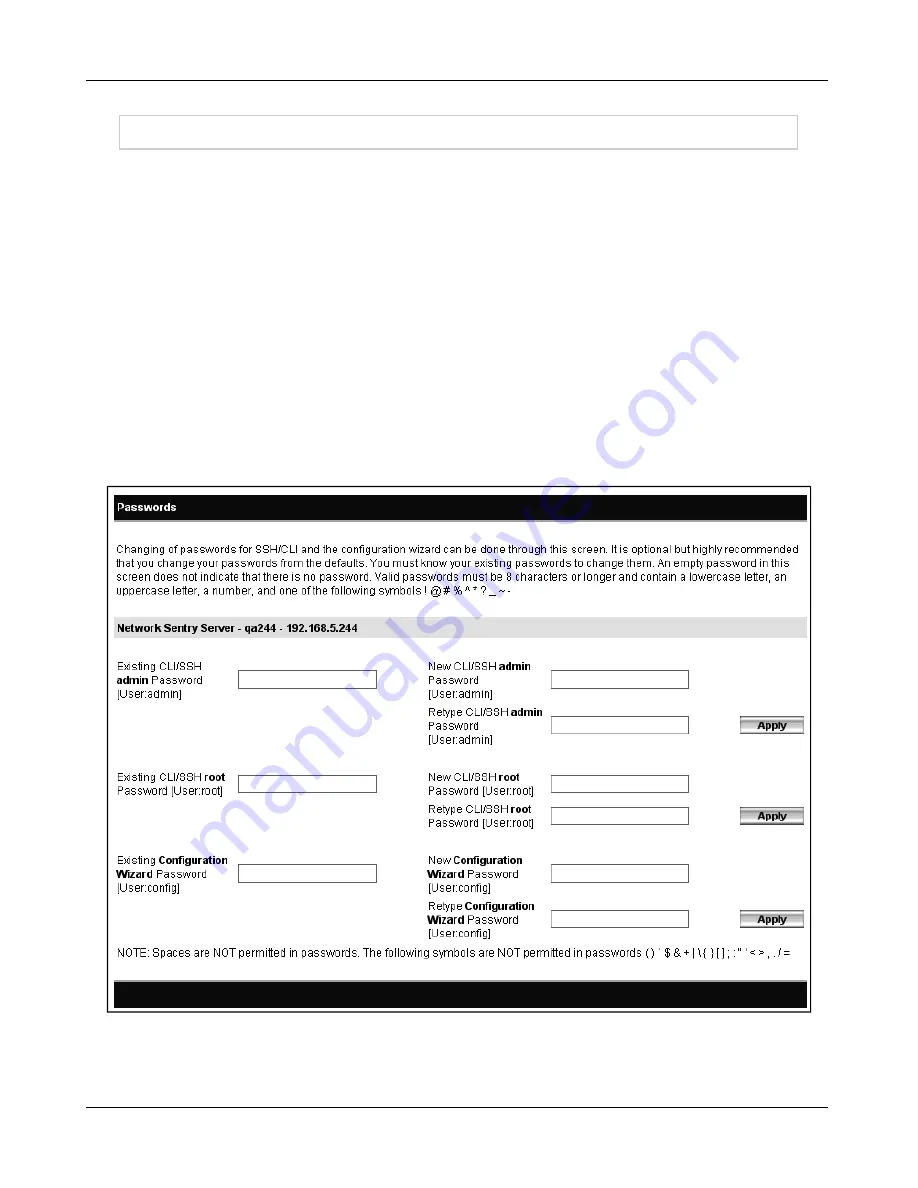
Change Passwords After Configuration
Configuration files are overwritten whenever you run the Configuration Wizard. It is strongly
recommended, therefore, that you do not make changes outside of the Configuration Wizard.
Making all changes from within the Configuration Wizard prevents you from having custom
configuration files that can be accidentally overwritten.
Running the Configuration Wizard to change passwords after the initial setup also causes all
configuration files to be overwritten if you use the Next button to scroll through all of the pages. If
no manual changes have been made, this does not cause a problem. However, it is
recommended that you go directly to the Change Password window without running the entire
Configuration Wizard, save the passwords and exit the wizard.
See
Configuration Wizard - Passwords on page 12
for additional information on modifying your
passwords.
To go directly to the Change Passwords window, type one of the following URLs:
http://<Host Name>:8080/configWizard/PasswordChange.jsp
http://<IP Address>:8080/configWizard/PasswordChange.jsp
Figure 24: Change Passwords Window
Change Passwords After Configuration
45
Содержание FortiNac BFN320
Страница 1: ...Appliance Installation Guide Version 8 3 Date 8 24 2018...
Страница 7: ...4...
Страница 11: ...Hardware Setup Note You will be required to change the Configuration Wizard password during the setup process 8...
Страница 19: ...Software Configuration Figure 7 Download Documentation Window 16...
Страница 20: ...Password Setup Figure 8 Change Passwords Figure 9 Configuration Wizard Password Setup Password Setup 17...
Страница 22: ...7 Close the window or tab 8 Click Next to continue Password Setup 19...
Страница 27: ...Layer 2 Network Configure VLANS Figure 11 Layer 2 Isolation Figure 12 Add Subnet 24...
Страница 35: ...Layer 3 Network Configure Route Scopes Figure 15 Layer 3 Network Configuration Isolation Scopes 32...
Страница 39: ...Layer 3 Network Configure Route Scopes Figure 18 Layer 3 Access Point Management 36...
Страница 40: ...Figure 19 Layer 3 Add Access Point Management Scopes Layer 3 Network Configure Route Scopes 37...
Страница 42: ...Figure 20 Layer 3 Routes Import Route Scopes Window Layer 3 Network Configure Route Scopes 39...
Страница 44: ...Figure 21 Additional Routes Window Figure 22 Add Route Window Layer 3 Network Additional Routes 41...
Страница 46: ...Figure 23 Results Window Results Layer 2 Layer3 Networks Or Control Manager 43...
Страница 49: ...Change Passwords After Configuration 46...


