background image

Introduction 

Fortinet documentation

FortiGate-3000 Installation Guide

01-28005-0026-20041101

 9

Fortinet documentation

Information about FortiGate products is available from the following FortiGate User 
Manual volumes:

FortiGate QuickStart Guide

Each 

QuickStart Guide

 provides the basic information required to connect and 

install a FortiGate model.

FortiGate Installation Guide

Each 

Installation Guide

 provides detailed information required to install a FortiGate 

model. Includes hardware reference, default configuration, installation procedures, 
connection procedures, and basic configuration procedures.

FortiGate Administration Guide

Each 

Administration Guide

 describes how to configure a FortiGate model. 

Configuration information includes how to use FortiGate firewall policies to control 
traffic flow through the FortiGate unit and how to configure VPN, IPS, antivirus, 
web filtering, spam filtering. The administration guide also describes how to use 
protection profiles to apply intrusion prevention, antivirus protection, web content 
filtering, and spam filtering to traffic passing through the FortiGate unit.

FortiGate CLI Reference Guide

Describes how to use the FortiGate CLI and contains a reference to all FortiGate 
CLI commands.

FortiGate Log Message Reference Guide

Describes the structure of FortiGate log messages and provides information on all 
log messages generated by the FortiGate unit.

• FortiGate High Availability Guide

Contains in-depth information about FortiGate High Availability and the FortiGate 
Clustering Protocol (FGCP).

The FortiGate online help also contains procedures for using the FortiGate web-based 
manager to configure and manage the FortiGate unit. For a complete list of FortiGate 
documentation visit Fortinet Technical Support at http://support.fortinet.com. 

Comments on Fortinet technical documentation

You can send information about errors or omissions in this document, or any Fortinet 
technical documentation, to [email protected].

Содержание FortiGate 3000

Страница 1: ...FortiGate 3000 Installation Guide POWER Hi Temp 1 2 3 INT EXT 4 HA Esc Enter 1 2 3 4 HA INTERNAL EXTERNAL Version 2 80 MR5 01 November 2004 01 28005 0026 20041101 ...

Страница 2: ...tion Guide Version 2 80 MR5 01 November 2004 01 28005 0026 20041101 Trademarks Products mentioned in this document are trademarks or registered trademarks of their respective holders Regulatory Compliance FCC Class A Part 15 CSA CUS CAUTION RISK OF EXPLOSION IF BATTERY IS REPLACED BY AN INCORRECT TYPE DISPOSE OF USED BATTERIES ACCORDING TO THE INSTRUCTIONS For technical support please visit http w...

Страница 3: ...iguration 17 Factory default Transparent mode network configuration 18 Factory default firewall configuration 18 Factory default protection profiles 19 Planning the FortiGate configuration 20 NAT Route mode 20 NAT Route mode with multiple external network connections 21 Transparent mode 22 Configuration options 23 Next steps 24 NAT Route mode installation 25 Preparing to configure the FortiGate un...

Страница 4: ...izard 43 Reconnecting to the web based manager 44 Connecting the FortiGate unit to your network 44 Next steps 45 High availability installation 47 Priorities of heartbeat device and monitor priorities 47 Configuring FortiGate units for HA operation 47 High availability configuration settings 47 Configuring FortiGate units for HA using the web based manager 49 Configuring FortiGate units for HA usi...

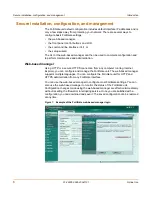
Страница 5: ...roughs in chip design networking security and content analysis The unique ASIC based architecture analyzes content and behavior in real time enabling key applications to be deployed right at the network edge where they are most effective at protecting your networks The FortiGate 3000 model provides the carrier class levels of performance and reliability demanded by large enterprises and service pr...

Страница 6: ...ration Web based manager Using HTTP or a secure HTTPS connection from any computer running Internet Explorer you can configure and manage the FortiGate unit The web based manager supports multiple languages You can configure the FortiGate unit for HTTP and HTTPS administration from any FortiGate interface You can use the web based manager to configure most FortiGate settings You can also use the w...

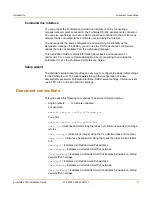
Страница 7: ... way to configure the basic initial settings for the FortiGate unit The wizard walks through the configuration of a new administrator password FortiGate interfaces DHCP server settings internal servers web FTP etc and basic antivirus settings Document conventions This guide uses the following conventions to describe command syntax Angle brackets to indicate variables For example execute restore co...

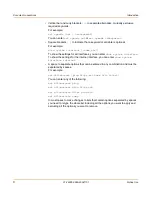
Страница 8: ...er show system interface To show the settings for the internal interface you can enter show system interface internal A space to separate options that can be entered in any combination and must be separated by spaces For example set allowaccess ping https ssh snmp http telnet You can enter any of the following set allowaccess ping set allowaccess ping https ssh set allowaccess https ping ssh set a...

Страница 9: ...ng spam filtering The administration guide also describes how to use protection profiles to apply intrusion prevention antivirus protection web content filtering and spam filtering to traffic passing through the FortiGate unit FortiGate CLI Reference Guide Describes how to use the FortiGate CLI and contains a reference to all FortiGate CLI commands FortiGate Log Message Reference Guide Describes t...

Страница 10: ...ailable from the following addresses For information on Fortinet telephone support see http support fortinet com When requesting technical support please provide the following information Your name Company name Location Email address Telephone number FortiGate unit serial number FortiGate model FortiGate FortiOS firmware version Detailed description of the problem amer_support fortinet com For cus...

Страница 11: ...b based manager Connecting to the command line interface CLI Factory default FortiGate configuration settings Planning the FortiGate configuration Next steps Package contents The FortiGate 3000 package contains the following items FortiGate 3000 Antivirus Firewall one red crossover ethernet cable Fortinet part number CC300248 one gray regular ethernet cable Fortinet part number CC300249 one null m...

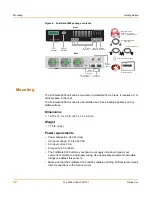
Страница 12: ... supply wiring Use appropriate equipment nameplate ratings to address this concern Make sure that the FortiGate 3000 unit has reliable earthing Fortinet recommends direct connections to the branch circuit 1 2 3 4 HA Interface External Interface Internal Interface Front Back Power Supply LEDs Power Connections Power Cables 2 Rack Mount Brackets Null Modem Cable RS 232 Documentation Ethernet Cables ...

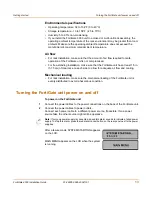
Страница 13: ...e sure that the FortiGate unit has at least 1 5 in 3 75 cm of clearance on each side to allow for adequate air flow and cooling Mechanical loading For rack installation make sure the mechanical loading of the FortiGate unit is evenly distributed to avoid a hazardous condition Turning the FortiGate unit power on and off To power on the FortiGate unit 1 Connect the power cables to the power connecti...

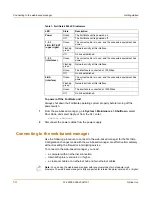
Страница 14: ...higher a crossover cable or an ethernet hub and two ethernet cables Table 1 FortiGate 3000 LED indicators LED State Description Power Green The FortiGate unit is powered on Off The FortiGate unit is powered off 1 2 3 4 HA INT EXT upper right Green The correct cable is in use and the connected equipment has power Flashing green Network activity at this interface Off No link established 1 2 3 interf...

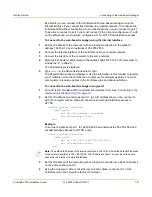
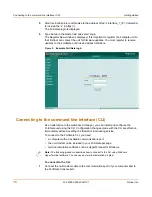
Страница 15: ...is window to register your FortiGate unit so that Fortinet can contact you for firmware updates You must also register to receive updates to the FortiGate virus and attack definitions To connect to the web based manager using port 1 1 Connect to the FortiGate 3000 command line interface CLI See Connecting to the command line interface CLI on page 16 2 Set the IP address and netmask of port 1 to an...

Страница 16: ...onnecting to the command line interface CLI As an alternative to the web based manager you can install and configure the FortiGate unit using the CLI Configuration changes made with the CLI are effective immediately without resetting the firewall or interrupting service To connect to the FortiGate CLI you need a computer with an available communications port the null modem cable included in your F...

Страница 17: ...e the FortiGate unit onto the network To configure the FortiGate unit onto the network you add an administrator password change network interface IP addresses add DNS server IP addresses and configure basic routing if required If you plan to operate the FortiGate unit in Transparent mode you can switch to Transparent mode from the factory default configuration and then configure the FortiGate unit...

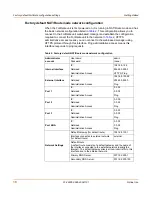
Страница 18: ...ion Administrator account User name admin Password none Internal interface IP 192 168 1 99 Netmask 255 255 255 0 Administrative Access HTTPS Ping External Interface IP 192 168 100 99 Netmask 255 255 255 0 Administrative Access Ping Port 1 IP 0 0 0 0 Netmask 0 0 0 0 Administrative Access Ping Port 2 IP 0 0 0 0 Netmask 0 0 0 0 Administrative Access Ping Port 3 IP 0 0 0 0 Netmask 0 0 0 0 Administrati...

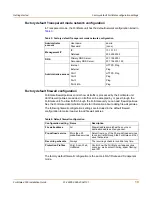
Страница 19: ...s The factory default firewall configuration is the same in NAT Route and Transparent mode Table 3 Factory default Transparent mode network configuration Administrator account User name admin Password none Management IP IP 10 10 10 1 Netmask 255 255 255 0 DNS Primary DNS Server 207 194 200 1 Secondary DNS Server 207 194 200 129 Administrative access Internal HTTPS Ping External Ping Port 1 HTTPS P...

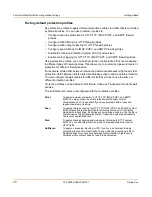
Страница 20: ...configure firewall policies for different traffic services to use the same or different protection profiles Protection profiles can be added to NAT Route mode and Transparent mode firewall policies The FortiGate unit comes preconfigured with four protection profiles Strict To apply maximum protection to HTTP FTP IMAP POP3 and SMTP traffic You may not use the strict protection profile under normal ...

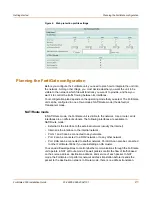
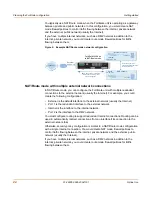
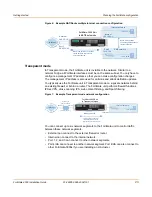
Страница 21: ...unit is visible to the network Like a router all its interfaces are on different subnets The following interfaces are available in NAT Route mode External is the interface to the external network usually the Internet Internal is the interface to the internal network Ports 1 and 3 can be connected to any networks Port 2 can be connected to a DMZ network or to any other network Port 4 HA can be conn...

Страница 22: ... the redundant interface to the external network Internal is the interface to the internal network Port 2 is the interface to the DMZ network You must configure routing to support redundant Internet connections Routing can be used to automatically redirect connections from an interface if its connection to the external network fails Otherwise security policy configuration is similar to a NAT Route...

Страница 23: ...tiGate unit to control traffic between these network segments External can connect to the external firewall or router Internal can connect to the internal network Port 1 2 and 3 can connect to other network segments Port 4 HA can connect to another network segment Port 4 HA can also connect to other FortiGate 3000s if you are installing an HA cluster FortiGate 3000 Unit in NAT Route mode Route mod...

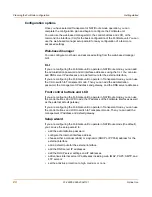
Страница 24: ...the CLI to switch to Transparent mode Then you can add the administration password the management IP address and gateway and the DNS server addresses Front control buttons and LCD If you are configuring the FortiGate unit to operate in NAT Route mode you can use the control buttons and LCD to add the IP address of the FortiGate interfaces as well as the external default gateway If you are configur...

Страница 25: ...nt IP address and gateway and the DNS server addresses Next steps Now that your FortiGate unit is operating you can proceed to configure it to connect to networks If you are going to operate the FortiGate unit in NAT Route mode go to NAT Route mode installation on page 27 If you are going to operate the FortiGate unit in Transparent mode go to Transparent mode installation on page 39 If you are go...

Страница 26: ...26 01 28005 0026 20041101 Fortinet Inc Next steps Getting started ...

Страница 27: ...cting the FortiGate unit to the network s Configuring the networks Next steps Preparing to configure the FortiGate unit in NAT Route mode Use Table 5 to gather the information that you need to customize NAT Route mode settings You can configure the FortiGate unit in several ways the web based manager GUI is a complete interface for configuring most settings See Using the web based manager on page ...

Страница 28: ...ble 5 NAT Route mode settings Administrator Password Internal IP _____ _____ _____ _____ Netmask _____ _____ _____ _____ External IP _____ _____ _____ _____ Netmask _____ _____ _____ _____ Port 1 IP _____ _____ _____ _____ Netmask _____ _____ _____ _____ Port 2 IP _____ _____ _____ _____ Netmask _____ _____ _____ _____ Port 3 IP _____ _____ _____ _____ Netmask _____ _____ _____ _____ Port 4 HA IP ...

Страница 29: ...r an interface 3 Set the addressing mode for the interface Choose from manual DHCP or PPPoE 4 Complete the addressing configuration For manual addressing enter the IP address and netmask for the interface For DHCP addressing select DHCP and any required settings For PPPoE addressing select PPPoE and enter the username and password and any other required settings For information about how to config...

Страница 30: ...e FortiGate unit Use the information that you recorded in Table 5 on page 28 to complete the following procedure Start when Main Menu is displayed on the LCD When you configure interfaces using the control buttons and LCD the interfaces are always named internal external and DMZ The interface names on the LCD correspond as follows to the FortiGate interfaces 1 Set the internal interface IP address...

Страница 31: ...highlight the external interface and press Enter 3 Use the down arrow to highlight Default Gateway 4 Press Enter and set the default gateway 5 After you set the last digit of the default gateway press Enter 6 Press Esc to return to the Main Menu You have now completed the initial configuration of the FortiGate unit and you can proceed to Next steps on page 37 Using the command line interface You c...

Страница 32: ...c set ip 192 168 120 99 255 255 255 0 end 3 Set the IP address and netmask of the external interface to the external IP address and netmask that you recorded in Table 5 on page 28 config system external edit external set mode static set ip address_ip netmask end Example config system external edit external set mode static set ip 204 23 1 5 255 255 255 0 end To set the external interface to use DHC...

Страница 33: ...44 75 21 set secondary 293 44 75 22 end To add a default route Add a default route to configure where the FortiGate unit sends traffic that should be sent to an external network usually the Internet Adding the default route also defines which interface is connected to an external network The default route is not required if the interface connected to the external network is configured using DHCP o...

Страница 34: ... medium or none Table 8 lists the additional settings that you can configure with the setup wizard See Table 5 on page 28 and Table 6 on page 28 for other settings Table 8 Setup wizard settings Password Prepare an administrator password Internal Interface Use the information you gathered in Table 5 on page 28 External Interface Use the information you gathered in Table 5 on page 28 DHCP server Sta...

Страница 35: ... on page 37 Connecting the FortiGate unit to the network s After you complete the initial configuration you can connect the FortiGate 3000 unit between the internal network and the Internet There are two fiber optic gigabit ethernet connectors on the FortiGate 3000 Internal for connecting to the internal network External for connecting to your public switch or router and the Internet Antivirus Hig...

Страница 36: ...ng in NAT Route mode 1 Connect the Internal interface to the hub or switch connected to the internal network 2 Connect the External interface to your public switch or router 3 Optionally connect interfaces 1 2 3 and 4 HA to networks Figure 9 FortiGate 3000 NAT Route mode connections Note You can also create redundant connections to the Internet by connecting two interfaces to separate Internet con...

Страница 37: ...ring monitoring and maintaining the FortiGate unit To set the date and time For effective scheduling and logging the FortiGate system date and time must be accurate You can either manually set the system date and time or configure the FortiGate unit to automatically keep its time correct by synchronizing with a Network Time Protocol NTP server 1 Go to System Config Time 2 Select Refresh to display...

Страница 38: ... configure the FortiGate unit to automatically receive new versions of the virus definitions and attack definitions are available 1 Go to System Maintenance Update Center 2 Select Refresh to test the FortiGate unit connectivity with the FortiProtect Distribution Network FDN To be able to connect to the FDN the FortiGate unit default route must point to a network such as the Internet to which a con...

Страница 39: ...ing the FortiGate configuration on page 21 This chapter describes Preparing to configure Transparent mode Using the web based manager Using the front control buttons and LCD Using the command line interface Using the setup wizard Connecting the FortiGate unit to your network Next steps Preparing to configure Transparent mode Use Table 9 to gather the information that you need to customize Transpar...

Страница 40: ...ess of the management computer to 10 10 10 2 Connect to port 1 2 or 3 and browse to https followed by the Transparent mode management IP address The default FortiGate Transparent mode management IP address is 10 10 10 1 To change the Management IP 1 Go to System Network Management 2 Enter the management IP address and netmask that you recorded in Table 9 on page 40 3 Select access methods and logg...

Страница 41: ...g the front control buttons and LCD This procedure describes how to use the control buttons and LCD to configure Transparent mode IP addresses Use the information that you recorded in Table 9 on page 40 to complete this procedure Starting with Main Menu displayed on the LCD use the front control buttons and LCD 1 Press and hold the Esc button until Main Menu appears after four seconds 2 Press Ente...

Страница 42: ...bal set opmode transparent end The FortiGate unit restarts After a few seconds the login prompt appears 3 Type admin and press Enter The following prompt appears Welcome 4 Confirm that the FortiGate unit has switched to Transparent mode Enter get system status The CLI displays the status of the FortiGate unit including the following line of text Operation mode Transparent To configure the manageme...

Страница 43: ...t dst 0 0 0 0 0 0 0 0 set gateway address_gateway set device interface end Example If the default gateway IP is 204 23 1 2 and this gateway is connected to port2 config router static edit 1 set dst 0 0 0 0 0 0 0 0 set gateway 204 23 1 2 set device port2 end Using the setup wizard From the web based manager you can use the setup wizard to begin the initial configuration of the FortiGate unit For in...

Страница 44: ... Otherwise you can reconnect to the web based manager by browsing to https 10 10 10 1 If you connect to the management interface through a router make sure that you have added a default gateway for that router to the management IP default gateway field Connecting the FortiGate unit to your network After you complete the initial configuration of the FortiGate 3000 unit you can connect the FortiGate...

Страница 45: ...he FortiGate system date and time must be accurate You can either manually set the system date and time or configure the FortiGate unit to automatically keep its time correct by synchronizing with a Network Time Protocol NTP server 1 Go to System Config Time 2 Select Refresh to display the current FortiGate system date and time 3 Select your Time Zone from the list 4 Optionally select Automaticall...

Страница 46: ...bers of the FortiGate units that you or your organization have purchased You can register multiple FortiGate units in a single session without re entering your contact information To configure virus and attack definition updates You can configure the FortiGate unit to automatically receive new versions of the virus and attack definitions on a schedule through the web based manager You can also rec...

Страница 47: ...its with the same HA configuration This section describes how to configure each of the FortiGate units to be added to a cluster for HA operation The procedures are the same for active active and active passive HA High availability configuration settings Configuring FortiGate units for HA using the web based manager Configuring FortiGate units for HA using the CLI High availability configuration se...

Страница 48: ...t None when the cluster interfaces are connected to load balancing switches Hub Load balancing for hubs Select Hub if the cluster interfaces are connected to a hub Traffic is distributed to units in a cluster based on the Source IP and Destination IP of the packet Least Connection Least connection load balancing If the FortiGate units are connected using switches select Least connection to distrib...

Страница 49: ...ide master 7 Enter and confirm a password for the HA cluster 8 If you are configuring Active Active HA select a schedule 9 Select Apply The FortiGate unit negotiates to establish an HA cluster When you select apply you may temporarily lose connectivity with the FortiGate unit as the negotiation takes place 10 If you are configuring a NAT Route mode cluster power off the FortiGate unit and then rep...

Страница 50: ...system ha set mode a a a p standalone set groupid id_integer set priority priority_integer set override disable enable set password password_str set schedule hub ip ipport leastconnection none random round robin weight round robin end The FortiGate unit negotiates to establish an HA cluster 2 If you are configuring a NAT Route mode cluster power off the FortiGate unit and then repeat this procedur...

Страница 51: ...nterrupts communications on the network because new physical connections are being made to route traffic through the cluster Also starting the cluster interrupts network traffic until the individual FortiGate units in the cluster are functioning and the cluster completes negotiation Cluster negotiation normally takes just a few seconds During system startup and negotiation all network traffic is d...

Страница 52: ... the information in Transparent mode installation on page 39 to install the cluster on your network The configurations of all of the FortiGate units in the cluster are synchronized so that the FortiGate units can function as a cluster Because of this synchronization you configure and manage the HA cluster instead of managing the individual FortiGate units in the cluster You can configure and manag...

Страница 53: ...uster unit The cluster automatically synchronizes all configuration changes to the subordinate units in the cluster as the changes are made The only configuration settings that are not synchronized are the HA configuration except for the interface heartbeat device and monitoring configuration and the FortiGate host name For more information about configuring a cluster see the FortiGate Administrat...

Страница 54: ...54 01 28005 0026 20041101 Fortinet Inc Installing and configuring the cluster High availability installation ...

Страница 55: ...onfiguring FortiGate units for HA operation 47 connecting an HA cluster 51 52 High availability 47 HTTPS 6 I internal network configuring 37 IP addresses configuring from the CLI 42 configuring with front keypad and LCD 30 41 L LCD and keypad configuring IP address 30 M management IP address transparent mode 42 N NAT Route mode configuration from the CLI 31 NTP 37 45 NTP server 37 46 P power requi...

Страница 56: ...56 01 28005 0026 20041101 Fortinet Inc Index ...

Отзывы: