background image


B1057003 Rev. 3 


FONA CDRelite System User Guide


22 

4. LED Indicators 

4.1.  FONA CDRelite USB Interface Module Indications 

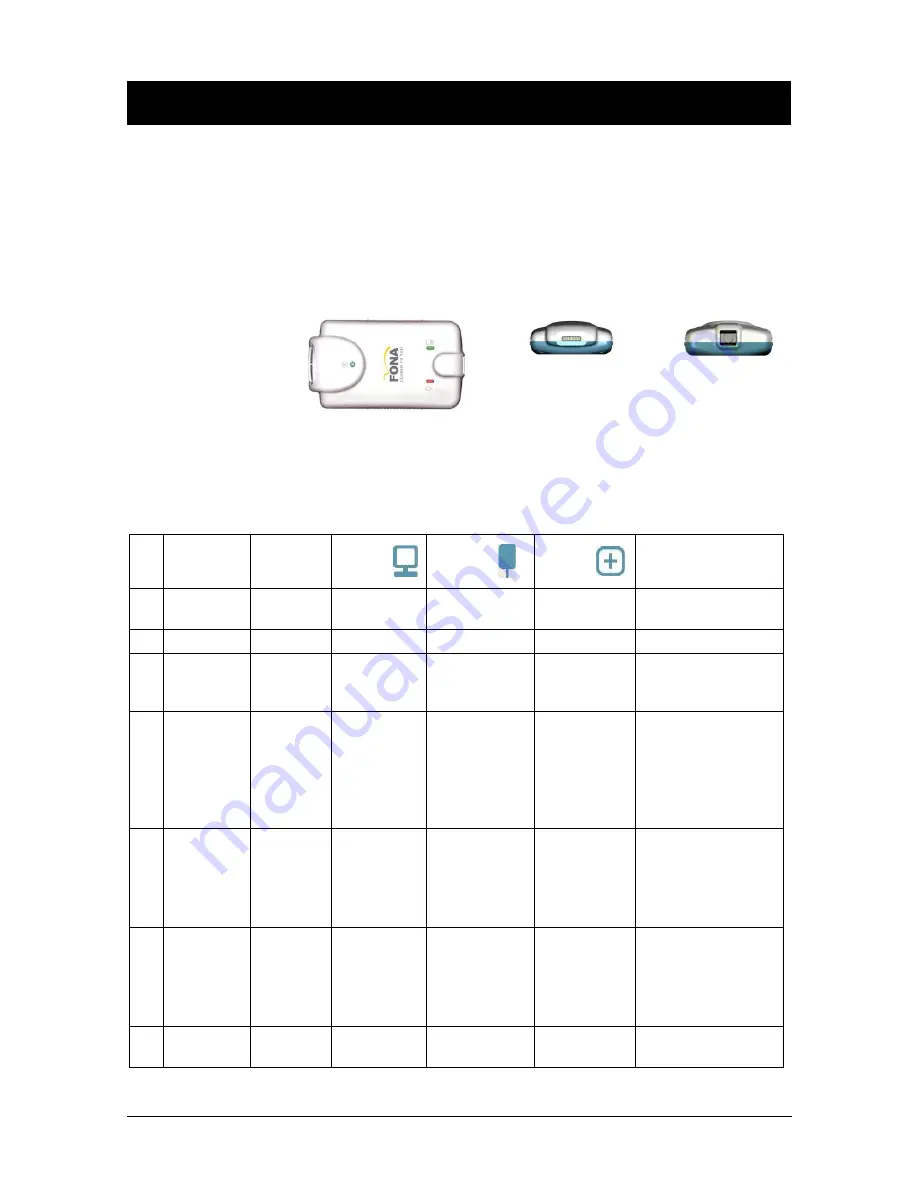
The  FONA  CDRelite  USB  Interface  Module  has  three  LED 
indicators: amber, green (USB cable side), and  green (Sensor cable 
side) for reporting its functional status. The location and description 
of the LEDs is shown in Figure 5 and described in Table 2. 


Sensor Cable Side 

USB Cable Side 

Figure 5. FONA CDRelite USB Interface Module LED and Connector Views 

Table 2. FONA CDRelite USB Interface Module LED Indications 

N

O

S

ENSOR


CDR


DICOM 

G

REEN 

LED 


A

MBER 

LED 


G

REEN 

LED 


S

TATUS


Connected 

Running 

ON 

Blinking every  
½ - 1½ secs. 

ON 

Ready for image 
acquisition 

Connected 

Running 

ON 

OFF 

ON 

Image acquisition 

Connected 

Not 
Running 

OFF 

OFF 

ON 

Start CDR DICOM 
to prepare for image 
acquisition 

Connected 

Not 
Running 

OFF 

ON 

OFF 

Cable short or over-
current condition. 
Replace Sensor 
cable. 

Replace Sensor if 
problem persists. 

Connected 

Running  
or not 
running 

OFF 

ON 

Blinking 

Low current 
condition. Replace 
Sensor cable.  

Replace Sensor if 
problem persists. 

Connected 

Running  
or not 
running 

OFF 

ON 

OFF 

Over current 
condition. Replace 
Sensor cable.  

Replace Sensor if 
problem persists. 

Not 
connected 

Not 
running 

OFF 

ON 

OFF 

Connect Sensor and 
start CDR DICOM 


NOTE: FONA CDRelite USB Interface Module is considered connected for the cases described in the above table.   

Содержание CDRelite B1111000

Страница 1: ...USB Interface User Guide B1057003 Sirona Dental Inc 30 30 47th Avenue Suite 500 Long Island City NY 11101 USA 718 937 5765 718 937 5962 fax Sirona Dental GmbH Fabrikstr 31 D 64625 Bensheim Germany PA...

Страница 2: ...nted in the United States of America This document was originally prepared in English Sirona Dental Inc products are covered by one or more US patents For a current listing please refer to the followi...

Страница 3: ...ista 9 3 4 Sensor Calibration File Installation 11 3 5 Image Enhancement 11 3 6 CDR AutoDetect 15 3 7 Using the CDR Elite Utility 17 4 LED Indicators 22 4 1 FONA CDRelite USB Interface Module Indicati...

Страница 4: ...22 List of Tables Table 1 Description of FONA CDRelite USB Interface Module Cable Connections 5 Table 2 FONA CDRelite USB Interface Module LED Indications 22 Table 3 Proper Sensor Removal from Protec...

Страница 5: ...ucting electrical current and may cause a shock hazard to patients if appropriate safety practices are not observed Follow All Instructions to Ensure Cable Replacement Procedures are Performed Correct...

Страница 6: ...te Sensor and USB Interface Module must conform to Electromagnetic Compatibility regulations to which the EMC tables in this document s Appendix serve as guidance Non conforming equipment with known p...

Страница 7: ...Module as Directed Always use the FONA CDRelite Sensor and USB Interface Module in accordance with the directions and recommendations contained in this User Guide Do not attempt to modify the FONA CDR...

Страница 8: ...a protective sheath Never use a damaged sheath Always dispose of the sheath after every patient Protective sheaths are single use devices and must not be reused under any circumstance Reuse of single...

Страница 9: ...ct life this device must be disposed of in accordance with the requirements of the Waste Electrical and Electronic Equipment WEEE directive 2002 96 EC Indicates that this product meets North American...

Страница 10: ...50419 and in accordance with WEEE Directive 2002 96 EC This crossed out wheeled bin symbol on the product or its packaging indicates that this product must not be disposed of with other unsorted munic...

Страница 11: ...aufacturer s date is placed on the equipment Information for Reuse Centers Treatment and Recycling Facilities As required by the WEEE Directive Sirona Dental or its Dealers will provide reuse treatmen...

Страница 12: ...B1057003 Rev 3 FONA CDRelite System User Guide x FONA CDRelite Sensor and USB Interface Module FONA CDRelite Sensor with FONA CDRelite USB Interface Module...

Страница 13: ...ndividuals requiring intraoral dental examinations 1 3 System Description The FONA CDRelite Sensor is connected to the FONA CDRelite Interface Module which is connected via a USB A B cable supplied se...

Страница 14: ...e and reliable operation the replaceable cable provides appropriate strain relief molded protection from electronic contacts and components and easy installation Details on replacing FONA CDRelite cab...

Страница 15: ...P2 and Vista x64 Intel i7 or equivalent 4 GB RAM 256 MB graphics card 500 GB hard drive practice specific depends on number of patients Intel USB 2 0 or 3 0 1 5 2 Server Windows Server 2003 R2 SP1 min...

Страница 16: ...tion 3 6 and you can work with either Sensor type The FONA CDRelite USB Interface Module that connects the FONA CDRelite Sensor to the workstation via USB 2 0 cable is unique to the FONA CDRelite Sens...

Страница 17: ...e listed below B2250150 5 meters 16 5 feet B2250151 2 meters 6 5 feet B2250152 0 5 meter 1 6 feet IMPORTANT Fornormal operationof yourFONA CDRelite systemandtoensure compliance withregulatoryEMCandEMI...

Страница 18: ...FONA CDRelite USB Interface Module Holder 2 2 1 Wall Mounting Option with Fasteners IMPORTANT Whenchoosingalocationfortheholder makesuretherearenoelectrical wiresorconnectionsthatcouldbecontactedaccid...

Страница 19: ...e as follows 1 Remove the FONA CDRelite USB Interface Module from its holder 2 Cut and trim a piece of Velcro adhesive not supplied to the size of the back of the Remote Remove one half of the tape an...

Страница 20: ...for installingthesefilescanbe foundonthefollowingpages The software component to accompany the your FONA CDRelite USB Interface Module installation consists of the FONA CDRelite USB Interface Module d...

Страница 21: ...1 A Insert the FONA CDRelite USB Remote Driver CD B Click Run setup exe when prompted at the Autoplay message window C Click Allow when the message An unidentified program wants access to your comput...

Страница 22: ...drivers to your workstation STEP 5 A Click Finish B Connect the FONA CDRelite USB Interface Module to your computer When you do you will receive a momentary message saying that new hardware has been i...

Страница 23: ...nitor There are 3 options Edge High Edge Low and Smooth and the names themselves describe the enhancements they perform For sample X rays that illustrate the effects of these enhancements please refer...

Страница 24: ...Guide 12 3 5 2 Disabling Image Enhancement Image Enhancement can be disabled at any time by clicking the Apply Image Enhancement checkbox again which removes the checkmark When the checkbox is cleared...

Страница 25: ...FONA CDRelite System User Guide B1057003 Rev 3 13 Figure 3 Enhancements Smooth top and Edge High bottom...

Страница 26: ...B1057003 Rev 3 FONA CDRelite System User Guide 14 Figure 4 Enhancements Edge Low top and None Applied bottom...

Страница 27: ...abled by default If however it has been disabled and you wish to re enable it open the X ray acquisition options page in CDR DICOM browse to the System menu and select X ray Settings If unchecked clic...

Страница 28: ...ting that the device was just detected and has become active It is also possible to interact with the CDR AutoDetect feature by clicking on the notification window when it appears or by double clickin...

Страница 29: ...This tool can be used to accomplish the following Perform USB Interface tests Perform Sensor Pattern tests Perform USB Interface firmware upgrades Perform Sensor Module firmware upgrades A sample scr...

Страница 30: ...erns which can be the result of a problem with the FONA CDRelite device or its USB connector or the USB cable and or port or corrupt firmware inside the FONA CDRelite device Additional troubleshooting...

Страница 31: ...result of a problem with the FONA CDRelite device or its Sensor connector or the Sensor cable or corrupt firmware inside the FONA CDRelite device Additional troubleshooting can be performed if another...

Страница 32: ...lose CDR DICOM if running 2 Verify that FONA CDRelite USB Interface is connected to the host computer 3 Start the CDR Elite Utility Start All Programs CDR DICOM for Windows CDR Elite Utility 4 If the...

Страница 33: ...ure Peform the following steps to upgrade FONA CDRelite Sensor firmware STEP ACTION 1 IMPORTANT Close CDR DICOM if running 2 Verify that FONA CDRelite USB Interface is connected to the host computer 3...

Страница 34: ...US 1 Connected Running ON Blinking every 1 secs ON Ready for image acquisition 2 Connected Running ON OFF ON Image acquisition 3 Connected Not Running OFF OFF ON Start CDR DICOM to prepare for image a...

Страница 35: ...nning The green LED on the same side will also be illuminated 6 The green LED on the Sensor side of the FONA CDRelite USB Interface Module illuminates also and remains steady on indicating proper curr...

Страница 36: ...ng the X ray setting depending on intraoral position and placing the X ray source as close as possible to the imaging area of the Sensor all of these contribute towards obtaining quality digital X ray...

Страница 37: ...he aiming bar where it joins the Sensor 2 Still grasping the bar underneath the sheath use your thumb to start pushing the distal tip of the Sensor out of the sheath 3 Continue pushing the Sensor away...

Страница 38: ...er Guide 26 Table 4 Examples of FONA CDRelite Sensor to Image Orientation Sensor Location Sensor Orientation Inverse Pixels Circled and Image Orientation Patient s left side Left Bitewing Patient s up...

Страница 39: ...t Series which opens the Edit Viewset dialog box Re usable customized series can be created at the Series New Intraoral Series menu C The numbers in the text boxes correspond to how many target frames...

Страница 40: ...n the view box is highlighted click on it again If using a serial footpedal press the amber pedal STEP 6 The system is ready to acquire an X ray image A Please Wait message may appear momentarily STEP...

Страница 41: ...ard Shortcuts Intraoral image acquisition can be also accomplished though the use of shortcut keys Refer to the following table for information Table 5 Keyboard Shortcuts Desired Action Use Keys Selec...

Страница 42: ...gs arms and holders should be cleaned and disinfected following manufacturer s instructions If you are using the Rinn holder system refer to their product documentation or their website for more infor...

Страница 43: ...30 seconds 9 Repeat steps 7 and 8 When the Sensor has been wiped two times continue with the following steps 10 Remove potential chemical build up from the Sensor by wiping it with a sterile lap spong...

Страница 44: ...Damaged Sensor In the event of obvious physical damage to the Sensor customers shall discontinue use of that Sensor substitute another FONA CDRelite Sensor if available and contact their local distrib...

Страница 45: ...Ddamage Touchingametalsurfacepriorto replacingthe FONACDRelitecable willreducetheriskof damagingSensorcomponentsbyaccidentalstaticdischarge Theuseof anti staticfloor matsorfloortreatments forexampleSt...

Страница 46: ...elite spare parts kit and place it into position When positioned correctly the flat side of the frame will be facing up NOTE FONA CDRelite parts are blue B Using tweezers take a new blue strip from th...

Страница 47: ...e cable to the Sensor insert one of the screws into its hole E Using the screwdriver tighten the first screw just until you feel some resistance Repeat this action for the second screw F Returning to...

Страница 48: ...tab cover over the screw slot and slide it across the slot while applying downward pressure especially at the middle of the tab B When the tab completely covers the slot snap it into place C Verify t...

Страница 49: ...C Using an appropriate dental instrument such as a scaler carefully lift and remove the tab cover from the back of the Sensor cable Dispose of the tab cover as a new one will be used when the new cab...

Страница 50: ...n the sensor should be completely covered by the cable STEP 5 A Holding the cable to the Sensor insert one of the screws into its hole Using the screwdriver tighten the first screw just until you feel...

Страница 51: ...57003 Rev 3 39 STEP 6 A Place the new tab cover over the screw slot and press evenly with both thumbs You should hear a soft click when the cover closes B Verify that the tab cover fits evenly in its...

Страница 52: ...s please contact your local distributor A 2 Part Numbers The following table provides customer orderable part number information for FONA CDRelite Sensors cables and kits Table 6 Orderable Item Part N...

Страница 53: ...C Council Directive of 14 6 1993 concerning medical devices amended by directives 98 79 EC 27 10 98 2000 70 EC 16 10 2000 2001 104 EC 7 12 2001 2007 47 EC 5 9 2007 Classification Class II Type BF equi...

Страница 54: ...e leakage current requirements of IEC 60601 1 1 safety standard Variations however may exist in the construction of computers to which the FONA CDRelite USB Interface Module is connected Customers are...

Страница 55: ...any interference in nearby electronic equipment RF emissions CISPR 11 Class B The FONA CDRelite USB Interface Module is suitable for use in all establishments including domestic establishments and th...

Страница 56: ...ty should be that of a typical commercial or hospital environment Conducted RF IEC 61000 4 6 3 Vrms 150 kHz to 80 MHz 3 Vrms Portable and mobile RF communication equipment should be used no closer to...

Страница 57: ...he FONA CDRelite USB Interface Module is intended for use in an electromagnetic environment in which radiated RF disturbances are controlled The customer or user of the FONA CDRelite USB Interface Mod...

Страница 58: ...distributor B 2 Troubleshooting Table Item Description Corrective Action 1 Both green LEDs are off when CDR DICOM or other imaging software is not running Cable short or over current condition Replac...

Страница 59: ...Maintenance 32 Operation 23 Periodic Maintenance 32 Picture of x Visual Inspection 32 FONA CDRelite Setup Windows Vista 9 I Image Enhancement 11 K Keyboard Shortcuts 29 L Leakage Current Statement 42...

Страница 60: ...terference Considerations iv Use USB Cables Approved for FONA CDRelite System iii Wait for Prompts before Operating X ray Source v Setup 5 8 Summary of Specifications 41 T Troubleshooting Table 46 U U...

Отзывы: