background image


Introduction 

 Introduction 

1


1-7 

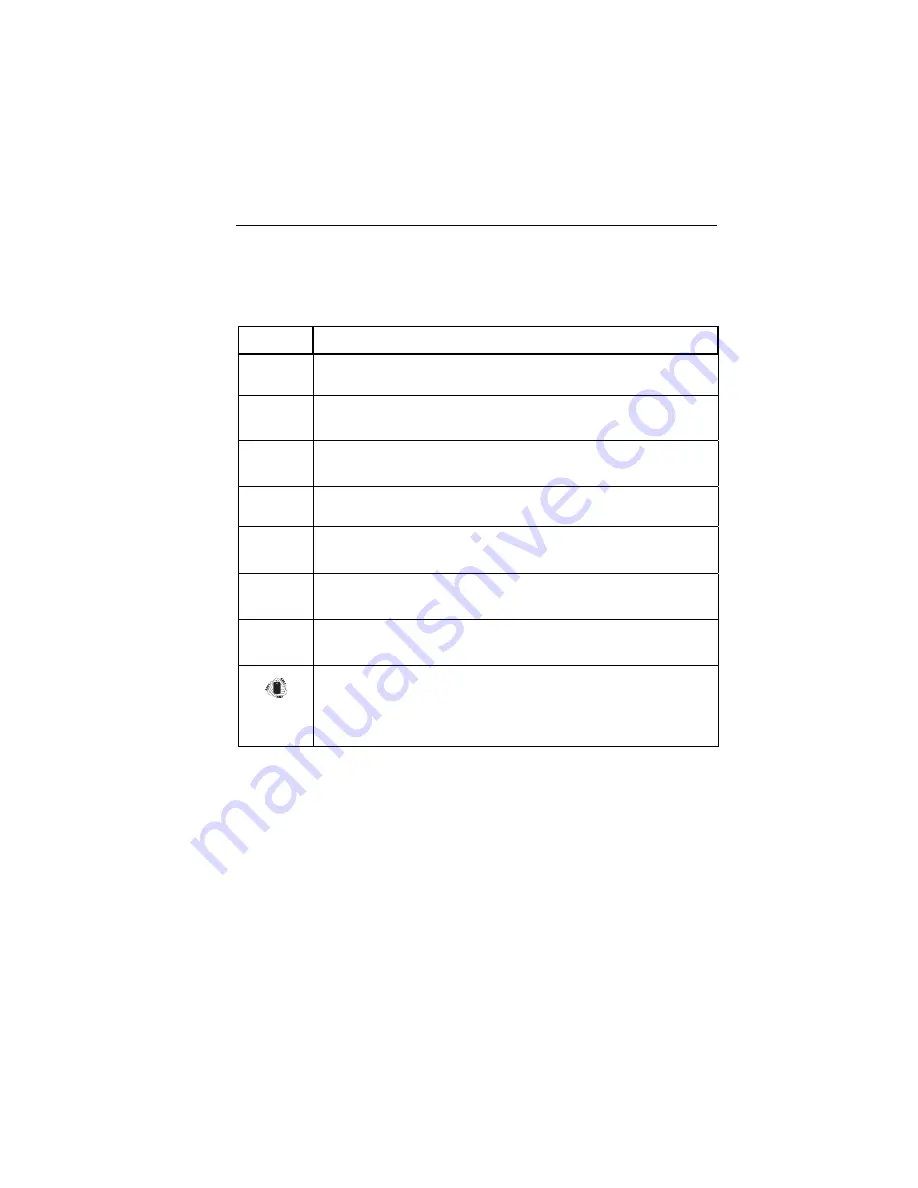
Table 1-1 describes the international electrical symbols that are found on the 
CopperPro and used in this guide. 

Table 1-1. International Electrical Symbols 

Symbol Meaning 

X


Warning: Risk of electric shock. 

W


Important Information. See specific explanations where this 
symbol is displayed in this guide. 

T


Equipment is protected by double insulation or reinforced 
insulation to protect the user against electric shock. 

v


Battery should be recycled. 

=


Do not mix with solid waste stream. Dispose using a qualified 
recycler or hazardous material handler. 

P


Conforms to the requirements of the European Union and 
European Free Trade Association (EFTA). 

)


Canadian Standards Association. Conforms to relevant safety 
standards in Canada and the United States. 


This instrument contains a Nickel Metal Hydride battery pack. 
Fluke Networks subscribes to the U. S. Rechargeable Battery 
Recycle Corporation (RCRB) program. Contact your authorized 
Fluke Networks Service Center for recycling information.  


Содержание 990DSL

Страница 1: ...990DSL CopperPro Series II Broadband Loop Tester Users Guide August 2006 Rev 2 09 07 2006 2007 Fluke Networks Inc All rights reserved All product names are trademarks of their respective companies...

Страница 2: ...portation costs of re pair replacement parts when product purchased in one country is submitted for repair in another country Fluke Networks warranty obligation is limited at Fluke Networks option to...

Страница 3: ...mages the limitations and exclusions of this warranty may not apply to every buyer If any provision of this Warranty is held invalid or unenforceable by a court or other decision maker of competent ju...

Страница 4: ......

Страница 5: ...port 1 11 2 Controls and Connections 2 1 Introduction 2 1 The CopperPro Loop Tester at a Glance 2 2 Front Panel 2 2 LCD 2 3 Keypad 2 3 Top Connector Panel 2 6 Side Connector Panel 2 6 Back Panel 2 7 C...

Страница 6: ...forming Basic Operations 3 20 Calibrating the CopperPro 3 20 Turning the Backlight On and Off 3 21 Adjusting the Contrast of the LCD 3 21 Adjusting the Volume of the Speaker 3 22 Displaying System Inf...

Страница 7: ...Noise Test 4 40 Setting Up a VF Noise Test 4 40 VF Noise Test Results 4 41 Power Harmonics Test 4 42 VF Loss Test 4 43 Setting Up a VF Loss Test 4 43 Running a VF Loss Test 4 44 VF Loss Test Results...

Страница 8: ...Service Types 5 11 Saving DSL Auto Test Results 5 13 DSL Modem Test 5 14 Setting Up a DSL Modem Test 5 16 Running a DSL Modem Test 5 18 Ping 5 20 Setting Up and Running a Ping 5 20 Ping Setup Details...

Страница 9: ...topping a TDR Auto Test 6 6 TDR Auto Test Results 6 7 Saving TDR Auto Test Results 6 10 The TDR Toolbox 6 10 Running a Test in the TDR Toolbox 6 11 Saving TDR Test Results 6 11 Pair 1 Test 6 11 Pair 1...

Страница 10: ...ency Sweep Graph 7 10 Deleting a Saved Frequency Graph 7 11 Printing Test Results 7 11 Uploading Test Results to a PC 7 12 8 Updating the CopperPro with New Software 8 1 Introduction 8 1 Before You Be...

Страница 11: ...4 13 Dial Up Tests and Associated Subtests 4 52 4 14 Dial Up Test Setup Parameters 4 53 4 15 Smart Pro Tests 4 59 4 16 Smart Pro Test Key Commands 4 60 4 17 SASS Test Key Commands 4 62 4 18 DATU Manua...

Страница 12: ...990DSL Users Manual viii...

Страница 13: ...its Test Result Screen 4 21 4 12 RFL Test Results Fault Value and Position 4 23 4 13 RFL Test Results Double sided Fault or Short 4 24 4 14 Two Wire RFL Test Results Tip Ground 4 25 4 15 Two Wire RFL...

Страница 14: ...ondary Results Screen VDSL1 5 Line 5 19 5 11 DSL Modem Test Bits Bin Graph ADSL2 Line 5 20 5 12 DSL Modem Test Ping Results ADSL2 Line 5 21 5 13 Primary Ping Setups Screen 5 23 5 14 XDSL Toolbox 5 28...

Страница 15: ...nd using it to precisely locate common faults on a loop and to verify the ability of a copper loop to transport various classes of high speed data services This guide is intended for users who want to...

Страница 16: ...aused by poor splice joints The tester can also be used to expose corroded metallic faults on unused pairs This type of problem which is virtually undetectable by conventional meters can eventually ca...

Страница 17: ...ressed High capacity rechargeable battery pack that provides a full eight hours of operation Modular field replaceable test leads one shielded pair for Broadband tests one unshielded pair for Voiceban...

Страница 18: ...ated testing Double ended same pair testing capability requires no control pair AC DC Voltage Shorts Grounds Opens Leakage and Resistance Fault Location RFL physical tests Load Coil Noise Loss SNR and...

Страница 19: ...ound Do not move the CopperPro from pair to pair while in a continuous testing mode to prevent damage to the unit The following general safety precautions must be observed during all phases of operati...

Страница 20: ...e the CopperPro if it operates abnormally Protection may be impaired Inspect the CopperPro before using Do not use it if it is damaged When servicing the CopperPro use specified replacement parts only...

Страница 21: ...to protect the user against electric shock v Battery should be recycled Do not mix with solid waste stream Dispose using a qualified recycler or hazardous material handler P Conforms to the requireme...

Страница 22: ...o clean the tester use a soft slightly damp cloth To remove any stains use a mild soap Never use detergents solvents or abrasive cleaners on the tester Service and Adjustment Service and adjustment of...

Страница 23: ...the items from the shipping container and check that the package contains all of the standard accessories in the following list Match each item with those shown in Figure 1 1 If any item is missing o...

Страница 24: ...ST SAV ED RESULTS BACK 1 2 3 4 DIAL COPP ERPRO 990DSL LOO P TEST ER RS 232 cable Shielded Pair 1 Test Lead Set 990DSL Copper Pro Loop Tester and Holster NiMH rechargeable battery pack installed Power...

Страница 25: ...support flukenetworks com or call one of these numbers For operating assistance in the USA call 1 800 28 FLUKE 1 800 283 5853 This number is for Technical Support in theUS only To order accessories o...

Страница 26: ...990DSL Users Guide 1 12...

Страница 27: ...w of the tester s front side and back panels so that you know where the various controls and connectors are located and so that you can familiarize yourself with the functions of the keys and indicato...

Страница 28: ...figure are descriptions of the numbered items in the illustration COPPERPRO SERIES II 990DSL BROADBAND LOOP TESTER USER OPTIONS PRINT SCREEN HOME ENTER ABC DEF GHI JKL MNO PQRS TUV SPACE WXYZ 1 4 5 6...

Страница 29: ...dent function keys To activate a function press its softkey 1 2 3 or 4 which is located on the tester s keypad directly below the label Keypad The keypad is a sealed waterproof membrane that has 29 ke...

Страница 30: ...ss a key that has two functions the alternate function of the key is activated The alternate function is printed in yellow letters above the key Causes the CopperPro to go off hook on the T R test lea...

Страница 31: ...own left or right Press Then press I to decrease or G to increase the contrast of the LCD Press Then press F to increase or H decrease the volume of the speaker L Does the following Selects test optio...

Страница 32: ...232 port item A A nine pin male D Sub connector with locking nuts The RS 232 port and the supplied RS 232 cable are needed when you download programs from a PC to the tester and when you control the t...

Страница 33: ...tester s back panel is shown in Figure 2 2 This panel contains a speaker item A and a microphone item B The speaker and microphone enable you to use the CopperPro as a dial set see Operating the Test...

Страница 34: ...C Barrel plug into the DC connector This connector is located on the tester s side panel see Figure 2 1 3 Do one of the following Turn off the tester to begin charging see Charging the Battery for det...

Страница 35: ...tor 2 Attach the nine pin male cable connector to the printer Connecting to a PC If the CopperPro is connected to a PC you can download and upload files and control the tester remotely from the PC To...

Страница 36: ...the USER OPTIONS menu 2 Select Battery Status then press L The Battery Status screen is displayed This screen gives you the following information about the internal battery pack Battery voltage VDC Ba...

Страница 37: ...ng to AC Power or connect it to an automobile battery see Connecting to an Automobile Battery During operation from either external power source the battery receives a trickle charge that allows you t...

Страница 38: ...arged The CopperPro can be left in the trickle charge state for an indefinite period of time without harm Note Do not attempt to charge the battery at extremely low temperatures see Appendix A Dischar...

Страница 39: ...operating preferences The chapter begins with an introduction to the menu system and shows you how to locate desired tests operational functions and setup parameters The chapter concludes by showing...

Страница 40: ...00 Installed Options TDR Wideband Battery Charge Status 25 Estimated Run time 4 Hours Self Test in Progress FLUKE CopperPro networks acy03s eps Figure 3 1 CopperPro Startup Screen The startup screen...

Страница 41: ...isplay the test and setup menus Displaying the Main Menu The Main menu is the top level menu From this menu you can access all of the CopperPro s setup and testing functions After you turn on the Copp...

Страница 42: ...XDSL or TDR toolbox see Chapter 4 5 or 6 respectively Note When running a Continuous test make sure that you connect the green Ground test lead to a good Earth ground C O Frame ground or cable sheath...

Страница 43: ...2 Select the test that you want to set up Then press D Setups The Setups menu for the test is displayed Generic and Test Specific Setup Parameters Figure 3 3 shows a typical setup menu for a toolbox...

Страница 44: ...s eps Figure 3 3 Typical Setup Menu Beneath the generic setup parameters is a second group of setup parameters The parameters in this group are specific to the selected test Look at the Setup VF Noise...

Страница 45: ...five digits maximum CopperPro Pair No This number identifies the CopperPro test lead pair In the highlighted field type a 1 for T R or a 2 for T1 R1 if no external multiple pair access modules are att...

Страница 46: ...parameter you want to change has a fixed group of choices press F or H until the desired choice appears in the field Then press L to save the selection OR If the parameter has an alphanumeric field a...

Страница 47: ...with the desired alphabetic character Keep pressing the key until the desired alphabetic character is displayed Exit alphabetic text entry mode and return to numeric entry mode Press Move the cursor...

Страница 48: ...t System Version Company Info Date Time System Setups Select function then press Enter or press System Setups Initialize Bluetooth Upload Setups Restore All Defaults acy08s eps Figure 3 4 USER OPTIONS...

Страница 49: ...4 Press H to move the cursor down to the Date Display Mode field Press A Edit Then press G to select one of the following formats for the date MM DD YYYY DD MM YYYY Press L to save your selection 5 Pr...

Страница 50: ...ate Setting a Timer to Conserve Power To conserve battery power you can program a timer that automatically switches the tester into low power mode or power down mode after a specified period of inacti...

Страница 51: ...Selecting a Language and Associated Units of Measure The CopperPro displays and prints information in the following languages English U S U K and Canada Spanish French France and Canada Portuguese Br...

Страница 52: ...anguage are also displayed Creating a Phone List You can create and store a list of telephone numbers that you use frequently The list can save you time when you run the dial up tests described in Cha...

Страница 53: ...r notes in the Remarks field 1 Press the I or G key to select the Number or Remarks field Then press A Edit 2 Press the I or G key to move the cursor to the desired position within the selected field...

Страница 54: ...numeric characters All other parameters can consist of up to 30 alphanumeric characters a Position the cursor on the desired field Then press A Edit b Use the keypad to enter alphabetic or numeric inf...

Страница 55: ...ing operations Printer baud rates are internally preset for the Seiko DPU 414 and DPU 411 printer choices 4 To change the information on this screen complete the following for each parameter a Positio...

Страница 56: ...haracters long System Setups Operator Name Wire Center FLEETWOOD CO Location 2144 Adams St Job Number 1021 4443 Edit Include All List Wire Centers To include Operator Name Location Job Number in Saved...

Страница 57: ...formation that you supply for Wire Center in the header 5 Press H to move the cursor to Location Press A Edit and supply the desired information When you finish press L 6 Press H to move the cursor to...

Страница 58: ...t allows the CopperPro to compensate for test lead resistance and capacitance in subsequent Resistance Fault RFL and Opens measurements The constants generated from this test are stored in non volatil...

Страница 59: ...ideo so that it is easier to view in low light conditions press then To return to normal video press then again Adjusting the Contrast of the LCD To adjust the contrast of the LCD complete the followi...

Страница 60: ...wly adjusted volume giving you a sample of the level of sound 2 When the volume is acceptable to you press again The new setting is saved in memory and remains in effect even after you turn off the te...

Страница 61: ...est lead to the cable sheath or C O ground 3 Press The Dialing Mode Selection screen is displayed 4 Do one of the following To automatically dial the number press A Auto Dial Select the number from th...

Страница 62: ...n Then press K Printing Displayed Results and Setup Information You can print any setup information or test result screen that is currently displayed on the tester s LCD To do this follow these steps...

Страница 63: ...l TeraTerm etc Set up the program as follows Baud Rate 38 400 bps 8 Data bits 1 Stop bit No Parity Set data transfer mode to the XMODEM Receive File format with CRC enabled Name the file with a BMP fi...

Страница 64: ...990DSL Users Guide 3 26...

Страница 65: ...eristics of either a spare or working POTS pair The chapter then describes the individual tests in the POTS toolbox This toolbox contains a group of specialized tests that provide detailed information...

Страница 66: ...t All but the first two tests are user selectable which gives you the flexibility to customize an Auto Test that fits your particular testing situation Setting Up a POTS Auto Test To set up a POTS Aut...

Страница 67: ...dit b Press F or H to select Y if you want to include the test or N if you do not want to include the test c Press L to save your selection Note To restore the factory default values of the setup para...

Страница 68: ...of coils and approximate distance to the first on spare or working POTS pairs plus a frequency response graph Select Y to enable the test Select N to disable the test Loop Devices Detects the presenc...

Страница 69: ...s Milliwatt Milliwatt or N Tone sweep number Setup screen 2 Enter number to enable test on working POTS pairs VF Noise Test Delay Post dialing delay prior to running VF Noise test Setup screen 2 Enter...

Страница 70: ...Test at any time press K POTS Auto Test Results While Auto Test is running the tester displays the test it is currently performing When Auto Test is completed a Test Summary screen is displayed showi...

Страница 71: ...sor on the name of the test then press A Details To page directly to the next test Details screen press H To view the setup for a test press F or H to position the cursor on the name of the test then...

Страница 72: ...toolbox tests shows you how to run them and describes their results Running a Test in the POTS Toolbox From the Main menu press A POTS to display the POTS toolbox Figure 4 3 Press an arrow key to sel...

Страница 73: ...tage test setup parameters Table 4 2 Voltage Test Setup Parameters Parameter Settings default in bold ACV Hazard Volt Threshold 50 VAC Range 40 to 120 ACV Pass Thresholds TR TG RG 3 VAC Range 1 to 30...

Страница 74: ...ge readings are reported that are outside the acceptable limits for a spare pair as defined in Setups These readings are shown on the diagram in flashing reverse video format for emphasis From the res...

Страница 75: ...ots real time voltage variations against the reference center value of the initial reading Peak voltage excursions are recorded as half tone shaded portions of the bar with excursions beyond the scale...

Страница 76: ...Settings default in bold Resist Fault Pass Threshold 150 Ke Range 2 to 9999 Cable Gauge 19 22 24 26 or 28 AWG Cable Temperature 68 F Range 99 to 199 Measurement Mode Normal or High AC Rejection See PO...

Страница 77: ...obtain a continuous resistance reading Press B Leakage Stress to run a high voltage test to break down and expose high resistance oxidized copper faults See Leakage Stress Test Press C RFL to run a Re...

Страница 78: ...nce values to distances complete the following 1 On the Shorts Grounds result screen press D Ohms to Distance 2 If the cable gauge or temperature is different from that specified in the setup for the...

Страница 79: ...ter actually measures the Capacitance Ratio of the pair during the Opens Test The Opens Test performs a measurement of the capacitive length of the pair as well as the capacitive balance between the T...

Страница 80: ...ou obtain you may want to run additional tests on the pair From the Opens test results screen you can do the following Press A Adjusted Opens to calibrate the pair to a known length or mutual capacita...

Страница 81: ...as much as 7 among cables Therefore for greater accuracy it is strongly recommended that you first perform an Opens test on a known good pair in the cable This data can then be saved as a Custom Cable...

Страница 82: ...ts maximum no commas and or a Cap Reference value if known to be non standard When finished press D Save as Custom to create a Custom Cable Type based on the entered data using the same 3T Cap Ratio v...

Страница 83: ...eing fairly short In this case when the pair is known to be split but shows to be good and balanced you should run the Splits Test Note The Splits test provides the approximate distance to a split To...

Страница 84: ...standard 3T Cap Ratio If the pair is a known good pair with a non standard 3T Cap Ratio you can create a Custom Cable Type with those characteristics by pressing A Adjusted Opens then D Save as Custo...

Страница 85: ...nection diagram Figure 4 10 4 Press K Note The two split pairs must be the same lengths within 5 to obtain a meaningful measurement If not the tester detects the imbalance and displays an error messag...

Страница 86: ...tio is then changed until it precisely mirrors the ratio of the faulted leg to the good leg and is then used to calculate resistance values to the fault and strap Setting Up an RFL Test To set up an R...

Страница 87: ...ates the leg positions and values of all fault resistances and then displays a screen that prompts you to connect a far end strap dotted line For a single sided ground fault the display will look like...

Страница 88: ...ure 4 13 and you have not already connected a far end strap go to Short or Double Sided Fault Location Test Results for instructions on how to strap the pair and complete the test If your screen is si...

Страница 89: ...d select RFL again from the POTS Toolbox Select A Continue Prev Test then press K If the strap is not detected a Strap Connection Error message is displayed If the strap is properly connected the test...

Страница 90: ...o enter single gauge and temperature information or press C Multiple Gauge to enter multi gauge section information b When finished press M then A Distance to Fault The relevant distances are displaye...

Страница 91: ...ed as a length of cable having a gauge that is different from the preceding length or a length of cable containing a load coil at the end To enter multiple wire gauge information do the following 1 On...

Страница 92: ...H to select Y Otherwise select N and press L 10 PressG to move the cursor to the Section 2 Length field 11 Repeat Steps 2 7 until you enter information for all of the sections When you finish press M...

Страница 93: ...d strap distance Note If the cable contains one or more gauge changes between the tester and the far end strap the average resistivity calculated from the entered strap distance could result in inaccu...

Страница 94: ...wn in Figure 4 17 is displayed acy29s eps Figure 4 17 Two Wire RFL Test Results Good Wire Strap a As prompted reconnect the leads to the good wire and connect the far end strap Then press K When the t...

Страница 95: ...Distances OR If a good pair is available press B Good Pair Any Ga and a connection diagram like the one shown in Figure 4 19 is displayed acy26s eps Figure 4 19 Three Wire RFL Test Good Pair Strap Th...

Страница 96: ...he separate good pair as the strap When completed resistances to the fault and strap are displayed Note The 3W RFL test is slightly longer because the tester has to run the nulling bridge process on b...

Страница 97: ...potential and occur at the same physical place on the cable The larger fault resistance must be greater than twice the smaller value The larger fault resistance must be at least one hundred times grea...

Страница 98: ...is normally done Load Coils Test The Load Coils test performs a frequency sweep of the pair either spare or working POTS to determine the number of load coils present and the approximate distance to t...

Страница 99: ...Results Figure 4 21 shows that six load coils were detected with 3029 feet to the first From this result screen you can do the following a Press A Load Coil Graph to view a frequency sweep graph of t...

Страница 100: ...oads but the actual number may be visually determined by looking at the graph b Press B TDR to go directly to the TDR menu which allows a more accurate distance to the first coil to be measured c Pres...

Страница 101: ...ce test that uses a higher test voltage than normal in order to punch through a potential metallic wire fault that has oxidized over time During normal resistance testing this type of fault typically...

Страница 102: ...tially started at a reading of 140 kilohms but during the applied stress voltage its value decreased to 138 kilohms This reduction indicates the presence of a T R short that has oxidized Under normal...

Страница 103: ...d only between Ring and Ground D T R Tone applied only between Tip and Ring audible Setting Up a Tracing Tone Test The Tracing Tone test has no test specific setup Running a Tracing Tone Test To run a...

Страница 104: ...OTS Toolbox and press D Setups Refer to Table 4 7 for VF Noise test setup parameters Table 4 7 VF Noise Test Setup Parameters Parameter Settings default in bold Termination Impedance 600 e or 900 e Te...

Страница 105: ...eptable Metallic Noise Nm but the Power Influence PI value is above the acceptable threshold as defined in Setups acy36s eps Figure 4 24 VF Noise Test Results From this screen you can run other tests...

Страница 106: ...in VF Noise Setups The fundamental frequency 50 60 Hz is automatically derived from the selected Language Country in USER OPTIONS Figure 4 25 illustrates a typical set of Power Harmonics on a working...

Страница 107: ...trolled VF transmitting device such as another CopperPro tester or the C9925BLT be connected at the far end of the pair The device must be capable of transmitting single tones at a level of 0 dBm at 6...

Страница 108: ...own in Figure 4 26 acy108s eps Figure 4 26 Connection Diagram for the VF Loss Test 2 Connect the far end sending unit as shown in the diagram 3 Do one of the following Select A Single Tone if the send...

Страница 109: ...martTone loss test measures the 100 tone composite frequency set transmitted by another CopperPro tester and displays a complete graph of the results This test in addition to being much faster than te...

Страница 110: ...alance Setup Parameters Parameter Setting default in bold Pass Threshold 60 dB Range 0 to 80 Disturbing Frequency 1000 Hz Range 200 to 2500 VF Longitudinal Balance Test Results To run the VF Long Bala...

Страница 111: ...perPro tester generates a variety of precision single tones swept tone sets or a composite VF tone set Setting Up a Send VF Tone Test To set up a VF Tone select it on the POTS Toolbox and press D Setu...

Страница 112: ...box then press L The Send VF Tone screen is displayed as shown in Figure 4 29 2 Press the softkey for the desired tone see Table 4 11 for descriptions Press D More to view the second screen of tone se...

Страница 113: ...ence of 3 tones each lasting four seconds 404 1004 2804 Hz 0 0 dBm fixed level per tone 10 Tone Sweep Sequence of 10 tones each lasting three seconds 404 804 1004 1204 1404 1604 1804 2004 2804 3004 Hz...

Страница 114: ...surement point to C O Setting Up a Loop Current Ground Ohms Test 1 From the POTS Toolbox select Loop Cur Gnd and press D Setups The Setups Loop Current Ground Ohms screen is displayed 2 Enter the desi...

Страница 115: ...ired function softkey to view continuous test results for any of the three tests Dial Up Test Group The Dial Up Test group consists of terminated VF transmission tests that are conducted on idle worki...

Страница 116: ...o tester Setting Up a Dial Up Test To set up a Dial Up test do the following 1 Enter the setup parameters for all associated subtests shown in Table 4 13 Table 4 13 Dial Up Tests and Associated Subtes...

Страница 117: ...the desired test in the Dial Up Test Toolbox shown in Figure 4 30 and press L The Select Dialing Mode screen is displayed 3 Press D Setups to display the Setups Dial up Tests screen 4 Select the desi...

Страница 118: ...the desired Dial Up test from the Dial Up Toolbox and press L The Select Dialing Mode screen is displayed 3 Do one of the following Press A Auto Dial Select the desired phone number from the displayed...

Страница 119: ...The Select Dialing Mode screen is re displayed Running a Quiet Term VF Noise Test After you select the QT VF Noise function and dial either automatically or manually a C O Quiet Termination phone numb...

Страница 120: ...est allows you to capture and either display or announce via speaker the telephone number of the test line After you select the Number ANI function and dial either automatically or manually a C O ANAC...

Страница 121: ...ature the tester detects the incoming Caller ID information sent by the C O switch after the first ringing interval It then displays the received Phone number along with the associated Name Date and M...

Страница 122: ...ng with the associated Name Date and Message if included Press A Timing Details to view CID signal information as above Press B Raw Data to view the raw hexadecimal CID data digits If the test line wa...

Страница 123: ...o Tests Test Description N Tone Slope The Smart Pro applies a sequential set of 3 10 or 30 tones to the line The CopperPro tester measures the Frequency Loss and Slope of these tones SmartTone Loss Th...

Страница 124: ...ant to manually dial the number of the C O Smart Pro press B Manual Dial Dial the number from the tester s keypad then press L After the tester successfully connects the Smart Pro announces the callin...

Страница 125: ...he frequency loss and slope of each tone it receives and displays results in real time as shown in Figure 4 31 acy43s eps Figure 4 31 Smart Pro N Tone Slope Test Results Failing slope and 1004 Hz loss...

Страница 126: ...similar VF tests over a working POTS line To run tests in this group follow the above procedure for Smart Pro Tests When prompted enter the desired test code from Table 4 17 Table 4 17 SASS Test Key C...

Страница 127: ...This test allows the DATU Auto Open or dry line number typically a unique number that is separate and distinct from the normal DATU access number to be dialed from the test line After the number is d...

Страница 128: ...es To run this test Press key s Open Line 6 Short Line 7 Short Ground Line 33 Ground Ring 37 Ground Tip 38 Hi Level TR Tone 44 Hi Level RG Tone 47 Hi Level TG Tone 48 3 When prompted to hang up press...

Страница 129: ...ield test set when used in conjunction with a C 0 located DATU EXP test head The three basic test sequences provided are 1 Loop Test Initial line test comprised of three groups of tests a CopperPro te...

Страница 130: ...igit alphanumeric string Password any 16 digit alphanumeric string DATU EXP Access Telephone Number up to 16 digits Running the DATU EXP Auto Test This section describes the operation of the Loop Test...

Страница 131: ...erminator or TN2200 Terminator II 3M FED or FEDII or CMC My Helper The tester automatically controls the Terminator FED and Helper over the same pair Therefore a separate control pair is not required...

Страница 132: ...Toolbox select Terminated VF Tests and press L b From the Select Terminated Test Type screen press D Setups c Enter a setting for Loop Resistance Ground Resistance and Unbalance Resistance Pass Thresh...

Страница 133: ...r Far End Device as shown in the connection diagram connecting both units to either one or two test pairs 3 Select either A Pair 1 Test or B Pair 2 Test then press K The CopperPro displays the test it...

Страница 134: ...Test section Detailed results for the VF Loss Slope test are shown in Figure 4 35 acy103s eps Figure 4 35 Terminator VF Auto Test Results Smart Tone Loss 5 Press B Slope Graph to view the VF Loss res...

Страница 135: ...re as follows Idle If the Emulator is neither receiving commands from a CopperPro tester nor applying a requested termination it displays an Idle message on its screen Test in Progress If the Emulator...

Страница 136: ...nds screen is displayed 2 Select the desired Terminator Function refer to the list in Table 4 20 and the desired time Duration for the function Then press K The CopperPro tester signals the Terminator...

Страница 137: ...function Voiceband Tone VF Single Tone Frequency 24 Hz to 20 kHz Impedance 600 or 900 Wideband Tone WB Single Tone Frequency 10 to 1200 kHz Impedance 100 or 135 Broadband Tone BB Single Tone Frequency...

Страница 138: ...990DSL Users Guide 4 74...

Страница 139: ...d its suitability for various grades of service You are then instructed on how to run a DSL Modem Test which uses the Fluke Networks 990 GM 2 ADSL2 or 990 GM V VDSL2 Golden Modem appliqu to connect wi...

Страница 140: ...VF transmission tests then a series of terminated wideband or broadband transmission tests These test results are used to effectively qualify the pair for either a specific user selected digital servi...

Страница 141: ...vice Type chosen To choose a Service Type do the following 1 From the Main menu select DSL Auto Test and then press L The DSL Auto Test Selection Screen is displayed shown in Figure 5 1 2 Press D Setu...

Страница 142: ...Criteria Table 5 1 Service Types for Qualification Service Type Qualification Criteria DDS 56 kb s Param results vs DDS 56 Pass Thresholds 28 kHz Nyquist Loss WB Long Balance DDS 64 kb s Param result...

Страница 143: ...Balance ADSL2 Param results vs ADSL2 Pass Thresh 2 2 MHz WB Long Balance VDSL1 1 5 2 Param results vs VDSL Pass Thresholds 0 25 MHz to 17 7 MHz WB Long Balance HDSL Param results vs HDSL Pass Thresho...

Страница 144: ...Nyquist Frequencies of all above Services 4 From Setup Screen 1 select the Loss Pass Fail Thresholds field Choose one of the following options a Predefined Thresholds default These Pass Fail threshold...

Страница 145: ...s value for the chosen Service Type All Nyquist frequency Loss values for Service Type All Nyquist frequency and Loss values for Service Type Custom Up Down Loop Attenuation values for HDSL2 HDSL4 7 P...

Страница 146: ...L Auto Test Summary Results HDSL2 Note that the pair failed the WB Loss test with a descriptive message in the upper right corner of the screen Failed Loop Atten 4 Select the desired test and press A...

Страница 147: ...he Loop Attenuation graph press B PSD Atten Mask and then press G or I to overlay either the Upstream or Downstream mask on the graph Figure 5 4 shows the Loop Attenuation graph with the superimposed...

Страница 148: ...the pair The process is as follows First loss values at each DMT frequency tone bin along with Wideband Noise measurement data for each bin enable the tester to generate a Signal to Noise Ratio SNR g...

Страница 149: ...er Mask then press G or I to superimpose any of a group of typical disturber masks on the graphs By comparing the graphs to each type of disturber mask you can visually determine which type of service...

Страница 150: ...Pro measures the Nyquist frequency loss of each Service Type along with other parameters Each vertical bar in the above figure corresponds to the Nyquist maximum energy frequency of a given Service Ty...

Страница 151: ...save them do the following 1 From the Summary Result screen press C Save Results 2 Enter the following Test Identification information Job Enter up to 16 alphanumeric characters Ckt ID Enter up to 16...

Страница 152: ...e DSLAM from the line The following description applies to usage of both the GM 2 and GM V as their operation is generally the same In either case the DSL Modem Test will control the GM via the 990 s...

Страница 153: ...from 0 to 16 Interleaver Delay ms Up Down Transmission delay due to the interleaving process used to implement noise protection PSD Power Spectral Density dBm Hz Up Down Average transmit power spectr...

Страница 154: ...erely Errored Seconds NE FE Count of the number of one second intervals containing 18 or more CRC errors over the received bearer channel s DSLAM Vendor Identifies the specific DSLAM or ADSLx VDSLx ch...

Страница 155: ...d DSLAM All ADSLx Service Types are enabled in the default condition To set up parameters for the DSL Modem Test do the following 1 From the 990 Main menu select the DSL Modem Test then press the Setu...

Страница 156: ...ght corner displays the real time status of the process a Power Up The 990 is applying power to the GM GM POWER LED is on and remains on until you exit the test b Booting The GM is booting its operati...

Страница 157: ...n for a typical test on an ADSL2 line Figures 5 10 and 5 11 show the secondary Modem Results screen and the Bits Bin graph for a typical test on a VDSL1 5 line fcw01s bmp Figure 5 9 DSL Modem Test Pri...

Страница 158: ...block is the US1 band In some cases the Upstream 0 block USO will also be used VDSL2 services also employ the higher US2 and DS2 bands Ping The Ping subtest of the DSL Modem Test requires dedicated pr...

Страница 159: ...Ping results are displayed Figure 5 12 shows the results of a Ping operation on a typical ADSL2 line elf203s bmp Figure 5 12 DSL Modem Test Ping Results ADSL2 Line If the Ping operation is unsuccessf...

Страница 160: ...tatic IP connection type this address is the Static IP address entered on the secondary Ping Setup screen see Ping Setup Details Pkt Sent Displays the number of packets sent selected in the primary Pi...

Страница 161: ...e 5 13 is displayed elf204s bmp Figure 5 13 Primary Ping Setups Screen Do the following 1 Enter the desired target s for the Ping operation The 990DSL II can remember up to four Ping targets in either...

Страница 162: ...ing the Edit function scroll to and select the desired connection type for the line under test PPPoE PPPoE Static IP Static IP DHCP PPPoA 6 Press the More softkey to display the secondary Ping Setups...

Страница 163: ...d by some ATM networks for the ATM Encapsulation field PPPoE Static IP Note This connection type is provided for users usually businesses who have requested a Static IP address and the service is prov...

Страница 164: ...ssigned to the customer Subnet Mask Enter the subnet mask address associated with the above static IP address and line under test Gateway Enter the gateway address associated with the above static IP...

Страница 165: ...or a particular carrier s network VCI Enter the VCI default 35 commonly used which may vary according to the standards developed for a particular carrier s network ATM Enc Select either LLC SNAP defau...

Страница 166: ...l in this chapter WB Noise Level WB Loss WB Long Balance Send WB Tone ADSL Verify Test Terminated WB Auto Tests Impulse Noise acy61s eps Figure 5 14 XDSL Toolbox Starting and Stopping a Test in the XD...

Страница 167: ...uency set Fine up to 1 2 MHz at 508 Hz spacing or with the DMT frequency set Coarse up to 18 MHz at 4 3 kHz spacing Setting Up a WB Noise Level Test To set up a WB Noise Level test select the test on...

Страница 168: ...regate Weighted Noise across the filter band is shown in the upper right corner of the screen 60 7 dBrnG To zoom in or out horizontally press A Zoom then press H to zoom in or F to zoom out You can se...

Страница 169: ...cteristics indicate that it should be This non intrusive test can often be used to diagnose excessive bridged tap interference from other data circuits or AM radio signals or defective modems as the c...

Страница 170: ...e Type run on a spare pair having crosstalk from an adjacent VDSL circuit elf60s bmp Figure 5 17 WB Noise Level Test Results VDSL Crosstalk WB Loss Test The WB Loss test measures the level and frequen...

Страница 171: ...tor it automatically rounds off the entered frequency to the nearest bin frequency to ensure accurate results Unlike the DSL Auto Test the WB Loss test is manually controlled There is no communication...

Страница 172: ...al as shown in Figure 5 17 acy64s eps Figure 5 18 WB Loss Test Results Screen In the above test the transmitted signal was 772 kHz theT1 Nyquist frequency to qualify the test pair for T1 service The r...

Страница 173: ...d then press D Setups Refer to Table 5 6 for setups Termination Impedance and Filters are automatically selected based on choice of Tone Type and Frequency 1 2 MHz 135 Ohms 1 3 MHz Filter 1 2 MHz 100...

Страница 174: ...gure 5 19 Failing values are highlighted in flashing reverse video format This test was run with the Multi tone set to qualify the pair for VDSL service elf61s bmp Figure 5 19 WB Longitudinal Balance...

Страница 175: ...isplayed 2 Press A Enter Send Frequency Enter the desired frequency between 10 kHz and 17 66 MHz and then press L For tones above 1 2 MHz the 100 Ohm Transmit Impedance is automatically used 3 Press K...

Страница 176: ...and not to obtain bit rate information Setting up an ADSL Verify Test There are no setups required for this test The test is not modem vendor specific and works equally well on all network equipment...

Страница 177: ...displays predicted Downstream and Upstream bit rate ranges and the measured signal loss at the training frequency Downstream Bit rate Ranges HIGH 4 to 8 Mb s MED 2 to 4 Mb s LOW 1 to 2 Mb s Upstream...

Страница 178: ...nated WB Tests Terminated WB Tests are similar to the Terminated VF Tests described in Chapter 4 but employ wideband and broadband tests rather than voiceband tests to qualify pairs for high speed dig...

Страница 179: ...SL Auto Test described earlier in the chapter It appears as well in this test group for convenience It employs a Fluke Networks Terminator or Terminator II or another CopperPro I or II tester in the T...

Страница 180: ...shown in Figure 5 3 under DSL Auto Test Results 4 Refer to procedures described earlier in the DSL Auto Test section to view detailed results Saving Terminated WB Test Results Refer to the procedure i...

Страница 181: ...Lx Test Time Setting 15 minutes Range 1 to 1440 minutes Counter Threshold 40 dBm Range 0 to 50 dBm Pass Threshold 10 counts Range 0 to 999 counts Running an Impulse Noise Test To run an Impulse Noise...

Страница 182: ...t results screen acy105s eps Figure 5 20 WB Impulse Noise Test Results 3 To reset the Elapsed Time or Impulse Count at any time during the test press A Reset Counters 4 To change the setup for the tes...

Страница 183: ...can you confirm the results of the basic parametric tests but when you use TDR in conjunction with those tests you can also vastly improve your ability to accurately measure the distance to faults in...

Страница 184: ...of all of the tests and their relative strengths and weaknesses You may want to refer to this table when trying to decide which tests to use in a particular situation Table 6 1 TDR vs Parametric Fault...

Страница 185: ...pulse at 64 of the speed of light Length Measurements and VOP To obtain accurate length measurements you must choose the right cable type or supply the correct VOP of the cable that you are testing T...

Страница 186: ...g point in the troubleshooting process The TDR Auto Test automatically flags and pinpoints the location of the following types of faults Open conductors Resistance shorts Load coils Bridged taps Bad s...

Страница 187: ...ponding to the desired range 4 Select the Cable Makeup option using Single Gauge when the pair is predominantly one gauge otherwise use Multi Gauge Uncertain Note The Single Gauge option yields the mo...

Страница 188: ...ops 1 Pr Aer Drop 2 Pr Universal Custom VOP 0 589 Range 0 300 to 0 999 Filter OFF ON Average OFF ON Fault Detect Sensitivity 95 0 Range 1 0 to 100 0 Starting and Stopping a TDR Auto Test To run a TDR...

Страница 189: ...overall result that the CopperPro derives by interpreting results from all of the individual tests that it runs Launch Pulse appears as the larger positive pulse on the left side of the screen Launch...

Страница 190: ...tkeys that activate the functions described in Table 6 3 The softkey is highlighted when the function is activated To deactivate a function press its softkey again The TDR Auto Test is a snapshot func...

Страница 191: ...display window Fltr Avg Scan The F key to apply the Power Filter Fltr Press F again to remove the filter The H key to apply the Averaging Filter Avg Press H again to remove the filter The I or G key...

Страница 192: ...The TDR Toolbox The TDR toolbox is shown in Figure 6 2 The tests in this toolbox enable you to perform a variety of individual measurements on a pair These tests are described separately later in this...

Страница 193: ...he basic TDR auto ranging test tool In this test a launch pulse is continuously applied to Pair 1 and the resulting reflections are continuously displayed The resulting waveform is a single trace on t...

Страница 194: ...it just begins to move off the horizontal baseline The C value should now be the most accurate possible distance to the fault After a waveform is displayed you can force the unit to increase or decrea...

Страница 195: ...ifference between the two tests is that in the Pair 1 2 Difference test the CopperPro internally computes the mathematical difference between the two waveforms and displays the difference as a single...

Страница 196: ...ucted on a pair with an intermittent splice connection acy74s eps Figure 6 4 Pair 1 Monitor Test Result Intermittent Splice The TDR function keys operate in the same manner as they do on the Pair 1 te...

Страница 197: ...reflections on Pair 1 The signal level of the resulting single trace is directly proportional to the leakage between the two pairs and the position of the reflection occurs at the point of the leakag...

Страница 198: ...te in the same manner as they do on the Pair 1 test result screen see Pair 1 Test and Table 6 3 for descriptions To delete a file press Delete for details see Chapter 7 Saved Test Results Compare Reca...

Страница 199: ...ult Multiple gauges in the cable makeup Cable dielectric differences between manufacturers Dielectric variation with temperature 1 per 10 C Water in the cable Age of the cable The following procedure...

Страница 200: ...from both ends does not equal the known section length adjust the VOP factor and re test from both ends When the sum of the Delta C distances equals the section length you have found the exact locati...

Страница 201: ...0 feet sanity check Testing for Faults Close to the CopperPro Reflections that occur before the launch pulse has been completed due to faults that are very near the CopperPro connection can be distort...

Страница 202: ...990DSL Users Guide 6 20...

Страница 203: ...that is represented by a waveform in the case of TDR or a frequency sweep graph The results of more complex tests such as the TDR Noise Level and Loss tests are stored as graphical files Storage Limit...

Страница 204: ...name that identifies the primary work location For instructions on how to specify or change the Wire Center name see Creating a Custom Header for Test Result Files in Chapter 3 Facility Cable Number A...

Страница 205: ...ime you modify the information that is used for the header the change is reflected in a new header that appears immediately before the group of results it pertains to If the elapsed time between tests...

Страница 206: ...ge option allows you automatically store text based files only You must manually save graphical files see Saving a Displayed Waveform or Frequency Graph as well as text results for the Auto Tests The...

Страница 207: ...yed on the tester s LCD 2 Press L The list of saved waveforms see Figure 7 4 or frequency graphs see Figure 7 5 is displayed 3 Press F or H move the cursor to the desired storage position 1 through 10...

Страница 208: ...s Frequency graphs The following sections provide instructions for viewing the three types of test results Viewing Text based Results To view stored text based results press A View Text Results on the...

Страница 209: ...e Saved Results screen Figure 7 2 press A View All Results A screen similar to that shown in Figure 7 3 is displayed The tester lists all of the text based results that are stored in memory beginning...

Страница 210: ...lowing 1 On the Saved Results screen Figure 7 2 press B View by Filename A list of Wire Center names with associated results is displayed 2 Press A More until you display the screen containing the des...

Страница 211: ...se Text Results All saved text results are permanently deleted from the tester s memory Viewing TDR Waveforms To view stored TDR waveforms do the following 1 On the Saved Results screen Figure 7 1 pre...

Страница 212: ...desired waveform 2 Press C Erase The selected waveform and associated remarks are permanently deleted from the tester s memory Viewing Stored a Frequency Sweep Graph To view a stored frequency sweep g...

Страница 213: ...Test Results To print a saved text result TDR waveform trace or a frequency sweep graph do the following 1 Connect the CopperPro to a serial graphics printer see Connecting to a Printer in Chapter 2...

Страница 214: ...th the desired trace selected as shown in Figure 7 4 The list of frequency sweep graphs with the desired graph selected as shown in Figure 7 5 4 Start the PC communications program 5 Uploading Text Ba...

Страница 215: ...d it from the Fluke Networks website at http www flukenetworks com The process of updating the CopperPro with new operating software consists of three basic steps 1 Connect the CopperPro to a personal...

Страница 216: ...lied with the CopperPro The ability to connect to the Internet and access the Fluke Networks web site Step One Connect the Tester to a PC To connect the CopperPro to a PC complete the following 1 Conn...

Страница 217: ...way of entering the download mode is to power the tester up while holding L down Step Three Update the Tester s Software The update software is available from the Fluke Networks website www flukenetw...

Страница 218: ...rning window 4 Click Yes if the Security Warning window is displayed Your PC displays this message Searching for CopperPro After the program detects the CopperPro it begins updating the tester s Flash...

Страница 219: ...f Processing block 0XX messages The value XX represents the number of the block that is being transferred The number of the first block however is not determined until the Flash update is created Afte...

Страница 220: ...990DSL Users Manual 8 6...

Страница 221: ...Appendices Appendix Title Page A Features and Specifications A 1 B Replacement Parts and Accessories B 1...

Страница 222: ...990DSL Users Guide...

Страница 223: ...A 1 Appendix A Features and Specifications Introduction Appendix A describes the physical and operational characteristics of your 990DSL CopperPro Series II Broadband Loop Tester...

Страница 224: ...ng status indicator located on the side connector panel Communication Port RS 232 PC and printer port DB 9 Power AC Operation operates from an external AC adapter charger Battery Type operates from an...

Страница 225: ...ut condensation 95 Rain Resistance IEC60529 IP02 Ingress Protection water dripping Vibration Random 2 g 5 Hz to 500 Hz Shock 1 Meter Drop Test Altitude 4500 m 15 000 ft Standards Compliance Analog Tra...

Страница 226: ...ult 1 M or 10 optional 0 V to 150 V 150 V to 240 V 240 to 300 V 1 0 5 V 2 3 DC Loop Current 430 0 mA to 120 ma 2 0 3 mA Resistance 0 to 100 0 1 0 10 Shorts Grounds 100 to 4 k 0 3 0 10 4 k to 999 M 3 L...

Страница 227: ...Load Coils Count 0 to 6 1 Distance to First 0 to 12 000 ft 10 500 ft Tracing Tone Frequency 577 5 Hz 0 1 Level 3 5 V peak to peak 10 VF Noise Impedance 600 900 Bridged 3 1 Filters C C Notched 3 k Fla...

Страница 228: ...20 kHz 0 1 Amplitude Settable 20 dBm to 3 dBm 0 5 dB 1 dB steps Impedance 600 900 1 WB BB Noise Level Impedance 100 135 Bridged4 1 Filters E F G 1 3 MHz 20 MHz Frequency 10 kHz to 1 2 MHz5 0 1 508 63...

Страница 229: ...tude 0 dB to 50 dB 1 dB7 50 dB to 90 dB 3 dB 7 HDSL2 4 Loop Atten 0 dB to 70 dB 2 dB WB BB Long Balance 0 dB to 20 dB 3 dB 7 9 20 dB to 40 dB 2 dB 7 9 40 dB to 50 dB 3 dB 7 9 50 dB to 55 dB 3 dB Typic...

Страница 230: ...ce 100 135 1 WB BB Impulse Noise Impedance 100 135 Bridged4 1 Filters E F G 1 3 MHz 20 MHz Test Time 1 to 1440 minutes 24 hrs 1 Impulse Counter 0 to 9999 Counter Threshold 0 dBm to 40 dBm 40 dBm to 50...

Страница 231: ...000 ft 1 VOP uncertainty Vertical Gain 80 dB 2 dB Power Filter 5 kHz Highpass Averaging Filter 4 waveform average Input Protection 400 V peak 1 Dist to End Dist to Split 50 ft Split pairs must be sam...

Страница 232: ...990DSL Users Guide A 10...

Страница 233: ...e replacement parts and optional accessories that you can obtain for the 990DSL CopperPro Loop Tester To order accessories call one of the following numbers USA 1 888 993 5853 Canada 1 800 363 5853 Eu...

Страница 234: ...listed in this table Use the Item Number to locate the part Table B 1 Replacement Parts for the CopperPro Loop Tester Item Number Description A Holster B Battery Door C Shoulder Strap D Softcase E RS...

Страница 235: ...3 5 2 1 USE R OPT ION S PRI NT SCR EEN HO ME EN TE R AB C DE F GH I JKL MN O PQ RS TU V SPA CE WX YZ 1 4 5 6 7 8 0 9 2 3 ST AR T ST OP TE ST SA VE D RE SU LTS BA CK 1 2 3 4 DIAL 3 4 6 7 YEL BLU GRN R...

Страница 236: ...r Description A Deluxe Soft Case B NiMH Extra Battery Pack C External Battery Charger NiMH INTL with Power Supply D External Battery Charger NiMH 120V with Power Supply E Test Lead Set Shielded Pair 1...

Страница 237: ...Appendices Replacement Parts and Accessories B B 5 4 3 2 1 5 6 7 8 or YEL BLU GRN 9 RED BLK elf77f eps Figure B 2 Optional Accessories...

Страница 238: ...990DSL Users Guide B 6...

Страница 239: ...and off 3 21 battery 2 10 calibrating 3 20 configuring the tester 3 10 connector panel 2 6 date time setting 3 11 dial set operation 3 23 features A 2 front panel 2 2 individual tests 3 4 keys 2 3 la...

Страница 240: ...st 4 50 Loop Current test 4 50 Loop Devices test 4 36 low power mode 3 12 M Main menu 3 3 menus 3 3 O Ohms to Distance measurement 4 14 On Off key 3 2 Opens test 4 15 P Pair 1 Monitor test 6 14 Pair 1...

Страница 241: ...t 6 11 Pair 1 to 2 Crosstalk test 6 15 Pair 1 Pair 2 Compare test 6 12 Pair 1 Pair 2 Difference test 6 13 toolbox tests 6 10 telephone list creating 3 14 Terminated VF tests 4 67 terminated WB Tests 5...

Страница 242: ...990DSL Users Manual 4 Z Zero Leads utility 3 20...

Отзывы: