background image


We do Your Level Best


We do Your Level Best


Wiring the EchoPod

®


After mounting the EchoPod

®

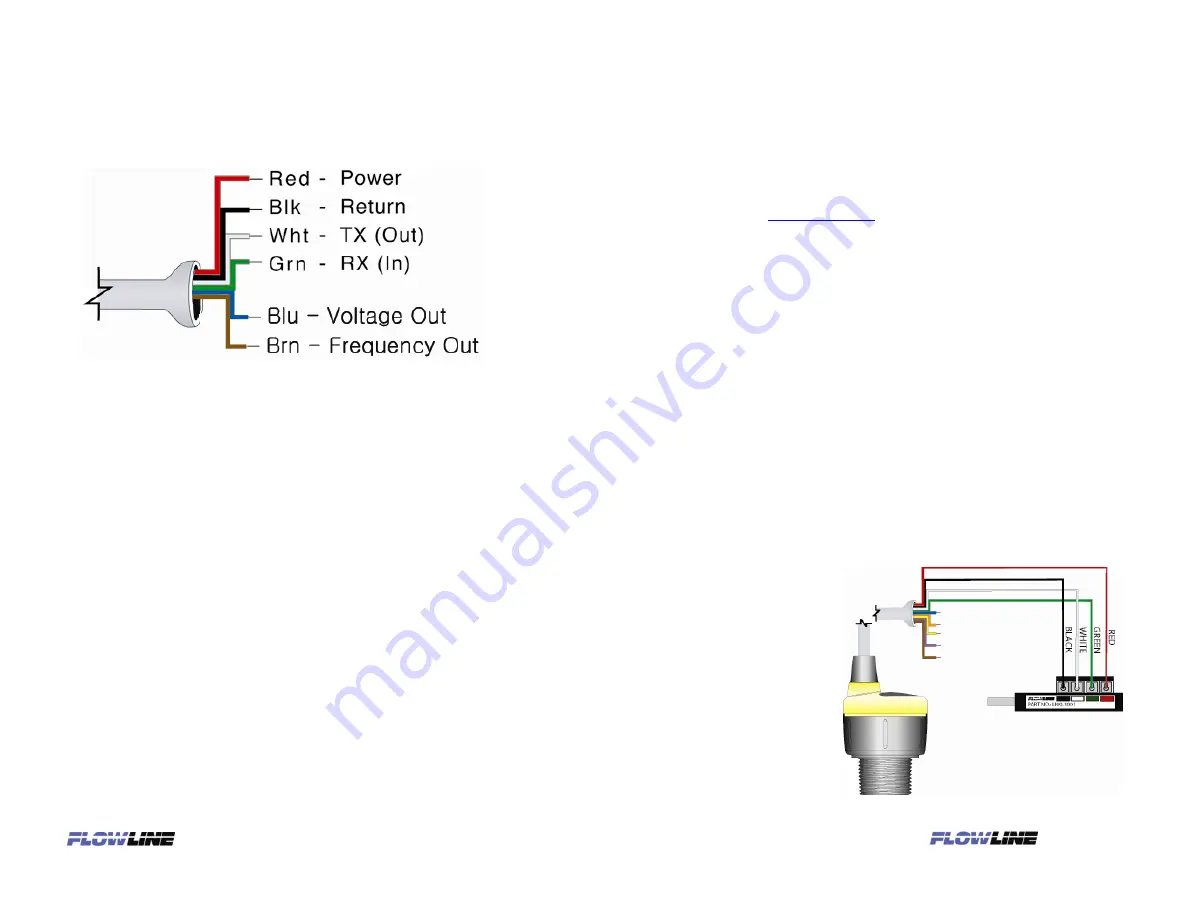
, make the necessary electrical connections.  A wiring 

diagram with specific recommendations for the sensor’s configuration can be printed 

from the WebCal program.  A typical wiring diagram is shown on the next page. 


Red

 and 

Black

 leads are for connection to a 24 VDC power supply. The red and 

black wires can be extended more than 1000 feet using 22 gauge or larger wire, 

however do not extend the green and white wires. 

White

 and 

Green

 leads are reserved for use with WebCal and should not be 

connected during usage in the application.  These wires should not be connected to 

WebCal while power is supplied from any source other than the LI99 FOB. 

Never allow the white or green wires to touch any power supply. 

The 

Blue

 wire is for Voltage Output. 

The 

Brown

 wire is for Frequency Output. This output requires a pull-up resister to 

positive voltage sized to supply less than 15mA current.


Configuring the EchoPod

®


Configuration of your EchoPod

® 

should be performed prior to mounting, since it 

requires connection to your PC. 


Step 1: Install the WebCal Software 

Download WebCal from 

www.flowline.com

 onto a PC with the following minimum 

specifications: 

Windows

®

 2000/XP/Vista/7, 10 MB storage space, 256 MB RAM, 1 USB 2.0 port 

Double-click the WebCal icon to install before proceeding to Step 2. You must have 

an active Internet connection to install WebCal, as it will automatically verify driver 

updates. 

Step 2: Connect the USB Fob 

NOTE

: Do not connect the Fob until after you’ve installed WebCal. 

The EchoPod

® 

communicates to its configuration software through the USB Fob. Prior 

to connecting the Fob, ensure that all external power is disconnected from the 

EchoPod

® 

as power is provided through the PC’s USB 2.0 port. Do not use a cable 

connecting the EchoPod

® 

to the Fob any longer than 15 feet. 

1)  Connect the red, green, white, and black wires from the EchoPod

® 

to the 

corresponding colored terminals on the Fob (as shown in the diagram). 

2)  Tighten the terminal 

screws with a slotted 

screwdriver. 

3)  Plug the Fob into your 

PC’s USB port. 


Spec Tech Industrial Electric

               www.spectechind.com

888-773-2832

Spec Tech Industrial Electric

               www.spectechind.com

888-773-2832

Содержание EchoPod DX10 Series

Страница 1: ...ligent use 3 have been modified or altered 4 anyone other than service personnel authorized by Flowline have attempted to repair 5 have been involved in accidents or natural disasters or 6 are damaged during return shipment to Flowline Flowline reserves the right to unilaterally waive this warranty and dispose of any product returned to Flowline where 1 there is evidence of a potentially hazardous...

Страница 2: ...llation must have a redundant backup safety system installed Wiring should always be completed by a licensed electrician Supply voltage should never exceed 28 VDC Protect the sensor from excessive electrical spikes by isolating the power whenever possible The sensor materials must be chemically compatible with the liquids to be measured Design a fail safe system for possible sensor and or power fa...

Страница 3: ...your EchoPod should be performed prior to mounting since it requires connection to your PC Step 1 Install the WebCal Software Download WebCal from www flowline com onto a PC with the following minimum specifications Windows 2000 XP Vista 7 10 MB storage space 256 MB RAM 1 USB 2 0 port Double click the WebCal icon to install before proceeding to Step 2 You must have an active Internet connection to...

Страница 4: ...y vapor Select a 3 pipe a 2 pipe is usable but the minimum and attach the EchoPod with a coupling and reducer bushing The pipe length should run the measurement span and the bottom of the pipe should remain submerged at all times to prevent foam from entering the pipe Cut the bottom end of the pipe at 45 and drill a 1 4 pressure equalization hole high in the dead band The pumps should not drive li...

Страница 5: ... vinyl tape to dampen vibrations For installations in open tanks and sumps 1 Use Flowline s LM50 1001 1 side mount bracket which includes a 2 x 1 thread reducer bushing Using the drop down menus on the left of the WebCal screen set the configuration for your application requirements When a selection does not apply to your application Not Applicable will appear in the drop down Make sure all drop d...

Страница 6: ...guration file and click Save Config File Configuration is now complete Disconnect the USB Fob before continuing to the next step Mounting the EchoPod For updates to WebCal or to make sure you re using the most up to date version available click the Update tab on the top of the WebCal screen Write to Unit Send your configuration into EchoPod Wiring Diagram Open PDF wiring schematic of your configur...

Отзывы: