background image

30 - Gebruiksaanwijzing Glider DCT350 crosstrainer

5. Algemene informatie

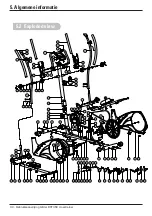
5.2  Exploded view

Содержание GLIDER DCT350

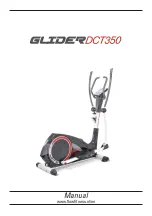
Страница 1: ...www flowfitness nl Gebruiksaanwijzing Manual ...

Страница 2: ...kt of gereproduceerd in welke vorm of op welke wijze dan ook zondervoorgaande schriftelijke toestemming van Flow Fitness B V All rights reserved Nothing in this instruction manual may be used or reproduced in any form or way without the express written permission of Flow Fitness B V Handleiding Nederlands Manual English 3 33 34 68 ...

Страница 3: ... Inhoud verpakking 7 2 2 Belangrijke onderdelen 9 2 3 Specificaties 9 3 Fitness 10 3 1 Trainen op hartslag 10 3 2 Warming up en cooling down 12 4 Gebruik 13 4 1 Montage 13 4 2 Gebruik computer 19 4 3 Onderhoud 27 5 Algemene informatie 28 5 1 Training schema s 28 5 2 Exploded view 30 5 3 Probleemoplossen 32 6 Garantie 33 6 1 Garantie 33 ...

Страница 4: ...juist functioneert In geval van storing of defect stoppen met trainen en direct contact opnemen met uw dealer Gebruik het product nooit als deze defect is Dit product is alleen bedoeld voor thuisgebruik en dient op een vlakke ondergrond te staan Dit product mag door maximaal één persoon tegelijk worden gebruikt Het apparaat is geschikt voor personen met een lichaamsgewicht tot 140 kilogram Zorg er...

Страница 5: ...waarschuwingen en voorschriften zoals vermeld in deze gebruiksanwijzing Dit product is bedoeld voor gebruik in een schone droge omgeving Opslag in koude en of vochtige ruimtes zou tot problemen in het product kunnen leiden Dit product is niet geschikt voor therapeutische ondersteuningen of het professioneel gebruik ervan in de fysiotherapie WAARSCHUWING Laat uw conditie controleren door een arts v...

Страница 6: ...stellen om zo gevarieerde trainingen te volgen De Glider DCT350 crosstrainer heeft maar liefst 21 programma s De hartslag wordt door de hand sensoren of door een optionele hartslagband geregistreerd Door het traploze weerstandsysteem is het mogelijk om zeer nauwkeurig en op eenvoudige wijze de ideale weerstand in te stellen Het magnetische remprincipe is op basis van inductie weerstand en zorgt vo...

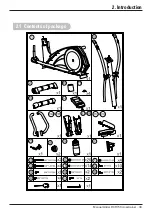
Страница 7: ...Gebruiksaanwijzing Glider DCT350 crosstrainer 7 2 Introductie 2 1 Inhoud verpakking ...

Страница 8: ...e DCT350 Crosstrainer te kunnen assembleren zijn in 1 verpakking samengevoegd Hieronder staat per montagestap weergegeven welke bevestigingsmiddelen u nodig heeft imbus sleutel combinatie sleutel Stap 1 Stap 2 Stap 3 Stap 4 Stap 5 Stap 6 M8 15L D15 4 D22 M8 95L D22 M5 10L D14 D6 5 0 8T D40 M6 12 x4 x4 x4 x2 x8 ...

Страница 9: ...0 crosstrainer 9 2 Introductie 2 3 Specificaties Lengte Hoogte Breedte Gewicht 116 cm 163 cm 63 cm 54 4 kg 2 2 Belangrijke onderdelen Computer Stuur buis Pedaal Hand hartslag sensoren Bewegende handgrepen Vaste handgrepen Hoofd frame ...

Страница 10: ...t beste op 60 van uw maximale hartslag trainen Wanneer uw trainingsdoel is om de conditie te verbeteren dan is dat 85 van uw maximale hartslag Het lichaam slaat energie op in twee vormen koolhydraten en vetten Bij een inspanning gebruiken we een combinatie van deze twee engergievoorraden Wanneer de in spanningsintensiteit hoog is kiest het lichaam grotendeels voor snel verbrandbare energie te wete...

Страница 11: ... De eerste fase bestaat uit zes weken en is een goede richtlijn voor beginners of perso nen die sinds lange tijd weer gaan trainen gedurende deze fase wordt de intensiteit van de training langzaam opgebouwd Na zes weken begint de tweede fase U kunt dan kiezen voor een trainingsschema om gewicht te verliezen of om uw conditie te verbeteren Op www flowfitness nl kunt uw vooruitgang berekenen Leeftij...

Страница 12: ... voorste been en leun tegen de muur Houd uw achterste been recht zodat uw onderbeen gestrekt wordt Houd dit vijf seconden vast en herhaal dit vervolgens met uw andere been Doe dit twee of drie keer Side Stretch Steek uw beide armen in de lucht en rek met uw rechterarm zo hoog als u kunt Buig naar links zodat uw rechterzijde wordt gestrekt Houd dit gedurende één seconde vast Ontspan en doe vervolge...

Страница 13: ...erpoot 19 aan het hoofdframe 1 Gebruik hiervoor de inbusbouten 3 sluitringen 6 veerringen 7 en bolkop moeren 8 Zie fig A Draai deze stevig vast 2 Door het wieltje aan weerszijde van de achterpoot 19 te draaien kan de hoogte worden ingesteld Hiermee kan de crosstrainer waterpas worden gezet 4 1 Montage ...

Страница 14: ...strainer 4 Gebruik Stap 2 1 Monteer de pedalen 21L 21R op de linker en rechter pedaalstang 11 met behulp van ringen 73 en de pedaal verstelknop 77 Zie fig a 2 De pedalen 21L 21R kunnen in 3 verschillende posities bevestigd worden Zie fig b C ...

Страница 15: ...kabel 29 met de onderste communicatiekabel 30 zoals afgebeeld in fig b 3 Monteer de stuurbuis 10 aan het hoofdframe 1 met behulp van sluitringen 6 Veerringen 7 en inbusbouten 9 zoals afgebeeld in fig c 4 Monteer de bewegende armen 52L 52R aan de Bevestigingsbuis draaibare arm 12 met behulp van sluitringen 6 veerringen 7 en inbusbouten 9 5 Verbind de hand hartslagkabels 105 en 107 met elkaar ...

Страница 16: ...rosstrainer 4 Gebruik Stap 4 1 Verbind de bovenste communicatiekabel 29 met de computer 64 2 Verbind de twee hand hartslagkabels 107 3 Monteer de computer 64 aan de stuurbuis 10 met de bouten 76 4 Sluit de adapter 27 aan de achterzijde aan ...

Страница 17: ...Gebruiksaanwijzing Glider DCT350 crosstrainer 17 4 Gebruik Stap 5 1 Monteer de vaste armen 72L 72R aan de stuurbuis 10 met behulp van de veerringen 7 gebogen ring 6 inbusbouten 17 en borgmoeren 18 ...

Страница 18: ...lider DCT350 crosstrainer 4 Gebruik Stap 6 1 Monteer de computer afdekkap achter 67 en de computerafdekkap voor 68 met behulp van de schroeven 90 en 63 aan de stuurbuis 10 2 Monteer de bidonhouder 102 met M5x15 schroeven 101 ...

Страница 19: ...r STAR STOP Starten of stoppen van training RESET Resetten van huidige waarden en terugzetten van computer naar het trainings keuze menu Verhogen van waarden of verhogen van weerstand Verlagen van waarden of verlagen van weerstand RECOVERY Analyse van conditie aan de hand van hartslag herstel BODY FAT Analyse van vetpercentage MODE ENTER 1 Bevestigen van keuze 2 Selectie van waarde in het hoofdven...

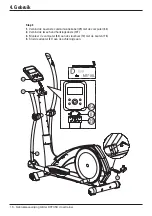
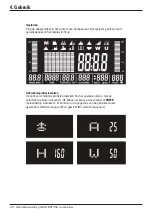
Страница 20: ... kort geluidssignaal en het display licht op Gebruikersprofiel instellen U kunt 4 verschillende profielen instellen Na het opstarten kunt u met de selectieknop kiezen tussen U1 U4 Maak uw keuze en bevestig met ENTER selectieknop indrukken Er kunnen nu de gegevens van de gebruiker zoals geslacht leeftijd A hoogte H en gewicht W worden ingevoerd ...

Страница 21: ...n beeld worden weergegeven Door op de ENTER knop te drukken kan een waarde vastgezet worden U kunt tussen de waardes wisselen door op de ENTER knop te drukken totdat de gewenste waarde zichtbaar is Alle waardes zijn in het klein zichtbaar onderin het scherm Handmatige training SNELSTART Door direct op de START STOP knop te drukken kan de training direct worden gestart Alle waarden starten bij dit ...

Страница 22: ...ning Kies in het workout menu het icoon voor hartslag gestuurde training De hartslag wordt gemeten met een borstband niet meegeleverd of door de hartslagsensoren beet te pakken De computer rekent automatisch uw maximale hartslag uit aan de hand van uw gebruikersprofiel De maximale hartslag wordt berekend met de formule 220 uw leeftijd 1 U kunt kiezen uit drie percentages van uw maximale hartslag o...

Страница 23: ...Gebruiksaanwijzing Glider DCT350 crosstrainer 23 Tekst box Ctrl Shift Linker klik om aan te passen 4 Gebruik ...

Страница 24: ... u klaar bent druk dan de ENTER toets ca 4 seconden lang in 3 U kunt nu uw trainingstijd instellen 4 Druk op START STOP om uw training te beginnen Tijdens uw training kunt u de weerstand eventueel nog aanpassen met de selectieknop Constant vermogen training Kies in het workout menu het icoon voor het constant vermogen WATT programma 1 Stel het vermogen wattage in met de selectieknop en bevestig me...

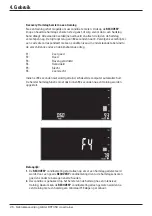
Страница 25: ...agina kunt uw met behulp van het symbool in welke vetpercen tage categorie u zit Het is mogelijk dat er een van de twee onderstaande codes verschijnt E 1 Er kan geen goede analyse worden uitgevoerd omdat de sensoren niet goed worden vastgepakt E 4 Het vetpercentage overschrijdt de meetbare waarden Als u klaar bent met de analyse kunt op de BODY FAT knop drukken om weer terug te gaan naar het train...

Страница 26: ...verschillende codes en de bijbehorende uitleg F1 Zeer goed F2 Goed F3 Boven gemiddeld F4 Gemiddeld F5 Slecht F6 Zeer slecht Indien er 90 seconden niet wordt getraind schakelt de computer automatisch uit De herstel hartslag functie moet dus binnen 90 seconden na een training worden opgestart Belangrijk 1 De RECOVERY conditiemeting start alleen op als er een hartslag gedetecteerd wordt Voor een goed...

Страница 27: ...Gebruik hiervoor het bij het product aangeleverde gereedschap Veeg tevens na iedere training het eventuele zweet van alle onderdelen Hiermee voorkomt u dat het zweet kringen of zelfs corrosie veroorzaakt De metalen en kunststof onderdelen zijn met standaard schoonmaakmiddelen te reinigen Zorg er echter wel voor dat alle onderdelen goed droog zijn voordat deze weer worden gebruikt 4 3 Onderhoud ...

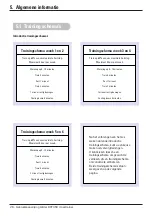
Страница 28: ...ten Train 5 minuten Rust 1 minuut Train 3 minuten 1 minuut rustig bewegen Cooling down 5 minuten Trainingschema week 5 en 6 Train op 60 van uw maximale hartslag Maximaal 5 keer per week Warming up 5 10 minuten Train 6 minuten Rust 1 minuut Train 4 minuten 3 minuut rustig bewegen Cooling down 5 minuten Na het volbrengen van het zes weken durende introductie trainingsschema kunt u een keuze maken ui...

Страница 29: ...n Trainingschema week 9 en verder Train op 85 van uw maximale hartslag Maximaal 6 keer per week Warming up 5 10 minuten Train 10 minuten Rust 1 minuut Train 10 minuten Herhaal training 2 a 3 keer 1 minuut rustig bewegen Cooling down 5 minuten Trainingschema week 7 en 8 Train op 60 van uw maximale hartslag Maximaal 6 keer per week Warming up 5 10 minuten Train 7 minuten Rust 1 minuut Train 5 minute...

Страница 30: ...30 Gebruiksaanwijzing Glider DCT350 crosstrainer 5 Algemene informatie 5 2 Exploded view ...

Страница 31: ... 1 0T 1 47 Gebogen Ring D21 D16 2 0 3T 3 48 Sluitring D13 D6 5 1 0T 4 49 Hoofdframe Afsluitkap 1 50 C Ring S 16 1T 3 51 Pin D6 26 5 7 7 6 52L Bewegende Handgreep Links 1 52R Bewegende Handgreep Rechts 1 53 HDR Foamgrip D30 3T 680L 2 Nr Onderdeel Aantal 54 HDR Foamgrip D23 5T530L 2 55 Stang Afdekkap 2 56 Veer D2 6 D105 5L 1 57 Gebogen Ring D27 D21 0 3T 1 58 Inbusbout M6 1 0 15L 16 59 Inbusbout M6 1...

Страница 32: ...et altijd constant Zweet beweging en zelfs handcrème kunnen hier een negatieve invloed op hebben Daarom adviseren wij altijd om bij het trainen op hartslag een borstband te gebruiken De handsensoren zijn voornamelijk bedoeld om af en toe tijdens de training het hartslagniveau te controleren Indien u geen of slechte hartslag registratie heeft bij gebruik van een hartslagband Controleer dan de volge...

Страница 33: ...aar eigen inzicht verhelpen Indien het defect binnen het garantietermijn valt zal dit kosteloos gebeuren De garantie vervalt wanneer er gebreken zijn onstaan aan het product door een onjuiste montage van het toeste dan wel wanneer er sprake is van het niet juist opvolgen van de instructies zoas beschreven in deze handleiding reparaties aan het product zijn verricht door anderen dan door Flow Fitne...

Страница 34: ...www flowfitness nl en Manual ...

Страница 35: ...age 39 2 2 Important parts 41 2 3 Specifications 41 3 Fitness 42 3 1 Training by heart rate 42 3 2 Warming up and cooling down 44 4 Use 45 4 1 Assembly 45 4 2 Use of the computer 51 4 3 Maintenance 59 5 General information 60 5 1 Training schedule 60 5 2 Exploded view 62 5 3 Troubleshooting 64 6 Warranty 65 6 1 Warranty 65 Content ...

Страница 36: ...uct as described in this instruction manual Before using this product check that the product functions as it should In case of malfunction or a defect stop training immediately and contact your vendor Do not use the product when there is a malfunction The product is only meant for use in the home and it has to be positioned on a flat surface The product can only be used by one person at the time T...

Страница 37: ...onsible for all users to be aware of the warnings and instructions as mentioned in this instruction manual This product is intended for use in a clean and dry environment Storage in cold and or moist areas could lead to problems with the product This product is not suitable for therapeutic supports or professionally use in physical therapy WARNING Have your physical condition checked by a licensed...

Страница 38: ...nce system and robust frame is the absolute top of the Flow Fitness Dynamic Line The advanced resistance system creates an outstanding training experience With the special magnetic resistance system you can change the resistance smoothly and very accurate Therefore the DCT350 is ideal for rehabilitation and physical therapy practices This manual contains all information necessary for the use and o...

Страница 39: ...Manual Glider DCT350 crosstrainer 39 2 Introduction 2 1 Contents of package ...

Страница 40: ...eeded to assemble the Glider DCT350 are combined into one set Below you find a overview of fasteners needed in every step of assembly Allen tool Combination tool Step 1 Step 2 Step 3 Step 4 Step 5 Step 6 M8 15L D15 4 D22 M8 95L D22 M5 10L D14 D6 5 0 8T D40 M6 12 x4 x4 x4 x2 x8 ...

Страница 41: ...0 crosstrainer 41 2 Introduction 2 2 Important parts 2 3 Specifications Length Height Width Weight 116 cm 163 cm 63 cm 54 4 kg Computer Handlebar post Pedal Moveable handlebar Fixed handlebar Main frame Hand pulse sensors ...

Страница 42: ...our training goal is to lose weight then the most effective training is at 60 of your maximum heart rate If your training goal is to improve your stamina then you should train at 85 of your maximum heart rate The body stores energy in two forms carbohydrates and fat When we exercise we use a combination of these two energy supplies If the training intensity is at a high level the body will mostly ...

Страница 43: ...chedules are divided in two phases The first phase can be used for beginners or persons who start training after a long period of inactivity During this phase the level of intensity is built up gradually After six weeks the second phase begins You can then choose a training schedule to lose weight or improve your stamina At www flowfitness nl en you can calculate your progress Age Weight lost beat...

Страница 44: ...orward leg and lean against the wall Stretch your back leg and feel the muscle in your calf stretch Hold this position for five seconds and repeat with your other leg Repeat this two or three times Side Stretch Extend both your arms up in the air and reach as high as you can with your right arm Lean a bit to the left so that the muscles in the right side of your torso are stretched Hold this posit...

Страница 45: ... 19 to the main frame 1 Fasten Allen bolts 3 washers 6 spring washers 7 and self locking nuts 8 as displayed in figure A Tighten them firmly 2 The height of the crosstrainer can be adjusted by rotating the wheels on rear stabilizer This can be used for levelling the crosstrainer 4 Use 4 1 Assembly ...

Страница 46: ...r 4 Use Step 2 1 Assemble the pedals 21L 21R onto the left and right pedal support 11 by fastening washers 73 and club knob 77 as displayed in figure a 2 The pedals 21L 21R can be assembled in three different positions See figure b and c ...

Страница 47: ...e lower computer cable 30 as displayed in figure b 3 Assemble the handlebar post 10 onto the main frame by fastening washers 6 spring washers 7 and Allen bolts 9 as displayed in figure c 4 Assemble the movable arms 52L 52R to the moveable supporting tube 12 by fastening washers 6 spring washers 7 and Allen bolts 9 5 Connect the hand pulse cables 105 and 107 for the left and right arm ...

Страница 48: ... Step 4 1 Connect the upper computer cable 29 to the back of computer 64 2 Connect the two hand pulse cables 107 3 Assemble the computer 64 to the handlebar post 10 by fastening bolts 76 4 Connect the adapter 27 to the back of the crosstrainer ...

Страница 49: ...Manual Glider DCT350 crosstrainer 49 4 Use Step 5 1 Assemble the fixed arms 72L and 72R to the handlebar post 10 by fastening spring washers 7 curved washers 6 Allen bolts 17 and self locking nuts 18 ...

Страница 50: ...der DCT350 crosstrainer 4 Use Step 6 1 Assemble the front and rear computer cover 67 68 by fastening screws 90 and 63 to the handlebar post 10 2 Assemble the water bottle holder 102 by fastening the M5x15 screws 101 ...

Страница 51: ...sets all values Back to the workout menu Increase values or resistance Decrease values or resistance RECOVERY Analysis of stamina by checking the heart rate recovery BODY FAT Analysis of fat percentage SELECTION ENTER Rotate to select Press to enter During training session press to set the value within the main window ...

Страница 52: ...displayed below When powering up the computer will give a sound signal Setup user profile Your able to setup for different user profiles After powering up you can select between U1 U4 with the selection knob Confirm your selection by pressing the selection knob User specific values like Gender Age A Height H and Weight W can be setup ...

Страница 53: ...S WATT and PULSE are displayed for a few seconds in main window of the screen By pressing ENTER the current value can be fixed inside the main window You can switch between values by pressing ENTER until the desired value appears in the main window All the values are displayed at the bottom of the screen Manual program QUICKSTART By pressing START STOP the workout will start directly with all valu...

Страница 54: ...rt rate will be measured by a optional chest belt or by holding the hand heart rate sensors within the handlebar The computer will automatically calculate your maximum heart rate by using information from your user profile The maximum heart rate is a calculation of 220 minus your age 1 Your able to choose between three different percentage of your maximum heart rate 55 75 90 or select TARGET where...

Страница 55: ...Manual Glider DCT350 crosstrainer 55 Text box Ctrl Shift Right Mouseclick to edit 4 Use ...

Страница 56: ... knob 2 When you have setup the segments press and hold the selection knob for 4 seconds 3 Now you can set the workout duration 4 Press START STOP to start the training session During the training you can adjust the resistance by rotating the selection knob Constant Watt workout Select the W icon from the workout menu for a constant watt workout 1 Select the output wattage with the selection knob ...

Страница 57: ...Fat Percentage F with a symbol appears Your BMI B value will also be displayed The chart below explains the symbol on your screen It is also possible that one of the following codes will appear E 1 The analysis can t be made because the sensors are hold incorrectly E 4 The body fat percentage exceeds the measurable values SYMBOOL GENDER FAT low below average average high MALE 13 13 25 8 26 30 30 F...

Страница 58: ...table below F1 Excellent F2 Good F3 Average F4 Below average F5 Bad F6 Very bad no correct measurement In case there is no movement for 90 seconds the computer will automatically shut down The Recovery program needs to run within 90 seconds after the training has finished Important 1 The RECOVERY stamina test will only start when a heart rate is detected For a correct measurement you need to hold ...

Страница 59: ...s However make sure that all parts are completely dry before they are used again Flow Fitness advises to fasten nuts and bolts check and fasten pivot points once every six weeks For fastening use the tool supplied with the product To prevent unnecessary wear the product can only be used indoors and in a dry environment 4 3 Maintenance ...

Страница 60: ...nutes Rest 1 minute Train 3 minutes Calmly train 1 minute Cooling down 5 minutes Schedule week 5 and 6 Train at 60 of your maximum heart rate Max 5 times a week Warming up 5 10 minutes Train 6 minutes Rest 1 minute Train 4 minutes Calmly train 3 minutes Cooling down 5 minutes After completing the introduction training schedule for six weeks you can choose the follow up training schedule that is be...

Страница 61: ...es Schedule week 9 and beyond Train at 85 of your maximum heart rate Max 6 times a week Warming up 5 10 minutes Train 10 minutes Rest 1 minute Train 10 minutes Repeat training 2 or 3 times Calmly train 1 minute Cooling down 5 minutes Schedule week 7 and 8 Train at 60 of your maximum heart rate Max 6 times a week Warming up 5 10 minutes Train 7 minutes Rest 1 minute Train 5 minutes Calmly train 1 m...

Страница 62: ...62 Manual Glider DCT350 crosstrainer 5 General information 5 2 Exploded view ...

Страница 63: ...tic washer D50 D10 1 0T 1 47 Waved washer D21xD16 2x0 3T 3 48 Flat washer D13 D6 5 1 0T 4 49 Upper protective cover 1 50 C clip S 16 1T 3 51 Pin 6 52L Left moveable bar 1 52R Right moveable bar 1 53 Foam D30x3Tx680L 2 54 Foam D23x5Tx530L 2 55 End cap 2 56 Spring D2 6 D105 5L 1 57 Waved washer D27 D21 0 3T 1 58 Bolt M6 1 0 15L 16 59 Bolt M6x1 0x15L 1 60 Flat washer D21 D8 5 1 5T 4 61 Crank axle 1 6...

Страница 64: ...to use a chest belt while training a heart rate controlled exercise program The handle bar sensors are primarily used for occasionally checking the heart rate during a training excises When there is no heart rate reception when using a chest belt check the following Is the chest belt coded Coded chest belts don t work on our equipment The chest belt must be Polar Compatible and send a 5Hz signal H...

Страница 65: ... The warranty is provided by the Flow Fitness distributor of your country and the reseller where you have purchased your product Please check http www flowfitness nl en dealers locations php for contact information 6 Warranty 6 1 Warranty ...

Страница 66: ...66 Glider DCT350 crosstrainer Notities Notes ...

Страница 67: ...Glider DCT350 crosstrainer 67 Notities Notes ...

Страница 68: ...Glider DCT350 crosstrainer www flowfitness nl ...

Отзывы: