


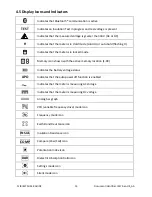


FLIR
IM75
USER
GUIDE
Document
Identifier:
IM75
‐
en
‐
US_AA
14
5.
Operation
Note:
Before
operating
the
device,
you
must
read,
understand,
and
follow
all
instructions,
dangers,
warnings,
cautions,
and
notes.
Note:
When
the
meter
is
not
in
use,
the
function
switch
should
be
set
to
the
OFF
position.
Note:
When
connecting
the
probe
leads
to
the
device
under
test,
connect
the
COM
(negative)
lead
before
connecting
the
positive
lead.
When
removing
the
probe
leads,
remove
the
positive
lead
before
removing
the
COM
(negative)
lead.
5.1
Powering
the
Meter
1.
Set
the
function
switch
to
any
position
to
switch
on
the
meter.
2.
If
the
battery
indicator
shows
that
the
battery
voltage
is
low
or
if
the
meter
does
not
power
on,
replace
the
battery.
See
section
6.
2
Battery
Replacement
.
5.1.1
Auto
Power
Off
The
meter
enters
sleep
mode
after
30
minutes
of
inactivity.
The
meter
beeps
three
times
20
seconds
before
powering
off.
Press
any
button
or
turn
the
Rotary
Switch
to
prevent
the
meter
from
powering
off.
The
auto
power
off
time
‐
out
is
then
reset.
To
disable
auto
power
off
(APO)
press
the
MODE
button
while
turning
on
the
meter.
To
change
the
APO
time,
read
section
5.12.6
Setup
Utility
5.2
Manual
AC/DC
Selection
When
measuring
voltage,
press
the
MODE
button
to
select
AC
or
DC
voltage.
5.3
Auto
Range
Auto
‐
Range
is
the
only
mode
of
operation
for
Capacitance;
ranges
are
automatically
selected
by
the
meter.
Insulation
and
Earth
Bond
Resistance
tests
allow
for
voltage
test
selection
using
the
rotary
switch.
5.4
‘Smart’
Out
‐
of
‐
Range
Warnings
If
the
input
is
over/under
the
full
‐
scale
range,
the
display
will
show
>x
or
<x,
where
x
is
the
high
or
low
end
of
the
full
‐
scale
range.
5.5
Data
Hold
and
Auto
‐
Hold
Modes
These
two
modes
are
discussed
in
detail
below.
In
the
Settings
menu,
if
Auto
‐
Hold
is
set
to
OFF,
the
meter
will
operate
in
the
standard
Hold
mode.
If
Auto
‐
Hold
is
set
to
ON
in
the
settings
menu,
the
meter
will
operate
in
the
Auto
‐
Hold
mode.
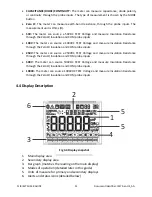
5.5.1
Data
Hold
Mode
In
Data
Hold
mode,
press
the
HOLD
button
to
capture
the
measurement
that
is
shown
on
the
main
display.
The
captured
reading
will
be
displayed
in
the
secondary,
upper
display
area
(the
main
display
will
then
function
normally).
The
‘H’
display
icon
will
appear
solid
on
the
LCD
in
the
Hold
mode.
To
exit
the
Hold
mode,
press
the
HOLD
button
again.


