background image

11

2.Preparation Before Printing

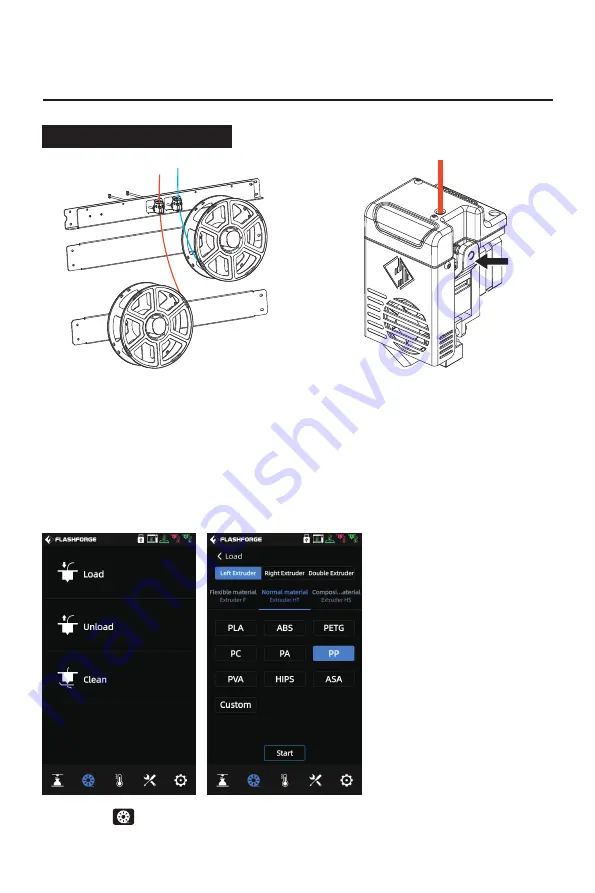
2.1 Filament Loading

1. Open the door of the filament spool, 
hang the filament on the filament spool 
holder, and pass the filament through 
the corresponding filament sensors 
respectively until the filament is seen 
from the other end of the guide tube;

2. Press the filament feeding handle 
on the extruder to insert the filament 
into the extruder;

3. Click the          -[Load] on the screen, select the corresponding filament for each 
extruder, start filament feeding, and operate following the screen prompts.

Handle

Filament

Содержание Creator 4

Страница 1: ...This guide is only applicable to FLASHFORGE Creator 4 3D printer USER GUIDE EN A01 Creator 4...

Страница 2: ...nfiguration and Operation 5 1 Normal Mode 5 2 Dual extruder Printing Mode 5 3 Mirror Duplicate Mode 5 4 Filament Configuration 5 5 Filament Parameter Setting 5 6 Removal Method of Water soluble Suppor...

Страница 3: ...midity will increase the risk of electric leakage Exposure to sunlight will accelerate the aging of plastic parts Make sure to only use the power cord provided by Flashforge Do not use the equipment d...

Страница 4: ...model into your mouth 03 EQUIPMENT ENVIRONMENT REQUIREMENTS EQUIPMENT PLACEMENT REQUIREMENTS COMPATIBLE FILAMENT REQUIREMENTS FILAMENT STORAGE REQUIREMENTS The equipment must be placed in a dry and v...

Страница 5: ...assembly or modification of the equipment by the customer No one is allowed to modify or translate this guide without the permission of Flashforge This guide is protected by copyright and Flashforge r...

Страница 6: ...s it can be adjusted according to different materials and printing components FFF Fused Filament Fabrication 130 65 IDEX Independent Dual Extruders Direct Drive Extruder 0 4mm default 0 6 0 8mm optio...

Страница 7: ...13 14 15 10 16 1 Upper Cover 2 Filter Fan 3 Inner Chamber Heating Assembly 4 Handle 5 Filament Door 6 Power Switch 7 Filament Spool Fixing Frame 8 USB Port 9 Flexible Steel Plate 10 Platform Plate 11...

Страница 8: ...the steel edged wooden case 2 Remove the steel edged wooden case board and take off the protective foam 3 Lift the equipment from the bottom of the wooden case 4 Remove the protective wrapping film fr...

Страница 9: ...ensure that they can move freely in X and Y directions 11 Adjust the casters at the bottom of the equipment make it rotate clockwise and the foot pad will rise so that the equipment can be pushed Move...

Страница 10: ...uide Unclogging Pin Tool This guide is only applicable to FLASHFORGE Creator 4 3D printer 4 3D P35 USER GUIDE CN EN A01 Creator 4 4 Lubricating Grease 2 Allen Wrench Leveling Card USB Flash Drive Diag...

Страница 11: ...nt equipment packaging configurations with the following differences Extruder Assembly Nozzle Assembly Flexible Platform Steel Plate F Nozzle Assembly 2 HT Nozzle Assembly 2 HT Extruder 2 HS Nozzle As...

Страница 12: ...the corresponding filament sensors respectively until the filament is seen from the other end of the guide tube 2 Press the filament feeding handle on the extruder to insert the filament into the ext...

Страница 13: ...nnecessary to calibrate again However the leveling plane may be damaged due to the vibration generated during transportation It is recommended to perform a Z axis calibration before printing Please pr...

Страница 14: ...rk 2 3 1 Wired Network Connection 1 Click the Network on the touch screen and select the WiFi 2 Click to connect to the corresponding wireless network If the icon appears in the upper right corner of...

Страница 15: ...cial English website www flashforge com for installation Import the file to FlashPrint for slicing select the Creator 4 to connect to the machine or by entering the IP address or by auto scanning whil...

Страница 16: ...operating At this time you can check the temperature icon on the status bar of the screen to confirm the platform temperature The green icon indicates that the platform temperature is lower than 50 th...

Страница 17: ...e to remove the model Remove the model and put the platform plate back into the equipment again Operate as follows 1 Install the flexible steel plate on the platform plate with the four snap hooks ins...

Страница 18: ...e Start Slicing select the corresponding printing material and click the Slice and the sliced file can be generated 5 2 Dual extruder Printing Mode When printing dual color dual filament models in the...

Страница 19: ...18 The following settings can be made when printing dual color dual filament models 1 Load the model 2 Click the icon and select the support type as 3 Click the Auto Supports...

Страница 20: ...le Creator 4 PLA PVA 6 Click the Slice By default the equipment prints the support and model with the same extruder If different filaments are used for support such as printing PVA support with the le...

Страница 21: ...s are consistent Z axis calibration is based on the right extruder and the height difference between the left and right extruders is recorded When the height difference is less than 0 2mm the compensa...

Страница 22: ...uder HS Suitable for printing composite filaments PACF PAGF PET CF etc Soluble lament combination Insoluble lament combination Left extruder Right extruder PVA PVA HIPS HIPS HIPS HIPS HIPS PLA NYLON A...

Страница 23: ...emperature is lower than 10 it is recommended to set the raft temperature to 50 Make sure to close the equipment door and front door when printing models with ABS When printing partial and small model...

Страница 24: ...e video screen can be viewed in the FlashPrint Multi Machine Control Warm water will decrease the dissolving time If PLA is used for the printed model please ensure that the water is no hotter than 35...

Страница 25: ...functions 6 1 Printing Screen Some parameters can be adjusted during printing Click the icon for the control of the printing speed fans and lights After finishing printing a file if the color of the f...

Страница 26: ...filament cleaning In this way it will avoid the situation that the filament is carbonized thus causing blockage or is not extruded due to different melting temperatures of the filaments When switchin...

Страница 27: ...the equipment 6 3 Preheating Screen The temperature of the extruder chamber and platform can be set in advance as required on the preheating screen Maintain Maintenance Here lists some maintenance ite...

Страница 28: ...rinting of the current model after the power supply is recovered Air Filter When the air filtration function is turned on the fan on the back of the equipment starts The front of the fan is equipped w...

Страница 29: ...28 7 Maintenance You can query the current encountered problem on the maintenance screen 7 1 Maintenance Screen...

Страница 30: ...xtruder and the right extruder The parts and numbers related to the extruder assembly are consistent but they are left right symmetric Please note that they cannot be used interchangeably at will When...

Страница 31: ...t the flatness of the platform has been damaged during installation At this time the initial platform leveling is required 7 2 3 Platform Flatness Calibration 1 2 Remove the flexible steel plate Loose...

Страница 32: ...e right screw under the profile in the same way as the left screw 4 5 6 Move the extruder to the Position 2 manually and be sure to move it slowly If the extruder scratches the platform it is necessar...

Страница 33: ...erature di erence of di erent laments Q8 Can the equipment automatically shut down after nishing printing Answer Yes Q9 Is printing ABS material safe Answer ABS material will release toxic gases durin...

Страница 34: ...t mode explanation in the screen calibration instructions Q15 Matters needing attention in updating the rmware Answer Please do not disconnect the power and the network when downloading or updating th...

Страница 35: ...ems In case you contact us during o duty time your inquiry will be answered the next following business day immediately We are sorry for any inconvenience caused Note Due to the replacement of di eren...

Страница 36: ...Zhejiang Flashforge 3D Technology Co Ltd Address No 518 XianYuan Road Jinhua City Zhejiang Province China Service Hotline 86 579 82273989 support ashforge com Follow us...

Отзывы: