VESDA-E VEP-A00-P Product Guide
52
www.xtralis.com
detector status screen.
l
For static IP addresses, set
Automatically obtain IP Address
to off and set the
IP Address
,
Subnet Mask
and
Default Gateway
to a valid address in the building network.
l
Set the detector authentication password. Refer to Section 5.3.1 on page 54 for further information.
Connect to a detector using Xtralis VSC
1. Using the normal building network connection process, connect the PC to the network.
2. Add an Ethernet / WiFi connection using Connection Manager in Xtralis VSC. Refer to Section 5.1.2 for
further information.
3. Enter the IP address of the detector previously set when enabling Ethernet connections. Where the
IP address is not known, it may be viewed on the detector status screen using a USB connection.
4. Enter the Authentication Password previously set when enabling Ethernet connections.
5. Select
Connection > Connect and View
.
6. If the previously defined connection profile is set as the default connection, select OK, otherwise select
Details, then select the required Ethernet connection from the list of available connection profiles and
select OK.
5.2.3
Connecting to a detector via WiFi
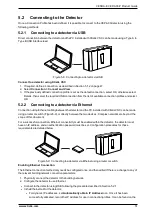
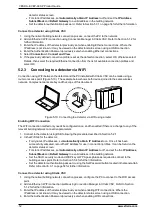
Connection using WiFi between the detector and the PC installed with Xtralis VSC can be made using a
router or access point (Figure 5-10). The example below shows both devices joined to the same wireless
network. Complex networks are beyond the scope of this document.
Figure 5-10: Connecting to a detector via WiFi using a router
Enabling WiFi Connection
The WiFi connection method only needs be configured once, and then edited if there is a change to any of the
relevant building network connection parameters.
1. Connect to the detector using USB following the procedure described in Section 5.2.1.
2. In the WiFi tab for the detector:
l
For dynamic IP addresses, set
Automatically obtain IP Address
to on. Once it has been
successfully allocated, record the IP Address for use in connection profiles. It can be found on the
detector status screen.
l
For static IP addresses, set
Automatically obtain IP Address
to off, and set the the
IP Address
,
Subnet Mask
and
Default Gateway
to a valid address in the building network.
l
Set the SSID, security mode and WEP key or WPA pass phrase as required to connect to the
building access point. Refer to Section 5.5.4 for further information.
l
Set the detector authentication password, using the Set Password button located in the General tab.
Refer to Section 5.3.1 on page 54 for further information.
Connect to a detector using Xtralis VSC
1. Using the normal building network connection process, configure the PC to connect to the WiFi access
point.
2. Add an Ethernet / WiFi connection profile using Connection Manager in Xtralis VSC. Refer to Section
5.1.2 for further information.
3. Enter the IP address of the detector previously set when enabling WiFi connections. Where the
IP address is not known, it may be viewed on the detector status screen using a USB connection.
4. Enter the Authentication Password previously set when enabling WiFi connections.
Содержание VESDA-E VEP-A00-1P
Страница 2: ......
Страница 10: ...VESDA E VEP A00 P Product Guide 4 www xtralis com This page is intentionally left blank ...
Страница 20: ...VESDA E VEP A00 P Product Guide 14 www xtralis com This page is intentionally left blank ...
Страница 52: ...VESDA E VEP A00 P Product Guide 46 www xtralis com This page is intentionally left blank ...
Страница 80: ...VESDA E VEP A00 P Product Guide 74 www xtralis com This page is intentionally left blank ...
Страница 98: ...VESDA E VEP A00 P Product Guide 92 www xtralis com 1 2 3 Figure 7 21 Undo Sampling Module screws ...
Страница 106: ...VESDA E VEP A00 P Product Guide 100 www xtralis com This page is intentionally left blank ...
Страница 112: ...VESDA E VEP A00 P Product Guide 106 www xtralis com Z zone 56 58 77 101 ...


