background image

 Table of Contents 

Section 1  Introduction ................................................................................................................ 1


Intended Use.............................................................................................................. 1


Section 2    Analyzer Components ............................................................................................... 2


Analyzer Component Illustrations...............................................................................

2


Section 3  Initial Startup .............................................................................................................. 3


Section 4    Analyzer Setup ........................................................................................................... 5


Test Settings .......................................................................................................... 5


Type of Strip ............................................................................................................... 5


Mode .......................................................................................................................... 6


Test Number............................................................................................................... 6


Continuous Test ......................................................................................................... 7


Operator ID ................................................................................................................ 7


Units........................................................................................................................... 7


Analyzer Configuration......................................................................................... 7


Printer Setup .............................................................................................................. 7


Sound......................................................................................................................... 8


Barcode reader .......................................................................................................... 9


Language ................................................................................................................... 9


Date/Time................................................................................................................... 9


Auto Number Reset.................................................................................................. 10


Database............................................................................................................... 10


Clear all Records.......................................................................................................11


Locate Record...........................................................................................................11


View Current Record.................................................................................................11


Self Test................................................................................................................ 12


QC Test ................................................................................................................. 12


QC Setup ................................................................................................................. 12


Run QC Test............................................................................................................. 13


Setting the QC Values.............................................................................................. 14


User Login............................................................................................................ 14


ID Admin .................................................................................................................. 14


Section 5    Analyzer Operation .................................................................................................. 17


Entering Canister Code ...................................................................................... 19


Normal Operation, no Barcode reader .............................................................. 20


Sample/Strip Preparation ......................................................................................... 20


Strip Test – Single Test Mode ................................................................................... 20


Strip Test – Continuous Test Mode........................................................................... 22


Normal Operation, Barcode reader installed .................................................... 23


Strip Test – Single Test Mode with Barcode reader .................................................. 23


Strip Test – Continuous Test Mode with Barcode reader .......................................... 24


Urine Controls QC Testing ................................................................................. 26


Strip Preparation ...................................................................................................... 26


Urine Control Test Procedures ................................................................................. 27


QC lockout ........................................................................................................... 27


Section 6  Data/Communication ............................................................................................... 29


External Printer ........................................................................................................ 29


Barcode reader ........................................................................................................ 29


Section 7  Quality Control ......................................................................................................... 30


Section 8  Maintenance ............................................................................................................. 31


Loading Printer Paper......................................................................................... 31


General Cleaning................................................................................................. 32


Daily Cleaning...................................................................................................... 32


Remove the Strip Holder .......................................................................................... 32


Clean the Strip Holder .............................................................................................. 32


Load the Strip Holder ............................................................................................... 32


Return the Strip Holder/Mount to its Internal Position............................................... 33


Sample Deposit Cleaning ................................................................................... 33


Strip Holder Sterilization..................................................................................... 33


Section 9  Precautions .............................................................................................................. 34


Section 10  Troubleshooting..................................................................................................... 35


Appendix 1  Urine Analyzer Specifications ............................................................................. 36


Appendix 2    Compatible Urinalysis Reagent Strips................................................................ 37


Appendix 3    Urinalysis Reagent Strips Parameter Table ....................................................... 43


Appendix 4  Result Print-Out .................................................................................................... 44


Appendix 5  Barcode reader ..................................................................................................... 45


Appendix 6  Catalog .................................................................................................................. 46


Appendix 7  Index of Symbols.................................................................................................. 47


Appendix 8  Warranty ................................................................................................................ 48


Содержание AimStrip

Страница 1: ...ation Barcode reader installed 23 Strip Test Single Test Mode with Barcode reader 23 Strip Test Continuous Test Mode with Barcode reader 24 Urine Controls QC Testing 26 Strip Preparation 26 Urine Cont...

Страница 2: ...nalyzer in a waived setting Users should read this complete test procedure before performing a test using this analyzer Failure to adhere to these instructions for use and for performing QC testing is...

Страница 3: ...r Release Lever green color 5 Printer Roller 6 Printer Paper 7 Printer Cover Pull 8 Printer Paper Access Slot 9 Strip Holder 10 Strip Holder Channel 11 Strip Holder Stop 12 White Calibration Circle 13...

Страница 4: ...ailed The Strip Holder Mount will be extended Turn off the Power Switch 4 Remove the Strip Holder from the plastic packaging Position the white Calibration Circle up and towards the back of the analyz...

Страница 5: ...again to re test Refer to Section 10 Troubleshooting to correct the failure Ensure the Strip Holder is installed properly 7 Press MENU to access the Test Settings Analyzer Configuration Database func...

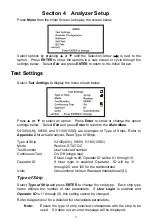
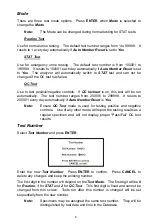
Страница 6: ...2 for actual Analyzer Read Type of Strips Type of Strip 54100 4LN 58100 51100 10SG Mode Routine STAT QC Test Number User selected number Continuous Test On Off single test Operator ID If User Login i...

Страница 7: ...omatically The test number ranges from 200001 to 299999 It resets to 200001 every day automatically if Auto Number Reset is Yes Note Ensure QC Test mode is used for testing positive and negative contr...

Страница 8: ...d Operator ID is 11 through 20 this setting cannot be changed Select EXIT and press ENTER to return to the Main Menu Units Select Units and press ENTER to cycle the units between Conventional or SI un...

Страница 9: ...e Labs Technical Support for a list of printers and printer cables that can be used Print Darkness Print darkness ranges from 1 to 9 The darkest is 9 After 9 it reverts back to 1 The default is 5 Prin...

Страница 10: ...ith and press ENTER to save changes The screen will return to the Main Menu Language Select Language and press ENTER to change the current language Each time ENTER is pressed the language changes Sele...

Страница 11: ...n Auto Number Reset Select Auto Number Reset and press Enter to cycle to Yes or No If Yes the test number will reset to 000001 100001 or 200001 for Normal STAT or QC modes each day If No the test numb...

Страница 12: ...only the Test Number is entered records with the current Date will be searched If there is no Test Number with the current Date the latest previous Date will be searched For example assume the curren...

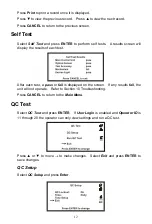
Страница 13: ...ults of each test After each test a pass or fail is displayed on the screen If any results fail the unit will not operate Refer to Section 10 Troubleshooting Press CANCEL to return to the Main Menu QC...

Страница 14: ...or to change Continue to press or until the correct number is shown Press or to progress to the next digit to be changed Press or to increase or decrease the number Change each of the time and date d...

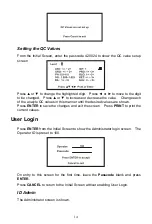
Страница 15: ...values in this manner until the desired values are shown Press ENTER to save the changes and exit the screen Press PRINT to print the current values User Login Press ENTER from the Initial Screen to s...

Страница 16: ...scode from blank to a valid passcode select Change Admin Passcode and press ENTER A non blank passcode must be entered to enable User Login If a blank is entered a new screen will indicate the passcod...

Страница 17: ...een Scan or enter a new Passcode Press ENTER to save the settings and exit Press CANCEL to cancel the settings and exit Enter a blank Passcode to disable the ID Logout After the User Login is enabled...

Страница 18: ...e Passcode is correct the analyzer will display the Initial Screen The logged in ID will be shown 11 20 or 100 The user ID will be 11 20 for Operators This provides access to operate the analyzer chan...

Страница 19: ...this prompt appears When visible Continuous Test is set to test up to 120 tests per hour If not Single Test is set to test one strip at a time up to 60 tests per hour When visible the printer is set t...

Страница 20: ...umber as needed After the last digit of the correct code is entered the next screen will be shown Press CANCEL to cancel the changes and exit the screen If the canister code is incorrect the following...

Страница 21: ...odes that have already been entered and will lockout the user until a new canister code is entered One canister code can be entered for each Type of Strip and will be managed independently of other st...

Страница 22: ...strip in fresh well mixed urine Immediately remove the strip to avoid dissolving the reagents Run the edge of the strip against the rim of the urine specimen container to remove excess urine Hold the...

Страница 23: ...is fully extended to begin the test The following screen will be displayed Wait for the audible triple beep to immerse the strip Note Timing is set up to process a new strip every 30 seconds Once STA...

Страница 24: ...ime the countdown clock reaches 1 it will return to 30 instead of 65 A triple beep occurs every 30 seconds This prompts the operator to immerse a new strip Discard the used strip according to local re...

Страница 25: ...e test Press MENU to change the current testing mode After the barcode is entered ID will display Review the ID before testing the strip Press START after the ID has been entered to display the next s...

Страница 26: ...ow the next sample to be tested Press START to begin the batch mode Press CANCEL to return to the Initial screen Press ENTER to enter a new screen to edit the Barcode ID Using the keypad or barcode re...

Страница 27: ...is complete the Results Screen will show briefly The next strip can be placed on the Strip Holder Stop testing by pressing CANCEL when the prompt appears All other testing procedures are the same as t...

Страница 28: ...ult will be printed If the QC test Fails please contact Germaine Laboratories Inc Technical Support QC lockout When QC lockout is turned On the user will be notified when a QC test is required The fol...

Страница 29: ...analyzer will display the testing results If any parameter is out of range it will be highlighted and marked with a If Auto print is set to On the result will be printed Press ENTER to test control Le...

Страница 30: ...uitable software Please contact Germaine Labs Technical Support for details on the data transfer External Printer The RS232 port can connect to an optional external printer for printing data Please co...

Страница 31: ...operator uses the analyzer 3 Test results seem inaccurate 4 After performing maintenance or service on the analyzer If the QC tests do not provide expected results perform the following checks 1 Ensur...

Страница 32: ...f the printer paper through the feed and the printer paper will now easily feed through the Printer Roller 3 A green Paper Release Lever is located near the Printer Roller Press and push the back end...

Страница 33: ...sing a cotton swab or cotton ball with distilled water Dry with a clean dry cotton ball Note The White Calibration Circle should be replaced if any nicks or non removable dirt are found Please contact...

Страница 34: ...it to its original position as described above Strip Holder Sterilization 1 Remove the Strip Holder and repeat Daily Cleaning above 2 Clean the Strip Holder using a lint free non absorbent cotton swab...

Страница 35: ...id interference with the Strip Holder 6 Keep the unit clean Wipe it frequently with a soft clean and dry cloth Use fresh water when needed 7 Do not clean the unit with substances such as gasoline pain...

Страница 36: ...the Power Switch off then on Perform a Self Test Refer to Manual Self Test section Optical Sensor Failed Ensure the Strip Holder is locked onto the Strip Holder Mount correctly The Strip Holder should...

Страница 37: ...hermal printer 25 Pin Parallel External Printer Connector Barcode reader Connector USB port External printer optional Barcode reader optional Major Readable Barcodes See Appendix 5 Available Languages...

Страница 38: ...kocytes 10 51100 10SG Glucose Bilirubin Ketone Specific Gravity Blood pH Protein Urobilinogen Nitrite and Leukocytes Note Ensure that the type of strip selected corresponds with the strip to be used I...

Страница 39: ...thod within 0 005 Blood BLO 3 3 5 5 tetramethylben zidine TMB cumene hydroperoxide buffer and non reactive ingredients Detects free hemoglobin as low as 0 018 0 060 mg dL or 5 10 Ery L in urine specim...

Страница 40: ...waiver study demonstrated that the following performance data of the AimStrip Urine Analyzer in the hands of non technical users when using only the Quick Reference Guide Bilirubin Bayer Clinitek 500...

Страница 41: ...Bayer Clinitek 500 Urine Chemistry Analyzer 0 15 30 100 300 Total 0 265 10 0 0 0 275 15 19 42 13 0 0 74 30 0 9 48 17 0 74 100 0 0 0 42 9 51 AimStrip Urine Analyzer 300 0 0 0 0 86 86 Total 284 61 61 59...

Страница 42: ...WM is 62 5 350 560 with 95 CI 58 4 66 6 Agreement within 1 block is 98 4 551 560 from each other with 95 CI 97 0 99 3 Bayer Clinitek 500 Urine Chemistry Analyzer Specific Gravity 1 0 1 005 1 01 1 015...

Страница 43: ...0 0 404 1 0 41 7 1 0 49 2 0 0 22 18 0 40 4 0 0 0 26 19 45 AimStrip Urine Analyzer 8 0 0 0 0 22 22 Total 390 55 29 45 41 560 The exact agreement between the CM and the WM is 89 5 501 560 with 95 CI 86...

Страница 44: ...1 020 1 025 1 030 1 000 1 005 1 010 1 015 1 020 1 025 1 030 1 000 1 005 1 010 1 015 1 020 1 025 1 030 Blood BLO 1 2 3 neg 10 Ery L 25 Ery L 80 Ery L 200 Ery L neg 10 Ery L 25 Ery L 80 Ery L 200 Ery L...

Страница 45: ...ological significance will be marked with an Arbitrary Results 1 All positive results except pH and Specific Gravity SG will be reported as 1 2 or 3 2 Positive results for pH and Specific Gravity SG w...

Страница 46: ...eader can scan the following Code 39 Standard Full ASCII Codabar NW 7 Code 128 Italy Pharmacode UPCA EAN 128 French Pharmacode UPCE MSI Industrial 25 EAN8 Plessey Interleave 25 EAN13 Telepen Matrix 25...

Страница 47: ...ter Paper Rolls 2 Fuses 2 0A 2 Power Cord 1 Quick Start Guide 1 Instruction Manual 1 Barcode reader 1 51220 AimStrip Urine Analyzer With Barcode reader Serial Splitter Cable 1 Barcode reader 1 51320 U...

Страница 48: ...Kit SN Serial Number Keep away from sunlight and heat Use by Serial Port Keep Dry Fragile handle with care This Side Up Continuous Test Auto print is on Internal printer is used Auto print is off Ext...

Страница 49: ...placement due to defects in parts or workmanship Parts required which were not defective shall be replaced at additional cost Germaine shall not be required to make any repairs or replace any parts th...

Страница 50: ...one year of purchase Refer to Appendix 8 Warranty in the Instruction Manual for details and terms of the product warranty Date of Purchase Analyzer Serial Number e g SN 0000000 See label on back of a...

Отзывы: