517804 D
34
9 SERVICE
PROCEDURES
Safety Considerations
COMPONENT REPLACEMENT
9.1
Icemaker PCB Replacement
•
The icemaker PCB is fitted to the outside of the power module.
•
Disconnect the refrigerator from the power supply.
•
Remove the power module from the unit compartment.
•
Using a flat bladed screwdriver, lever the PCB cover from the power module.
Note: Care should be taken as too much pressure may cause the clip on the cover to break.
•
Remove the RAST connector from the icemaker PCB and remove the PCB.
•
Refit in reverse order.
9.2
Icemaker Unit Replacement
•
Disconnect the refrigerator from the power supply.
•
Remove all baskets/trays from the freezer.
•
Remove left hand side rail supports.
•
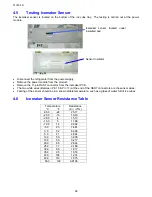
Remove the clip and insulation pad holding the icemaker sensor from bottom of the ice tray.
•
Remove the sensor from under the icemaker tray.
•
Place fingers at the rear of the icemaker and with a brisk downward motion pull the icemaker from
the roof of the freezer.
Note: Both front and rear clips should have dislodged. If only the rear clip has dislodged,
place fingers in the front of the icemaker and once again briskly pull the icemaker down.
•
Disconnect the icemaker harness.
9.3 Refitting
Icemaker
•
Refit the sensor to the underneath of the icemaker tray.
•
Refit the wiring connector.
•
Place harness into the groove on the edge of the body of the icemaker.
•
Locate the clips and align the icemaker to the clips.
•
With an upward pressure, re-clip icemaker.
Note: If either front or rear clips do not re-clip, further pressure will need to be exercised to re-
clip the icemaker.
9.4
Icemaker Temperature Sensor Replacement
•
Remove the icemaker (refer to Section 4.1.2).
•
The sensor wires are to be cut as close to the sensor as possible. Strip the wires back (10mm) on
the new sensor and on the wiring in the cabinet to allow the wires to be soldered together.
•
Place heat shrink onto both wires of the sensor.
•
Solder the wires, slide the heat shrink over the joints and heat the joints.
CAUTION
ALL TERMINALS AND INTERNAL PARTS SHOULD BE TREATED AS LIVE.
ALL SERVICING SHOULD BE CARRIED OUT WITH THE REFRIGERATOR
DISCONNECTED FROM THE POWER SUPPLY.
Содержание E522BLXFDU
Страница 2: ......
Страница 18: ...517804 D 18 3 10 Airflow...
Страница 32: ...517804 D 32 7 WIRING DIAGRAMS...


