www.fishhaw electronics.com 7
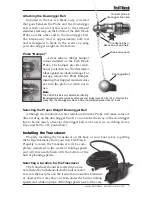
Attaching the Downrigger Ball
Included in the box is a break-away wire lead
that goes between the Probe and the downrigger
ball. Attach one end of this lead to the stamped
stainless steel loop on the bottom of the Fish Hawk
Probe and the other end to the downrigger ball.
The break-away lead is approximately 60lb test
and is designed to break in the event you snag
your downrigger weight on the bottom.
Probe “Bumper”
A clear silicone rubber bumper
comes installed on the Fish Hawk
Probe. The bumper provides addi-
tional protection for the thermistor
tubes against accidental damage. For
storage, remove the Probe Bumper,
insuring that trapped moisture does
not turn the probe on when not in
use.
Selecting the Proper Weight Downrigger Ball
Although it is minimized, water resistance from the Probe will cause some ad-
ditional drag on the downrigger line. If you consider the sway in the downrigger
line to be too much, a heavier downrigger ball can be used (i.e. switching from a
10 pound ball to a 12 pound ball.)
Installing the Transducer
Properly installing the Transducer on the back of your boat is key to getting
the best performance from your new Fish Hawk.
Properly located, the Transducer will be com-
pletely immersed in the water at trolling speeds
and will ride nearly flush with the bottom of the
hull at planning speeds.
Selecting a Location for the Transducer
The Transducer should be located in an area
not affected by turbulence from the hull or motor.
To locate the best place on the transom to mount the Transduc-
er, observe the water flow out from under the hull at trolling
speeds and while on plane. At trolling speeds look for the area
Connect probe to
downrigger line here.
Connect probe to
Break-away Lead here.
Break-away Lead
Downrigger Ball
Note
The X4/X4D probe is very durable, but denting
the temperature sensor probes will cause your probe to read 03.9 or 04.0. Remove the
probe from the downrigger cable and store in a protected place when not in use.

