background image

12  Fish Hawk Owners Manual

cluding: the species and size of fish caught, Probe depth, Probe temperature, Probe 
speed, time, GPS coordinates (optional,) and notes (lure info, weather conditions, 
etc…) The Catch Log is organized by date, and you easily share logged catch infor-
mation with fishing buddies in other boats via text message or email

Routine Maintenance

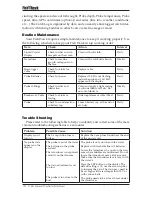
Your Fish Hawk requires simple maintenance to keep it working properly. Use 

the following schedule to keep your Fish Hawk in top working order: 

Item 

Check

Action

Interval

Liquid Crystal 

Display

Check for dirt and wa-

ter spots on the screen.

Clean with soft cloth.

Daily

Transducer

Check for marine 

growth or deposits on 

the face.

Clean with a soft bristle brush.

Weekly

Downrigger 

Cable

Check for kinks for 

fraying.

Replace cable.

Daily

Probe Batteries

Check for power.

Replace if LED is not flashing

inside the probe or if LO BAT 

appears on the display.

Daily

Probe O-Rings

Check for dirt and 

lubrication.

Clean and apply a light coating 

of silicone lubricant if dry. Do 

not over-lubricate.

Weekly

Break-away Cable

Check for kinks or 

fraying.

Order replacement cable if bad.

Daily

Probe

Check for condensation 

in battery cap

Loosen battery cap at the end of 

each day

Daily

Trouble Shooting

Please refer to the following table to help you identify and correct some of the more 

common troubleshooting scenarios we encounter.

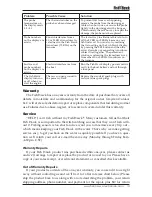
Problem

Possible Cause

Solution

Display won’t 

turn on

The 1-amp in-line fuse is 

broken

Replace the 1-amp fuse found near the end 

of the power cord

No probe data 

appears on the 

display

The probe is out of the water
The batteries in the probe 

are dead
The transducer is not placed 

correctly on the transom

The Gain adjustment is set 

too low

The probe is too close to the 

boat

The probe is only on when in the water
Replace with fresh alkaline AA batteries
Locate the transducer in a spot on the tran-

som where bubbles are minimized. Do not 

locate the transducer near a kicker motor. 

Make sure the transducer face is level with 

the water’s
Press the SET button on the display. The 

default setting is 15, use the arrow up key 

to increase the gain. The Gain may need to 

be set higher in water deeper than 150’ or 

with cannon balls
The probe needs to be at least 5-feet under 

the transducer

Содержание X4D

Страница 1: ... business we enjoy working personally with each of our customers If you like our products and customer service please tell your fishing friends about us and take a moment to write a review or visit us at facebook com Fish HawkElectronics If you have any questions about your Fish Hawk please contact us Thank you again and have a safe and enjoyable fishing season Sincerely Trevor Sumption President ...

Страница 2: ...2015 Fish Hawk X4D Owner s Manual ...

Страница 3: ...er Weight Downrigger Ball 7 Installing the Transducer 7 Selecting a Location for the Transducer 7 More Transducer Mounting Tips 8 Sonar Interference 9 The Fish Hawk LCD Display 9 Installing the Display 9 Adjusting the Angle of the Display 9 Using the Fish Hawk Display 9 Setting the Gain Screen 1 10 Setting the Temperature Unit of Measure Screen 2 1 1 Setting the Speed Unit of Measure Screen 3 1 1 ...

Страница 4: ...Water Temperature Ranges shown in Fahrenheit Species Lower Limit Optimum Upper Limit Brown Trout 44 52 75 Chinook Salmon 40 44 60 Coho Salmon 44 54 60 Crappie 60 70 75 Kokanee 52 Lake Trout 40 42 55 Largemouth Bass 50 70 80 Atlantic Salmon 45 50 60 Rainbow Trout 44 54 63 Smallmouth Bass 50 65 73 Steelhead 42 45 62 Walleye 50 67 76 Alewife 48 54 72 Cisco 53 Emerald Shiner 61 Gizzard Shad 69 Rainbow...

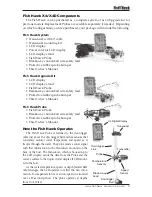
Страница 5: ...wk Probe Fish Hawk Probe Breakaway cannonball wire safety lead Protective rubber probe bumper This Owner s Manual How the Fish Hawk Operates The Fish Hawk Probe is fastened to the downrigger cable just above the downrigger ball and has sensors that constantly monitor water temperature and speed as it travels through the water The probe sends a sonar signal with that information to the Transducer m...

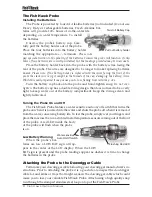
Страница 6: ...ery cap has a double O ring design that does not need to be overly tight to keep water out of the battery compartment Keep the O rings clean and lightly lubricated Turning the Probe On and Off The Fish Hawk Probe features a water sensitive auto on off switch that turns the probe on when it is lowered into the water and shuts the probe off when it is removed from the water conserving battery life T...

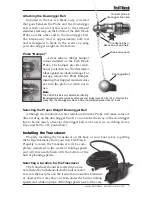
Страница 7: ...e sway in the downrigger line to be too much a heavier downrigger ball can be used i e switching from a 10 pound ball to a 12 pound ball Installing the Transducer Properly installing the Transducer on the back of your boat is key to getting the best performance from your new Fish Hawk Properly located the Transducer will be com pletely immersed in the water at trolling speeds and will ride nearly ...

Страница 8: ...eption the deeper the probe goes More Transducer Mounting Tips Most often the Fish Hawk Transducer should be mounted using the same criteria as most fish finders DO NOT cut the Transducer cable If the cable is too long simply coil the excess out of the way Ten foot cable extensions are available for sale on line from Fish Hawk Electronics if a longer cable is needed When possible run the Transduce...

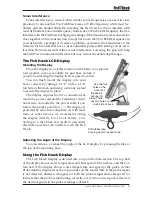
Страница 9: ... x 6 1 8 tall hole in the dash and using a silicone sealant to secure the display in place The display requires that two connections be made the power cord and the Transducer Addi tional wire can added to the power cable if you follow the proper polarity The display is protected by an in line 1 amp fuse As with most radio or sonar devices we recommend wiring the display directly to a 12 volt batte...

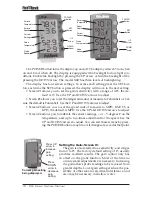
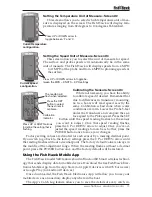
Страница 10: ...s you to calibrate the sensor readings or 5 degrees F on the temperature and up to two times adjustment for the speed Use the UP and DOWN arrows to adjust You can exit these screens by press ing the POWER button at any time All changes are saved at that point POWER Button SET Button UP Arrow DOWN Arrow Probe Speed Probe Temperature Current Settings Surface Speed Surface Temperature POWER Button SE...

Страница 11: ...R button once to save your changes Factory setting values are denoted for each sensor by a missing decimal point If you wish to go back to the factory settings press the UP or DOWN arrow until the reading flashes without a decimal point The factory default value is always in the middle of the adjustment range When the reading flashes without a decimal point press the POWER button once and the fact...

Страница 12: ...r lubricate Weekly Break away Cable Check for kinks or fraying Order replacement cable if bad Daily Probe Check for condensation in battery cap Loosen battery cap at the end of each day Daily Trouble Shooting Please refer to the following table to help you identify and correct some of the more common troubleshooting scenarios we encounter Problem Possible Cause Solution Display won t turn on The 1...

Страница 13: ... a flat rate see chart below Please ship the product back to us along with a note describing the problem your return shipping address phone number and payment for the repair plus 10 for return Problem Possible Cause Solution The probe temperature on the display reads 3 8 4 0 The thermistor tubes on the probe have been damaged To prevent this from ever happening remove the probe from the downrigger...

Страница 14: ...include inbound or outbound transit times SERVICE TIPS Here are some other tips that make the repair process more hassle free Ship your product back via Fed Ex UPS or Priority Mail so you get a tracking number Very seldom is the Transducer the problem contact us prior to removing the Transducer from the boat Visit our website www fishhawkelect onics com to view trouble shooting videos and FAQ it m...

Страница 15: ......

Страница 16: ......

Отзывы:

Похожие инструкции для X4D