6 Fish Hawk Owners Manual
The Fish Hawk Probe
Installing the Batteries
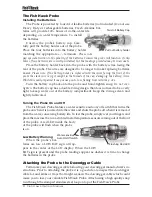
The Probe is powered by four AA Alkaline batteries (not included.) Do not use
Heavy Duty or rechargeable batteries. Fresh Alkaline bat-
teries will provide 100+ hours of in-the-water life
depending on water temperature. To install
the batteries:
Unscrew the probe’s battery cap. Care-
fully pull the battery holder out of the probe.
Place the four batteries into the battery holder
matching the appropriate +/- terminals.
Please note:
pay special attention to the polarity of the batteries because the probe will function if only
three of four batteries are correctly installed, but the readings provided may be inaccurate.
Place the battery holder back into the probe with the battery wires facing the
rear of the probe. The wires are designed to be longer to make replacing batteries
easier.
Please note: if the battery holder is replaced with the wires facing the front of the
probe the slack wire can get caught in the threads of the cap, damaging the battery wires.
While this easily repaired it may cause you to lose fishing time with the p obe.
Turn the battery cap back onto the probe and hand-tighten snug.
Do not over-
tighten.
The battery cap has a double O-ring design that does not need to be overly
tight to keep water out of the battery compartment. Keep the O-rings clean and
lightly lubricated.
Turning the Probe On and Off
The Fish Hawk Probe features a water sensitive auto on/off switch that turns the
probe on when it is lowered into the water and shuts the probe off when it is removed
from the water, conserving battery life. To test the probe, simply wet your fingers and
place them across the two activated metal temperature sensors coming out of the front
of the probe. A red LED inside the body
of the probe will flash when the probe
is on.
Low Battery Warning
When the probe’s bat-
teries are low a LOW BAT sign will ap-
pear in the center of the LCD display. When the LOW
BAT sign is present and the probe readings appear as dashes it is time to change
the batteries in the probe.
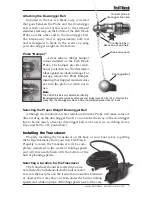
Attaching the Probe to the Downrigger Cable
Terminate your downrigger cable following your downrigger manufacturer’s in-
structions. Prior to attaching the probe it is a good idea to inspect the downrigger
cable for and kinks or frays that might weaken the downrigger cable which could
cause you to lose your valuable Fish Hawk Probe. Attach using a high quality snap
run through the stamped stainless steel loop on top of the Fish Hawk Probe.
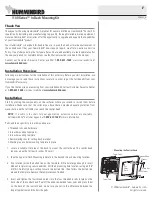
Twist off Battery Cap
Pull out battery holder
Flashing Red LED
Water sensitive
Auto On/Off switch

