11
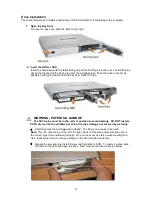
3. Attach the eSATA cables
Install an eSATA data cable on the rear of the miniSwap/ES for each hard disk/SSD
inserted into the enclosure. Attach the other end of the eSATA cable to a SATA controller
or an eSATA ExpressCard.
Note:
•
The original Serial ATA (Type A SATA) connectors have an L shaped opening. This type of
connector is
not
used on the back of the miniSwap/ES enclosure. See Figure 2A.
•
The newer “ eSATA” connectors have a rectangular opening. This style of connector is
provided on the back of the miniSwap/ES for connecting to the SATA host adapter. See
Figure 2B.
Figure 2: Serial ATA Connector Types: “L shaped” & “I shaped” eSATA
Figure 3: Serial ATA Cable Connectors Ship with the miniSwap/ES. Both ends of the cable have
eSATA type I connectors.
Making the SATA Connections:
Caution
: Be sure to connect the cable using the proper orientation to your SeriTek host
adapter and external enclosure. It should easily snap into place. Please do not force the
cable connector onto the host adapter and hard drive or peripheral interface.
Remember the male and female connectors must be of the same type for a correct fit -
eSATA female to eSATA male are used on the miniSwap.
•
First check that you are connecting the correct type of connector
•
If the connector still does not fit, rotate the cable and try again
Figure 2A: “L shaped”
connector
Figure 2B: “I shaped”
eSATA connector


