background image

Page 84

VIVO Monitor


VIVO Monitor


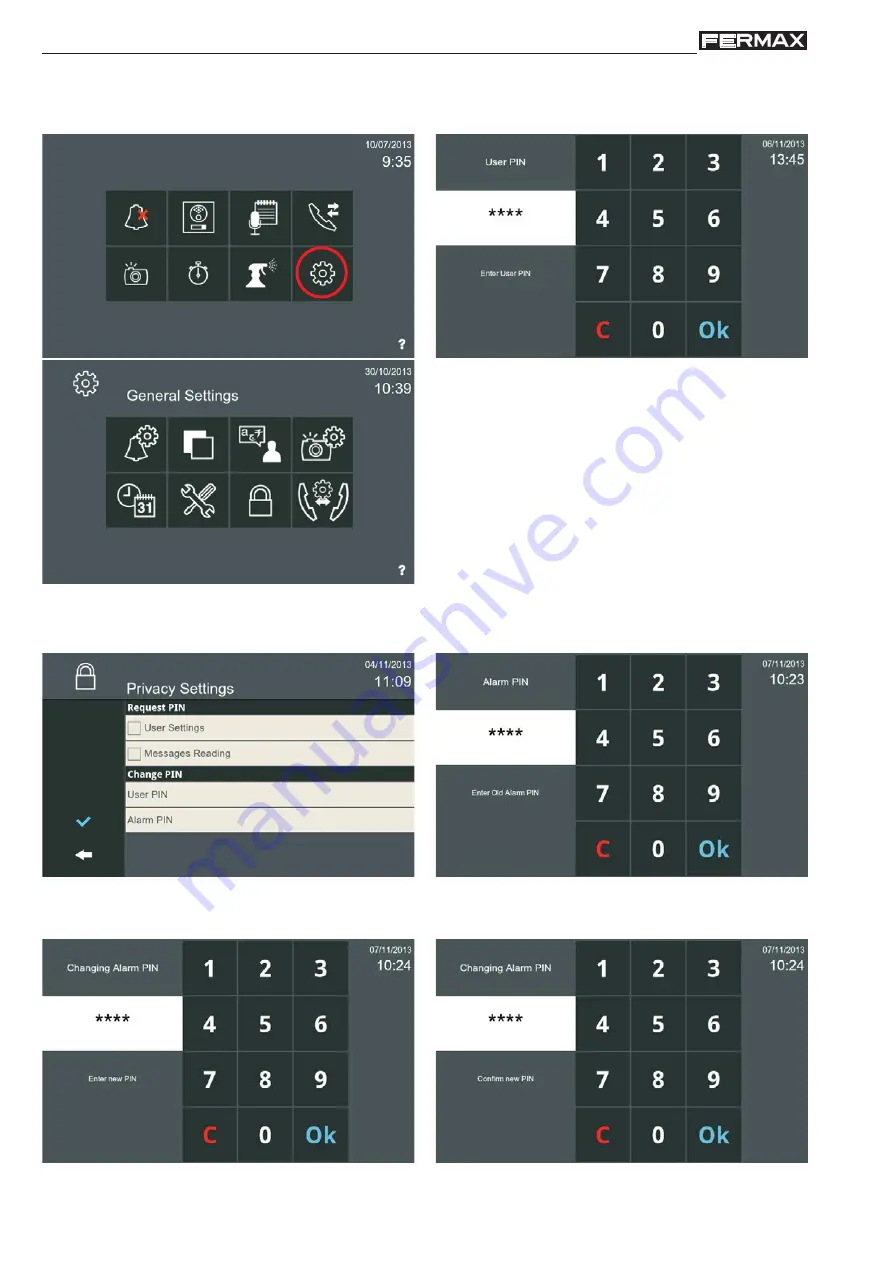
b) Alarm PIN


To change the alarm PIN. The default alarm PIN: 

0000

Press the 

Alarm PIN

 parameter to select it. 

A screen opens and requests the current alarm PIN 
(0000 by default). Once entered, press OK.

Once the 

User PIN

 code has been changed, press on the 

General Settings

 icon in the Start Menu and 

enter the NEW 

PIN

 code and press

 OK 

to access the screen where the icons corresponding to the different 

Monitor Settings are located.

A screen opens where the current Alarm PIN can be 
changed (4 digits). Once entered, press OK.

A screen opens to confi rm the new Alarm PIN. Once 
entered, press OK.

Содержание VIVO KIT

Страница 1: ...ENGLISH VIVO MONITOR INSTALLER S MANUAL...

Страница 2: ...nt is published for information purposes by FERMAX ELECTR NICA S A U which reserves the right to modify the technical specifications of the products referred to herein at any time and with no prior no...

Страница 3: ...1 2 3 Panic Call SOS button 31 1 Pressing the SOS button for 3 seconds 32 2 Pressing an External Secondary SOS button 33 3 Activating the Alarm System 34 o 1 2 4 Inter Communication Calls between moni...

Страница 4: ...ed 81 a User Settings 81 b Reading Messages 82 2 16 6 2 Changing PIN 83 a User PIN 83 b Alarm PIN 84 2 16 7 Home to Home Call Settings 85 2 16 8 Installation Settings 87 2 16 8 1 Monitor Settings 87 2...

Страница 5: ...ble equipment which fulfils the highest design and technology standards The Vivo monitor is a technological device designed to maximise communication security and comfort in the home This manual descr...

Страница 6: ...ons When switched on the monitor starts up and displays the FERMAX logo the firmware version and the MAC address The start up process takes less than 60 seconds and the monitor enters stand by mode Th...

Страница 7: ...e monitor and an optional beep is heard this sound can be disabled This lit message icon can refer to a message an audio note or a missed call A text is displayed at the bottom of the screen to indica...

Страница 8: ...ark on the screen that opens a screen that displays the icon and its meaning To activate the icons not available by default enter Optional Functions To do so press General Settings to access the scree...

Страница 9: ...e intui tive icons displayed on the monitor such as arrows or icons corresponding to the current screen by pressing the MENU button or after a period of time as the monitor returns to stand by screen...

Страница 10: ...The icons can be dragged for a personalised configuration of the Start Menu with the functions most frequently used and in the required order Notes The position of the icons in the menu is defined by...

Страница 11: ...set update the date and time regional uses regarding date formats can also be adapted on the International Settings screen To do so press General Settings to access the screen where the International...

Страница 12: ...rver Function not available o Server database IP Address of the Database Server Property Management Station configured during PC installation as database Administrator PC o NTP Server Not used if left...

Страница 13: ...Capture Door Release The information and icons displayed on the Conversation Screen vary according to the terminal from where the call was made Outdoor panel PMS Guard Unit Monitor same home Monitor a...

Страница 14: ...answered by pressing the icon Answer Call green telephone the audio communication is connected and the audio controls are displayed audio and mute setting With regards to the icons displayed on the sc...

Страница 15: ...he audio connection is open Functions enabled by default Using the Picture Capture icon camera pictures can be taken manually or automatically if it is activated This function is enabled by default Ma...

Страница 16: ...time On sliding a finger from left to right the most recent photos are displayed and on sliding from right to left the older photos are displayed in sequence If the picture is pressed once it is disp...

Страница 17: ...than the factory configured setting press General Settings to access the screen where the Picture Settings option is located PICTURE RESET To delete all existing pictures press the Delete waste bin b...

Страница 18: ...e there are 10 seconds left before returning to stand by mode the countdown time is displayed in the upper right hand corner of the screen to inform the user that the connection will end after the se...

Страница 19: ...th the incoming call When one of them answers the others stop ringing and return to stand by Receiving calls with the monitor in a conversation If another call is received on the monitor while it is i...

Страница 20: ...ozen for 1 second and a flash sound is played During this time the Picture Capture icon turns green Capture pictures automatically The monitor is set by factory default with the Picture Capture option...

Страница 21: ...ss is also possible to the IP cameras with the IP address in the range of the Private Home Entry Panels and the Block Entry Panels through this function although this function is not available for Gen...

Страница 22: ...ng the Reject Call icon or after waiting 30 seconds if the audio is not connected The timer is set to 90 seconds if the audio is connected If a conversation is being held with the selected panel a mes...

Страница 23: ...he Vivo monitors Given that all cameras are connected to the same physical network they can all be managed by a standard Digital Video Recording DVR network Notes The monitor detects the camera during...

Страница 24: ...e other than OFF Mode These parameters can be viewed on the PMS itself Select Installer to access the screens where the defined language ring tone volume and PMS name are displayed PMS Screens The def...

Страница 25: ...nitor In GENERAL SETTINGS the language and ring tone volume of the PMS are displayed Note The application must be restarted for the language change to be effective PMS SETTINGS displays the descriptio...

Страница 26: ...be operative must be Home Mode or Full Mode Users can select an PMS and a call is sent to it The call ring tone is played If the guard unit does not answer the call in 30 a message is displayed on the...

Страница 27: ...monitor shows the operator concierge of the PMS if the PC has a camera fitted and a conversation can be held with him her PMS is busy he will call back as soon as possible PMS On making the call to th...

Страница 28: ...me e g Home 102 The PMS calls Home 102 and if the owner accepts the call the concierge then transfers the initial call to Home 102 PMS To end the conversation press the End Conversation icon or the co...

Страница 29: ...Page 29 VIVO Monitor VIVO Monitor Enter Home number or search for the home using the Address Book Press accept to transfer the call Yaga Yaga...

Страница 30: ...Page 30 VIVO Monitor VIVO Monitor The conversation with the PMS is limited to 90 seconds It is also possible to transfer the call to another PMS...

Страница 31: ...For the SOS button to work there must be a PMS ALARMS and this must be online If not there will be no answer when the SOS button is pressed The default user name and password for the PMS Alarms is Use...

Страница 32: ...seconds and the countdown will be displayed i e the seconds remaining and an alarm tone will be triggered Users must keep the panic button pressed down for 3 seconds for the panic call to be sent to t...

Страница 33: ...and the PMS Alarms because the owner is not in front of the monitor PMS To end the conversation press the End Conversation icon or the conversation will end after 90 seconds 2a Silent panic alarm usin...

Страница 34: ...g the alarm PIN which is 0000 by default An alarm message is sent to the PMS Alarms and no video and audio connection is established between the monitor and the PMS Alarms because the owner is not in...

Страница 35: ...ent tag Given that up to 8 monitors can be installed in each home the extension numbers are 0 7 To complete these labels Tenant Name and Monitor Tag go to Home to Home Call Settings To do so press Gen...

Страница 36: ...The display shows that a call from the kitchen monitor is incoming On accepting the call on the kitchen monitor the Internal Call icon indicates that both monitors are in an internal communication gi...

Страница 37: ...same installation The External Call Call from Home to Home function is disabled by default Note The External Call icon must have been previously enabled by the installer On enabling this icon the Con...

Страница 38: ...been completed Tenant Name display the Block No and Unit monitor no To make an external call Home to Home Call the user selects the required monitor and the call is automatically sent and displayed o...

Страница 39: ...handle two groups of contacts Allow All Incoming Calls Only allow incoming calls from Friends List Calls are restricted to the Friendship Request through the Contacts List The Contacts List can be acc...

Страница 40: ...ist and press confirm When confirmed a text message is sent to the target home and a screen is displayed to indicate that the friendship request is being sent In the target home when the message is re...

Страница 41: ...epted calls of the target home on all of its monitors and in the list of friends of the source home all monitors Reject When pressed a message is sent to the source home to indicate non acceptance if...

Страница 42: ...d as indicated in this chapter 1 2 4 2 External Call Call from one monitor to another monitor in the same installation Making an External call The Contacts List displays who can be called and who can...

Страница 43: ...all ring tone is played Once the connection has been made answer from PMS the monitor shows the operator concierge of the PMS if the PC has a camera fitted and a conversation can be held with him her...

Страница 44: ...be displayed that contains all the monitors available Select the required monitor and the call is automatically sent Notes All of the monitors in the same home must have o The same Tenant Name Block a...

Страница 45: ...is pressed an acceptance message is sent to the source home if the TFT is on 1 In the target home when the message is received on the monitor the message icon lights up and an optional beep is heard S...

Страница 46: ...MODE Function to deactivate the call ring tone This mode can be selected using the Do Not Disturb icon In this mode when a call is received the call ring tone is not generated and only video is activa...

Страница 47: ...all the panels available is displayed Name the description defined in each one of them Explained in Chapter 1 2 1 Call connection to outdoor panel 2 3 PROPERTY MANAGEMENT STATION PMS Guard Unit Functi...

Страница 48: ...s in a given unit Explained in Chapter 1 2 4 Inter Communication Calls between monitors 1 2 4 2 External Call Call from one monitor to another monitor in the same installation Friendship Request conta...

Страница 49: ...displayed b New message This enables users to write a new message c Delete message This deletes the selected message Several messages can be selected at the same time The selected messages can be dele...

Страница 50: ...eading messages Privacy Settings A PIN code password can be used to protect some of the characteristics of the monitor for privacy purposes or other reasons The Vivo monitor can be configured to reque...

Страница 51: ...Receiving Messages 2 7 2 Sending Messages The monitor can send text messages to the Property Management Stations PMS Guard unit and to other monitors in the Contacts List Friendship Request See Chapte...

Страница 52: ...ed the message See Chapter 2 7 1 Receiving Messages for further details The Send Message screen displays all of the fields for drafting and sending the message Press the Send Message icon and the Send...

Страница 53: ...otes icon changes to indicate that audio notes have been recorded on the monitor It displays a blue circle with the number of notes recorded and the message LED lights up 3 Once inside the Audio Note...

Страница 54: ...icon to access the Audio Note screen Audio notes are displayed in chronological order from the latest received top to the oldest bottom If the list is too long for the size of the screen it can be scr...

Страница 55: ...This saves the audio note and returns to the previous menu Back This returns to the Audio Notes Menu without saving See Chapter 2 8 1 Recording an Audio Note Notes The maximum length per audio note i...

Страница 56: ...e been heard the blue and white circle disappear and the Audio Notes icon will return to its original appearance The Audio Notes icon changes to indicate that audio notes have been recorded on the mon...

Страница 57: ...te Time Press the Calls Register icon to access the Call History screen Press the Dialled Calls tab to view all calls made Press the Received Calls tab to view all calls received If a photo has been t...

Страница 58: ...ls received The status bar indicates that a new missed call has been registered SOS Press the Calls Register icon to access the Call History screen Press the Missed Calls tab to view the calls missed...

Страница 59: ...ll return to the Start Menu the remaining time will be displayed at the bottom left of the screen Press Cancel to exit the Start Menu without activating the timer When the counter reaches 00 00 00 the...

Страница 60: ...ton closes the browser and returns to the Start Menu Up to 5 different servers can be pre configured by the installer If more than 1 is configured the Home Automation icon provides a list tags so that...

Страница 61: ...Home Automation Settings Name Name of the application Server IP address of the server Port Optional if required Port number URL Web address of the server For example http www fermax com Unit Router Se...

Страница 62: ...Home Alarm mode configuration LED indicator The Vivo monitor can manage a Fermax proprietary alarm through its Sensor Module This Sensor Module allows for the management of up to 16 zones This module...

Страница 63: ...week Sensors that are always armed such as smoke gas water etc Night Zone Perimeter control sensors and or movement sensors Out Zone All types of sensor Mode Operating mode of the Zone NO Normally Op...

Страница 64: ...anging to a lower security mode e g from OUT to HOME or from NIGHT to HOME the alarm PIN code is requested that by default is 0000 before pressing OK This should be changed for security reasons If the...

Страница 65: ...he home without the alarm being triggered for 100 seconds Pre Alarm Notification After receiving a pre alarm command from the Sensor Module the monitor displays a keypad to enter the alarm PIN and dea...

Страница 66: ...installation and configuration provided by the installer For security reasons use of the lift by visitors and residents tenants may require some kind of restriction in a system The restriction level d...

Страница 67: ...t parameters are set from the Property Management Station Press the Lift Control icon to activate up to 3 relays depends on the installation configuration provided by the installer The relay must be i...

Страница 68: ...Monitor VIVO Monitor Lift Settings This allows for the existing lifts in the installation to be defined and associated to the accesses possible to the Lift Control From the Installer Menu go to Lift...

Страница 69: ...er relay module number corresponding to this lift Panels Number of the panel or panels of this block that allow access to that lift Example 1 2 3 Start Floor Starting floor of the lift s run End Floor...

Страница 70: ...oors to be represented with text instead of numbers are defined for example BASEMENT GARAGE etc FLOOR these are the characters represented in the FLOOR box in the USERS table Address Book Number this...

Страница 71: ...Page 71 VIVO Monitor VIVO Monitor Once all of the parameters are defined press Save When Save is pressed all of the configuration is saved in the different system units Panels Monitors etc...

Страница 72: ...ptional to allow access to the floors defined in it as well as his her own Press Add to open a screen where the data to generate these groups must be entered The parameters in Lifts are Tag Group desc...

Страница 73: ...ge 73 VIVO Monitor VIVO Monitor Enter the parameters Once all of the parameters are defined press Save Note Use the characters AA to indicate ranges of floors e g 0 AA 20 means relays from 0 to 20 AA...

Страница 74: ...n selected on the panel As a Door Release message replacing the default message if the option has been selected on the panel Block Block where the lift is located Floor Floor where the home monitor is...

Страница 75: ...Page 75 VIVO Monitor VIVO Monitor Enter the parameters Once all of the parameters are defined press Save...

Страница 76: ...Page 76 VIVO Monitor VIVO Monitor Once all of the parameters are defined press Save When Save is pressed all of the configuration is saved in the different system units Panels Monitors etc...

Страница 77: ...enu can be restricted using a PIN code By default it is not restricted See 2 16 6 Privacy Settings 2 16 1 CALL SETTINGS 2 16 2 BACKGROUND SETTINGS 2 16 3 LANGUAGE SETTINGS 2 16 4 PICTURE SETTINGS 2 16...

Страница 78: ...elected the ring tone is played for 30 seconds If this option is not selected the specific ring tone is played just once Select to hear a tone when receiving Message Received Beep per message received...

Страница 79: ...or such as arrows or icons corresponding to the current screen by pressing the MENU button or after a period of time as the monitor returns to stand by screen off after 30 seconds For example the Time...

Страница 80: ...ed calls only The automatic picture configuration options are Always Missed calls only by default factory configured Never 2 16 5 INTERNATIONAL SETTINGS Once the data has been entered press to validat...

Страница 81: ...Alarm PIN by default 0000 On pressing the Privacy Settings icon enter the PIN code that by default is 1234 and press OK to access the screen where the Privacy Settings options are located Press a fun...

Страница 82: ...ess the screen where the icons corresponding to the different monitor settings are located SOS If in Privacy Settings the following is selected in PIN required Reading Messages the PIN code request sc...

Страница 83: ...r PIN To change the user PIN The default user PIN 1234 Press the User PIN parameter to select it A screen opens and requests the current user PIN 1234 by default Once entered press OK A screen opens w...

Страница 84: ...Once entered press OK Once the User PIN code has been changed press on the General Settings icon in the Start Menu and enter the NEW PIN code and press OK to access the screen where the icons correspo...

Страница 85: ...g OK If the security mode is higher no PIN code is requested 2 16 7 HOME TO HOME CALL SETTINGS The Home to Home Call Settings function opens a screen where the Monitor Tags can be completed Tenant Nam...

Страница 86: ...Monitor Tag go to Home to Home Call Settings To do so press General Settings and then Home to Home Call Settings When one of the labels is pressed a cursor and a key board are displayed so that the d...

Страница 87: ...ts 0000 8191 number of homes Extension number 1 digit 0 7 number of monitors per home Note There must always be a monitor with extension 0 This information will automatically generate the IP address o...

Страница 88: ...This warning message is displayed in any option selected Delete User Settings Restore to Factory Settings 2 16 8 3 Lift Control Settings The Lift Control Settings function allows for the relays that...

Страница 89: ...one with 10 relays Power Supply at least 1 the number depends on the number of slave modules Each group of relays controls a lift and each group of relays has a unique IP address Each IP module can ma...

Страница 90: ...n The new function selected is displayed on the Start screen Note Given that a maximum of 8 icons are displayed per screen and another function has been added new screens are displayed that slide hori...

Страница 91: ...ined previously 2 16 8 5 Alarm Settings The Alarm Settings function allows for the various Sensor Modules and their parameters to be configured The Vivo monitor can manage a Fermax proprietary alarm t...

Страница 92: ...Operating mode of the Zone NO Normally Open NC normally Closed The first eight zones will be NC Normally Closed and the other 8 zones can be configured as required either NC or NO as of zone 9 I O Zon...

Страница 93: ...the steps explained above If this function is not programmed a message is displayed to indicate that the installer must be contacted Parameters in Home Automation Settings Name Name of the application...

Страница 94: ...A screen opens and requests the current User PIN 1234 by default Once entered press OK A screen opens where the current User PIN can be changed 4 digits Once entered press OK A screen opens to confirm...

Страница 95: ...rm PIN can be changed 4 digits Once entered press OK A screen opens to confirm the new Alarm PIN Once entered press OK A screen is displayed to indicate that the Alarm PIN has been changed c Installer...

Страница 96: ...call ring tones from the SD card to the monitor Loaded call ring tones will be available to users with the file name d Save configuration This saves the current con figuration on the SD card e Save pi...

Страница 97: ...s acces sed via the IP address of the monitor The factory default IP address of the monitor is 10 0 0 1 Block 0 Unit 1 although the monitor will most likely already have its corresponding IP address f...

Страница 98: ...screen D1 D2 RS 485 serial port for communications with another future system A1 A2 RS 485 serial port for communications with the alarm system 12 Vdc power supply if a PoE switch is not used 1 2 3 4...

Страница 99: ...me Conversation time 90 seconds Call ring tones 22 20 pre set ADPCM wav o mp3 melodies 2 to upload by users from SD card or web server wav or mp3 Maximum call ring tone time 30 seconds Images Memo 128...

Страница 100: ...www fermax com fermax fermax com Audio and Video Door Entry Systems...

Отзывы: