Ferm
11
4. ASSEMBLY
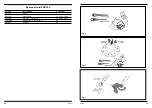
Fitting the trimmer shroud on the base of the head
Fig. 3
•
Locate the trimmer shroud with its open end round the back of the trimmer head and fit the
hooks on the bottom of the shroud through the holes in the bottom of the base of the
trimmer head.
•
Screw the shroud to the base of the trimmer head. The hole is located behind the trimmer
head on top of the trimmer shroud.
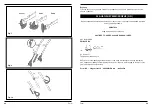
Changing the blades
Fig. 4 + 5
This trimmer has a removable plastic blade that can be fitted or, when damaged or worn, can
be replaced by a new blade very easily and quickly.
Ensure the battery pack is disconnected from the product before working near or
on the blade.
Fitting the cutting blades (Fig. 4):
•
Fit the large part of the hole in the blade over the metal lug located on the hub in the bottom
of the trimmer head.
•
Pull the blade away from the centre of the blade hub until you feel it snap into place.
Removing the cutting blades (Fig. 5):
•
Grip the blade and push towards the centre of the hub. Remove and dispose of in normal
waste.
•
Grip the new blade in the middle and hook it over the metal lug. Pull it away from the centre
of the blade hub until you feel it snap into place.
Fitting the central handle
•
Fit the central handle with the screw holes facing up.
•
Pull the arms of the assist handle slightly open so they will fit over the connecting part on
the main unit.
•
With the central handle facing towards you, insert the bolt on the left and the nut on the
right and fasten the bolt to fix the central handle in place.
Push the end cap in the hole over the bolt.
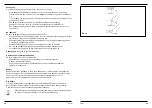
Carrying the battery pack
Wear the carrying belt with battery pack across your chest to ensure it does not swing around.
82
Ferm
¢ÂÓ ı· Ú¤ÂÈ Ó· ¯ÚËÛÈÌÔÔÈÂ›Ù·È ÛÙË ‚ÚÔ¯‹.
£ÂÚÌÈ΋ ÚÔÛÙ·Û›·.
ºÔÚ¿Ù Á˘·ÏÈ¿ ·ÛÊ·Ï›·˜ Î·È ˆÙÔ·Û›‰Â˜
ºÔÚ¿Ù ÚÔÛٷ٢ÙÈο Á¿ÓÙÈ·
∫Ú·Ù‹ÛÙ ÙÔ˘˜ ·Ú¢ÚÈÛÎfiÌÂÓÔ˘˜ Û ·fiÛÙ·ÛË
∂›Â‰Ô ÈÛ¯‡Ô˜ ‹¯Ô˘
∂Ï·Ùو̷ÙÈο Î·È / ‹ ·ÔÚÚÈÌ̤ӷ ËÏÂÎÙÚÈο ‹ ËÏÂÎÙÚÔÓÈο ·ÓÙÈΛÌÂÓ· Ú¤ÂÈ
Ó· Û˘ÏϤÁÔÓÙ·È ÛÙȘ ηٿÏÏËϘ ÙÔÔıÂۛ˜ ·Ó·Î˘ÎÏÒÛˆ˜.
√‰ËÁȘ ·ÛÊ·ÏÂȘ
ñ
¶Âٿ٠ÙȘ Ï·ÛÙÈΤ˜ Û·ÎԇϘ Ì ·ÛÊ·Ï‹ ÙÚfiÔ - ·ÔÙÂÏÔ‡Ó Î›Ó‰˘ÓÔ ·ÛÊ˘Í›·˜ ÁÈ· Ù·
ÌÈÎÚ¿ ·È‰È¿.
ñ
¢È·ÙËÚ›Ù ηı·Úfi Î·È Ù·ÎÙÔÔÈË̤ÓÔ ÙÔÓ ¯ÒÚÔ ÛÙÔÓ ÔÔ›Ô ÂÚÁ¿˙ÂÛÙÂ.
ñ
ªË ¯ÚËÛÈÌÔÔț٠ËÏÂÎÙÚÈο ÂÚÁ·Ï›· ÛÙË ‚ÚÔ¯‹ ‹ Û ˘ÁÚ¿ ÂÚÈ‚¿ÏÏÔÓÙ·.
ñ
ªË ¯ÚËÛÈÌÔÔț٠ËÏÂÎÙÚÈο ÂÚÁ·Ï›· Û ¯ÒÚÔ˘˜ fiÔ˘ ˘¿Ú¯ÂÈ Î›Ó‰˘ÓÔ˜ ˘ÚηÁÈ¿˜ ‹
¤ÎÚË͢ - fiˆ˜ ÎÔÓÙ¿ Û ‡ÊÏÂÎÙ· ˘ÁÚ¿ ‹ ·¤ÚÈ·.
ñ
ªËÓ ·Ê‹ÓÂÙ ·È‰È¿ Ó· ÏËÛÈ¿˙Ô˘Ó ÙÔÓ ¯ÒÚÔ ÛÙÔÓ ÔÔ›Ô ÂÚÁ¿˙ÂÛÙÂ.
ñ
ªËÓ ÂÎı¤ÙÂÙ ٷ ËÏÂÎÙÚÈο ÂÚÁ·Ï›· ÛÙË ‚ÚÔ¯‹.
ñ
ªËÓ ·Ê‹ÓÂÙ ·È‰È¿ ‹ ¿ÏÏÔ˘˜ ·ÓıÚÒÔ˘˜ Ó· ·ÁÁ›˙Ô˘Ó Ù· ËÏÂÎÙÚÈο ÂÚÁ·Ï›·
ñ
ªËÓ ·Ê‹ÓÂÙ ÙÔ ËÏÂÎÙÚÈÎfi ÂÚÁ·ÏÂ›Ô ¯ˆÚ›˜ ÂÈÙ‹ÚËÛË Î·È ‚Á¿˙ÂÙ ¿ÓÙÔÙ ÙË Ì·Ù·Ú›·
·fi ÙÔ ÂÚÁ·ÏÂ›Ô ÌÂÙ¿ ·fi ÙË ¯Ú‹ÛË.
ñ
º˘Ï¿ÍÙ ÙÔ ÂÚÁ·ÏÂ›Ô Û ¤Ó· ÛÙÂÁÓfi ¯ÒÚÔ, ÛÙÔÓ ÔÔ›Ô ‰ÂÓ ¤¯Ô˘Ó ÚfiÛ‚·ÛË ·È‰È¿.
ñ
ºÔÚ¿Ù ¿ÓÙÔÙ ÚÔÛٷ٢ÙÈο Á˘·ÏÈ¿ ·ÛÊ·Ï›·˜. ™·˜ Û˘ÓÈÛÙԇ̠›Û˘ Ó·
¯ÚËÛÈÌÔÔț٠ˆÙÔ·Û›‰Â˜.
ñ
ºÔÚ¿Ù ÙÔÓ Î·Ù¿ÏÏËÏÔ ÚÔ˘¯ÈÛÌfi - fi¯È ʷډȿ ÚÔ‡¯· ‹ ÎÔÛÌ‹Ì·Ù· Ù· ÔÔ›· ı·
ÌÔÚÔ‡Û·Ó Ó· ¤ÚıÔ˘Ó Û ·ʋ Ì ٷ ÎÈÓÔ‡ÌÂÓ· ̤ÚË ÙÔ˘ Ì˯·Ó‹Ì·ÙÔ˜.
ñ
ºÔÚ¿Ù ·ÓÙÈÔÏÈÛıËÙÈο ·Ô‡ÙÛÈ·. ªË ÊÔÚ¿Ù ۷Ӊ¿ÏÈ· ‹ ·ÓÔÈÎÙ¿ ·Ô‡ÙÛÈ·.
ñ
¶ÚÈÓ ¯ÚËÛÈÌÔÔÈ‹ÛÂÙ ÔÔÈÔ‰‹ÔÙ ËÏÂÎÙÚÈÎfi ÂÚÁ·Ï›Ô, ÂϤÁÍÙ ÚÒÙ· Â¿Ó ·˘Ùfi ¤¯ÂÈ
ÊıÔÚ¤˜ ‹ ‚Ï¿‚˜. ∂¿Ó ‰È·ÈÛÙÒÛÂÙ ÊıÔÚ¤˜ ‹ ‚Ï¿‚˜, ÌË ¯ÚËÛÈÌÔÔÈ‹ÛÂÙ ÙÔ
ÂÚÁ·ÏÂ›Ô ÚÈÓ ·fi ÙËÓ ·ÓÙÈηٿÛÙ·ÛË ÙˆÓ ÂÏ·Ùو̷ÙÈÎÒÓ ÂÍ·ÚÙËÌ¿ÙˆÓ Ì Ӥ·.
ñ
ªË ¯ÚËÛÈÌÔÔț٠ËÏÂÎÙÚÈο ÂÚÁ·Ï›· fiÙ·Ó Â›ÛÙ ÎÔ˘Ú·Ṳ̂ÓÔÈ ‹ ¤¯ÂÙ ηٷӷÏÒÛÂÈ
ÔÈÓÔÓÂ˘Ì·ÙÒ‰Ë ÔÙ¿.
ñ
¶ÔÙ¤ ÌËÓ ÌÂٷʤÚÂÙ ÙÔ ÂÚÁ·ÏÂ›Ô / ÙÔÓ ÊÔÚÙÈÛÙ‹ ÙÔ˘ ÎÚ·ÙÒÓÙ·˜ ÙÔ ·fi ÙÔ Î·ÏÒ‰ÈÔ Î·È
ÔÙ¤ ÌËÓ ÙÔ ÙÚ·‚¿Ù ÁÈ· Ó· ÙÔ ‚Á¿ÏÂÙ ·fi ÙËÓ Ú›˙·. º˘Ï¿ÍÙ ÙÔ Î·ÏÒ‰ÈÔ Ì·ÎÚÈ¿ ·fi
ËÁ¤˜ ıÂÚÌfiÙËÙ·˜, Ï¿‰È· Î·È ·È¯ÌËÚ¤˜ ÂÈÊ¿ÓÂȘ.
Содержание FGT-12V
Страница 2: ...Ferm 91 Explodedview 02 Ferm Fig 1 Fig 2 Fig 3...
Страница 5: ...Ferm 05 88 Ferm Ferm 6 12 12 Fig 10...


