37
threading or non-threading operations.
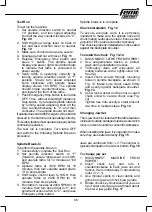
Feed Direction Lever: Selects carriage travel
direction.
The carriage moves left when feed direction
lever is up, half nut lever is engaged, and spindle
direction switch is set to “F”.
Carriage travel direction reverse when the
spindle switch is set to “R”.
Fig. 22 - 23
The carriage moves right when the feed direction
lever is all the way down.
The carriage will not move when the lever is in
center position.
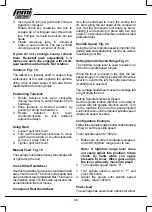
End Gears Fig. 24
The end gears must be correctly setup for power
feed and threading.
Use the photo below to identify the A, B, C, and
D change gears, which are also referenced on
the headstock feed rate gear chart.
The following subsections explain how to
confi gure the end gears, which are accessed
by removing the end cover.
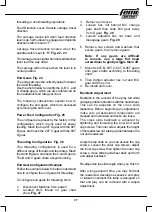
Power Feed Confi guration Fig. 25
The end gears are preset by the factory in this
confi guration, which is only used for power
feeding. Mesh the top 20T A gear with the 80T
B gear, and mesh the 20T C gear with the 80T
D gear.
Threading Confi guration Fig. 26
This threading configuration is used for a
diff erent range of threads and feed rates. Mesh
the A and B gears, and mesh the C and D gears,
The B and C gears share a keyed bushing.
End Gear Confi guration Example
Follow the example below to better understand
how to confi gure the end gears for threading.
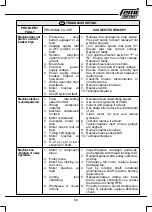
To confi gure end gears for threading 2mm:
1. Disconnect Machine from power!
2. Located 2mm thread on gear chart
show.
Fig. 27
3. Remove end cover.
4. Loosen hex nut behind B/C change
gear shaft then slide B/C gear away
from D gear.
Fig. 28
5. Loosen adjusted hex nut down and
disengage gears.
Fig. 29
6. Remove cap screws and washers that
secure gears, then remove gears.
Note: If any gears are diffi
cult
to remove, use a large fl at head
screwdriver to gently wiggle them off .
7. Mount A-60T, B-50T, C-50T, D-45T gears
onto gear shafts according to threading
chart.
8. Then tighten adjuster hex nut and B/C
gear shaft hex nut.
9. Re-install end cover.
Backlash Adjustment
Backlash is the amount of free play felt while
changing rotation directions with the handwheel.
This can be adjusted on the cross slide
leadscrew. Before beginning any adjustment,
make sure all associated components are
cleaned and lubricated and locks are loose.
The cross slide backlash is adjusted by
tightening and loosening the inner and outer
cap screws. The inner screw adjusts the height
of the leadscrew nut, taking up lash between the
nut and leadscrew.
Angle the top slide so you can access the cap
screws. Loosen the outer cap screws, adjust
the inner cap screw, then tighten the outer cap
screws. cross slide handwheel back and forth
and adjust backlash.
Re-adjust the top slide angle when you fi nish it.
After a long period of time, you may fi nd that
the leadscrew develops excessive end-play
or lateral movement this lathe is designed so
that end play can be removed with a simple
adjustment.
Содержание JOB LINE DIGITO ML 350
Страница 5: ...5...
Страница 22: ...22 325 mm 760 mm 315 mm 2 1 20 Kg 3...
Страница 51: ...51...
Страница 55: ...55...
Страница 58: ...58 Ingombro per etichetta FAC SIMILE Ingombro per etichetta FAC SIMILE...


