background image

36

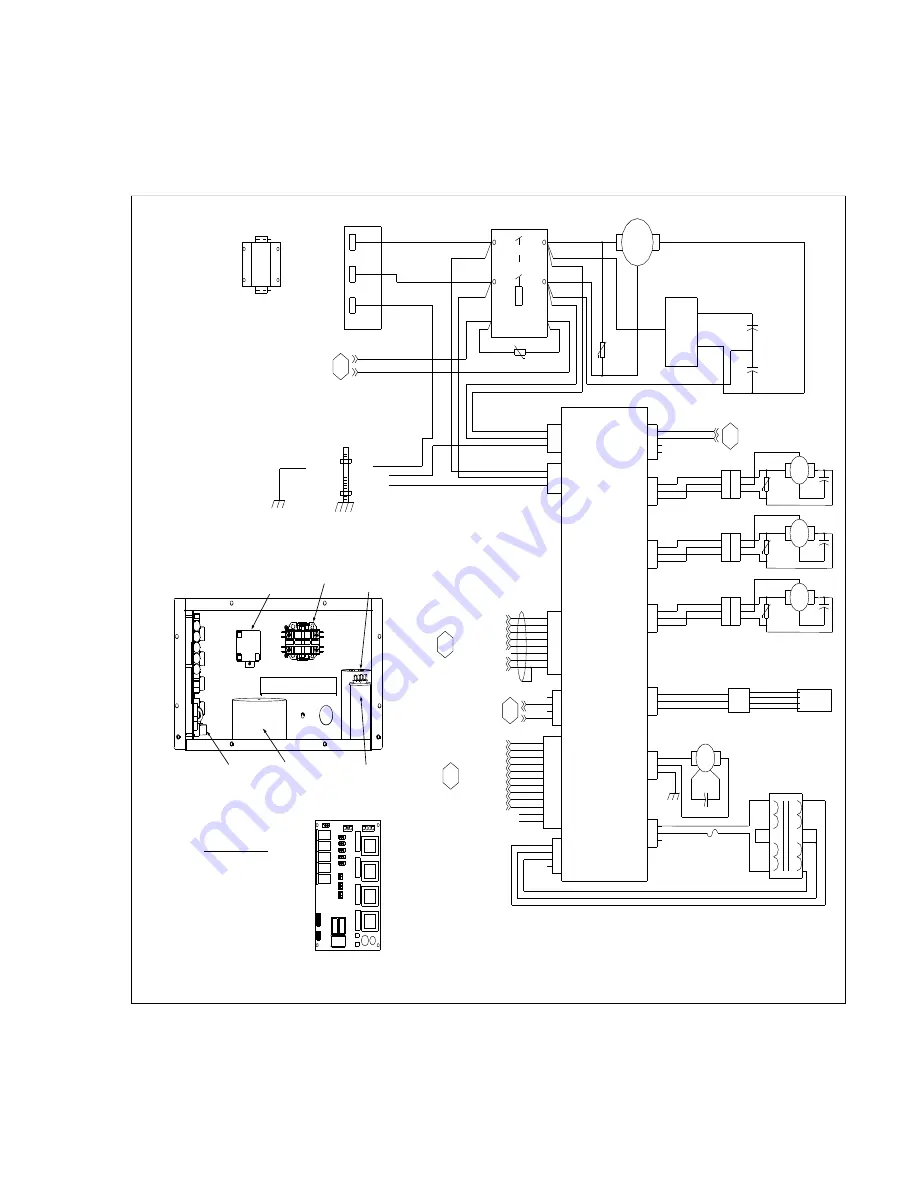
15.3 ELECTRICAL/SCHEMATIC-01

T2

L2

GRN/YEL

COIL B

MAIN GND

SECONDARY GND3

SECONDARY GND1

SECONDARY GND2

L6-30P

MAIN GROUND

WHT

WHT/RED

GRN/YEL

GRN/YEL

GRN/YEL

GRN

CONTACTOR, 2POLE 30AMP

COIL A

COIL B

BRN

5

LT BLUE

LT BLUE
GRN/YEL

GRN/YEL

LT BLUE

BRN

Line

1

NC

BLK

2

Common

RED

BLUE

189-227 uF @ 250 VAC

START CAP.

40 uF @ 370 VAC

RUN CAP.

OUTPUT

L2

L1

T2

T1

COIL A

INPUT

MAIN AC-P1

230 VAC NEU

230VAC LINE

WHT

BLK

T1

L1

S

R

C

BRN

COMPRESSOR

DIAGRAM

CONTACTOR, 2POLE 30A

L1

L2

GND

RELAY

STARTER

BRN

2

12

LPB-P14

BTR 230VAC LINE

230AC LINE
230AC NEUTRAL
CHASSIS GND

POS LAMPS

BTR_EN RIGHT
BTR_CHASSIS

230AC NEU.[SW'D]

230VAC LINE

CHASSIS GND

XFMR

PCB, LOWER POWER DISTRIBUTION

FAN

WHT/YEL

24VAC INPUT

GND

GND

12VAC

24VAC

LPB-P9

1

3
4

2

LOAD1 CTRL P5-9

BTR2 CTRL P5-7

BTR1 CTRL P5-8

BTR3 CTRL P5-6

AC_REF_IN CTRL P5-5

LOAD REF CTRL P5-3

LOAD3 CTRL P5-10

LOAD2 CTRL P5-4

+5VDC1_CNTLR_P12-1

+5VDC2_CNTLR_P12-2
+15VDC_CNTLR_P12-3

-15VDC_CNTLR_P12-4

ANA GND_CNTLR_P12-5

DIG GND1_CNTLR_P12-7
DIG GND2_CNTLR_P12-9

FAN RUN CTRL P5-12

COMP RUN CTRL P5-1

+5 VDC 2 IN

+5 VDC 1 IN

+15VDC IN

-15VDC IN

ANA GND

DIG GND 1
DIG GND 2

GRN

GRN

RED
RED

YEL

ORG
GRN

1

8

7

3

6

5

4

2

24VAC RTN

24VAC RTN

WHT/RED

WHT/GRN

4

3

2

1

WHT

LOAD2

2

WHT
WHT
WHT
WHT
WHT
WHT
WHT

LOAD3
BTR1
BTR2
BTR3
LOAD REF
AC_REF_IN

7
8

4
5
6

3

WHT

LOAD1

LPB-P13

1

LPB-P10

24VAC

24VAC 

WHT

FAN

10

11

12

COMP RUN

9

LT BLUE

BRN

1
2
3

LPB-P4

8

5

8

7

6

7

6

5

RED

1

2

3

4

1

4

3

2

325VA 24VAC_CT

WHT

BLK

GRN

1
2
3

LPB-P3

ORN
GRN/YEL

3

2

3

2

1

BRN
BLUE

GRN/YEL

START CAP

FAN 1

LPB-P12

3

BLK

3

COMP_RUN

24 VAC

CONTACTOR COIL

BTR MOTOR 1

BTR MOTOR 2

BTR_CHASSIS

BTR_EN LEFT

BTR 230VAC LINE

SW_230 VAC LINE T1-3
SW_230 VAC NEU T2-3

SECONDARY GND 2

230VAC NEU L2-2
SECONDARY GND 1

230VAC LINE L1-2

2

1

3

LPB-P2 SWITCHED AC INPUT

1

3

2

LPB-P1 MAIN AC INPUT

WHT/RED
WHT

2
3

1

4

LPB-P8

BLK

LPB-P7

BLK

LPB-P6

RED
GRN/YEL

2
3

1

GRY

1

LEFT

TAN

GRN

BTR

GRY

1

3

CENTER

TAN

BTR

GRN

BLK

2

1

1

3

2

PCB, LOWER POWER DISTRIBUTION

RED

RED

WHT

YEL

YEL

BRN

LT BLU

RED

WHT

LEGEND: FUSE  RATINGS

F1-LEFT BEATER (2.5A/230V)
F2-RIGHT BEATER (2.5A/230V)
F3-AIR COMP. (2.5A/230V)
F4-T1 (2.5A/230V)
F5-MERCHANDISER (2.5A/230V)

P2

P12

P1

BALLAST

RED
RED
BLUE
BLUE

FLUORESCENT LAMP

BTR MOTOR 2

BTR_CHASSIS

BTR_EN RIGHT

BTR 230VAC LINE

LPB-P5

BLK

2
3

GRN/YEL

YEL

1

11

33

22

BTR

RIGHT

GRY

BLK

TAN

GRN

A

A

T1

K101

LPB1

F1

F2

F3

F4

F5

CONTACTOR

C101

C102

F5

F4

F3

F2

F1

P13

P14

P3
P4
P5
P6
P7

P8

P9

P10

B

C

D

Содержание FBD553D

Страница 1: ...ANTIES OF MERCHANTABILITY AND FITNESS FOR A PARTICULAR PURPOSE FBD shall not be liable for errors contained herein or for incidental consequential damages in connection with the furnishings performance or use of this material This document contains proprietary information which is protected by copyright All rights reserved Copyright 2006 by FBD all rights reserved This manual supersedes and replac...

Страница 2: ... 2 REQUIRED CLEANING EQUIPMENT 14 8 3 DAILY CLEANING OF THE UNIT 14 8 4 SANITIZING THE SYRUP SYSTEMS 14 9 BASICS OF OPERATION 15 9 1 MAKING ADJUSTMENTS TO THE FBD553D 15 10 CHANGING FACTORY SET LEVEL CONTROL 16 10 1 BEFORE CHANGING LEVEL CONTROL SETTINGS 16 10 2 DRINK TOO HARD AND COLD 17 10 3 DRINK TOO LIQUID 17 10 4 CHANGING THE DEFAULT LEVEL CONTROL SETTING 18 11 CHANGING FACTORY THAW AND FREEZ...

Страница 3: ...nts of electrical wiring CARBON DIOXIDE CO2 CO2 carbon dioxide displaces oxygen Strict attention must be observed in the prevention of CO2 gas leaks in the entire CO2 and soft drink system If a CO2 gas leak is suspected immediately ventilate the contaminated area before attempting to repair the leak Personnel exposed to high concentrations of CO2 gas will experience tremors which are followed rapi...

Страница 4: ...ghly inspected before shipment At the time of shipment the carrier accepts the unit and any claim for damages must be made with the carrier Upon receiving the unit from the delivering carrier carefully inspect carton for visible indication of damage If damage exists have carrier note same on bill of lading and file a claim with the carrier 2 2 UNPACKING A Cut banding from shipping carton and remov...

Страница 5: ...achine requires single phase 230VAC If line voltage is below 215VAC or above 245VAC a 10 buck and boost transformer must be used If a buck and boost transformer is installed ensure that the boosted leg is on L1 of the contactor Operation below 215VAC or above 245VAC may damage the unit and cause inconsistent performance This also voids all warranties B If connected to a delta three phase electrica...

Страница 6: ...1 4 flare nut fitting will be required C Install a shutoff valve in the water line as close to the unit as practical and convenient The use of a water filter is recommended D Clear the line by running a minimum of two 2 gallons 7 57 liters of water through the line before attaching the line to the unit E Connect the line to the bulkhead fitting labeled WATER IN located at the rear of the unit see ...

Страница 7: ...ure 5 2 C Do not turn on the CO2 at this time FIVE GALLON FIGAL TANK SUPPLY A Fabricate three 3 1 4 inch supply lines for connecting the unit to the syrup tanks B Connect the lines to the bulkhead fittings labeled SYRUP LEFT SYRUP CENTER and SYRUP RIGHT located at the rear of the unit see Figure 5 2 C When using five gallon figal syrup tanks a Syrup Restart Valve SRV and tank couplers must be used...

Страница 8: ... set water flow to provide a flow of 15 ounces in 10 seconds using a graduated container Do this for both left and right side flow controls Turn control adjustment screw clockwise to increase flow or counter clockwise to decrease flow H Pre set Syrup flow by turning in Syrup flow controls four 4 turns clockwise I Place a container under the sample tube and fully depress the sample valve until a go...

Страница 9: ...O2 in the chamber press the left side FILL button to begin filling the chamber with prod uct If the chamber does not fill gently pull the Relief Ring until filling begins and then release As the chamber fills the pressure in the chamber will increase until it rises above the PSI fill point At this point the chamber will stop filling and the LCD will readout Fill Hold It will then be necessary to p...

Страница 10: ...osition 7 OPERATION OF THE DISPENSER 7 1 OPERATING ELECTRONIC CONTROLS A The electronic machine controls are designed to provide a logical sequence of operation with a minimum of written instruction System operating parameters are selected and set from a menu 7 FBD FWD BACK SELECT CANCEL OFF RIGHT SIDE FILL BEATER RUN DEF LEFT SIDE FILL BEATER RUN OFF DEF CENTER FILL BEATER RUN OFF DEF Figure 7 1 ...

Страница 11: ...hin the current level This button also allows the operator to decrease or lower values numbers The FWD button steps the operator forward within the current level This button also allows the operator to increase or raise values The SELECT button allows the operator to enter changes in the unit programming and it also allows the operator to move into different levels in the menu 2 The LCD display sc...

Страница 12: ...system to be monitored and changed 1 The current mode is displayed in the lower half of the LCD Press the FWD button to step to the next mode Continue pressing the FWD or BACK button until the desired mode is displayed When the desired mode is displayed press SELECT to enter the mode 2 To make changes to the displayed mode press the SELECT button When a value in the lower half of the display begin...

Страница 13: ... Press CO2 Press R Reg CO2 R Reg CO2 Press Line Volt L CO2 Sol L Solution Sol L Beater Motor L Defrost Sol L Refrig Sol L Prod Out C CO2 Sol C Solution Sol C Beater Motor C Defrost Sol C Refrig Sol C Prod Out R CO2 Sol R Solution Sol R Beater Motor R Defrost Sol R Refrig Sol R Prod Out Compressor Fan Motor Manual On Off One Side Min One Side Thaw One Side Max Two Side Min Two Side Thaw Two Side Ma...

Страница 14: ...ide and Center defrost times by 45 minutes 6 WAKE SLEEP TIME Sets the machine wake and sleep times 00 00 To manually wake up and operate the unit press DEFROST then RUN 7 FAULT CODE This feature stores the last 10 error codes and helps HISTORY the service agent to readily diagnose a problem The readout is formatted as shown in the two examples below 0 Out of syrup first error is an out of syrup er...

Страница 15: ...ure 24 F to 28 F before adjusting Defrost Max Time Max Def Time 420 Number of minutes Defrost Cycle will run unless Return Temperature reaches 50 F first Common Settings Voltage Offset 0 Use this offset to match the Line Voltage readout in Common Readouts to the actual incoming voltage measured with a voltmeter at L1 and L2 of the contactor This must be completed prior to starting machine for oper...

Страница 16: ...2 Pressure R incoming CO2 pressure Regulated CO2 This represents the current Regulated CO2 R internally REGULATED CO2 as set by the secondary CO2 regulator Line Voltage This represents the current incoming line voltage 8 CLEANING AND SANITIZING THE UNIT 8 1 GENERAL INFORMATION NOTE The following cleaning and sanitizing procedures pertain to the FBD equipment identified by this manual If other equi...

Страница 17: ...ve and wash drip tray in mild soap solution Rinse with clean water Reinstall drip tray on unit 8 4 SANITIZING THE SYRUP SYSTEMS The unit should be sanitized every 90 days Prepare a chlorine solution less than pH 7 0 containing 500 PPM available chlorine with clean potable water at 90 F to 100 F Note 500 PPM is five 5 times stronger than the usual recommended 100 PPM This is required because the sa...

Страница 18: ...k quality 9 1 MAKING ADJUSTMENTS TO THE FBD553D A In order to produce a consistent quality beverage with the FBD553D Frozen Beverage Machine there are a few critical settings that must be maintained These settings are preset when you receive the machine from the factory but due to variations that occur e g in operating environments syrups and individual machines etc it may be necessary to make min...

Страница 19: ... the point at which the refrigeration system turns back on and refreezes the product This assures the product is maintained in a good acceptable quality frozen drink range b Prior to changing any Thaw or Freeze settings make sure the brix and water flow rate are correct and the liquid level control settings are properly set Also assure the chambers stay filled to the proper levels with the proper ...

Страница 20: ...before the machine turns on after the RUN button is pushed This delay is normal Do not press the RUN button again or press any other buttons until the machine starts 10 2 DRINK TOO HARD AND COLD A If the drink is too hard and cold or the chamber is not full adjust the level control to a higher level setting Use the recommended settings that follow to properly adjust the liquid level control settin...

Страница 21: ...ine ships with THAW and FREEZE values preset These values should be correct for normal operation of the machine and are designed to produce a drink temperature between 24 and 28 degrees Before making any changes to THAW AND FREEZE settings check drink temperature If drink temperature is within correct range DO NOT CHANGE THAW FREEZE SETTINGS B Before changing the THAW or FREEZE settings verify tha...

Страница 22: ...e number every night and download current status information about the unit as well as daily sales numbers The information is collected and cataloged on the FBD server and is readily available to subscribers via the Internet The data available for viewing is Sales totals for each barrel in daily weekly or monthly periods Number of units not reporting in Number of machines currently in an out of st...

Страница 23: ...y will both hang up and wait until time for the next call B The server will reschedule the next call to fall in the window of midnight to 5 AM local time to the unit This is based on the unit s time of day clock The data collected is processed at 6 AM and posted on the Bevtrak web site C To access the data on the Internet you must be a subscriber and have a user name and password assigned to you Y...

Страница 24: ...act the factory for details when necessary TROUBLE CAUSE REMEDY MECHANICAL 14 1 Chamber will not fill A Fill off A Press Fill button Filling or Fill Hold will appear on LCD display B Pressure in chamber above B Gently pull faceplate relief valve RFill refill point ring to relieve pressure in chamber C Defrosting or Sleeping C Press Def then Run Wait for unit to freeze and red light to go out D Out...

Страница 25: ...t Syrup pressures may only be raised by increasing pump CO2 pressure if separate regulators are installed for unit and syrup pumps Never exceed pump manufacturer s recommended maximum CO2 inlet pressure see Section 12 4 H Transducer problem H2O H Check pressure readouts H2O CO2 or Syrup CO2 and Syrup for 70 72 psi If not within 2psi adjust regulator and or check transducer Replace transducer if ne...

Страница 26: ... water pressure restriction restrictions B CO2 not turned on or too low B Assure CO2 is turned on and verify CO2 Press readout is 70 72 PSIG 482 6 496 4 KPa Adjust if necessary C Water pressure transducer C Verify H2O Pressure readout at failure 70 72 psi Check transducer and replace if needed D Water pump failure D Check water pump and replace if necessary 14 8 Noisy condenser fan A Fan contactin...

Страница 27: ...e see Sections 9 1 10 and 11 B Lower motor control board B Replace board failure C Beater motor capacitor C Check motor capacitor and replace if necessary D Beater motor problem D Replace beater motor 14 13 Excessively rapid A Lower Board problem A Replace lower board rising falling beater B Buck Boost transformer B Disconnect and replace counts problem if used Buck Boost transformer 14 14 Display...

Страница 28: ...nsducer D Low 15VDC from Lower D Check for 15VDC on lower board Board test points see Figure 14 3 Replace lower board if necessary E Upper board failure E Replace main control Upper board REFRIGERATION 14 21 Compressor won t start A Incorrect start procedure A Press Def then Run to start B In 2 minutes compressor B Run Beater or Def Beater delay indicates delay mode C Out of CO2 Syrup or Water C C...

Страница 29: ...necessary Recharge system with 65 0 oz of R404 A F Expansion valve not opening F 1 Test expansion valve coil to ensure it is receiving 24VAC Replace expansion valve if plunger inside doesn t move Recover refrigerant and replace valve Recharge system with 65 0 oz of R404 A 2 Test relay board for 24VAC output and 5VDC relay coil input Replace if necessary G Expansion valve restriction G Recover refr...

Страница 30: ...ck water and syrup flows and flow rates adjust if necessary Then check brix see Section 6 2 H Tank Pressure readout not H Observe Tank Transducer check moving between 18 and and replace if necessary 40 psi or doesn t lower when chamber pressure is reduced I Relay board not sending I Test relay board for 24VAC output power to CO2 solenoid coil and 5VDC input on solenoid relay Replace Relay Board if...

Страница 31: ...ot On Off Check for 24VAC at coil allowing the chamber to fill Clean solenoid or replace if necessary G Relay board not sending G Test relay board for 24VAC output power to solution solenoid and 5VDC input on solenoid relay coil Replace relay board if necessary 14 28 Drink tends to grow A THAW FREEZE settings are A Lower the THAW FREEZE or continue to expand set too high settings using the instruc...

Страница 32: ... e water CO2 syrup 14 33 BTR LO ERR A Product freezing too hard A 1 Check brix and correct if Beater below 450 necessary 2 Check Level Control and correct if necessary 3 Check for restriction of beater blades 4 Check for failed beater motor B Bad capacitor on motor B Check capacitor and replace as required C Motor control board failure C 1 Check connector from Beater Motor to lower control board 2...

Страница 33: ...lator and or check transducer Replace transducer if necessary G Lower Board problem G Test lower board for 5 15 and 15 outputs on lower board test points see Figure 14 3 H Upper Board Problem H Circuits within Main Control Upper Board electronics read transducer pressures Replace Main Control Upper Board if necessary 14 36 CO2 Out A Unit receiving no CO2 A Assure CO2 supply is not empty or turned ...

Страница 34: ... on Main Control board goes bright if short occurs goes out if open circuit and stays dim if working properly 2 Check for poor connection in sensor plug 3 Replace temperature sensor 14 38 InletTempErr A Temperature Sensor error A 1 Check for short in sensor and or failure cable LED on Main Control board goes bright if short occurs goes out if open circuit and stays dim if working properly 2 Check ...

Страница 35: ...or to starting a freeze down this is a time delay before the Refrigeration Solenoid opens Run Frz Wt This is displayed after the freeze down has finished Run Freeze This is displayed when a side is freezing down Run Thaw W This is displayed after the Thaw percent has been reached Run Thaw This is displayed when a side is Thawing before refreezing Run Beater If Run is pressed and if the beater has ...

Страница 36: ...a PMAX error It will restart automatically when PMAX the error is cleared Stop BTR The beater shuts off after 3 hours of a sold out condition It will restart automatically when LongPrd Out the sold out has been cleared 33 WARNING LIGHTS FBD553D FROZEN BEVERAGE DISPENSER PROBLEM CAUSE SOLUTION Left red light Left side out of syrup Replace empty syrup container flashing Left Side flavor see Section ...

Страница 37: ...UNTING DIAGRAM This Figure illustrates the locations of threaded mounting holes in the base of the FBD553D machine 34 16 75 1 75 11 50 34 50 20 25 22 0 MACHINE MUST EDGE OF USE 1 2 DRILL EDGE OF MACHINE BIT 4 HOLES MACHINE BE SUPPORTED TO THIS POINT 1 0 ...

Страница 38: ...CCESS VALVE CONDENSER WATER OUT CONDENSER WATER IN CONDENSER WATER OUT IN 250 PSIG 22 0390 0001 50 22 0390 0001 40 12 2611 0001 34 0103 0002 38 0126 0001 12 2615 0001 12 2610 0001 12 2609 0001 12 2608 0001 22 0389 0001 37 12 2146 0002 12 0316 0001 12 0316 0001 12 0316 0001 22 0389 0001 43 22 0389 0001 47 RIGHT SYRUP IN CENTER SYRUP IN LEFT SYRUP IN H2O IN CO2 IN 30 PSIG 30 PSIG 30 PSIG RIGHT BARRE...

Страница 39: ...ND 2 GRN GRN RED RED YEL ORG GRN 1 8 7 3 6 5 4 2 24VAC RTN 24VAC RTN WHT RED WHT GRN 4 3 2 1 WHT LOAD2 2 WHT WHT WHT WHT WHT WHT WHT LOAD3 BTR1 BTR2 BTR3 LOAD REF AC_REF_IN 7 8 4 5 6 3 WHT LOAD1 LPB P13 1 LPB P10 24VAC 24VAC WHT FAN 10 11 12 COMP RUN 9 LT BLUE BRN 1 2 3 LPB P4 8 5 8 7 6 7 6 5 RED 1 2 3 4 1 4 3 2 325VA 24VAC_CT WHT BLK GRN 1 2 3 LPB P3 ORN GRN YEL 3 2 3 2 1 BRN BLUE GRN YEL START C...

Страница 40: ...NTLR P5 11 8 9 10 9 10 1 3 4 2 8 7 6 5 24VAC OUT OF 3 OUT OF 2 OUT OF 1 5V PWR 2 5V 15V 3 4 15V 5 PRESSURES DEF 2 REF 1 REF 2 DEF 1 CNTLR P2 CNTLR P9 5 6 2 4 3 1 2 4 3 1 8 7 6 5 MEMBRANE KEYPAD L OUT C OUT TANK LEFT SYRUP LEFT 24VAC RTN 24VAC RTN CNTLR P6 SHIELD DRAIN WIRE SHIELD DRAIN WIRE 24VAC 24VAC CNTLR P14 CNTLR P15 CNTLR P13 4 1 3 2 1 4 1 3 2 2 3 1 4 24VAC 24VAC GAS 2 GAS 1 24VAC 24VAC GAS ...

Отзывы: