9
Revision history:
V1.0:
produced from 2011 to July 2013
v1.1:
produced since August 2013, change: VGA-connector, product name (add V1.1)
V2:
produced since July 2014, changes: new backcase with mounting frame for all sizes,
standardized connectors, new more powerful chipset for Audio- and Video-playback,
improved panels
DISPLAY CONNECTION
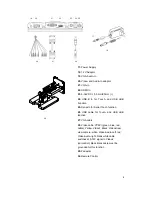
Each cable is labeled for easy connection. To operate your faytech display properly, there
must be at least one
signal source
and a
power source
connected. To use the touch function
please connect the
USB
cable to your PC.
TO CONNECT THE SIGNAL SOURCE,
you have the following options:
z
On a PC: Connect the VGA cable from the faytech monitor to the VGA output of your PC
graphics card. Please select SOURCE VGA, so you have an image on the display.
z
On a PC: If you have a DisplayPort/HDMI/DVI output on your PC please use the
HDMI-port of the faytech touch-monitor, with DVI/DisplayPort you need a DVI respectively
DisplayPort to HDMI connector. Please change SOURCE to HDMI.
z
To DVD-Player/camera/Video source: Connect one, two or three video inputs (labeled
Video1, Video2, YPbPr) to a corresponding video source. Please be sure to switch off the
video source before you connect the cables. Switch SOURCE to the respective channel
input.
ATTENTION – Video2 is not reachable via Menu, faytech´s display switches
automatically to Video2 when there is a voltage on the SignalPIN (carcontrol).
In addition, the display has two analogue stereo audio inputs, one for the PC (3.5mm Audio-In)
and one for the three video inputs (sound is carried on all video channels), a white and red
RCA connector, white AUDIO-Left and red AUDIO-Right. Additionally, via HDMI is another
digital Audio-In. Audio comes through the speakers only if there is an image signal. Audio is
also available from the earphone output on the front side of the display. If earphones are
connected, the built-in speakers will not be active.
Tip: You can use the display simultaneously with all five video signal sources. Use the
SOURCE button on the display or remote control to switch between the various signal
inputs.
Содержание FT10TM
Страница 1: ...Non Wifi Touch Screen FT10TM ...
Страница 3: ...3 Kontakt Contact 28 ...


