


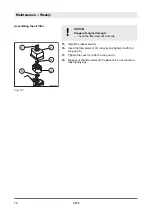


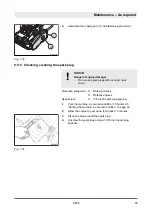


8.
Check the O-ring (2) for damage, replace if necessary.
9.
Install the filter (1).
Observe the alignment (A) of the filter on the housing.
10.
Assemble the filter bowl (3) with the O-ring.
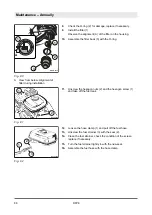
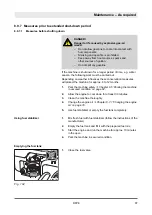
11.
Unscrew the hexagon nuts (2) and the hexagon screw (1)
and take off the fuel tank.
12.
Loosen the hose clamp (1) and pull off the fuel hose.
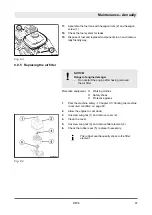
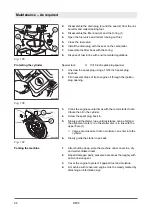
13.
Unscrew the fuel strainer (3) with the seal (2).
14.
Clean the fuel strainer, check the condition of the screen,
replace if necessary.
15.
Turn the fuel strainer tightly in with the new seal.
16.
Assemble the fuel hose with the hose clamp.
1
2
3
A
1
B-HON-0039
Fig. 80
A View from below: Alignment of
filter during installation
1
2
B-834-0038
Fig. 81
2
1
B-834-0039
3
Fig. 82
Maintenance – Annually
DFP8
86
Содержание DYNAPAC DFP8
Страница 6: ...Table of contents DFP8 6 ...
Страница 7: ...1 Introduction Introduction DFP8 7 ...
Страница 11: ...2 Technical data Technical data DFP8 11 ...
Страница 15: ...3 Concerning your safety Concerning your safety DFP8 15 ...
Страница 39: ...4 Indicators and control elements Indicators and control elements DFP8 39 ...
Страница 45: ...5 Checks prior to start up Checks prior to start up DFP8 45 ...
Страница 52: ...Checks prior to start up Checking the water level topping up DFP8 52 ...
Страница 53: ...6 Operation Operation DFP8 53 ...
Страница 64: ...Operation Parking the machine in secured condition DFP8 64 ...
Страница 65: ...7 Loading transporting the machine Loading transporting the machine DFP8 65 ...
Страница 69: ...8 Maintenance Maintenance DFP8 69 ...
Страница 100: ...Maintenance As required DFP8 100 ...
Страница 101: ...9 Troubleshooting Troubleshooting DFP8 101 ...
Страница 107: ...10 Disposal Disposal DFP8 107 ...
Страница 109: ......
Страница 110: ......


