CLEANING THE GENERATOR SET
CLEAN THE GENERATOR SET EVERY 100 HOURS OF
OPERATION OR EACH YEAR, WHICHEVER IS FIRST .
-Remove all dust and debris around the exhaust silencer.
- Clean the entire generator using a cloth and a brush (it
is not recommended to wash with a water jet).(Clean the
motor and AC generator inlets and outlets carefully.)
-Check the general condition of the generator and replace
defective parts if required.
DÉMARRAGE, FONCTIONNEMENT
ET ARRÊT DU GROUPE
GENERAL MAINTENANCE CHART
*This operation must be performed by an experienced
technician (contact your regional agent). For details on ope-
rations, refer to the relevant sections.
MAINTENANCE SCHEDULE :
Although a maintenance operation frequency is given in the
maintenance schedule, please note that the environment
in which the motor operates determines the maintenance
schedule. Therefore, it is necessary to understand that, if
the motor is working under extreme conditions, shorter
intervals should be adopted between operations. Use the
schedule opposite to prepare your own schedule adapted to
your specific operating conditions.
These maintenance periods only apply to motors running
with fuel and oil in compliance with the specifications given
in this booklet.
*This operation must be performed by an experienced
technician (contact your regional agent). For details on ope-
rations, refer to the relevant sections.
TROUBLESHOOTING GUIDE
The generator sets to be stored for over 30 days must under-
go special operations to ensure their correct storage.
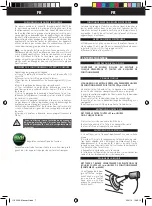
1- To protect the motor, we recommend the use of Briggs
& Stratton petrol additive, Reference No. 5041(see figure I),
available for all approved distributors. Add the additive in
the fuel tank or in a storage tank. Run the motor for a few
moments to circulate the additive in the carburettor. The
motor and the fuel can then be stored for not more than
24 months.
2- While the motor is still hot, drain the oil from the casing.
Replace it with new oil of a suitable grade.
3- Remove the spark plug and pour approximately 15 ml of
motor oil into the cylinder. Reassemble the spark plug and
run the motor to distribute the oil.
4- Remove dirt from the cylinders, cylinder head blades,
cooling casing, wheel grille and silencer.
5- Clean the generator set.
6- Seal the AC generator air inlet and outlets with plastic
adhesive tape.
7- Store the generator set in a clean and dry place.
MAINTENANCE REPAIRS
If maintenance or repairs are required, contact one of our
approved agents. For quick and effective service, your agent
will need to know the model, type and code numbers of your
generator set.
EN
EN
STORAGE INSTRUCTIONS
Intervals, frequency
Operations to be carried out
5
hours
25/50
hours
100
hours
Oil level check
x
Motor oil drainage
x
x
Air filter maintenance
x
Clean/replace spark plug
x
Cleaning of generator set.
x
Descale and check the play on the relief valves *
x
CAUTION, IF NOT USING AN ADDITIVE, DRAIN
ALL THE PETROL FROM THE TANK AND RUN THE
MOTOR UNTIL IT STOPS.
SYMPTOMS
PROBABLES CAUSES
CORRECTIVES ACTIONS
Motor does not start or
shuts down
Overheating
No power present
Machine noisy
Circuit breaker is tripped
1- Generator set placed on load during start-up.
2-Petrol or oil dipstick too low.*
3- Start-up control set to «OFF»
4- Fuel cock closed*
5- Fuel system blocked or leaky*
6- Air filter blocked
1- Ventilation opening blocked
2- Probable overload
1- Circuit breaker tripped
2- Defective circuit breaker
3- Defective female connector.
4- Defective equipment power cable
5- Defective AC generator.
1- Ball bearing broken
1- Defective exhaust
1- Generator set overload
2- Defective equipment or cable
1- Remove load
2- Fill with petrol or oil
3- Set control to «ON»
4- Open cock
5- Return system to operational condition
6- Clean air filter
Clean intake and exhaust protectors
2- Check load
1- Switch on circuit breakers
2- Have checked, repaired or replaced
3- Have checked, repaired or replaced
4- Replace cable
5- Have checked, repaired or replaced
1- Inspect and replace
2- Inspect and replace
1- Reduce load
2- Have checked, repaired or replaced
118025-4-Manual-G.indd 14
5/12/14 10:09:16
Содержание GGC 3300
Страница 3: ...03 e coté t o lado o lato side 1 3 2 4 118025 4 Manual G indd 3 5 12 14 10 09 05 ...
Страница 44: ...GGC 3300 118025 4 Manual G indd 44 5 12 14 10 09 40 ...
Страница 45: ...GGC 3300 118025 4 Manual G indd 45 5 12 14 10 09 40 ...
Страница 46: ...GGC 3300 118025 4 Manual G indd 46 5 12 14 10 09 40 ...
Страница 47: ...GGC 3300 118025 4 Manual G indd 47 5 12 14 10 09 40 ...
Страница 48: ...GGC 3300 118025 4 Manual G indd 48 5 12 14 10 09 40 ...
Страница 49: ...GGC 3300 118025 4 Manual G indd 49 5 12 14 10 09 40 ...
Страница 50: ...118025 4 Manual G indd 50 5 12 14 10 09 40 ...


