Megadisk NAS Owner’s Manual
12
1. Quick Setup
Quick setup allows a simple, step by step control of the basic required settings to get your
MegaDisk NAS up and running. You may access the quick setup controls by navigating to
“Basic” -> “Quick Setup”.
1.1 Configuration Wizard
The configuration wizard is a 6 step process that is used to quickly customize your MegaDisk
NAS to your network. The following are the steps involved:
1.1.1 Step 1: Specify the UI language. The default language settings is browser default. Click next
to continue.
1.1.2 Step 2: Set Administrative Password. Fantom Drives recommends that you choose your
own password for security reasons. To do so, enter the desired administrative password in the
password entry and confirm entry boxes, and click “Next” to continue.
1.1.3 Step 3: Set your MegaDisk NAS system
name. Enter the desired system name in
the hostname entry box, and click “Next” to
continue.
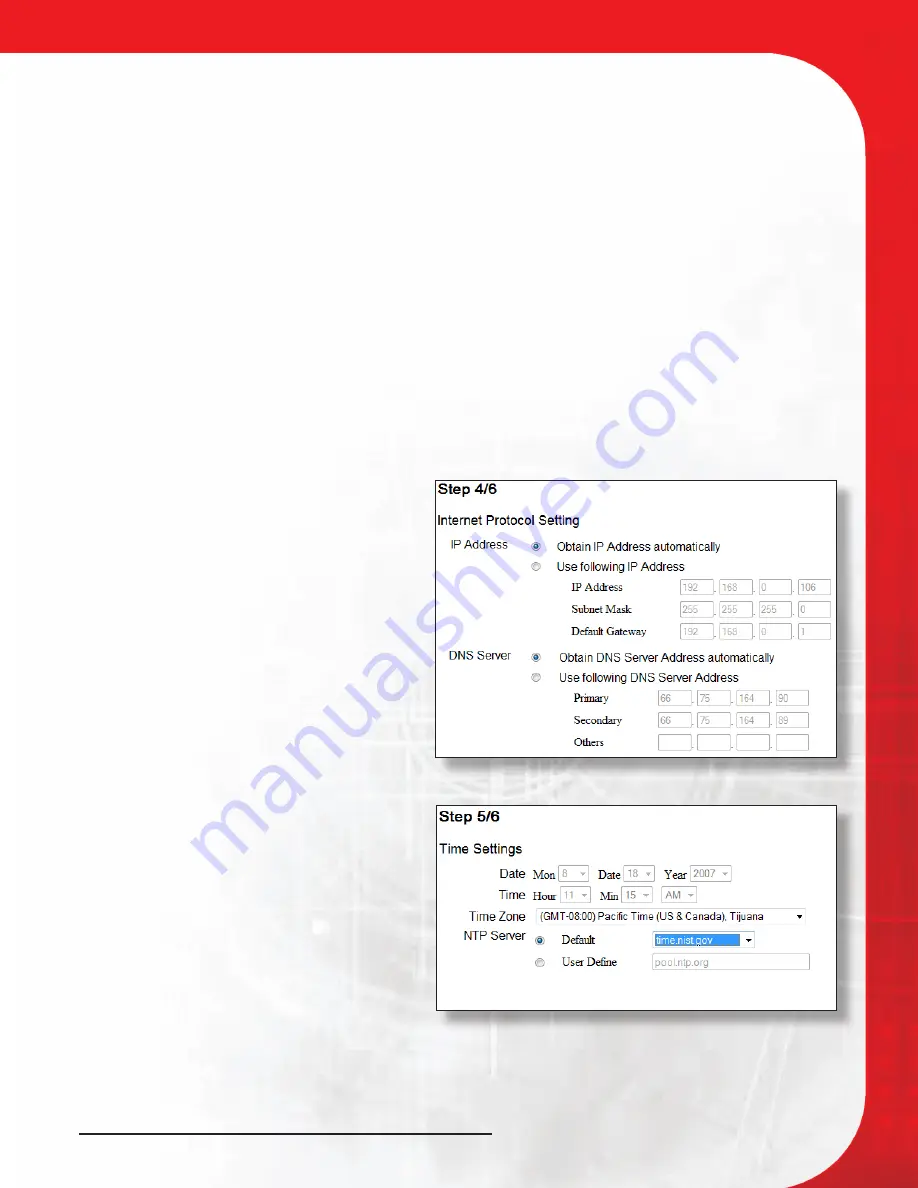
1.1.4 Step 4: IP Protocol Settings. Your
MegaDisk NAS is preconfigured as a DHCP
client for automatic IP address and network
setting. If your network does not have a DHCP
server or you require a fixed configuration,
you may customize the following IP fields
illustrated right. When all fields are entered,
click “Next” to continue.
1.1.5 Step 5: Set the time
You may set the system date and time in this
step manually, or specify an NTP (Network
Time Protocol) server as illustrated right.
When all fields are entered, click “Next” to
continue.
1.1.6 Step 6: Review and Confirm your
settings. In this screen all settings made in the
previous 5 steps are displayed. If all settings
are correct, click “complete” to finalize the
wizard, or “Back” to go back and make an
changes. To cancel the wizard, click the “Cancel” button.
3-Administering the MegaDisk NAS


