Faicom A Series Скачать руководство пользователя страница 13

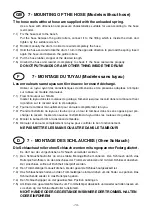
  GB     7 - MOUNTING OF THE HOSE (Models without hose)

The hose reels without hose are supplied with the unloaded spring.

Use a hose with dimension and pressure characteristics suitable for use according to the hose
reel model.

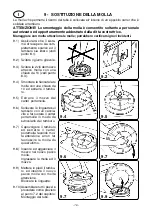
7.1) Fix the hose reel to the bench.

Put the hose between the guide rollers, connect it to the fitting which is inside the drum and
tighten by the suitable wrench.

7.2) Rotate manually the drum in order to rewind completely the hose.
7.3) Hold the hose-end and rotate the drum 1 turn in the opposite direction to pre-load the spring. Insert

again the hose-end between the guide rollers.

7.4) Put the hose rubber stopper at the desired length.
7.5) Unwind the hose and rewind it completely, to check if  the hose reel works properly.

DO NOT PUT HANDS OR ANY OTHER THING INSIDE THE DRUM!

F

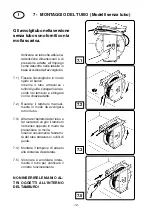
7 - MONTAGE DU TUYAU (Modèles sans tuyau)

Les enrouleurs sans tuyau sont livrés avec le ressort déchargé.

Utiliser un tuyau ayant des caractèristiques de dimensions et de pressions adaptées à l'emploi
sur la base du modéle d'enrouleur.

7.1) Fixer l'enrouleur sur l'établi.

Insérer le tuyau dans les rouleaux de guidage, l'amener jusqu'au raccord dans le tambour et fixer
la jonction sur le raccord avec la clé adaptée.

7.2) Tourner le tambour manuellement pour enrouler complètement le tuyau.
7.3) Prendre l'extremité du tuyau et tourner pour un tour le tambour dans le sens opposè pour pré-

charger le ressort. Insérer de nouveau l'extrémité du tuyau dans les rouleaux de guidage.

7.4) Monter la butée d'arrêt à la distance demandée.
7.5) Dérouler et enrouler complètement le tuyau pour contrôler le bon fonctionnement.

NE PAS METTRE LES MAINS OU AUTRE DANS LE TAMBOUR!

Die Schlauchaufroller ohne Schlauch werden mit ungespannter Feder geliefert.

Es darf nur der vorgschriebene Schlauch verwendet werden.

7.1) Den Schlauchchaufroller an eine stabile Montagefläche montieren. Den Schlauch durch das

Rollenjoch einfhüren, an den Anschluss der Trommel verbinden und mit dem Schlüssel anziehen.
Der Anschluss sollte auf Dichtheit überprüft werden.

7.2) Den Trommelkörper manuell drehen, bis der gesamte Schlauch aufgewickelt ist.
7.3) Das Schlauchende halten und den Trommelkörpen einmal drehen um die Feder zu spannen Das

Schlauchende wieder in das Rollenjoch geben.

7.4) Den Schlauchstopper an del gewünschten Position anbringen.
7.5) Am Ende den gesamten Schlauch vom Trommelkörper abwickeln und wieder aufrollen lassen um

zu sehen ob der Schlauchaufroller funktioniert.

NICHT HÄNDE ODER GEGESTÄNDE INS INNERE DER TROMMEL HALTEN

ODER EINFÜHREN!

D

7  -  MONTAGE DES SCHLAUCHES (Ohne Schlauch)

- 13 -

Содержание A Series

Страница 1: ...AL AX ALX MANUALE USO E MANUTENZIONE USE AND MAINTENANCE MANUAL NOTICE D UTILISATION ET D ENTRETIEN GEBRAUCHSANWEISUNG 09 COSTRUZIONI MECCANICHE TORINO RENATO S Chiaffredo Strada antica di Cuneo 43 12...

Страница 2: ...n planned in conformity to the present EEC rules and namely UNI EN 292 1 EN 292 2 Safety of the machines General design methods UNI EN 294 Safety of the machines Safety Distances to prevent danger zon...

Страница 3: ...pr cis ment UNI EN 292 1 EN 292 2 S curit de la machinerie El ments fondamentaux de projet UNI EN 294 S curit de la machinerie Distances de s curit pour emp cher l approche de zones dangeureses par l...

Страница 4: ...reels supplied without hose are provided with the unloaded spring Follow the instructions described at the chapter HOSE ASSEMBLY Um eine lange Lebensdauer zu gew hrleisten sind die Schlauchaufroller M...

Страница 5: ...CQUA WATER EAU WASSER 40 C Max OLIO OIL HUILE OEL ARIA AIR AIR LUFT 18 Bar A183820ST G 3 8 F 20 m GRASSO GREASE GRAISSE FETT 400 Bar A4G1415ST G 1 4 F 15 m ACQUA 150 C WATER 150 C EAU 150 C WASSER 150...

Страница 6: ...3 8 R1 1 2 R1 1 2 R1 10 m 15 m 10 m 15 m GRASSO GREASE GRAISSE FETT 400 Bar A4G1410 A4G1415 G 1 4 F G 1 4 F 1 4 R2 1 4 R2 10 m 15 m ACQUA 150 C WATER 150 C EAU 150 C WASSER 150 C 400 Bar A4H3810 A4H38...

Страница 7: ...lauchaufroller nicht in der N he und im Kontakt mit Lebensmittelprodukten plaziert werden Les enrouleurs modeles AX ALX sont construits enti rement en acier inox AISI 304 l exception de quelques compo...

Страница 8: ...pour objets endommag s cause d un montage incorrect de l enrouleur F 4 INSTALLATION IMPORTANT The hose reel has to be wall mounted at a minimum height of the floor of 2 50 m in order to prevent accid...

Страница 9: ...er Ainsi on peut viter de possibles pertes de fluide du joint tournant enrouleur pour haute pression Conform ment aux normes sur la ligne d alimentation l enrouleur appliquer une vanne boisseau sph ri...

Страница 10: ...eventuali sostituzioni di pezzi si consiglia di interpellare la casa costruttrice Dopo ogni operazione di manutenzione ripristinare le eventuali protezioni I 6 USO E MANUTENZIONE The automatic device...

Страница 11: ...ich an den Hersteller zu wenden D 6 GEBRAUCH UND WARTUNG f r den Schlauch Le cliquet d arr t fonctionne sur une zone correspondante un demi tour du tambour Pour d bloquer le tuyau exercer une courte t...

Страница 12: ...so i rullini di guida collegarlo al rac cordo nel tamburo e stringere con la chiave adatta 7 2 Ruotare il tamburo manual mente in modo da avvolgere tutto il tubo 7 3 Afferrare l estremit del tubo e fa...

Страница 13: ...le raccord avec la cl adapt e 7 2 Tourner le tambour manuellement pour enrouler compl tement le tuyau 7 3 Prendre l extremit du tuyau et tourner pour un tour le tambour dans le sens oppos pour pr char...

Страница 14: ...bo 8 2 Svitare il giunto girevole 8 3 Svitare le 2 viti del mozzo attacco molla con una chiave da 10 mm 8 4 Smontare la fiancata lato molla con una chiave da 10 e srotolare completamen te il tubo dal...

Страница 15: ...the spring is completely unloaded 8 2 Loosen the swivel joint 8 3 Loosen the two screws of the spring likage shaft by a 10 wrench 8 4 Disassemble the opening on the spring side and unwind completely t...

Страница 16: ...el mozzo attacco molla con una chiave da 10 vedi punto 8 3 9 4 Smontare la fiancata lato molla con una chiave da 10 ed estrarre il tambu ro 9 5 Estrarre il mozzo dal carter portamolla 9 6 Sollevare le...

Страница 17: ...9 4 Disassemble the opening on the spring side by a 10 mm wrench and take out the drum 9 5 Take out the shaft from the spring housing 9 6 Lift the tangs on the drum by a screwdriver and rotate the sp...

Страница 18: ...10 1 PARTI DI RICAMBIO SPARE PARTS PIECES DETACHEES ERSATZTEILE Models A AX 18...

Страница 19: ...MBOUR RESSORT 15m 18 bar RESSORT 15m 60 bar RESSORT 15m 400 bar RESSORT 20m 18 bar MOYEUDERESSORT VIS TE M 6x16 VIS TE M 6x10 BUTEE D 14 1 4 BUTEE D 17 3 8 BUTEE D 20 1 2 BUTEE D 23 5 8 MAMELON DOUBLE...

Страница 20: ...Models AL ALX 10 2 PARTI DI RICAMBIO SPARE PARTS PIECES DETACHEES ERSATZTEILE 20...

Страница 21: ...TE M 6x16 VIS TE M 6x10 BUTEE D 14 1 4 BUTEE D 17 3 8 BUTEE D 20 1 2 BUTEE D 23 5 8 MAMELONDOUBLE1 2 1 4 MAMELONDOUBLE1 2 3 8 MAMELONDOUBLE1 2 1 2 FLANC GAUCHE ECROUM6 FLANCDROIT TAMBOUR ENTRETOISEPO...

Страница 22: ...l Code F r Modell Art Nr Pour modele Code A ASG15 AL ALSG20 AX Inox AXSG15 ALX Inox ALXSG20 60 Bar 12 mm Aria Air Air Luft Acqua Water Eau Wasser 40 C Max Olio Oil Huile Oel 400 Bar 11 mm A Grasso Gre...

Страница 23: ...ISH SEAL WASHER BRASS WASHER SEAL SEAL WASHER SWIVEL SWIVEL SWIVEL SWIVEL SWIVEL WASHER SEAL SEAL FRANCAIS JOINT RONDELLE RONDELLELAITON JOINT JOINT RONDELLE RACCORD RACCORD RACCORD RACCORD RACCORD RO...

Страница 24: ...methods UNI EN 294 Safety of the machine Safety distances to prevent danger zones being reached by the upper limbs We declare that the complete technical booklet for the hose reels in question is ava...

Отзывы: