f1.mts-gruppe.com
20
EN
3 x
S.O.S. function
4 x
Off
Jumpsta
r
ting
Prepa
r
ation
s
1. Ensure the battery pack of the device is char-
ged. Do not jump start a car if the battery level
is below 30 %.
2. Be sure to follow the indications on jumpstar-
ting inside the vehicles‘ operator’s manuals.
3. Set the parking brake on both vehicles.
4. Set gearstick to neutral, for automatic trans-
missions to P.
5. Switch off ignition on both vehicles and all
devices.
6. Do not disconnect the drained battery from
the vehicle’s electrical system.
Conne
c
ting
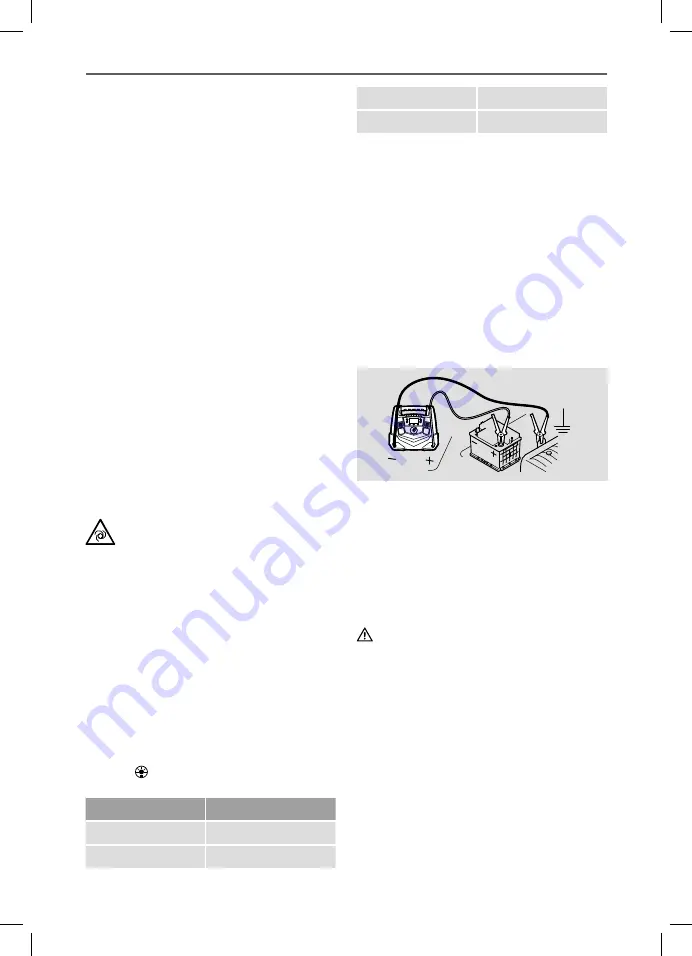
Place the jumper leads so they will not be tangled
in moving parts inside the engine compartment.
Connect the terminal clamps of the leads in the
following order:
1. Positive lead (red) to positive terminal of
drained battery.
2. Negative lead (black) to the negative pole on
the drained battery, or to a suitable mass (e.g.
engine block) on the vehicle.
Caution!
Connect this earthing point to the vehicle earth
as far away from the battery as possible to avoid
igniting explosive gas which may be present.
A signal will sound if the battery was connected
with reverse polarity. In this case, do not press
the „JUMP START“ dial (13). Disconnect the
clamps and connect the clamps as described
above.
Sta
r
ting
1. Set the „JUMP START“ dial (13) to „ON“.
2. Start the engine of the vehicle with the
discharged battery (start for max. 8 seconds -
wait at least 3 minutes between attempts).
+
-
MENÜ
220V
12V
OFF
ON
12V
12V
1
2
27. Power supply with 230 V power plug
28. Connecting plug
Ope
r
ation
Charging the s
t
o
r
age bat
t
ery
•
The storage battery should be fully charged
prior to first use.
•
Regularly check the charge of the battery pack
when stored for extended periods.
•
Fully charge the battery pack monthly, even if
the device was not used.
Charging by 230 V charging main
s
adap
t
er
1. Connect the plug (28) of the power supply to
the socket (17).
2. Connect the power supply (27) to a 230 V
mains socket. The charging LED (16) lights up
green.
3. The LED indicator (4) lights up, showing the
current battery pack capacity. The charging
time is approx. 20 - 22 hours.
4. After charging, disconnect the power supply
from the device and the 230 V power socket.
Note!
Do not operate the device while charging!
Powering the uni
t
On / O
f
f
Au
t
omatic sta
rt
warning!
If the On / Off switch (15) for compressor power
is set to ( I ) before switching the unit on, the
compressor will automatically start and com-
pressed air will be supplied to the compressed
air hose. Risk of property damage and personal
injury!
1. Press the „MENU“ button (11). The display (4)
shows the current capacity of the integrated
battery pack.
2. If the device is not used for 50 seconds, the
display will automatically switch off to save
energy.
U
s
ing the LE
Ds
The LEDs have three light functions Repeatedly
press the button (6) to set the desired light
function.
Press button
Light mode
1 x
Steady light
2 x
Flashing light


