


8
Hard disk
Recommended hard disks: SEAGATE, HITACHI, SAMSUNG
Fitting the hard disk
1.
Switch off the digital recorder and open the hard-disk slot.
2.
Turn the handle and pull the HDD frame carefully out of the slot. (Keys and fitting screws
are contained in the HDD frame.)
3.
Push the plastic lock of the HDD frame cover down and push the upper cover of the HDD
frame back.
4.
Change the hard disk jumper so that the hard disk works as MASTER.
The jumper settings are usually described on the hard disk.
5.
Connect the hard disk supplied to the HDD frame using a 4-pole power cable and a flat-
tape data cable.
6.
Fix the hard disk with 2 screws to the base of the HDD frame and close the frame with the
cover.
7.
Insert the HDD frame back into the slot and push it until it engages.
Then lock the hard disk with the key and push the handle forwards.
Please note before operating:
The recorder does not support any hot-swap function (disk exchange during operation). To
prevent damage, go to the main menu and exit all hard-disk activity, and remove the power
adapter from the recorder before exchanging the hard disk.
When you reconnect the power adapter, the recorder identifies the video system (NTSC/PAL) of
the camera connected to camera input 1. If no camera is connected, the last video system
setting is used.
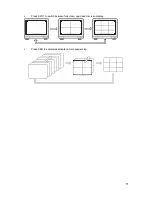
Following system restart, an 8-panel picture is displayed and the existing schedule settings are
used.
Содержание TV8911
Страница 2: ......
Страница 3: ...1 8 Kanal Digitalrekorder TV8911 Installationsanleitung...
Страница 34: ...32...
Страница 35: ...1 8 channel digital recorder TV8911 Installation Guide...
Страница 66: ...32...
Страница 67: ...1 Enregistreur digital 8 canaux TV8911 Instructions d installation...
Страница 98: ...32...
Страница 99: ...1 8 kanal digitaloptager TV8911 Installationsvejledning...
Страница 130: ...32...
Страница 131: ...1 1 8 kanaals digitale recorder TV8911 Installatiehandleiding...
Страница 162: ...32...


