


Follow these instructions, if in doubt about the disinfecting method
please contact us for further details.
Lubrication
When lubrication is needed a silicon or Teflon based spray can be
used. Do not excessively spray the lubricant over the buckle or gate.
Wipe off any excess and protect any webbing or rope from being
sprayed.
Storage - Transportation
After cleaning, store unpacked in a cool, dry, and dark place away
from direct sunlight, as UV will cause damage to the webbing over
time, excessive heat sources, sharp edges, vibration or other possible
causes of damage. Do not store when wet or in a damp area >70%. If
a long shelf life is required it is advisable to store in a moisture proof
package, like a polyethylene bag.
Lifespan
This is difficult to estimate but we advise as follows: Do not use more
than ten years after the date of manufacture. Assuming you have used
the correct storage, the working life can vary from a ten year span to a
single use in extreme circumstances (e.g. highly chemical environment,
serious fall, etc.). UV light including sunlight will reduce the working
life.
Anchoring
Any fall arrest anchorage used should be able to withstand a force of
22kN when not certified or withstand at least two times the Maximum
Arrest Force when engineered.
Do not create slack in the system and avoid any pendulum effect /
swing during a fall.
Ideally the user should be attached to the anchor as vertically as
possible.
For work positioning, restraint and rescue we advise the anchor at
least hold 12kN of force for every person/device attached to it. (Load
sharing is an option)
When connecting to an anchor device or structure use a suitable form
of connector complying with EN 362, either with a shock absorbers,
complying with EN 355, a lanyard, complying with EN 354 or sling and
carabiners depending on the situation you are in. Follow the standard
EN 795 for anchoring.
Harness Connection Point
Connect the lanyard to the harness preferably to the sternal attach-
ment point. When not possible attaching to the ventral attachment
point is allowed as long as falls are impossible or there is a proper
energy absorbance in the system, such as a dynamic rope system.
For fall arrest equipment, such as adding an energy absorber to the
lanyard the right connection point is the Sternal or Dorsal attachment
point, indicated with the letter A on a full body harness complying with
EN 361. This full body harness is the only type of harness suitable for
being used in a fall arrest system.
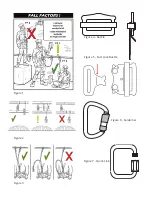
Fall clearance
It is important to keep in mind that the flight path is clear from any
obstacles when using a fall arresting system. It is essential for safety
to verify the free space required beneath the user at the workplace
before each occasion of use, so that, in the case of a fall, there will be
no collision with the ground.
Calculating the total fall clearance
The fall clearance is the distance required to safely arrest a fall. It is the
distance from the anchor to the ground.
Step 1 – calculate the Free Fall (F)
Step 2 – determine from the label how much the shock absorber
deploys (D)
Step 3 – determine the stretch of the harness (H)
Step 4 - add a safety factor of 2m (S)
Step 5 - add all figures together to get the clearance (C)
C=F+D+H+S
Markings and/or symbols
On our label you will find:
Product name, Product number (example G10) and assembly:
060 = Length of the lanyard
B = Colour of the product, B stands for Blue
DOM (date of Manufacture) in year and month
Serial # - Individual serial # or batch #
CE mark, which stands for “Conformité Européenne” (“European Con-
formity”).
EN 354 is the European standard to which the product is certified.
Country of destination
It is essential for the safety of the user that if the product is re-sold
outside the original country of destination the reseller shall provide
instruction for use, for maintenance, for periodic examination and
for repair in the language of the country in which the product is to be
used.
EN 361:2012 – EN 358:1999 – EN813:2008
Harness comfort and adjustability test
When choosing a harness make sure you choose the right size, try out
the harness and check the adjustability and comfort of the harness in
a safe place. This is to ensure the (sit) harness is the correct size, has
sufficient adjustment, and is of an acceptable comfort level for the
intended use.
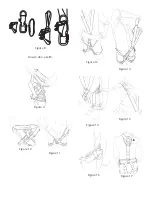
Correct way to put on a full body work positioning harness, see draw-
ings
Step 1 – Identify all the parts and lay it out.
Step 2 – Step in the leg loops and pull up the belt, like putting on your
pants.
Step 3 – Tighten the belt straps by pulling them forward and away
from the body.
Step 4 - Pull the chest straps over your head and adjust the straps.
Don’t pull them too tight; snug is good.
Step 5 – Tighten the leg straps until they fit snug.
Make sure that there is at least 5cm (2inch) of webbing past the buckle
to allow for webbing passing through the buckle during a major fall.
It is essential to regularly check fastening and/or adjustment elements
during use.
For the Viking harness, make sure the chest connector is positioned
behind the Ventral D-ring towards the body (see drawing).
W the Viking series harness, you are also allowed to insert an extra
connector to attach cowstails/lanyards, see drawing.
Chest Ascender Strap
If an Eyolf Chest Ascender Strap (CAS) is supplied with the harness,
see details in drawing on how to fix the chest ascender onto the Viking
harness. The bottom opening of chest ascender is to be put through
the chest assembly connector. We prefer the 10mm square quick link
(maillion rapide - Eyolf Product # C226-10)
Fall arrest mode of butt straps
When present on the harness; it is important to understand that the
adjustable butt straps have to be pulled tight when the harness is used
in fall arrest mode. For work positioning, they can be used slack for
better positioning.
Correct use of D-rings on a harness
Class A full body harnesses are designed to support the body during
and after the arrest of a fall. Following CSA standards, the dorsal
attachment is the only allowed way for arresting a fall.
Class D full body harnesses are designed for suspension or controlled
descent from a height.
Do not use the ventral (main) D-ring for fall arrest systems.
Class L full body harnesses are designed for use with fall restrict sys-
tems involving the use of a fall arrester that travels on a vertical lifeline
or rail.
Class P full body harnesses are designed to position the worker during
a work operation.
Accessory items on the harness
Any of the accessory webbing and plastic holders are not attachment
points and only to be used for carrying tools up to 10kg in total of all
tools combined.


