background image


Web-based User Interface

Extreme Networks EAS 100-24t Switch Hardware Installation Manual

33

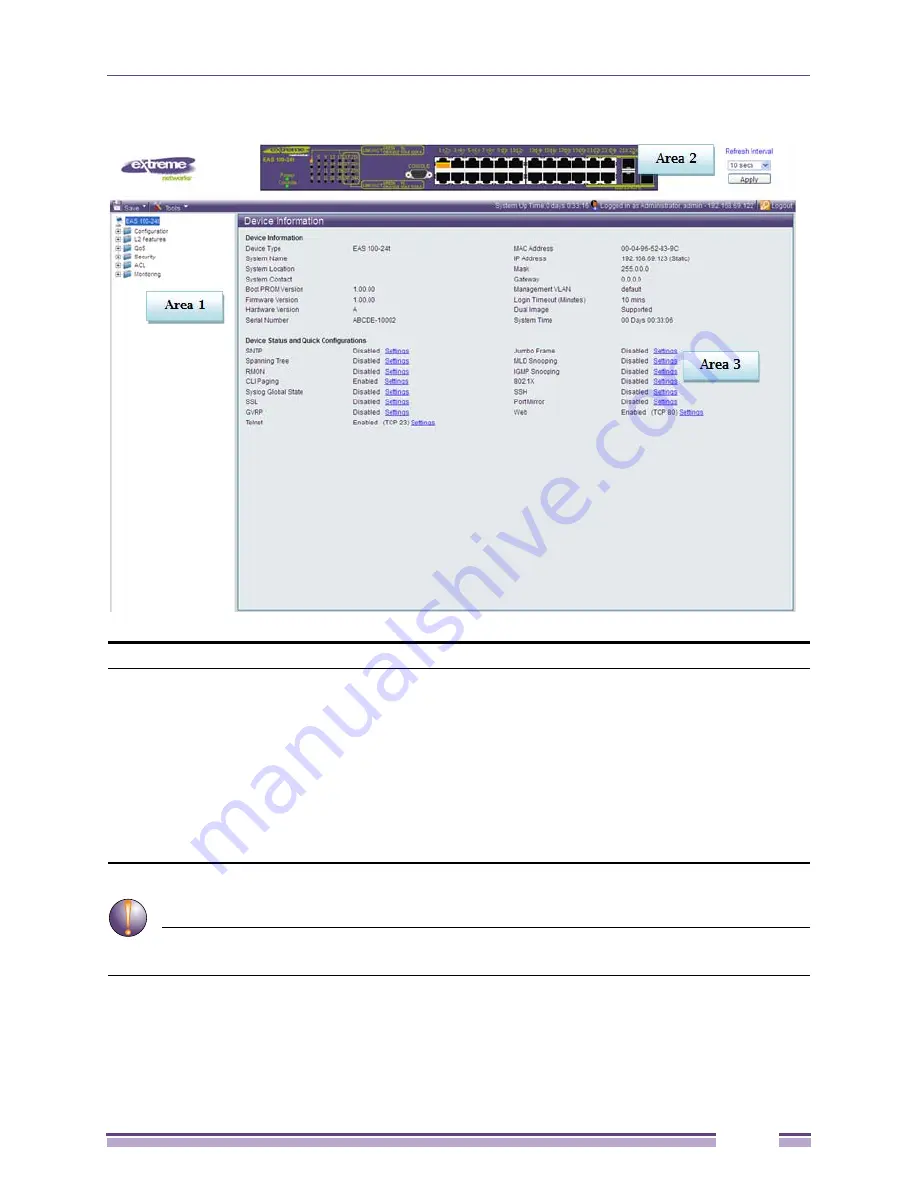
Figure 18: Main Web-Manager page

CAUTION

Any changes made to the switch configuration during the current session must be saved in the Save 

Changes web menu (explained below) or use the command line interface (CLI) command save.

Area

Function

Area 1:

Select the folder or window to be displayed. The folder icons can be opened 
to display the hyperlinked window buttons and subfolders contained within 
them. Click the Extreme Networks logo to go to the Extreme Networks 
website.

Area 2:

Presents a graphical near real-time image of the front panel of the switch. This 
area displays the switch's ports and expansion modules, showing port activity, 
duplex mode, or speed, depending on the specified mode.

Various areas of the graphic can be selected for performing management 
functions, including port configuration.

Area 3:

Presents switch information based on your selection and the entry of 
configuration data.

Содержание EAS 100-24t Switch

Страница 1: ...Santa Clara California 95051 888 257 3000 408 579 2800 http www extremenetworks com Extreme Networks EAS 100 24t Switch Hardware Installation Manual Layer 2 Managed Gigabit Switch Release 1 00 Published July 2011 Part number 120703 00 Rev 01 ...

Страница 2: ...ServiceWatch Summit SummitStack Triumph Unified Access Architecture Unified Access RF Manager UniStack XNV the Extreme Networks logo the Alpine logo the BlackDiamond logo the Extreme Turbodrive logo the Summit logos and the Powered by ExtremeXOS logo are trademarks or registered trademarks of Extreme Networks Inc or its subsidiaries in the United States and or other countries sFlow is the property...

Страница 3: ...Before You Connect to the Network 17 Installing the Switch without the Rack 18 Installing the Switch in a Rack 18 Mounting the Switch in a Standard 19 Rack 19 Power on AC Power 19 Power Failure 19 Chapter 3 Connecting the Switch 21 Switch to End Node 21 Switch to Hub or Switch 22 Chapter 4 Introduction to Switch Management 23 Management Options 23 Web based Management Interface 23 SNMP Based Manag...

Страница 4: ...00 24t Switch Hardware Installation Manual 4 Web Pages 34 Appendix A Technical Specifications 35 General 35 Physical and Environmental 37 Performance 37 LED Indicators 37 Appendix B Cables and Connectors 39 Ethernet Cable 39 Console Cable 40 ...

Страница 5: ... name of the file Do not type the brackets Bold font Indicates a button a toolbar icon menu or menu item For example Click on the Apply button Used for emphasis May also indicate system messages or prompts appearing on screen For example You have mail Bold font is also used to represent filenames program names and commands For example use the copy command Boldface Typewriter Font Indicates command...

Страница 6: ...nt observe the following precautions Observe and follow service markings Do not service any product except as explained in your system documentation Opening or removing covers that are marked with the triangular symbol with a lightning bolt may expose you to electrical shock Only a trained service technician should service components inside these compartments If any of the following conditions occ...

Страница 7: ...than the ratings marked on the product To help prevent electric shock plug the system and peripheral power cables into properly grounded electrical outlets These cables are equipped with three prong plugs to help ensure proper grounding Do not use adapter plugs or remove the grounding prong from a cable If you must use an extension cable use a 3 wire cable with properly grounded plugs Observe exte...

Страница 8: ...ocking position and then slide the component into the rack Do not overload the AC supply branch circuit that provides power to the rack The total rack load should not exceed 80 percent of the branch circuit rating Ensure that proper airflow is provided to components in the rack Do not step on or stand on any component when servicing other components in a rack NOTE A qualified electrician must perf...

Страница 9: ...he chassis You can also take the following steps to prevent damage from electrostatic discharge ESD 1 When unpacking a static sensitive component from its shipping carton do not remove the component from the antistatic packing material until you are ready to install the component in your system Just before unwrapping the antistatic packaging be sure to discharge static electricity from your body 2...

Страница 10: ...Preface Extreme Networks EAS 100 24t Switch Hardware Installation Manual 10 ...

Страница 11: ...ini GBIC Mini GBIC SFP 1000BASE SX MMF 220 550 meters LC connector 10052 LX mini GBIC Mini GBIC SFP 1000BASE LX MMF 220 550 meters SMF 10km LC connector 10056 1000BASE BX D BiDi SFP 1000BASE BX D SFP 1490 nm TX 1310 nm RX wavelength 10057 1000BASE BX U BiDi SFP 1000BASE BX U SFP 1310 nm TX 1490 nm RX wavelength Compliant to following standards IEEE 802 3z compliance IEEE 802 3u compliance 1000BASE...

Страница 12: ...indicator Figure 1 LED Indicators on EAS 100 24t Switch Per Device EAS 100 24t LED Per 10 100 1000 Mbps Port LED Indicator Color Status Description Power Green Solid Light Power ON Light off Power OFF Console Green Solid Light Console on Light off Console off LED Indicator Color Status Description Link Act Speed Green Orange Solid Green When there is a secure 1000Mbps Ethernet connection or link a...

Страница 13: ...ale connector of the provided power cord into this socket and the male side of the cord into a power outlet The switch automatically adjusts its power setting to any supply voltage in the range from 100 240 VAC at 50 60 Hz Figure 3 Rear panel view of the EAS 100 24t LED Indicator Color Status Description Link Act Speed Green Orange Solid Green When there is a secure 1000Mbps Ethernet connection or...

Страница 14: ...ation system components might overheat which could lead to system failure Figure 4 Side panels of the EAS 100 24t Gigabit Combo Ports The EAS 100 24t features four Gigabit Ethernet Combo ports These ports are 1000BASE T copper ports provided and Mini GBIC ports optional See the diagram below to view the two Mini GBIC port modules being plugged into the switch Please note that although these two fr...

Страница 15: ...s for a gigabit link that may span great distances These SFP ports support full duplex transmissions have auto negotiation and can be used with the following Extreme SFP transceivers 10051 SX mini GBIC Mini GBIC SFP 1000BASE SX MMF 220 550 meters LC connector 10052 LX mini GBIC Mini GBIC SFP 1000BASE LX MMF 220 550 meters SMF 10km LC connector 10056 1000BASE BX D BiDi SFP 1000BASE BX D SFP 1490 nm...

Страница 16: ...Chapter 1 Introduction Extreme Networks EAS 100 24t Switch Hardware Installation Manual 16 ...

Страница 17: ... least 2 61kg 5 75lbs of weight Do not place heavy objects on the switch The power outlet should be within 1 82 meters 6 feet of the switch Visually inspect the power cord and see that it is fully secured to the AC DC power port Make sure that there is proper heat dissipation from and adequate ventilation around the switch Leave at least 10 cm 4 inches of space at the front and rear of the switch ...

Страница 18: ...of the device Allow enough ventilation space between the switch and any other objects in the vicinity Figure 7 Prepare Switch for installation on a desktop or shelf Installing the Switch in a Rack The switch can be mounted in a standard 19 rack Use the following diagrams as a guide Figure 8 Fasten mounting brackets to Switch Fasten the mounting brackets to the switch using the screws provided With...

Страница 19: ...in injury Figure 9 Installing Switch in a rack Power on AC Power Plug one end of the AC power cord into the power connector of the switch and the other end into the local power source outlet Power Failure For AC power supply units as a precaution in the event of a power failure unplug the switch When power has resumed plug the switch back in WARNING Installing systems in a rack without the front a...

Страница 20: ...Chapter 2 Installation Extreme Networks EAS 100 24t Switch Hardware Installation Manual 20 ...

Страница 21: ...t routers An end node can be connected to the switch via a twisted pair Category 3 4 or 5 UTP STP cable The end node should be connected to any of the ports of the switch Figure 10 EAS 100 24t connected to an end node The Link Act LEDs for each UTP port will light green or orange when the link is valid A blinking LED indicates packet activity on that port NOTE All 10 100 1000Mbps NWay Ethernet por...

Страница 22: ...SE TX hub or switch can be connected to the switch via a twisted pair Category 5 UTP STP cable A 1000BASE T switch can be connected to the switch via a twisted pair Category 5e UTP STP cable A switch supporting a fiber optic uplink can be connected to the switch s SFP ports via fiber optic cabling Figure 11 Switch connected to a normal non Uplink port on a hub or switch using a straight or crossov...

Страница 23: ...ement You can manage the switch with an SNMP compatible console program The switch supports SNMP version 1 0 version 2 0 and version 3 0 The SNMP agent decodes the incoming SNMP messages and responds to requests with MIB objects stored in the database The SNMP agent updates the MIB objects to generate statistics and counters Connecting the Console Port RS 232 DCE The switch provides an RS 232 seri...

Страница 24: ...n displays 11 If you have not logged into the command line interface CLI program press the Enter key at the User name and password prompts There is no default user name and password for the switch The administrator must first create user names and passwords If you have previously set up user accounts log in and continue to configure the switch 12 Enter the commands to complete your desired tasks M...

Страница 25: ... console program in the switch to refresh the console screen Enter the username and password and press Enter You will be given access to the command prompt shown below The default username is admin and there is no initial password Figure 13 Command Prompt Password Protection The switch does not have a default password One of the first tasks when settings up the switch is to create user accounts On...

Страница 26: ...me newmanager Figure 14 Create account command CAUTION CLI configuration commands only modify the running configuration file and are not saved when the switch is rebooted To save all your configuration changes in nonvolatile storage you must use the save command to copy the running configuration file to the startup configuration SNMP Settings Simple Network Management Protocol SNMP is an OSI Layer...

Страница 27: ...red with a shared set of privileges The SNMP version may also be set for a listed group of SNMP managers Thus you may create a group of SNMP managers that are allowed to view read only information or receive traps using SNMP v 1 while assigning a higher level of security to another group granting read write privileges using SNMP v 3 Using SNMP v 3 individual users or groups of SNMP managers can be...

Страница 28: ...sent the corresponding subnet mask Alternatively you can enter config ipif System ipaddress xxx xxx xxx xxx z Where the x s represent the IP address to be assigned to the IP interface named System and the z represents the corresponding number of subnets in CIDR notation The IP interface named System on the switch can be assigned an IP address and subnet mask and then be used to connect a managemen...

Страница 29: ...address of 10 1 1 1 with a subnet mask of 255 0 0 0 the CIDR form was used to set the address 10 1 1 1 8 The system message Success indicates that the command was executed successfully The switch can now be configured and managed via Telnet and the CLI or via the Web based management config ipif System ipaddress 10 1 1 1 255 0 0 0 Command config ipif System ipaddress 10 1 1 1 8 Success ...

Страница 30: ...Chapter 4 Introduction to Switch Management Extreme Networks EAS 100 24t Switch Hardware Installation Manual 30 ...

Страница 31: ...ased management module and the Console program and Telnet are different ways to access the same internal switching software and configure it Thus all settings encountered in web based management are the same as those found in the console program Login to Web Manager To begin managing the switch simply run the browser you have installed on your computer and point it to the IP address you have defin...

Страница 32: ...k OK This will open the Web based user interface The switch management features available in the web based manager are explained below Web based User Interface The user interface provides access to various switch configuration and management windows allows you to view performance statistics and permits you to graphically monitor the system status Areas of the User Interface The figure below shows ...

Страница 33: ... icons can be opened to display the hyperlinked window buttons and subfolders contained within them Click the Extreme Networks logo to go to the Extreme Networks website Area 2 Presents a graphical near real time image of the front panel of the switch This area displays the switch s ports and expansion modules showing port activity duplex mode or speed depending on the specified mode Various areas...

Страница 34: ...Snooping Settings Port Mirror Loopback Detection Settings Spanning Tree Forwarding Filtering and LLDP QoS Contains main windows concerning Bandwidth Control Traffic Control 802 1P Default Priority 802 1P User Priority QoS Scheduling Settings Priority Mapping TOS Mapping and DSCP Mapping Security Contains main windows concerning Trusted Host Port Security 802 1X SSL Settings SSH Access Authenticati...

Страница 35: ...EEE 802 3ad Link Aggregation Control IEEE 802 3x Full duplex Flow Control IEEE 802 3 NWay auto negotiation Fiber Optic SFP Mini GBIC Support 10051 SX mini GBIC Mini GBIC SFP 1000BASE SX MMF 220 550 meters LC connector 10052 LX mini GBIC Mini GBIC SFP 1000BASE LX MMF 220 550 meters SMF 10km LC connector 10056 1000BASE BX D BiDi SFP 1000BASE BX D SFP 1490 nm TX 1310 nm RX wavelength 10057 1000BASE B...

Страница 36: ...Switch Hardware Installation Manual 36 Network Cables Cat 5 Enhanced for 1000BASE T UTP Cat 5 Cat 5 Enhanced for 100BASE TX UTP Cat 3 4 5 for 10BASE T EIA TIA 568 100 ohm screened twisted pair STP 100m Number of Ports 20 x 10 100 1000Mbps 4 Combo 1000BASE T SFP Ports ...

Страница 37: ... W x 207 D x 44 H mm Weight 2 61kg EMI KCC CCC Safety Certification Plan UL CB TUV ANATEL Transmission Method Store and forward Packet Buffer 512 KB per device Packet Filtering Forwarding Rate 35 71 Mpps MAC Address Learning Automatic update Supports 8K MAC address Priority Queues 4 Priority Queues per port Forwarding Table Age Time Max age 10 1000000 seconds Default 300 Location LED Indicator Col...

Страница 38: ...s Blinking Orange When there is reception or transmission i e Activity Act of data occurring at a port Light off No link Per SFP Port Link Act Speed mode Green Orange Solid Orange Light When there is a secure connection or link to 100Mbps Ethernet device at any of the ports Blinking Orange When there is reception or transmission i e Activity Act of data occurring at a port Light Off No link Solid ...

Страница 39: ...cts for matching cable pin assignment The following diagrams and tables show the standard RJ 45 receptacle connector and their pin assignments Figure 19 The standard RJ 45 port and connector RJ 45 Pin Assignment Contact MDI X Port MDI II Port 1 RD receive TD transmit 2 RD receive TD transmit 3 TD transmit RD receive 4 1000BASE T 1000BASE T 5 1000BASE T 1000BASE T 6 TD transmit RD receive 7 1000BAS...

Страница 40: ... cable is necessary The following diagrams and tables show the standard Console to DJ 45 receptacle connector and their pin assignments Figure 20 Console to RJ 45 Cable Console RJ 45 Pin Assignments Pin Console DB9 RS232 RJ 45 1 Not Used Not Used 2 RXD Not Used 3 TXD TXD 4 Not Used GND 5 GND shared GND 6 Not Used RXD 7 Not Used Not Used 8 Not Used Not Used ...

Отзывы: