background image


- 31 - 


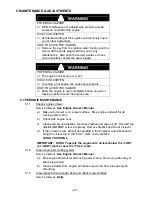
5.1.24 

Check battery charge: (Electric start units only) 


Service Interval: 

Monthly 


Allowing batteries to stand for an extended period of time without recharging 
them will result in reduced performance and service life.  To preserve optimum 
battery performance and life, recharge batteries in storage when the open 
circuit voltage drops to 12.4 volts.  


Note:  To prevent damage due to freezing, battery should be fully charged 
before putting away for winter storage. 


a)  Check the voltage of the battery with a digital voltmeter.  Locate the 

voltage reading of the battery in the table below and charge the battery for 
the recommended time interval to bring the charge up to a full charge of 
12.6 volts or greater.   


IMPORTANT:

  Make sure the negative battery cables are disconnected 

and the battery charger used for charging the battery has an output of 16 
volts and 7 amps or less to avoid damaging the battery (see chart below for 
recommended charger settings). 

Voltage 

Reading 

Percent 

Charge 

Maximum  

Charger Settings 

Charging Interval 

12.6 or greater  100% 

16 volts/7 amps 

No Charging Required 

12.4 – 12.6 

75 – 100% 

16 volts/7 amps 

30 Minutes 

12.2 – 12.4  

50 – 75% 

16 volts/7 amps 

1 Hour 

12.0 – 12.2 

25 – 50% 

14.4 volts/4 amps 

2 Hours 

11.7 – 12.0 

0 – 25% 

14.4 volts/4 amps 

3 Hours 

11.7 or less 

0% 

14.4 volts/2 amps 

6 Hours or More 


5.2 ADJUSTMENTS 


5.2.1 

Cutting height and anti-scalp roller adjustment. 


WARNING 

POTENTIAL HAZARD 

  When the two front support rod hairpins are removed 

from the mower deck, the weight of the tractor section 
may cause the front frame to rise suddenly 

WHAT CAN HAPPEN 

  If the unit rises suddenly, injury may occur. 

HOW TO AVOID THE HAZARD 

  Securely hold down the front of the unit when the front 

support rod hairpins are removed. 


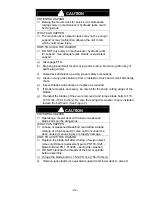
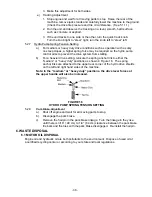
a)  Stop engine and wait for all moving parts to stop. 


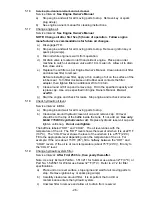
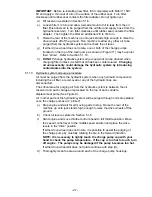
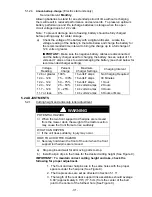
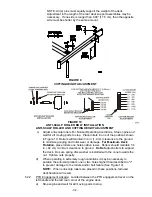
  b)  Install hairpin clips in the holes for the desired cutting height (See Figure 9). 


IMPORTANT:  To maintain correct cutting height and rake, check the 
following for proper adjustment.   


1.  The front and rear hairpins are in the same holes with the proper 

spacers under the hair pins (See Figure 9). 


2.  The tire pressures are set as directed in Section 5.1.11. 


3.  The length of the rear deck support link assemblies should average 

6.89” (approximately 6 7/8”) (17.5 cm) from the center of the ball 
joint to the center of the furthest hole (See Figure 9). 

Содержание TT4819KAC

Страница 1: ...For Serial Nos 440 000 Higher Part No 103 4871 ...

Страница 2: ...from eyes and skin Never siphon by mouth IMPORTANT When the mower is used or operated on any California forest brush or grass covered land a working spark arrester must be attached to the muffler If not the operator is violating state law Section 4442 Public Resource Code To acquire a spark arrester for your unit see your Engine Service Dealer This spark ignition system complies with Canadian ICES...

Страница 3: ...bmitting the Exmark Parts Plus order to Exmark by 3 00 p m central time the Distributor pays for the part and freight 3 Exmark being unable to ship the part and the Exmark parts order is received by 3 00 p m central time Exmark pays for the part and freight 4 If the part does not arrive overnight due to the shipper UPS the shipper pays for the freight and Exmark pays for the part The following res...

Страница 4: ...wer maintain its maximum efficiency and promote safe operation If additional information is needed or should you require trained mechanic service contact your authorized Exmark equipment dealer or distributor All Exmark equipment dealers and distributors are kept informed of the latest methods of servicing and are equipped to provide prompt and efficient service in the field or at their service st...

Страница 5: ...el Drive System 11 2 9 Tires 11 2 10 Deck 12 2 11 Dimensions 12 2 12 Torque Requirements 12 3 ASSEMBLY INSTRUCTIONS 3 1 to 3 21 Assembly 12 17 4 OPERATION INSTRUCTIONS 4 1 Controls 17 19 4 2 Pre Start 19 4 3 Operation Instructions 19 22 4 4 Transporting 22 5 MAINTENANCE ADJUSTMENTS 5 1 Periodic Maintenance 23 31 5 2 Adjustments 31 36 6 WASTE DISPOSAL 6 1 Motor Oil Disposal 37 6 2 Battery Disposal ...

Страница 6: ...perator s or mechanic s can not read English it is the owner s responsibility to explain this material to them 1 2 3 Do not allow operation of this machine by untrained personnel Never allow children teenagers or people unfamiliar with these instructions to use the mower Local regulations may restrict the age of the operator 1 2 4 Avoid mowing while people especially children or pets are nearby Ke...

Страница 7: ... burn you others and cause property damage HOW TO AVOID THE HAZARD DO NOT smoke while refueling and stay away from an open flame or where gasoline fumes may be ignited by spark Refuel only outdoors Store gasoline in an approved container and keep it out of the reach of children Add fuel before starting the engine Never remove the cap of the fuel tank or add fuel when engine is running or when the ...

Страница 8: ...tank or container opening at all times until fueling is complete WARNING POTENTIAL HAZARD Gasoline vapor can collect inside enclosed trailers and may be ignited by electrical sparks or hot engine exhaust components WHAT CAN HAPPEN Explosion and fire may occur resulting in property damage personal injury and or death HOW TO AVOID THE HAZARD Provide adequate ventilation of any enclosed trailer to pr...

Страница 9: ...hands feet hair jewelry or clothing away from rotating parts 1 4 1 Give complete undivided attention to the job at hand 1 4 2 Mow only in daylight or good artificial light keeping away from holes and hidden hazards Do Not operate the mower when children or others are in the area 1 4 3 When feasible avoid operating the equipment in wet grass 1 4 4 Use EXTREME caution when mowing and or turning on s...

Страница 10: ...devices in place and in proper working condition 1 4 8 Do Not change the engine governor settings or over speed the engine Operating an engine at excessive speed may increase the hazard of personal injury 1 4 9 Place speed control levers in neutral lock position disengage PTO and engage park brake before starting engine 1 4 10 Start the engine carefully with feet well away from blades 1 4 11 Keep ...

Страница 11: ...0 days without use 1 5 3 Allowing batteries to stand for an extended period of time without recharging them will result in reduced performance and service life To preserve optimum battery performance and life recharge batteries in storage when the open circuit voltage drops to 12 4 volts Note To prevent damage due to freezing battery should be fully charged before putting away for winter storage 1...

Страница 12: ...Use only Exmark riding attachments The use of other than Exmark riding attachments may create a hazardous condition resulting in injury 1 7 SAFETY SIGNS 1 7 1 Keep all safety signs legible Remove all grease dirt and debris from safety signs and instructional labels 1 7 2 Safety signs must be replaced if they are missing or illegible 1 7 3 When new components are installed be sure that current safe...

Страница 13: ...ffler and On Center Belt Cover 36 Decks PART NO 1 413206 LOCATION Top of Cutter Deck Under Center Belt Shield 48 52 Decks PART NO 1 413327 LOCATION Top Center of Cutter Deck Under Center Belt Shield PART NO 1 523522 LOCATION On Top of Hydraulic Tank PART NO 1 413421 LOCATION Left Rear on Top of Engine Deck PART NO 1 413214 LOCATION Right Side of Hydro Control Crank Arm 17 HP Kawasaki Electric Star...

Страница 14: ...e Deck PART NO 103 1798 LOCATION RH Side Console PART NO 103 1077 LOCATION On Top LH Side of Mower Deck 17 HP Kawasaki Electric Start PART NO 103 1976 LOCATION Console PART NO 103 2103 LOCATION Park Brake Lever PART NO 98 5954 LOCATION Under Mower Deck Belt Shield s ...

Страница 15: ... 10 15 17 HP Kawasaki Manual Start PART NO 103 1977 LOCATION Console PART NO 103 2242 LOCATION LH Side of Console PART NO 103 2243 LOCATION RH Side of Console ...

Страница 16: ...ngine to stop if speed control lever is not in neutral and or PTO is engaged 2 6 STEERING CONTROL Fingertip drive control levers provide independent speed control braking and neutral to each drive wheel for moving forward or reverse stopping and power turning 2 7 TRANSMISSION Twin Hydrostatic Drive 2 7 1 Two Hydro Gear BDP 10A series variable displacement high efficiency pumps independently couple...

Страница 17: ...3 0 Transport only 91 7 cm 122 2 cm 134 62 cm 2 11 2 Overall Length 36 48 52 77 7 73 7 75 9 196 cm 185 cm 191 cm 2 11 3 Curb Weight 36 48 52 565 lbs 610 lbs 644 lbs 211 kg 277kg 292 kg Weights will vary slightly depending on engine and electric start options 2 11 4 Overall Height 44 1 112 cm all models 2 11 5 Tread Width to outside of tires 36 Model 35 0 88 9 cm 48 Model 39 4 100 1 cm 52 Model 39 ...

Страница 18: ... battery has an output of 16 volts and 7 amps or less to avoid damaging the battery see chart below for recommended charger settings Voltage Reading Percent Charge Maximum Charger Settings Charging Interval 12 6 or greater 100 16 volts 7 amps No Charging Required 12 4 12 6 75 100 16 volts 7 amps 30 Minutes 12 2 12 4 50 75 16 volts 7 amps 1 Hour 12 0 12 2 25 50 14 4 volts 4 amps 2 Hours 11 7 12 0 0...

Страница 19: ...e fuel tank Do not over tighten Place a 5 16 SAE flat washer then a spring over each of the studs and fasten with a 5 16 nyloc nut Tighten 5 16 nyloc nut fully then back off a 1 2 turn This is to allow for normal fuel tank expansion and contraction with changes in temperature and fuel levels Do not over tighten 3 7 Attach the fuel tank hose to the tank fitting and secure with the clamp provided 3 ...

Страница 20: ...ed control lever from the right hand side and fasten with a hairpin from the bolt bag 3 12 Connect the lower end of the speed control linkage to the speed control crank located at the top rear of the fuel tank support Secure with clevis pin and hairpin from the bolt bag 3 13 Install drive lever linkages Refer to figure 4 Position speed control lever in neutral Position drive levers in neutral and ...

Страница 21: ...the key switch Fasten the harness to the left hand side of the handle using two large ties from the bolt bag On ECS models fasten the leads connecting to the OPC switch to the small hole in the channel under the console using a small tie from the bolt bag 3 15 If machine is shipped without muffler installed install muffler with hardware provided 3 16 SERVICE ENGINE Refer to Engine Owner s Manual 3...

Страница 22: ...ard speed and is infinitely variable from neutral 0 mph to 6 2 mph Park brake must be disengaged before speed control lever is moved out of neutral or engine will kill 4 1 4 Drive Levers Located on each side of the upper handle assembly directly below the handle grips See Figure 5 These levers individually control the speed and direction of each drive wheel When the speed control lever is moved ou...

Страница 23: ...on Rotate clockwise to the next position to engage the starter key must be held against spring pressure in this position When engine starts release key Operator must have speed control lever in neutral OPC levers depressed and blade engagement lever fully disengaged to start engine 4 1 11 Park Brake Lever Located on the right side of the unit above the hydraulic tank The brake lever engages the pa...

Страница 24: ...ns their functions and their safety requirements 4 3 OPERATING INSTRUCTIONS 4 3 1 Read the Engine Owner s Manual carefully for detailed operating instructions regarding the engine Before attempting to operate the unit refer to Section 1 Safety and follow all safety operating and preparation guidelines as stated in that section 4 3 2 Starting Engine Operator must have OPC lever depressed PTO diseng...

Страница 25: ...peration To lock the drive levers in neutral lock squeeze the drive levers back to the neutral position See Figure 6 a Do Not squeeze the drive levers all the way back as this will cause the drive wheels to go into full reverse direction Place thumbs on the inner thumb lobe of the neutral lock latches and rotate them to the neutral lock position See Figure 6 b Release drive levers CAUTION POTENTIA...

Страница 26: ...the left hand drive lever to turn left To make a zero turn squeeze either the left hand or the right hand drive lever back into the reverse position while the opposite drive lever is in a forward position at an equal but opposite speed For Reverse Squeeze both drive levers into the reverse position For smooth operation of this machine avoid quick jerky movements of the drive levers Move the drive ...

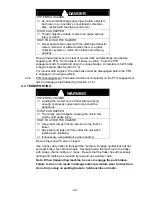
Страница 27: ...k completely on the PTO engagement arm to disengage the blades See Section 4 1 6 4 4 TRANSPORTING WARNING POTENTIAL HAZARD Loading the mower onto a trailer without strong enough or properly supported ramps could be dangerous WHAT CAN HAPPEN The ramps could collapse causing the unit to fall which could cause injury HOW TO AVOID THE HAZARD Use proper ramps that are secured to the truck or trailer Ke...

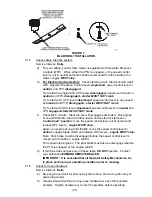
Страница 28: ...Check engine oil level Service Interval See Engine Owner s Manual a Make sure mower is on a level surface Stop engine and wait for all moving parts to stop b Check with engine cool c Clean area around dipstick Remove dipstick and wipe oil off Reinsert the dipstick DO NOT screw into place Remove dipstick and check oil level d If the oil level is low add oil as specified in the Engine Owner s Manual...

Страница 29: ...replace as required f If blade removal is necessary be careful for the sharp cutting edges of the blades g Re install the blades if they were removed and torque blade bolts to 115 120 ft lbs 156 163 N m Be sure the spring disc washer cone is installed toward the bolt head See Figure 7 CAUTION POTENTIAL HAZARD Operating a mower deck with loose or weakened blade bolts can be dangerous WHAT CAN HAPPE...

Страница 30: ...area Disengage park brake Run engine at one third throttle then with drive levers and neutral lock latches in neutral lock position move the speed control lever out of neutral and release OPC levers engine MUST stop Again run engine at one third throttle move the speed control lever to neutral engage blade clutch and release OPC levers engine MUST stop Note Park brake must be disengaged before the...

Страница 31: ...gine and check for leaks Stop engine and recheck oil levels 5 1 8 Check hydraulic oil level Service Interval 40 hr a Stop engine and wait for all moving parts to stop b Clean area around hydraulic reservoir cap and remove cap Oil level should be to the top of the baffle inside the tank If not add oil Use only Mobil 1 15W 50 synthetic motor oil Replace hydraulic reservoir cap and tighten until snug...

Страница 32: ...minates into the system 5 1 10 Hydraulic system air purge procedure Air must be purged from the hydraulic system when any hydraulic components including the oil filter are removed or any of the hydraulic lines are disconnected The critical area for purging air from the hydraulic system is between the oil reservoir and each charge pump located on the top of each variable displacement pump See Figur...

Страница 33: ...Service Interval Pneumatic air filled Drive Tires 40 hrs Semi pneumatic Caster Tires No maintenance a Stop engine and wait for all moving parts to stop Remove ignition key or spark plug wire s Check air pressure in drive tires recommended tire pressure is 12 16 psi 83 110 kPa b Inflate tires to pressures stated above Measure the circumference of each drive tire Adjust tire pressures within the abo...

Страница 34: ... 12 2 2 2 8 hours 2 Caster Pivots 2 2 2 2 8 hours 3 PTO Engagement Bellcrank 1 1 1 1 40 hours 4 Idler Pivot Pump Drive 2 1 1 1 40 hours 5 Clutch Arm Pivot 1 1 1 1 40 hours 6 Mower Deck Idler Pivots 2 1 1 1 40 hours 7 Pump Control Bearings 2 2 2 2 40 hours No 4 Idler Pivot Located Under Engine Deck No 5 Clutch Arm Pivot Located Under Engine Deck No 4 6 Idler Arm Pivots Disassemble and grease once a...

Страница 35: ...e used on the following fasteners a Pump drive sheave setscrews b Square head setscrews on Hydro pump control arms c OPC lever setscrews d Sheave retaining bolt in end of engine crankshaft e Lower Sheave retaining bolt on clutch arm f Shoulder bolts in ends of speed control crank g Fuel tank bulkhead fitting threads Adhesives such as Loctite RC 609 or RC 680 or Fel Pro Pro Lock Retaining I or Reta...

Страница 36: ...lts 7 amps No Charging Required 12 4 12 6 75 100 16 volts 7 amps 30 Minutes 12 2 12 4 50 75 16 volts 7 amps 1 Hour 12 0 12 2 25 50 14 4 volts 4 amps 2 Hours 11 7 12 0 0 25 14 4 volts 4 amps 3 Hours 11 7 or less 0 14 4 volts 2 amps 6 Hours or More 5 2 ADJUSTMENTS 5 2 1 Cutting height and anti scalp roller adjustment WARNING POTENTIAL HAZARD When the two front support rod hairpins are removed from t...

Страница 37: ... minimize gouging and roller wear or damage For Maximum Deck Flotation place rollers one hole position lower Rollers should maintain 1 4 in 64 cm minimum clearance to ground Do Not adjust rollers to support the deck Be sure spring disc washer is installed with the cone towards the nut Tighten nuts properly d When operating in extremely rough conditions it may be necessary to position the anti scal...

Страница 38: ...gine to Mower Deck Belt No adjustment necessary 5 2 5 Pump Drive Belt Tension Adjustment No adjustment necessary 5 2 6 Hydro Drive Linkage Adjustment a Adjust Speed Control Linkage and Neutral Safety Switch 1 Stop engine and wait for all moving parts to stop 2 Move the speed control lever located on the console to the full forward position and check the orientation of the tabs on the ends of the s...

Страница 39: ...ately 1 4 turn counter clockwise if the wheel is turning forward Release the drive lever to the forward drive position and squeeze back into the neutral position Check to see if the wheel stops If not repeat the above adjustment procedure 6 Make this adjustment on both sides 7 After adjustments are made and the wheels stop when the drive levers are in the neutral position tighten the nuts against ...

Страница 40: ...spring that keeps tension on the knob should normally not need adjustment However if adjustment is needed adjust to where length of spring is about 1 25 4 mm between the washers Adjust spring length by turning nut at front of spring d Drive Lever Linkage Adjustment 1 With rear of machine still on jack stands and engine running at full throttle disengage the park brake and move the speed control le...

Страница 41: ...or a heavier drive setting relocate the spring anchor link to either the medium or heavy duty positions as shown in Figure 16 The spring anchor links are attached to the upper rear corner of the hydro drive shields on the left and right hand sides of the machine Note In the medium or heavy duty positions the drive lever forces at the upper handle will also be increased FIGURE 16 HYDRO PUMP SPRING ...

Страница 42: ...r needs to be adjusted to Turn the knob in 1 4 turn increments until the mower tracks correctly 7 2 MOWER CUTS UNEVENLY a Check the drive tire pressure and tire circumference See 5 1 11 A more uniform cutting height may be obtained with higher tire pressure on rough terrain A lower tire pressure provides more flotation b Check deck support pins Hairpin clips must be in the same hole position on ea...

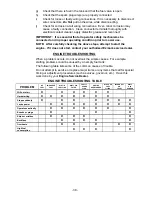
Страница 43: ... contact your authorized Exmark service dealer ENGINE TROUBLESHOOTING When a problem occurs do not overlook the simple causes For example starting problems could be caused by an empty fuel tank The following table lists some of the common causes of trouble Do not attempt to service or replace major items or any items that call for special timing or adjustment procedures such as valves governor etc...

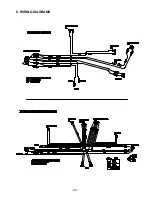
Страница 44: ... 39 8 WIRING DIAGRAMS ...

Страница 45: ... 40 9 HYDRAULIC DIAGRAM ...

Страница 46: ...purchase sales receipt to the Exmark Service Dealer If for any reason you are dissatisfied with the Service Dealer s analysis or with the assistance provided contact us at Exmark Customer Service Department The Exmark Warranty Company 2101 Ashland Avenue Beatrice NE 68310 402 223 6375 or service exmark com Owner s Responsibilities The Exmark turf equipment including any defective part must be retu...

Страница 47: ...L O P E T H IS IS A 1 0 S L O P E T H IS IS A 5 S LO P E ALIGN THIS EDGE WITH A VERTICAL SURFACE TREE BUILDING FENCE POST POLE ETC EXAMPLE COMPARE SLOPE WITH FOLDED EDGE FOLD ALONG APPROPRIATE LINE T H I S I S A 2 0 S L O P E ...

Страница 48: ... QDS GRASS CATCHER SELF STEERING SULKY MICRO MULCH ACCESSORY WARNING The engine exhaust from this product contains chemicals known to the State of California to cause cancer birth defects or other reproductive harm 1997 2003 PART NO 103 4871 EXMARK MFG CO INC 402 223 6300 INDUSTRIAL PARK BOX 808 FAX 402 223 5489 BEATRICE NE 68310 ALL RIGHTS RESERVED PRINTED IN U S A M F G CO IN C ...

Отзывы: