background image

Contents

Introduction ........................................................... 3
Safety ..................................................................... 5

Safety Alert Symbol ......................................... 5
Safe Operating Practices .................................. 5
Safety and Instructional Decals ......................11

Specifications ........................................................20

Systems ..........................................................20
Dimensions....................................................23
Torque Requirements .....................................24

Product Overview .................................................24
Operation ..............................................................25

Controls .........................................................25
Pre-Start.........................................................29
Operating Instructions ...................................29
Transporting ..................................................36

Maintenance ..........................................................39

Recommended Maintenance Schedule(s) ............39
Periodic Maintenance ........................................40

Check Engine Oil Level ..................................40
Check Battery Charge .....................................40
Check Mower Blades ......................................42
Check Safety Interlock System ........................44
Check Rollover Protections Systems (Roll

Bar) Knobs.................................................47

Check Seat Belt...............................................47
Check for Loose Hardware .............................47
Service Air Cleaner .........................................47
Check Deck Gearbox Oil................................47
Check Hydraulic Fluid Level ...........................48
Check Tire Pressures ......................................48
Check Condition Of Belts...............................48
Lubricate Grease Fittings................................49
Check Wheel Lug Nuts...................................49
Drain Fuel Filter/Water Separator...................50
Change Fuel Filter/Water Separator................51
Change Deck Gearbox Oil..............................52
Change Engine Oil and Filter..........................52
Change Hydraulic System Filter and

Fluid ..........................................................52

Check Engine Coolant Level...........................54
Change Engine Coolant..................................54
Thread Locking Adhesives..............................55
Mobil HTS Grease (Or Food-Grade

Anti-seize)..................................................55

Copper-Based Anti-seize ...............................55
Dielectric Grease............................................56

Adjustments ......................................................56

Deck Leveling–60 and 72 Inch Models ............56
Deck Leveling–96 Inch Models.......................58

Deck Belt Tension ..........................................61
Parking Brake Adjustment ..............................61
Motion Control Linkage Adjustment ..............62
Motion Control Damper Adjustment..............63
Caster Pivot Bearings Pre-Load

Adjustment ................................................63

Cleaning ............................................................64

Clean Engine and Exhaust System

Area ...........................................................64

Clean the Radiator ..........................................64
Clean Debris From Machine ...........................65
Clean Grass Build-Up Under Deck .................65
Inspect Engine Valve Clearance ......................65
Waste Disposal ...............................................65

Troubleshooting ....................................................66
Schematics ............................................................68

4


Содержание Lazer Z Series

Страница 1: ...LAZER Z DIESEL For Serial Nos 402 082 300 Higher Part No 4503 837 Rev B ...

Страница 2: ... or the engine is constructed equipped and maintained for the prevention of fire To acquire a spark arrester for your unit see your Engine Service Dealer For all models that do not have Exmark engines please refer to the engine manufacturer s information included with the machine For models with Exmark engines refer to this manual for information The gross or net horsepower or torque of this engin...

Страница 3: ... materials and Operator s manuals If additional information is needed or should you require trained mechanic service contact your authorized Exmark equipment dealer or distributor All Exmark equipment dealers and distributors are kept informed of the latest methods of servicing and are equipped to provide prompt and efficient service in the field or at their service stations They carry ample stock...

Страница 4: ...lts 48 Lubricate Grease Fittings 49 Check Wheel Lug Nuts 49 Drain Fuel Filter Water Separator 50 Change Fuel Filter Water Separator 51 Change Deck Gearbox Oil 52 Change Engine Oil and Filter 52 Change Hydraulic System Filter and Fluid 52 Check Engine Coolant Level 54 Change Engine Coolant 54 Thread Locking Adhesives 55 Mobil HTS Grease Or Food Grade Anti seize 55 Copper Based Anti seize 55 Dielect...

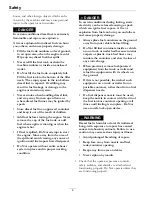
Страница 5: ...mechanic s can not read this manual it is the owner s responsibility to explain this material to them other languages may be available on our website Become familiar with the safe operation of the equipment operator controls and safety signs All operators and mechanics should be trained The owner is responsible for training the users Never let children or untrained people operate or service the eq...

Страница 6: ... exhaust system in place and in proper working condition DANGER In certain conditions during fueling static electricity can be released causing a spark which can ignite fuel vapors A fire or explosion from fuel can burn you and others and cause property damage Always place fuel containers on the ground away from your vehicle before filling Do Not fill fuel containers inside a vehicle or on a truck...

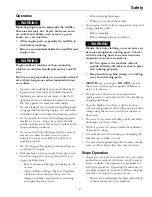
Страница 7: ...mal vibration occurs inspect the mower for damage and make repairs before restarting and operating the mower Before clearing blockages Whenever you leave the mower Stop engine wait for all moving parts to stop and engage parking brake Before refueling Before dumping the grass catcher WARNING Hands feet hair clothing or accessories can become entangled in rotating parts Contact with the rotating pa...

Страница 8: ...ating the machine on wet grass across slopes or downhill may cause the machine to lose traction Loss of traction to the drive wheels may result in sliding and a loss of braking and steering The machine can slide even if the drive wheels are stopped Remove or mark obstacles such as ditches holes ruts bumps rocks or other hidden hazards Tall grass can hide obstacles Uneven terrain could overturn the...

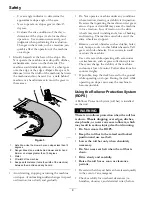
Страница 9: ...raighten or weld them Keep hands and feet away from moving parts If possible Do Not make adjustments with the engine running Charge batteries in an open well ventilated area away from spark and flames Unplug charger before connecting or disconnecting from battery Wear protective clothing and use insulated tools DANGER Charging or jump starting the battery may produce explosive gases Battery gases ...

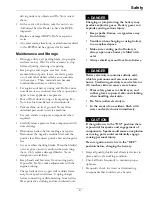
Страница 10: ...hands to find hydraulic leaks Safely relieve all pressure in the hydraulic system by placing the motion control levers in neutral and shutting off the engine before performing any work on the hydraulic system WARNING Fuel system components are under high pressure The use of improper components can result in system failure fuel leakage and possible explosion Use only approved fuel lines and fuel fi...

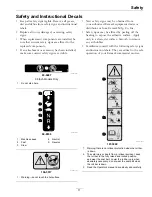
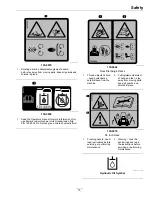
Страница 11: ...surface Apply only to a clean dry surface Smooth to remove any air bubbles Familiarize yourself with the following safety signs and instruction labels They are critical to the safe operation of your Exmark commercial mower decal93 6687 93 6687 96 Inch Models Only 1 Do not step here decal99 8936 99 8936 1 Machine speed 4 Neutral 2 Fast 5 Reverse 3 Slow decal106 5517 106 5517 1 Warning do not touch ...

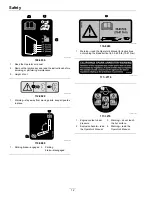
Страница 12: ...eep all guards in place decal116 5988 116 5988 1 Parking brake engaged 2 Parking brake disengaged decal116 8283 116 8283 1 Warning read the Operator s Manual for instructions on torquing the blade bolt nut to 55 60 ft lb 75 81 N m decal117 2718 117 2718 decal117 3276 117 3276 1 Engine coolant under pressure 3 Warning do not touch the hot surface 2 Explosion hazard read the Operator s Manual 4 Warn...

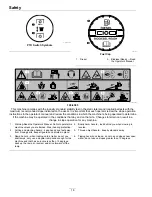
Страница 13: ...ce 2 Thrown objects hazard mower do not operate without the deflector discharge cover or grass collection system in place decal126 8597 126 8597 96 Inch Deck 1 Height of cut 2 Range adjustment decal126 8760 126 8760 96 Inch Deck 1 Height of cut 2 Range adjustment decal126 9100 126 9100 3TNV80FT Models 1 Chassis 15A 4 Power port 15A 2 Accessory 15A 5 Main relay 3 Main 10A decal126 9127 126 9127 96 ...

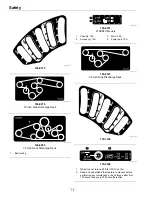
Страница 14: ... 9351 3TNV88C Models 1 Chassis 15A 3 Main 25A 2 Accessory 15A 4 Power port 15A decal126 9573 126 9573 60 Inch Side Discharge Deck decal135 1432 135 1432 decal135 0328 135 0328 1 Wheel lug nut torque 95 ft lb 129 N m 5x 2 Read and understand the Operator s manual before performing any maintenance check torque after first 100 hours then every 500 hours thereafter 14 ...

Страница 15: ...colored hydraulic fluid decal135 0664 135 0664 Rear Discharge Decks 1 Thrown objects hazard keep bystanders a safe distance from the machine 2 Cutting dismemberment of hand and feet stay away from moving parts keep all guards and shields in place decal135 0670 135 0670 96 Inch Deck 1 Crushing hazard hand read instructions before servicing or performing maintenance 2 Warning Lock the deck wings and...

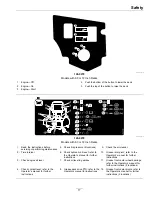
Страница 16: ... that site Changes to terrain can result in a change in slope operation for any machine 1 Warning Read the Operator s Manual Do Not operate this machine unless you are trained Wear hearing protection 4 Bodily harm hazard look behind you when mowing in reverse 2 Cutting and pinching hazard keep hands and feet away from moving parts keep all guards and shields in place 5 Thrown object hazard keep by...

Страница 17: ...me interval 6 Check hydraulic oil level refer to the Operator s manual for further instructions 10 Grease idler pivot refer to the Operator s manual for further instructions 3 Check engine oil level 7 Check oil level in gearbox 11 Grease front caster wheel bearings refer to the Operator s manual for further instructions 2 locations 4 Check coolant level refer to the Operator s manual for further i...

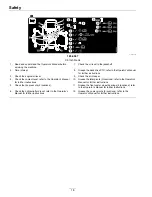
Страница 18: ...Check the coolant level refer to the Operator s Manual for further instructions 10 Grease the idler pivots 3 locations refer to the Operator s Manual for further instructions 5 Check the tire pressure 2 locations 11 Grease the front caster wheel bearings 4 locations refer to the Operator s Manual for further instructions 6 Check the hydraulic fluid level refer to the Operator s Manual for further ...

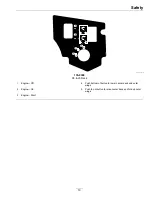
Страница 19: ...y decal135 0398 135 0398 96 Inch Deck 1 Engine Off 4 Push bottom of button to lower center deck and outer wings 2 Engine On 5 Push top of button to raise center deck and fold up outer wings 3 Engine Start 19 ...

Страница 20: ...re fuel freshness Petroleum Diesel Cetane rating 45 or higher Sulfur content Ultra low sulfur 15 ppm Diesel Fuel Specification ASTM D975 No 1 D S15 No 2 D S15 Use summer grade diesel fuel No 2 D at temperatures above 7 C 20 F and winter grade fuel No 1 D or No 1 D 2 D blend below that temperature Note Use of winter grade fuel at lower temperatures provides lower flash point and cold flow character...

Страница 21: ...t ethylene glycol antifreeze The use of Havoline Xtended Life coolant is recommended Coolant Capacity 7 quarts 6 6 L Operator Controls Steering and Motion Control Note Motion control levers are adjustable to two heights Separate levers on each side of the console control speed and direction of travel of the respective drive wheels Steering is controlled by varying the position of the levers relati...

Страница 22: ...mission to gearbox on deck using driveshaft Blades Driven By Side Discharge One B Section belt w self tensioning idler from gearbox shaft on deck to blade spindles 72 Inch Rear Discharge One BB Section belt w self tensioning idler from gearbox shaft on deck to blade spindles 96 Inch Deck One B Section or 5V belt on center deck One A Section belt on each wing Deck Side Discharge Full floating deck ...

Страница 23: ...arge Units 60 and 72 inch Decks 96 inch Deck Roll Bar Up or down 100 6 inches 255 5 cm 97 3 inches 247 1 cm Overall Height All Units Roll Bar Up Roll Bar Down 71 8 inches 182 4 cm 51 0 inches 129 5 cm Tread Width Center to Center of Tires Widthwise Drive Wheels 60 and 72 inch Decks 96 inch Deck 44 1 inches 112 cm 46 1 inches 117 cm Caster Wheels Discharge 60 inch Deck 72 inch Decks 96 inch Decks S...

Страница 24: ...Discharge Units Only See Figure 20 50 55 ft lb 68 75 N m Anti Scalp Roller Nyloc Nut Rear Discharge Units Only See Figure 21 30 35 ft lb 41 47 N m Engine Mount Bracket Bolts 30 36 ft lb 41 49 N m Wheel Lug Nuts 85 105 ft lb 115 142 N m Wheel Motor Mounting Bolts 72 77 ft lb 98 104 N m Rollover Protection System Roll Bar Mounting Bolts 100 110 ft lb 136 149 N m Front Frame to Rear Frame 238 292 ft ...

Страница 25: ... normal operating position Controls Motion Control Levers The motion control levers located on each side of the console control the forward and reverse motion of the machine Moving the levers forward or backward turns the wheel on the same side forward or reverse respectively Wheel speed is proportional to the amount the lever is moved Moving the levers outward from the center position into the T ...

Страница 26: ...uipped Logic Display Unit LDU 3 Ignition switch 2 Deck lift switch also folds wings on 96 inch deck 4 PTO engagement switch The RED Equipped Logic Display Unit LDU monitors and displays machine system information g216581 Figure 8 LDU Logic Display Unit 1 Information screen 3 Push buttons 2 LED status light Refer to the RED Equipped User s Guide Diesel Models for detailed information explaining the...

Страница 27: ...will turn red Continuous sound indicates critical errors Chirping sound indicates less critical errors such as required maintenance or service intervals Refer to the RED Equipped User s Guide Diesel Models for more information Brake Lever Located on right side of unit just to the front of the RH motion control lever The brake lever engages a parking brake on the drive wheels Note The LCD indicator...

Страница 28: ...ccessing the drive wheel release valves Located on each side of the hydrostatic pump Drive wheel release valves are used to release the hydrostatic drive system to allow the machine to be pushed without the engine running Rotate each bypass valve counterclockwise one turn to release rotate clockwise to reset system Do Not overtighten Do Not tow machine g004644 Figure 9 1 Right bypass valve 2 Left ...

Страница 29: ...only when absolutely necessary 1 The knob must be completely latched with the tabs interlocking as shown in Figure 10 to lock the roll bar in the raised operate position 2 Apply forward pressure to the upper hoop of the roll bar 3 Pull the knob and rotate 90 to hold in the unlatched position to lower the roll bar 4 To return to the operate position raise the roll bar and then rotate knobs 90 so th...

Страница 30: ...riod between starting attempts Failure to follow these guidelines can burn out the starter motor Lower the Outer Deck Wings 96 Inch Deck Only Important The outer deck wings need to be lowered into the mowing position before the PTO will engage 1 Remove the clevis pin and hairpin that secures each wing in the up position Place them in the storage position shown in Figure 12 g212197 Figure 12 Right ...

Страница 31: ...the blades Note The clutch saver feature allows the PTO to be engaged at any speed Disengaging the PTO Push the PTO switch in to disengage the blades Raising and Locking the Outer Wing Decks 96 Inch Deck Only 1 Be sure that all persons are clear of the deck wings Press and hold the top of the deck control switch the center deck will raise first and then the wings 2 Stop engine wait for all moving ...

Страница 32: ...hen the motion control levers are positioned fully outward apart in the T slot the drive system is in the neutral lock position Figure 14 Note The N LCD indicator appears when both levers are in the neutral lock position When the motion control levers are moved directly inward together the drive system is in the neutral operate position g008593 Figure 14 1 Neutral lock position handles out 4 Forwa...

Страница 33: ... the mower deck is adjusted from 1 to 5 1 2 inches 2 54 cm to 14 cm in 1 4 inch 6 4 mm increments 1 Stop the machine and move the motion control levers outward to the neutral locked position 2 Disengage the PTO Note When changing the cutting height positions always come to a complete stop and disengage the PTO 3 Press the top of deck lift switch on the panel control to raise the deck Push the bott...

Страница 34: ... mounting hardware from the gauge wheel B Adjust the front and rear gauge wheels to the appropriate hole location see the chart below and Figure 18 and reinstall the mounting hardware Hole Location Height of Cut Range Top hole 1 on decal 1 3 5 inches 25 89 mm Middle hole 0 on decal 2 4 5 inches 51 114 mm Bottom hole 1 on decal 3 5 5 inches 76 140 mm g212253 Figure 18 Height of Cut Range 1 Top hole...

Страница 35: ...mounting hardware Side Discharge Models A Be sure the roller bolts are installed with the spring disc washer between the head of the bolt and the mounting bracket see Figure 20 B Torque the 3 8 nyloc nut to 50 55 ft lb 68 75 N m g023992 Figure 20 1 3 8 16 X 3 3 4 Grade 8 bolt 3 Front right anti scalp bracket shown 2 Spring disc washer cone towards bolt head 4 3 8 nyloc torque to 50 55 ft lb 68 75 ...

Страница 36: ... Bolt 3 Nut 2 Bumper 7 Move each bumper to the desired position and secure them with the bolts and nuts Note Only use the top or center sets of holes to adjust the bumpers The bottom holes are used when switching sides at which time they become the top holes on the other side of the mower Transporting Transporting the Machine Use a heavy duty trailer or truck to transport the machine Ensure that t...

Страница 37: ... Use extreme caution when loading or unloading machines onto a trailer or a truck Use a full width ramp that is wider than the machine for this procedure Back up ramps and drive forward down ramps Figure 26 g028043 Figure 26 1 Back up ramps 2 Drive forward down ramps Important Do not use narrow individual ramps for each side of the machine Ensure the ramp is long enough so that the angle with the ...

Страница 38: ...etween the ramp and the trailer or truck Ensure the length of ramp is at least four times 4X as long as the height of the trailer or truck bed to the ground This will ensure that ramp angle does not exceed 15 degrees on flat ground Back up ramps and drive forward down ramps Avoid sudden acceleration or deceleration while driving the machine on a ramp as this could cause a loss of control or a tip ...

Страница 39: ...knobs Check the seat belt Check for loose hardware Check hydraulic reservoir level Check engine coolant level Clean the engine and exhaust system area Clean the grass and debris build up from the machine and cutting deck Clean the grass build up from under the cutting deck Every 50 hours Check the deck gearbox oil Check the tire pressures Check the condition of the belts Grease drive U joints and ...

Страница 40: ...ing and viscosity Do Not overfill Important Do Not operate the engine with the oil level below the LOW or ADD mark on the dipstick or over the FULL mark Check Battery Charge Service Interval Monthly WARNING CALIFORNIA Proposition 65 Warning Battery posts terminals and related accessories contain lead and lead compounds chemicals known to the State of California to cause cancer and reproductive har...

Страница 41: ...e conditions exist 2 Make sure the booster is a good and fully charged lead acid battery at 12 6 volts or greater Use properly sized jumper cables 4 to 6 AWG with short lengths to reduce voltage drop between systems Make sure the cables are color coded or labeled for the correct polarity CAUTION Connecting the jumper cables incorrectly wrong polarity can immediately damage the electrical system Be...

Страница 42: ...ised position as stated in the Clean Grass Build Up Under Deck procedure 3 Inspect blades and sharpen or replace as required 4 Reinstall the blades if they were removed in the following order A Install bushing through blade with bushing flange on bottom grass side of blade g006780 Figure 29 1 Install bushing in blade prior to installing bushing in spindle B Install bushing blade assembly into spin...

Страница 43: ...blade can be dangerous Failure to use all original components and assembled as shown could allow a blade or blade component to be thrown out from under the deck resulting in serious personal injury or death Always install the original Exmark blades blade bushings and blade bolts as shown 43 ...

Страница 44: ...hutdown Check the Normal Engine Starting Chart System Parking Brake PTO Motion Control Levers Operator Outcome Engaged Disengaged Blades Both levers out neutral lock In seat or out of the seat Starter should crank Engaged Up position but blades disengaged Both levers out neutral lock In seat or out of seat Starter should crank State of System Note The starter will crank with the PTO switch in the ...

Страница 45: ...tarter must not crank Disengaged Disengaged Both levers out neutral lock Operator in seat Starter must not crank State of System Check Shutdown Circuit Chart Note The state of system item s that is bold is being checked in each scenario System Engine Parking Brake PTO Blades Motion Control Levers Operator Outcome Running idle 1 3 throttle or efficient mode Disengaged Disengaged Both levers moved o...

Страница 46: ...aged Disengaged Both levers moved in or either right or left lever moved in Operator in seat Engine must begin shutdown within 1 second Running idle 1 3 throttle or efficient mode Engaged Engaged Both levers moved out neutral lock Raise off of seat but don t get off PTO must begin shutdown within 1 second engine stays running Running idle 1 3 throttle or efficient mode Disengaged Engaged and Deck ...

Страница 47: ... additional information 1 Stop engine wait for all moving parts to stop and remove key Engage parking brake 2 Unhook two air filter canister latches to gain access to the air cleaner element 3 Remove air cleaner canister cover and remove outer element 4 Check the condition of the paper element Replace if dirty bent or damaged 5 Check the condition of the inner element Replace whenever it appears d...

Страница 48: ...6 Figure 33 1 Full 2 Add If fluid is needed add enough oil to put the level in between the two marks on the dipstick Important Do Not overfill 8 Replace the dipstick and fill cap finger tighten only 9 Check all hoses and fittings for leaks Check Tire Pressures Service Interval Every 50 hours 1 Stop engine wait for all moving parts to stop and remove key Engage parking brake 2 Check tire pressure i...

Страница 49: ...s 0 2 Every 400 hrs or Yearly 96 inch Model Lubrication Chart Fitting Locations Initial Pumps Number of Places Service Interval 1 Deck drive PTO 1 3 50 hrs 2 Deck idler pivot 1 3 Every 400 hrs or Yearly 3 Caster wheel bearings 0 4 Yearly 4 Caster pivots 0 5 Every 400 hrs or Yearly See step 3 for special lubrication instructions on the front caster pivots and the Lubricate Caster Wheel Hubs section...

Страница 50: ...he axle Leave approximately 1 8 inch 3 mm from the outer surface of the spacer nut to the end of the axle inside the nut 9 Insert the assembled nut and axle into the wheel on the side of the wheel with the new seal and bearing 10 With the open end of the wheel facing up fill the area inside the wheel around the axle full of NLGI grade 1 multi purpose grease 11 Insert the second bearing and new sea...

Страница 51: ...rvice Interval Every 400 hours Yearly whichever comes first more often in dirty or dusty conditions DANGER Use of improper components can result in system failure fuel leakage and possible explosion Ensure that an Authorized Service Dealer replace the fuel filter and any components for the fuel system Use only approved fuel lines hose clamps and fuel filters for high pressure systems g031412 Figur...

Страница 52: ...e the engine oil and filter if not using Exmark Premium Engine Oil but any oil meeting API CJ 4 or higher or as stated in the Specifications Section Yearly if operated less than 200 hours 1 Stop engine wait for all moving parts to stop and remove key Engage parking brake 2 Drain oil while engine is warm from operation 3 Place pan under machine to catch oil Remove the oil drain plug Allow oil to dr...

Страница 53: ...emove and allow fluid to drain from reservoir Important Before reinstalling new filter apply a thin coat of Exmark Ruby Transmission Fluid on the surface of the rubber seal Install a new filter and turn the filter clockwise until the rubber seal contacts the filter adapter then tighten the filter an additional 2 3 to 3 4 turn 5 Reinstall all four plugs The wheel motor drain plugs are magnetic wipe...

Страница 54: ...y not register correctly during operation and or the warning buzzer may not sound if the engine overheats 1 Position the mower on a flat surface 2 Stop engine and wait for all moving parts to stop 3 Check with engine cold 4 Open the hood and check the coolant level in the expansion tank on the right side of the machine The coolant level should be between the marks on the overflow bottle g022120 Fi...

Страница 55: ...nt contains open belt drives fans and other rotating components that can cause injury Fingers hands loose clothing or jewelry can get caught by the rotating fan and drive shaft Do Not operate machine without the covers in place Keep fingers hands and clothing clear of rotating components Shut off engine wait for moving parts to stop engage parking brake and remove key before performing maintenance...

Страница 56: ...s The mechanical or hydraulic jacks may not be enough support or may malfunction allowing the unit to fall which could cause injury Do Not rely solely on mechanical or hydraulic jacks for support Use adequate jack stands or equivalent support Deck Leveling 60 and 72 Inch Models 1 Position the machine on a flat surface 2 Shut off the engine wait for all moving parts to stop remove the key and engag...

Страница 57: ...w clockwise to decrease turn counterclockwise Loosen the jam nuts on the top of each deck adjuster Fine tune the adjuster on the front deck lift assembly by turning it to get 3 inch 7 6 cm height see Figure 44 g231991 Figure 44 1 Adjuster link 3 Adjuster 2 Jam nut 10 Measure the back tip height Fine tune rear adjusters as required the single point adjustment can be utilized to gain more adjustment...

Страница 58: ...e available travel in their slots This will regain some up and down adjustment on each of the four deck links 16 Re tighten front and rear height of cut plate mounting bolts Important Torque the front and rear height of cut plate mounting bolts to 67 83 ft lb 91 113 N m 17 Repeat steps 8 through 12 Deck Leveling 96 Inch Models Leveling the Center and Wing Decks 1 Position the machine on a flat sur...

Страница 59: ...e key 12 Measure from the level surface to the front tip of the LH and RH center deck blades The measurement should read 4 inches 102 mm g239092 Figure 48 1 4 1 4 inches 108 mm 2 Back blade tip 3 Front blade tip 4 4 inches 102 mm 5 Level surface Adjusting the Center Deck 1 Adjust the height to increase turn the adjuster screw clockwise to decrease turn counterclockwise Loosen the jam nuts on the t...

Страница 60: ...ing bolts at least 1 3 the length of the available travel in their slots This will regain some up and down adjustment on each of the four deck links g232012 Figure 50 1 Single point height adjustment bolt 2 Front height of cut plate mounting bolt 3 Rear height of cut plate mounting bolt 7 Re tighten front and rear height of cut plate mounting bolts Important Torque the front and rear height of cut...

Страница 61: ...fter Check to make sure brake is adjusted properly This procedure must be followed after the first 100 hours or when a brake component has been removed or replaced CAUTION Raising the mower deck for service or maintenance relying solely on mechanical or hydraulic jacks could be dangerous The mechanical or hydraulic jacks may not be enough support or may malfunction allowing the unit to fall which ...

Страница 62: ...tment WARNING Engine must be running and drive wheels must be turning so motion control adjustment can be performed Contact with moving parts or hot surfaces may cause personal injury Keep fingers hands and clothing clear of rotating components and hot surfaces CAUTION Raising the mower deck for service or maintenance relying solely on mechanical or hydraulic jacks could be dangerous The mechanica...

Страница 63: ...o the lever allow the reverse indicator spring to bring the levers back to neutral The wheel must stop turning or slightly creep in reverse When adjustment is complete tighten lock nuts onto ball joints Repeat for LH motion control lever 8 Shut off unit Remove jumper wire from wire harness connector and plug connector into seat switch Motion Control Damper Adjustment The top damper mounting bolt c...

Страница 64: ...he exhaust system area 4 Wipe up any excessive grease or oil around the engine and exhaust area Important Do Not use water to clean engine Use low pressure compressed air See Engine Owner s Manual Clean the Radiator Service Interval Every 50 hours May be required more often in dry or dirty conditions 1 Stop engine wait for all rotating parts to stop and remove key Engage parking brake 2 Allow engi...

Страница 65: ...olely on mechanical or hydraulic jacks for support Use adequate jack stands or equivalent support 4 Clean out any grass build up from underside of deck and in discharge deflector Inspect Engine Valve Clearance Service Interval Every 800 hours Inspect the engine valve clearance Refer to the engine owner s manual Waste Disposal Motor Oil Disposal Engine oil and hydraulic oil are both pollutants to t...

Страница 66: ... Service Dealer 1 Fuel tank is empty 1 Fill the fuel tank 2 Oil level in the crankcase is low 2 Add oil to the crankcase 3 Dirt in fuel filter 3 Replace the fuel filter 4 Dirt water or stale fuel is in the fuel system 4 Contact an Authorized Service Dealer 5 Air cleaner is dirty 5 Clean or replace the air cleaner element 6 Seat switch is not functioning properly 6 Check the seat switch indicator R...

Страница 67: ...e blade mounting bolt 3 Engine mounting bolts are loose 3 Tighten the engine mounting bolts 4 Loose engine pulley idler pulley or blade pulley 4 Tighten the appropriate pulley 5 Engine pulley is damaged 5 Contact an Authorized Service Dealer 6 Blade spindle is bent 6 Contact an Authorized Service Dealer Abnormal vibration 7 Belt is damaged 7 Install new belt 1 Drive belt is worn loose or broken 1 ...

Страница 68: ...ED GREEN BLACK BLUE BLUE YELLOW BLUE YELLOW J1005 BLACK SP1012 GREENFUSE BLOCK 1 4 5 6 7 9 P1012 8 10 11 12 2 3 F05 15A ACC Y FUSE F06 15A CHASSIS FUSE F07 15A POWER PORT F08 10A MAIN MAIN K09 30 85 86 87 ENG07 ENGINE ECU ENG06 ENGINE SENSORS ENG05 GROUND L ENGINE ENGINE IG GLOW PLUGS B ALTERNATOR FUEL SOLENOID STARTER GROUND REAR FRAME GROUND FRAME FRONT P1020 1 K11 86 87 30 PREHEAT RELAY 85 P101...

Страница 69: ...VALVE AIR TEMP EGR GAS TEMP SENSOR DPF PRESSURE SENSOR DPF INLET TEMP DPF MIDDLE TEMP P9001 1 VB 2 GND 3 VB 4 GND 5 VB 6 GND 7 NO CONNECT 8 NO CONNECT 9 NO CONNECT 10 NO CONNECT 11 NO CONNECT 12 NO CONNECT 13 NO CONNECT 14 NO CONNECT 15 LOW OIL LAMP LOPSW 16 NO CONNECT 17 NO CONNECT 18 REGEN 19 NO CONNECT 20 1VPS 21 ANALOG GND A_GND 22 NO CONNECT 23 5VS 24 5VS 25 NO CONNECT 26 NO CONNECT 27 NO CON...

Страница 70: ...EEN WHITE GREEN WHITE SP07 GREEN GRAY GREEN GRAY RED WHITE RED WHITE RED WHITE SP01 SP02 SP03 SP04 SP05 SP06 CAP01 DUST CAP SW05 DOWN ON OFF ON UP ORANGE ORANGE GRAY RED BLACK BLACK BLACK BLACK BLACK BLACK RED GREEN RED WHITE BLACK BLACK RED GREEN BLUE BLACK BLUE BLACK ORANGE RED ORANGE RED RED GREEN SEN01 TRANS TEMP SENSOR P05 1 P05 2 S1 P09 2 P09 1 L04 S2 P08 2 P08 1 CLUTCH TRANSMISSION P17 A B ...

Страница 71: ...02 SP03 SP04 SP05 SP06 CAP01 DUST CAP SW05 DOWN ON OFF ON UP ORANGE ORANGE GRAY RED BLACK RED GREEN RED WHITE BLACK BLACK RED GREEN BLUE BLACK BLUE BLACK ORANGE RED ORANGE RED RED GREEN SEN01 TRANS TEMP SENSOR P05 1 P05 2 S1 P09 2 P09 1 L04 S2 P08 2 P08 1 CLUTCH TRANSMISSION P17 A B P1003 A B C P19 A B C SP1001 PX01 PROX SENSOR GND OUT 12V P1001 A B C PX02 PROX SENSOR GND OUT 12V P1002 A B C BLACK...

Страница 72: ...Charge Pump Gear Pump 3000 PSI Line Filter Beta 11 200 ISO 16889 43 PSI CHARGE RELIEF 86 15 PSI CHARGE PRESSURE TEST PORT PRESSURE VALVE 313 30 PSI OIL COOLER 1 0 691 1 1 1 1 025 1 1 025 PORT 2 0 031 in DECK CYLINDER 3 3 04 in DISP 75 X 6 9 in S1 S2 DECK LIFT MANIFOLD 040 047 P3 P2 C1 T YANMAR 3TNV88C 3000 1400 RPM YANMAR 3TNV80FT 2600 1400 RPM C1 CYLINDER P2 AUX PUMP P3 TEMPERATURE SENDER T OIL C...

Страница 73: ... 1 1 CID GEARBOX 1 1 CID PTO CLUTCH PTO PRESSURE TEST PORT 4000 PSI 0 031 in 17 8 CID TOW VALVE 0 37 CID 0 37 CID PORT 1 Suction Screen 100 Mesh Charge Pump Gear Pump 3000 PSI Line Filter Beta 11 200 ISO 16889 43 PSI CHARGE RELIEF 86 15 PSI CHARGE PRESSURE TEST PORT PRESSURE VALVE 313 30 PSI OIL COOLER 1 0 691 1 1 1 1 025 1 1 025 PORT 2 0 031 in YANMAR 3TNV88C 3000 1400 RPM IMPLEMENT RELIEF g23921...

Страница 74: ...74 ...
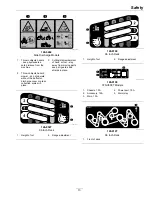
Страница 75: ...he slope indicator to determine the degree of slope of hills before operating Do Not operate this machine on a slope greater than 15 degrees Fold along the appropriate line to match the recommended slope 2 Align this edge with a vertical surface a tree building fence pole etc 3 Example of how to compare slope with folded edge 75 ...

Страница 76: ...STOM RIDE SEAT SUSPENSION SYSTEM DUAL TAIL WHEEL FLOOR PAN EXTENDER HITCH KIT LIGHT KIT MICRO MULCH SYSTEM ROLL OVER PROTECTION SYSTEM ROPS SNOW BLADE SNOWBLOWER SUN SHADE TRASH CONTAINER ULTRA VAC COLLECTION SYSTEM ULTRA VAC QUICK DISPOSAL SYSTEM WEATHER CAB Some accessories and options not available for some models Place Model No and Serial No Label Here Included in the Literature Pack or Fill i...

Отзывы: