background image

4-2 Diagnosis help

In this section, you will find all the information you need to carry out a few simple checks that you may be asked to run by your Evolis dealer 

to help you as effectively as possible.

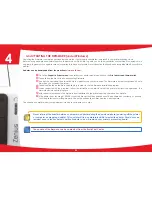
4-2a PRINTING A TECHNICAL TEST CARD

We recommend that you print a technical test card to ensure that your printer is working properly. This card shows various items of 

technical information concerning the machine (serial number, firmware, cleaning operations, print head, etc.). You may be asked for 

these by your dealer.

ä

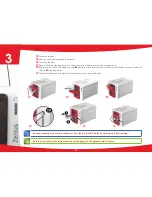
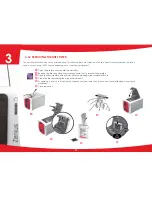
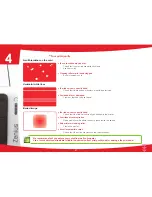
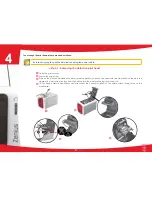
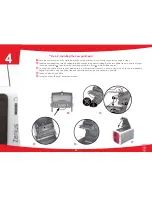
 Printing a technical test card

Ê

 Wait for any current print jobs to finish.

Ë

 Check that there is a ribbon and card in the printer.

Ì

 Press the pushbutton for four seconds. All the warning lights go out.

Í

 Press and hold down the pushbutton again.

Î

 The pushbutton light comes on.

Ï

 Release the pushbutton once the light flashes.

Ð

 The test card is printed in colour if a colour ribbon is fitted in the printer, or monochrome if the ribbon is monochrome.

Ñ

 The printed card is ejected into the output hopper.

Printing the technical test card can also be launched from the Evolis Print Center.

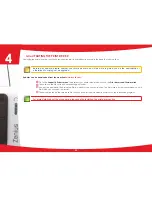
4-2b PRINTING A GRAPHIC TEST CARD

The graphic test card is used to check the print quality in colour or monochrome, the offsets and whether the ribbon is synchronised 

correctly.

To print the graphic test card, check first of all that a ribbon and a card are present in the printer.

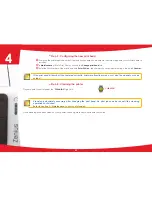
Go to Evolis Print Center, select System information and click on the Test cards tab. Then click the Graphic test card button. The card is 

printed and the printed card is ejected into the output hopper.

Printing the graphic test card can only be launched from the Evolis Print Center.

34

4

Содержание Zenius

Страница 1: ...USER GUIDE Evolis Card Printer 2011 All rights reserved December 2011 Ref KU20E Rev C0 ...

Страница 2: ...anty terms and conditions and limitations Environmental information Evolis is committed to helping the environment by reducing the energy consumption of its products Evolis printers have been certified ENERGY STAR due to their low power consumption Recycling of end of life products The manufacture of the equipment that you have purchased required the extraction and use of natural resources It may ...

Страница 3: ...e to read it in order to better understand your printer and its features and to save time during installation and use As with all Evolis products a great deal of care has been taken over this manual Should you find an error however please let us know by emailing us at info evolis com Contents The bookmarks found top left of your screen can be used to navigate between the various sections in this u...

Страница 4: ...the printer is returned without its original packaging and components are damaged in transit these components will no longer be covered by the warranty You will be charged for new packaging for shipping the printer back to you Accessories supplied with your printer n Power supply unit SWITCHBOX Type F10723 A n Mains power cable n USB cable n Installation documentation and software CD ROM n Starter...

Страница 5: ... C Output hopper D Control panel E USB connectors option F USB connector std G Ethernet connector option H Power cable socket I Kensington lock 1 2 Description of the printer and its functions 5 1 Pushbutton Cards and ribbon Cleaning Printer ...

Страница 6: ...erienced users The machine should always be disconnected from the power supply unplugged before carrying out any work on it Look at the getting started video described in the following section J Thermal print head K Cleaning roller L Card thickness adjustment gauge M Side panel opening mechanism N Dust filter O Serial number label 6 1 ...

Страница 7: ...er is not working properly Check the installation Before attempting any maintenance ensure that the power cable is always unplugged For your personal safety ensure that the cable and power supply unit remain easy to access especially in the event of an emergency To save energy the printer will automatically switch itself to standby mode after 10 minutes of inactivity The printer switches to hibern...

Страница 8: ... the manufacturer s warranty for the printer For optimum print quality Evolis recommends that the printer is fully cleaned every time the ribbon is changed See the Servicing and Maintenance section of this manual ä Fitting the ribbon The printer automatically recognises the ribbon inserted Ê Open the cover Ë Insert the ribbon as shown Ì Close the cover and press until a click is heard Ê Ë Ì 8 1 ...

Страница 9: ...e cards in order to preserve print quality Do not use cards that have been damaged folded embossed or dropped on the floor Keep your cards protected from dust ä Loading the cards Ê Open the card feeder Ë Insert the cards a maximum of 50 cards of thickness 0 76 mm Ensure the cards are positioned as illustrated in the diagram Ì Close the feeder 9 50x 9 1 Ê Ë Ì ...

Страница 10: ...d cards The printer is equipped with an output hopper with a maximum capacity of 20 x 0 76 mm cards ä Adjusting card thickness The printer is equipped with a manual card thickness adjustment mechanism which can be reached through the inside of the printing unit when the cover is open The printer accepts card s varying in thickness from 0 25 mm to 0 76 mm The factory setting is 0 76 mm 10 1 ...

Страница 11: ...Ê Open the printer cover by pressing on the opening lever then tilt the cover up Ë Adjust the thickness of the cards used by moving the gauge from right to left to the desired card thickness Ì Then close the cover 10 11 Ê Ì Ë 1 ...

Страница 12: ...in the Evolis Print Center see section 2 2 Managing the print settings Ê After starting your print task insert a card into the manual feeder The card will emerge automatically when printing is complete The printed card can be programmed in Evolis Print Center to be ejected either from the manual feeder or the output hopper 12 Ê 1 ...

Страница 13: ...r insert the CD into your computer and select the print driver menu A program will guide you through the entire installation process Do not connect your USB cable to your computer until prompted to do so by the installation program For the connection procedure see the section on Connecting the Printer Follow the installation procedure scrupulously All versions of Windows and Macintosh require the ...

Страница 14: ...c application called Evolis Print Center is available to help you if necessary to change certain predefined settings To access this application n From the Start button on the bottom left of your screen in the Windows task bar select All programs Evolis Card Printer Evolis Premium Suite Evolis Print Center n The application displays all connected Evolis printers 14 2 ...

Страница 15: ... click the name of the printer Pay attention to the settings defined under the print driver Properties and do not hesitate to contact your Evolis dealer for any advice and assistance needed before making any changes Please refer to the Evolis Print Center manual for more detail on the meanings of each of the settings 15 2 ...

Страница 16: ...ture of your print requests n Warnings about problems which have stopped the printer When the Evolis Printer Manager is active a small icon is displayed in the bar on the bottom right of your screen The colour of the icon varies according to the status of the printer n Green Printer ready n Orange Information message issued printing stopped n Red Warning message issued printing stopped n Grey Prin...

Страница 17: ... the task The Evolis Printer Manager service can be disabled by right clicking the Evolis icon on the status bar Interrupting the Evolis Printer Manager service is only recommended if there is a conflict with other applications installed on your computer The Evolis Printer Manager service is the best way of monitoring your printer effectively from your workstation 17 2 ...

Страница 18: ...application nClick on the File in the menu bar then on Page Setup n The Paper tab has a Paper Size option select CR80 Card n For Word 2010 click the Page layout tab then click on Size and select CR80 Card n In the Margins tab set all margins to 0 then in the Orientation section select Landscape n Close the window by clicking OK Your Word window should now look like this You are ready to customise ...

Страница 19: ... to a subnet in fixed IP address mode without WINS resolution The printer may be identified on the network in two ways n By its Hostname NETBIOS n By its IP address In addition the Ethernet connection wizard will automatically detect all installed Evolis printers The user definable settings are n IP address of the printer n Subnetwork mask n Gateway n WINS server Changing the printer s basic setti...

Страница 20: ...environment on the print head or on the cards Users must take all necessary precautions to insert only clean cards free of dust deposits or foreign bodies into the machine The frequency and quality of cleaning are decisive factors enabling users to extend the print head s useful life and to ensure excellent print quality Particular care must therefore be taken with cleaning Users must comply with ...

Страница 21: ...d with a cleaning warning system which is triggered after a certain number of cards have been inserted You should proceed with the routine cleaning of your printer as soon as the warning is triggered If you continue to run the printer despite the warning and if the warning light remains lit the print head warranty will be automatically voided owing to a failure to comply with your contractual main...

Страница 22: ...he printer cleans the cleaning roller in order to maintain print quality and increases the service life of the print head Ê Remove the cover from the printer as shown Ë Using the lever set the card thickness to the MAX position Ì Remove the ribbon as shown on the diagram Í Close the cover and check it has clicked shut Ì Ë Í Ê 22 3 ...

Страница 23: ...om the adhesive card Ê and insert the cleaning card into the manual feeder as shown adhesive side up Ë Cleaning starts Ó The used cleaning card is ejected automatically by the manual feeder Routine cleaning may also be carried out from the Evolis Print Center by clicking on Start cleaning Before using your printer remember to reset the gauge to the desired card thickness Î Ï Ð Ñ Ò Ó 23 3 ...

Страница 24: ...ver the ribbon is changed and during the routine cleaning using the cotton buds supplied by Evolis You must also protect the print head and its components from any discharge of static electricity Unplug the printer from its power supply before cleaning the print head Follow the cleaning cycles scrupulously Avoid any contact between the print head and any metal or sharp objects Avoid touching the p...

Страница 25: ...cotton bud is impregnated with alcohol Ë Unplug the power supply cable open the cover then find the print head Ì Gently rub the cotton bud from left to right along the print head for a few seconds Í Close the cover Reconnect the printer Wait for 2 minutes after cleaning before using your printer Ê Ì Ë Í 25 3 ...

Страница 26: ...he card feed rollers and the magnetic encoder head To ensure advanced cleaning is carried out properly the procedure given below must be followed 3 3a Routine printer cleaning Recommended cleaning cycle every 5 routine cleaning cycles Servicing accessory impregnated T shaped card and adhesive card Follow the procedure below Ê Open the printer cover Ë Sing the lever set the card thickness to the MA...

Страница 27: ...rom the adhesive cleaning card Ê and insert the cleaning card into the manual feeder as shown adhesive side up Ë Cleaning starts Ò The used cleaning card is ejected automatically by the manual feeder Warning the T shaped card must be used just after the sachet is opened Ð Ï Ñ Î Ò Routine cleaning may also be carried out from the Evolis Print Center by clicking on Start cleaning Before using your p...

Страница 28: ...g the print head directly with your fingers as this could affect print quality or permanently damage the print head The cleaning pen can be used up to 8 times for cleaning the print head Follow the procedure below Ê Remove the cover from the cleaning pen Ë Unplug the power supply cable open the cover then find the print head Ì Gently rub the pen from left to right along the print head for a few se...

Страница 29: ...pen the printer cover Locate the dust filter Ë Remove the filter by pulling it upwards and slide it out to release it completely Ì Once the filter is removed from its slot obtain a cleaning wipe supplied by Evolis Í Clean the filter by rubbing the wipe either side of it Î To replace it insert it in its slot notch towards you and lower it until you hear it click indicating it is correctly positione...

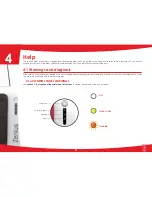
Страница 30: ...l support 4 1 Warnings and diagnosis Although the Evolis printer was designed to work independently keeping user involvement to a minimum it may nonetheless prove useful to gain some familiarity with the main warnings 4 1a CONTROL PANEL WARNINGS See section 1 Description of the printer and its functions for further details about the control panel OFF STEADY LIGHT FLASHING Pushbutton Cards and ribb...

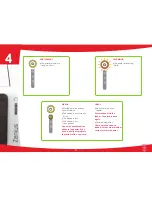
Страница 31: ... Check the condition of the ribbon in the printer If you have a print job in progress this restarts with a new card n The printer is receiving data n No cards in the card feeder Put cards back into the feeder the process starts again PRINTER READY RIBBON PROCESSING CARDS n Card loading error Check cards have been loaded For any other problem contact your Evolis dealer 31 4 ...

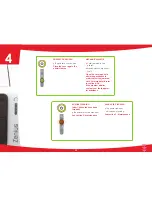
Страница 32: ...down the pushbutton in order to eject the jammed card For more details refer to section 4 3b If the problem persists contact your Evolis dealer for assistance MECHANICAL ERROR n The printer requires advanced cleaning See section 3 Maintenance ADVANCED CLEANING n The printer must be cleaned See section 3 Maintenance ROUTINE CLEANING after 1 000 cards have been inserted 32 4 ...

Страница 33: ...tarts following the update COOLING MODE FIRMWARE UPDATE n The printer is waiting for a card to be inserted or removed Insert a card or remove the card from the manual feeder see section 1 Getting started WAITING FOR A CARD TO BE INSERTED OR REMOVED n The printer must be cleaned to avoid the risk of the warranty being voided See section 3 Maintenance CLEANING after 1 200 cards have been inserted 33...

Страница 34: ...ld down the pushbutton again Î The pushbutton light comes on Ï Release the pushbutton once the light flashes Ð The test card is printed in colour if a colour ribbon is fitted in the printer or monochrome if the ribbon is monochrome Ñ The printed card is ejected into the output hopper Printing the technical test card can also be launched from the Evolis Print Center 4 2b PRINTING A GRAPHIC TEST CAR...

Страница 35: ...ARE VERSIONS You can identify directly the system versions installed print driver set etc Ê In Evolis Print Center double click the name of the printer to display its Properties Ë Click System information then System information 35 4 ...

Страница 36: ...ke sure you are using the power supply unit supplied with the printer Ì Check the USB cable Check that the USB cable is connecting the printer to your computer Í Check the ribbon Check that the ribbon is fitted correctly and that the cover is closed Î Check the cards Check that there are cards in the card feeder Check that no cards are jammed in the printer Ï Print a test card See elsewhere in thi...

Страница 37: ...ged Clean or replace the print head Blurred image n The ribbon is not correctly fitted Check that the ribbon is correctly positioned in the printer n Poor ribbon synchronisation Open and close the printer cover to synchronise the ribbon n Dirty printer or cleaning roller Clean the printer n Use of incompatible cards Check that the cards used match the specifications We recommend that you obtain yo...

Страница 38: ...r and the printer Try using another cable of the same type Ì Check that the printer is clean Clean the printer especially the cleaning roller See the maintenance section Í Check that the cards are clean Store your cards protected from dust Î Check the ribbon Check that the ribbon is fitted correctly Check that the ribbon spools freely Ï Check the print head Should horizontal straight lines appear ...

Страница 39: ...put If there is more than one card always push the top one first Ì Replace the ribbon then close the printer cover To prevent card jams Ê Check that the card thickness gauge is correctly adjusted Ë Check that the thickness of the cards used matches the specifications set out in Appendix A Technical specifications in this manual Ì Check that the cards are flat Keep them in a horizontal position Í C...

Страница 40: ...rint head may sometimes need to be replaced Evolis has designed a unique device enabling users to undertake such replacement with no tools needed simply by following the instructions very carefully Before doing anything else please contact your Evolis dealer in order to check the advisability of replacing the print head The dealer will supply a new print head if need be For more information on pri...

Страница 41: ...r cover Ë Locate the print head Ì Press on the plastic part behind the head pressure plate and pull on the head with the other hand as shown in the diagram in order to free the lugs from the holding fork then remove the lugs from their slots Í Tilt the head carefully downwards and disconnect the connector linked to the cable without using force on the mechanism Ê Ì Í Ë 41 4 ...

Страница 42: ... two guides so as to trap the lugs of the fork in their slots Ê Then lower it by pressing on the two forks Ë a click will be heard Ì Connect the cable into its socket making sure it is the right way round Do not use any force as this part is relatively fragile Press down on each side of the connector to ensure a good connection is made Í The head is back in position Î Close the cover The print hea...

Страница 43: ...ed down in step 2 Then click Confirm If the print head kit number is not entered correctly printer malfunctions may occur and the warranty may be voided ä Step 4 Cleaning the printer On your printer s control panel the CLEANING light is lit Cleaning is absolutely necessary after changing the print head No print jobs can be run until the cleaning operation has finished Refer to section 3 Maintenanc...

Страница 44: ...Then double click on the file in the directory in order to run the firmware installation program Î When requested by the program follow the instructions in order to select the printer and start the operation The firmware download is in progress Ï After about thirty seconds the firmware has transferred to the printer and the operation is complete Ð If the printer is not showing a READY status this ...

Страница 45: ...volis com Ê Go to the Support Drivers menu then select your printer model and click on the Print drivers and Firmware link Ë Then click on the file for the corresponding print driver Ì Accept the download then save the file in a directory on your hard drive The firmware is stored compressed as a zip file which you will need to extract Í Then double click on the setup exe file that you have just do...

Страница 46: ...er Ë The configuration and operating system that you are using Ì A description of the incident that has occurred Í A description of the steps that you have taken to resolve the problem In addition to enable you to find answers to your questions 24 7 the www evolis com website includes a number of aspects related to day to day use of your printer 4 4b FINDING INFORMATION ON WWW EVOLIS COM If you ne...

Страница 47: ... 120 cards hour n Monochrome 400 cards hour Maximum speed under special conditions n Colour up to 150 cards hour n Monochrome up to 500 cards hour ä Card management and technical data n Automatic or manual feeder n Feeder capacity 50 cards 0 76 mm 30 mil n Output hopper capacity 20 cards 0 76 mm 30 mil n Card thickness 0 25 to 0 76mm 10 to 30 mil adjustment using the gauge n Card types PVC and com...

Страница 48: ...vity n USB 1 1 compatible 2 0 n Ethernet port available as an option ä Display n LEDs n Graphic printer notifications1 Feeder empty Cleaning alerts Ribbon nearly finished finished warning Etc 1 Dependant on your version of Windows ä Software n Supplied with Evolis Premium Suite for Windows Printer driver Evolis Print Center for the administration management and configuration of the printer Evolis ...

Страница 49: ... n Data encryption for magnetic encoding1 1 Available for the Expert range and above ä Eco design and certifications n Standby mode and reduced power consumption n Printer Energy Star certified n Printer meets the Energy Related Products Directive ErP 2009 125 EC ä Contents of the packaging n Printer n CD ROM with printer driver user manuals n eMedia CS Card Designer a test version valid for 30 da...

Страница 50: ...f conformity n CE FCC IEC VCCI CCC KC n ErP 2009 125 CE Energy Star RoHS n 13 56 MHz PLL ASK semi duplex operation ä Power supply n Power supply module 100 240 Volts AC 50 60 Hz 1 8A n Printer 24 Volts DC 3 A ä Environment n Min max operating temperature 15 30 C 59 86 F n Humidity 20 to 65 without condensation n Min max storage temperature 5 70 C 23 158 F n Storage humidity 20 to 70 without conden...

Страница 51: ...Additional information This equipment has been tested and found to comply with the limits for a Class B digital device pursuant to part 15 of the FCC Rules These limits are designed to provide reasonable protection against harmful interference in a residential installation This equipment generates uses and can radiate radio frequency energy and if not installed and used in accordance with the inst...

Страница 52: ...then runs a data check Although able to be configured as high coercivity HiCo or low coercivity LoCo by a simple click in Evolis Print Center Evolis magnetic encoders come factory set for high coercivity HiCo ä Location of the magnetic encoder The magnetic encoder is a module installed either in the factory or on site by your Evolis dealer The read and write head is located under the path taken by...

Страница 53: ...e card feeder so that the magnetic stripe is facing downwards as shown below Ê Open the printer card feeder as shown ËInsert a maximum of 50 cards of thickness 0 76 mm Hold the cards as shown in the diagram magnetic stripe downwards Ì Close the feeder Ê Ë Ì 53 C ...

Страница 54: ...etic encoding to high HiCo or low LoCo coercivity A magnetic stripe that is encoded with high coercivity is more resistant to external disturbance than a magnetic stripe encoded using low coercivity Encoding via an application is used to encode magnetic stripe cards from applications under Windows such as Word for example A text field enclosed within and characters or some other character which th...

Страница 55: ...ad write head If in between two routine printer cleaning runs every 1000 cards inserted the read write process fails with more than one card it is recommended to run an advanced printer cleaning sequence manually please see the Maintenance section of this manual for the procedure to follow ä ISO 7811 magnetic encoding standards 1 Dots per inch 2 Except for the character 3 Including the Start Stop ...

Страница 56: ...location The contact station is a module installed either in the factory or on site by your Evolis dealer It is located over the path taken by the cards and after the print head To contact the smartcard the contact station descends mechanically against the smartcard The programming sequence for a chip is always carried out before the card is printed Use only smartcards compliant with the ISO 7816 ...

Страница 57: ...that the chip contact is facing upwards as shown below Ê Open the printer card feeder as shown Ë Insert a maximum of 50 cards of thickness 0 76 mm smartcard contact upwards Ensure the cards are positioned as illustrated in the diagram Ì Close the card feeder Ê Ë Ì 57 C ...

Страница 58: ...d to the contact station inside the printer is also connected to an external coupler to program the chip A sequence of commands must be sent via the printer s interface to insert a card into the printer then position it under the station and establish contact DB 9 connector pins Smartcard contact points 1 C1 V c c 2 C2 reset 3 C3 clock 4 C4 reserved 5 C5 ground 6 C6 Vpp 7 C7 I O 8 C8 reserved 9 Ca...

Страница 59: ...contact station to the DB 9 connector l The chip can be programmed via the external coupler Refer to the Programming Guide for the Evolis printer for more information on programming a smartcard and the Option installation manual for configuration of the card present signal The Evolis product catalogue also includes printers equipped with a chip contact station and a built in encoder These encoders...

Страница 60: ...ion of the antenna or the encoder including an antenna By means of a specific command the card is positioned close to the antenna such that the card lies within its radio range Reading data from or writing data to the card can then start The programming sequence for a chip is always carried out before the card is printed ä Card positioning There is in theory no restriction on card positioning when...

Страница 61: ... a COM port on the computer A sequence of commands must be sent via the printer s interface to insert a card in the printer then position it close to the antenna to establish radio communication between the card and the encoder The command sequence is as follows Sending the SIC sequence l A card is moved from the feeder towards the antenna and is positioned nearby l The chip is programmed via the ...

Страница 62: ...3XXX Red 1000 prints roll RCT014XXX Green 1000 prints roll RCT015XXX White 1000 prints roll RCT016XXX Metallic gold 1000 prints roll RCT017XXX Metallic silver 1000 prints roll RCT018XXX Scratch off ink 1000 prints roll RCT019XXX BlackWAX for printing on ABS and special overlays 1000 prints roll RCT021XXX Signature panel 1000 prints roll R2F009XXX KO black and clear overlay 300 prints roll Colour r...

Страница 63: ...servicing the cleaning roller 50 adhesive cards ACL004 T shaped card cleaning kit for cleaning the card feed rollers 10 impregnated T shaped cards A5003 Cotton bud cleaning kit for cleaning the print head 25 cotton buds with foam ends and reservoir with isopropyl alcohol IPA ACL005 Pen cleaning kit for cleaning the print head 3 cleaning pens up to 8 uses per pen Cards C4001 Blank white PVC cards S...

Отзывы: