EverFocus PARAGON 264x1 Скачать руководство пользователя страница 93


86 

APPENDIX A: TIMING OF ALARM MODES 
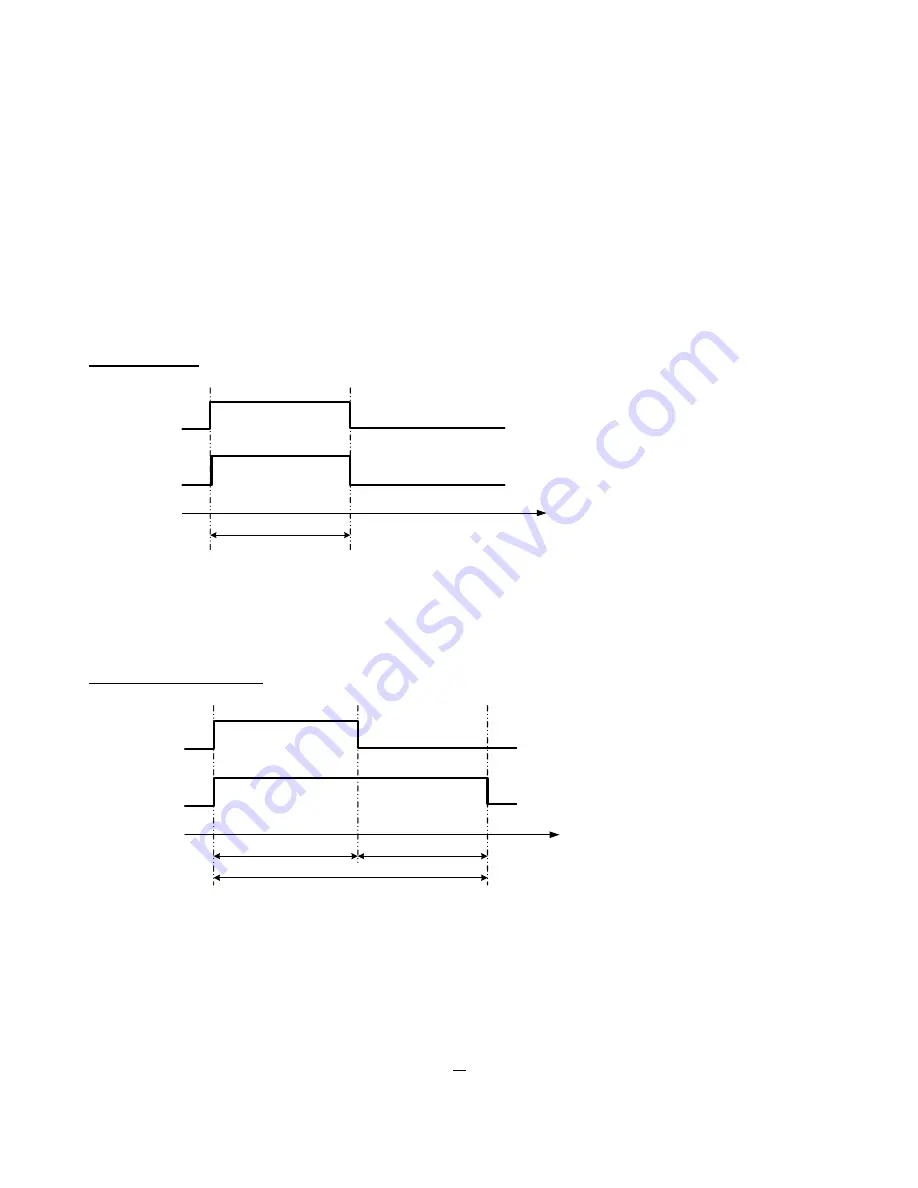
 
Transparent Mode 


Input Event

Alarm Duration

t

Event = 

Reaction


Event

:  

Duration of alarm input source (motion, contact, system events...)


reaction

:    Resulting duration for this alarm mode, related to event record, alarm outputs, OSD message, buzzer 


T Transparent Mode 


t

Input Event

Alarm Duration

Duration

Reaction

Event 


Event

:  

Duration of alarm input source (motion, contact, system events...) 

Duration

:   Alarm duration for timeout, defined in the event setup menus 

reaction

:    Resulting duration for this alarm mode, related to event record, alarm outputs, OSD message, buzzer 


Appendix 

Содержание PARAGON 264x1

Страница 1: ...User Manual P PA AR RA AG GO ON N2 26 64 4x x1 1 1 16 6C CH H D DV VR R...

Страница 2: ...permission of the Everfocus Electronics Corporation Release Date Dec 2011 QuickTime is a registered trademark of the Apple Computer Inc Windows is a registered trademark of the Microsoft Corporation...

Страница 3: ...extension cords as this could cause fire or electric shock Power Cables Power cables and their connectors should be placed where they are not likely to be walked on crushed or pinched by items placed...

Страница 4: ...nd if not installed and used in accordance with the instructions may cause harmful interference to radio communications However there is no guarantee that interference will not occur in a particular t...

Страница 5: ...atch Cable 11 1 12 FINAL INSTALLATION PROCESS 11 2 USING THE MOUSE AND FRONT PANEL 12 2 1 USING THE MOUSE 12 2 1 1 How to select a Channel and enable its Audio 12 2 1 2 Opening the OSD Root Menu 12 2...

Страница 6: ...Alarm 37 5 4 2 Event 38 5 5 SCHEDULE SETTING 43 5 5 1 Express Setup 43 5 5 2 Holidays and Others 43 5 5 3 Schedule 44 5 5 4 Alarm Action 48 5 6 NETWORK SETTING 50 5 6 1 LAN 50 5 6 2 EMAIL 51 5 6 3 DDN...

Страница 7: ...TING TO THIS DVR 72 7 2 BROWSER SECURITY SETTING 73 7 2 1 Installing ActiveX controls 73 7 2 2 Enabling ActiveX Controls 75 7 3 REMOTE LIVE VIEW VIA SMART PHONE 77 7 4 REMOTE LIVE VIEW VIA COMPUTER 79...

Страница 8: ...back actions in seconds by simply clicking a few tabs on the Express menu page of the GUI 1 1 FEATURES H 264 compression format for efficient disk utilization and network bandwidth conservation Real t...

Страница 9: ...g and mouse usage Multi language support Watermark capabilities to identify intentional modifications to exported data Can be mounted on a 19 rack USB Mouse and IR remote control included 1 2 PACKAGE...

Страница 10: ...larm In 16 One per Video Input Alarm Out 4 Alarm Outputs Video Pause Yes Video Loss Detection Yes Motion Detection Yes Event Log Yes Watch Dog Timer Yes Internal HDD 2 Hot swappable External HDD 1 eSA...

Страница 11: ...nel button to display that channel in full screen view to cycle between the info display types channel and status bar to enter the automatic sequence mode This will show each channel feed in the Displ...

Страница 12: ...playback Press the Stop button to stop all playback actions and exit the playback area 15 Fast Forward Press this button to play the recorded data in fast forward A green LED at the center of the butt...

Страница 13: ...ve The amber LED flickers when pin D Sub is for attaching RS 232 control devices or external control via connected RS 485 keyboards and This BNC port is for feeding the Main Monitor video Out signal t...

Страница 14: ...requires an amplifier to drive a speaker or headphones The audio installation must be done with audio coax cable and RCA plugs AUDIO RECORDING FUNCTIONALITY Audio recording is activated deactivated i...

Страница 15: ...applications A shielded cable should be used if the installed cables are expected to be highly susceptible to interference The number of devices installed in one bus is limited to 32 and the maximum...

Страница 16: ...eans that the signal only flows from the input towards the outputs Therefore e g the interconnection of several keyboards is not possible with these types of signal distributor 1 9 2 RS 485 socket pin...

Страница 17: ...uire an address offset of 1 i e the address assigned to the dome receiver in the DVR camera menu must be 1 below the address set in the dome receiver itself 1 10 USB MOUSE INSTALLATION Connect the USB...

Страница 18: ...a network switch or router Network Connection through Patch Cable Pinout of straight patch cable 1 12 FINAL INSTALLATION PROCESS Once you have completed the basic wiring connections you can turn on th...

Страница 19: ...k the Audio icon at the lower left side of the screen Every time you click this icon the number in the icon will increase indicating that a different channel s audio feed has been assigned to the Audi...

Страница 20: ...choice to select it The area to the right the Main Body will change every time a different submenu title is clicked as this area is the configuration field of each menu item in the Left Column 3 The M...

Страница 21: ...io Out line highlight the channel and click the Enter button A speaker icon will appear on the channel box indicating that the channel s audio is assigned to the Audio Out line This icon will disappea...

Страница 22: ...wheel s outer ring to highlight the Configuration icon and press Enter to open the Configuration menu NOTE If the DVR has been set up to require a password you will need to log in first Refer to Secti...

Страница 23: ...Check box When this type of field is highlighted press the Enter key to enable the function checked or disable it unchecked Button When this type of field is highlighted press the Enter key to activat...

Страница 24: ...era to record continuously 2 If a recording schedule or event is configured and activated check the Schedule Record box on the Record Play Record menu page to activate the schedule the DVR will follow...

Страница 25: ...ating that the channel s camera has been selected Front panel buttons Use the control wheel s outer ring to scroll through the channel boxes The selected channel box will be highlighted by a white fra...

Страница 26: ...he channel s Playback Bar The playback bar will appear at the bottom of the screen see the image below 2009 05 25 09 09 30PM 2009 05 25 09 09 40PM 2009 05 25 09 10 30PM 1 Stop key Click to stop playba...

Страница 27: ...ntrol for PTZ devices only Once you have selected the PTZ camera of your choice right click to bring up the menu bar and click on the PTZ dome icon to open that channel full screen and display the cam...

Страница 28: ...ol basic PTZ functions Quick Mouse Control The mouse cursor will change to different icons when held in different areas of the screen the areas are shown in the image below Simply click to activate th...

Страница 29: ...channel layout 4 4 SWITCHING CHANNEL POSITIONS Use this function to switch channel positions within a multi channel display or sequence 1 Pre select a camera 2 Press the Channel switch button 3 On the...

Страница 30: ...e default setting is channels 1 4 with a dwell time of 3 seconds each repeated 2 Front Panel Press the Seq button on the front panel to enter the sequential switching mode The DVR will display one cha...

Страница 31: ...direction areas The screen is divided into a 4x4 grid When your mouse cursor is held in one of these sectors clicking on it will move the screen in these directions 1 Left and up 2 3 Up 4 Right and up...

Страница 32: ...pecific grid areas in the feeds of specific cameras All Motion Detection events that fit the search criteria are displayed in the form of an Event List From Date Select starting date Time Select start...

Страница 33: ...roll on to the setup screen and press Enter to reveal the grid 3 Decide what area you want to select and scroll to the grid block at the upper left corner of the area you want to select Use the contro...

Страница 34: ...menu bar and click the icon to enter the Copy Menu Front Panel Press the Copy key to enter the Copy Menu directly Camera Select which cameras footage will be archived Choose Select All to select all t...

Страница 35: ...u Log in if necessary see the Login section for more details 5 1 EXPRESS On the right is a screenshot of the EXPRESS SETTING MENU This menu is used to configure global identical express settings for a...

Страница 36: ...SELECTION RULES Recording Days Not available if the Schedule Record box has been checked in the Record Play Record menu Use this option if you want to set the maximum number of days during which the D...

Страница 37: ...of the CAMERA SETTING MENU This menu is used to configure individual camera settings 5 2 1 Basic Setting Camera Select the camera to be configured Title The title setting allows you to assign a title...

Страница 38: ...ce EverFocus DVRs have the capability to change the size of recorded frames and the FPS rate in response to events it may be advisable to reserve some recording capacity for when an event response is...

Страница 39: ...copy the settings or Cancel to exit without copying 5 2 2 Video Adjust Camera Select the camera you wish to adjust Title will change to the name of the selected camera Brightness Adjusts how bright da...

Страница 40: ...on the DVR s configuration Alarm Output Selecting None will leave this function disabled Selecting one of the four numbers will instruct the DVR to transmit a signal through the alarm output relay mar...

Страница 41: ...to reveal the grid 3 Decide what area you want to select and scroll to the grid block at the upper left corner of the area you want to select Use the control wheel s outer ring to scroll horizontally...

Страница 42: ...been connected to the relevant alarm output relay Output Type If an Alarm Output has been selected above this setting this setting will decide how that Output is transmitted when a motion event occur...

Страница 43: ...Off to disable the time stamp Record Status Relay Output Selecting NONE would disable this function Select either 1 2 3 or 4 depending on the alarm relay port you want to assign to this function The...

Страница 44: ...larm footage will be recorded from the feeds of all related cameras as configured in the Record field below This pre alarm recording rate will follow the Normal frame rate setting Buzzer Check this bo...

Страница 45: ...nts in the write protected segment of the Hard Disk The DVR will lock a period of time around the moment an alarm event occurs the length of time will depend on the DVR settings Alarm Output Selecting...

Страница 46: ...zzer when the fan stops working Email Notify Check this box to enable email notification when the fan is not working This requires that valid email settings have been entered in the Network Setting Em...

Страница 47: ...at valid email settings have been entered in the Network Setting Email setup screen Network Alarm Check this box to send out a network alarm to a client PC when this event occurs This feature requires...

Страница 48: ...fy Check this box to enable email notification when this event occurs This requires that valid email settings have been entered in the Network Setting Email setup screen Network Alarm Check this box t...

Страница 49: ...box to let the DVR transmit a signal through the alarm output with the same number if this event occurs Selecting None would disable this reaction Output Type If an Alarm Output has been selected abo...

Страница 50: ...ggers would otherwise have been the only reason why that footage was recorded Normal Frame Rate Select the FPS for Normal continuous recording during the scheduled period This would be the maximum fra...

Страница 51: ...for that camera channel The DVR can be set up to record the feed of each camera channel according to the time schedule set on this page Different schedules can be created for each weekday and for all...

Страница 52: ...n the blue rectangle the start and end time of that period will appear in the information line below the timelines Use this information line to confirm the start and end times of your configured perio...

Страница 53: ...ee the image above 4 Enter time bar editing mode Use the scrolling wheel to switch to timeline editing mode When this mode is selected all 9 time bars will be highlighted within a blue frame 5 Select...

Страница 54: ...S 2 cameras 4CIF 30FPS plus 5 cameras 2CIF 15FPS plus 9 cameras CIF 10FPS 2x4x30 5x2x15 9x1x10 240 150 90 480 2 cameras 4CIF 30FPS plus 2 cameras 2CIF 30FPS plus 12 cameras CIF 10FPS 2x4x30 2x2x30 12x...

Страница 55: ...th the camera that is closest to it and would usually have the same number as that camera s channel Remember that all recordings for this alarm will be recorded with the camera that has the same numbe...

Страница 56: ...me bars will be highlighted within a blue frame 5 Select desired time bar for setting Press the Enter button the first time bar will be selected and highlighted in a red frame See the image on the rig...

Страница 57: ...he DDNS feature see the text below and in section 5 6 3 below and section 7 DDNS for more detail DNS Server 2 This field shows the secondary DNS server for your network HTTP Port Port number for HTTP...

Страница 58: ...erhaps using DDNS optional you MUST select functional ports and set up the port forwarding in your router Other ports such as 8080 and 8000 are sometimes blocked by ISPs as well What port s should be...

Страница 59: ...must be unique that is it must not already be in use Please go to the website http everfocusddns com and check that the name you wish to use is available PLEASE NOTE The name of the DVR cannot include...

Страница 60: ...camera feeds to remote mobile clients like smart phones MJPEG should be enabled if the remote client connects to the DVR via a web browser other than Internet Explorer H 264 offers better compression...

Страница 61: ...percentage of used disk space for the selected disk 5 7 2 Lock Format On the right is a screenshot of the DISK LOCK FORMAT MENU This menu is used to control the portion of the DVR s hard drive reserve...

Страница 62: ...e monitor type If you have a monitor connected to each of the two main monitor displays BNC and VGA you can press the Monitor button on the Front Panel to assign the feed to the other monitor one at a...

Страница 63: ...e general system parameters for the DVR 5 9 1 Date Time Date Set current Date Time Set current Time Date Format Choose date format from yyyy mm dd dd mm yyyy and mm dd yyyy Time Format Change time for...

Страница 64: ...the rights associated with each access level Add Click Add button to add a new user Set the name case sensitive password access level and status Press Add button to confirm a new user or Cancel to exi...

Страница 65: ...9 4 I O Control On the right is a screenshot of the I O Control Setting Menu This menu is used to define the settings for controlling the DVR through RS485 and for DVR control of attached PTZ cameras...

Страница 66: ...e key corresponding to its ID number on the remote control IR Remote ID ID used by the remote control to select this DVR This can be set from 1 to 4 5 9 5 Misc Firmware Current Firmware Version Displa...

Страница 67: ...figured Network ID The ID number for the PowerCon alarm network as set in the Alarm Server screen Status Disk Displays the status of the installed disk s normal disk operation is indicated by OK Fans...

Страница 68: ...w the log See the image below for more detail Clear Log Press Clear Log button to clear the log Export Log to USB Press Export button to export log data to USB Log List Prev Page Go to the previous pa...

Страница 69: ...resents a number in the range of 2 to 254 An IP address could be compared with a telephone number 6 2 SUBNET MASKS Each host in a LAN has a subnet mask The subnet mask is a set of octets that is used...

Страница 70: ...r a specific extension port it directs that data stream to the LAN IP address of the equipment associated with that extension port 6 5 PRE INSTALLATION Before beginning the installation please answer...

Страница 71: ...to one connection is the simplest type of network connection Use a cross over cable to make a direct connection from your computer to the DVR 2 Direct High Speed Modem Connection A direct modem conne...

Страница 72: ...on the back of the DVR and the other into the network card s connector LAN port on the back of the computer Log into the EverFocus DVR menu and go to the Network Setting Menu You must use the Static I...

Страница 73: ...66...

Страница 74: ...sign an IP address of 192 168 1 2 a Subnet Mask of 255 255 255 0 and a Default Gateway of 192 168 1 1 then click OK Restart both the computer and the DVR To access the DVR from the computer simply ope...

Страница 75: ...cable We recommend purchasing one if you have never made a straight through cable Please remember you can not use a cross over network cable for this application Once you have a straight through cable...

Страница 76: ...To access the DVR from a computer open Internet Explorer and in the address bar type http the static IP address given by your internet service provider Note When using this type of connection only one...

Страница 77: ...to DHCP The DVR will display the dynamic IP in the setup field Make sure to write down the IP address and the Gateway Exit from the Menu to save settings To manually assign an address static IP addre...

Страница 78: ...within your router Log into the router using a PC and open the following ports o Ports to open 80 o If your Internet service provider blocks port 80 you can change it to a different port in the DVR s...

Страница 79: ...DVR s Network Menu IP port used e g http 192 168 1 163 2468 Internet connection http IP address given by your Internet Service Provider IP port used e g http 57 182 67 204 2468 You should then see a l...

Страница 80: ...If you do not see a yellow bar like the one the arrow is pointing at your security settings may be too high If so go to Section 6 2 2 Enabling ActiveX Controls Right click on the yellow bar and select...

Страница 81: ...74 Right click on the yellow bar and select Run Add on Install the MSXML file when prompted to do so Now you will able to see the remote live page...

Страница 82: ...DO NOT see the yellow ActiveX bar at the top of your browser screen when you first connect to the DVR At the top of the Internet Explorer Window click on Tools then select Internet Options Click the S...

Страница 83: ...g ins Script ActiveX controls marked safe for scripting Prompt Download signed ActiveX controls Download unsigned ActiveX controls Disable Initialize and script ActiveX controls not marked as safe Cli...

Страница 84: ...like that of a home or small retail outlet If you cannot access your DVR via the Internet after completing this procedure it would mean that your LAN private network is probably more complex and you n...

Страница 85: ...phone a On your smart phone s home page tap on the MobileFocus app s icon to open it b Tap the Add Device icon on the iPhone this is a sign at the top right of the MobileFocus screen c In the Site Nam...

Страница 86: ...there is a speaker on the PC and a microphone and preamp attached to the DVR and audio recording is enabled on the DVR Double click on a camera image to enlarge the current display to full screen doub...

Страница 87: ...n Select from Time Search Event Search or Motion Search For more details about Search setting please refer to 4 9 Search Setting Event Search and Motion Search will show maximum 400 search result item...

Страница 88: ...and put in your chosen name in the DVR Name field PLEASE NOTE The name of the DVR cannot include a space or a dot period or any special characters particularly _ Step 4 Click or select and press Ente...

Страница 89: ...OK button to continue The first screen that appears displays the Setup tab This allows you to change the Router s general settings Change these settings as described here and click the Save Settings...

Страница 90: ...r and end user Please understand we DO NOT support this product and will not give tech support on it If you need additional technical support on this router you must call D Link Whenever you want to c...

Страница 91: ...e active When you have input all the information for a virtual server click on Apply to add it to the list at the bottom or Cancel to clear all fields Here is an example of the information for each se...

Страница 92: ...s multiple inputs make sure it is set to display the correct input source and resolution 1024x768 Check that the monitor cables are in working order and that the power is on Verify that the recorder i...

Страница 93: ...alarm mode related to event record alarm outputs OSD message buzzer Timeout Transparent Mode t Input Event Alarm Duration t Duration t Reaction t Event t Event Duration of alarm input source motion co...

Страница 94: ...ion Resulting duration for this alarm mode related to event record alarm outputs OSD message buzzer Permanent Mode t Input Event Alarm Duration t Reaction t Event Alarm Reset t Event Duration of alarm...

Страница 95: ...Resulting duration for this alarm mode related to event record alarm outputs OSD message buzzer Timeout Transparent Mode Retrigger of Alarms t Event Duration of alarm input source motion contact syste...

Страница 96: ...7 8 Normal Frame Rate 1 1 1 1 1 1 1 1 Quality Superior Standard Low Low Low Low Low Low Event Frame Rate 30 30 30 15 10 7 5 5 1 Case 2 Record Mode Event Only Record With Recording days DVR will Auto a...

Страница 97: ...Option Camera Item Apply value Best Quality Quality Superior Normal Frame Rate Max recording frame rate of DVR Event Frame Rate 30 Standard Quality Quality Standard Normal Frame Rate Half of max recor...

Страница 98: ...rol The effective distance is up to 33 feet line of sight The keypad functions are same as the front panel buttons of the DVR Appendix C ID number here must correspond to the IR Remote ID in I O Contr...

Страница 99: ...ashi Sumida Ku Tokyo 130 0022 Japan TEL 81 3 5625 8188 FAX 81 3 5625 8189 www everfocus co jp info everfocus co jp EverFocus Europe UK Unit 12 Spitfire Business Park Hawker Road Croydon Surrey CR0 4WD...

Отзывы: