background image


EQN2200/2201 

4. ACCESSING THE CAMERA MENU 

Step 1.Start an Internet Explorer browser session. 
Step 2. Enter the IP address or host name of the camera in the 

Location/Address 

field of your Internet Explorer browser in the form 

http://nn.nn.nn.nn:port

, or http://ddnsname.everfocusddns.com. (Please refer to 

EQN2200/2201 Installation Guide for how to find the IP address by using the IP 
Finder)  
Step 3. At the login popup window enter “Username” and “Password”. Default 
Username is “user1” and default password is “11111111”. 
Step 4. Click “Login” button. 
Step 5. You might be required to download Active X files, which are required to 
process camera video. Please click "Yes".   
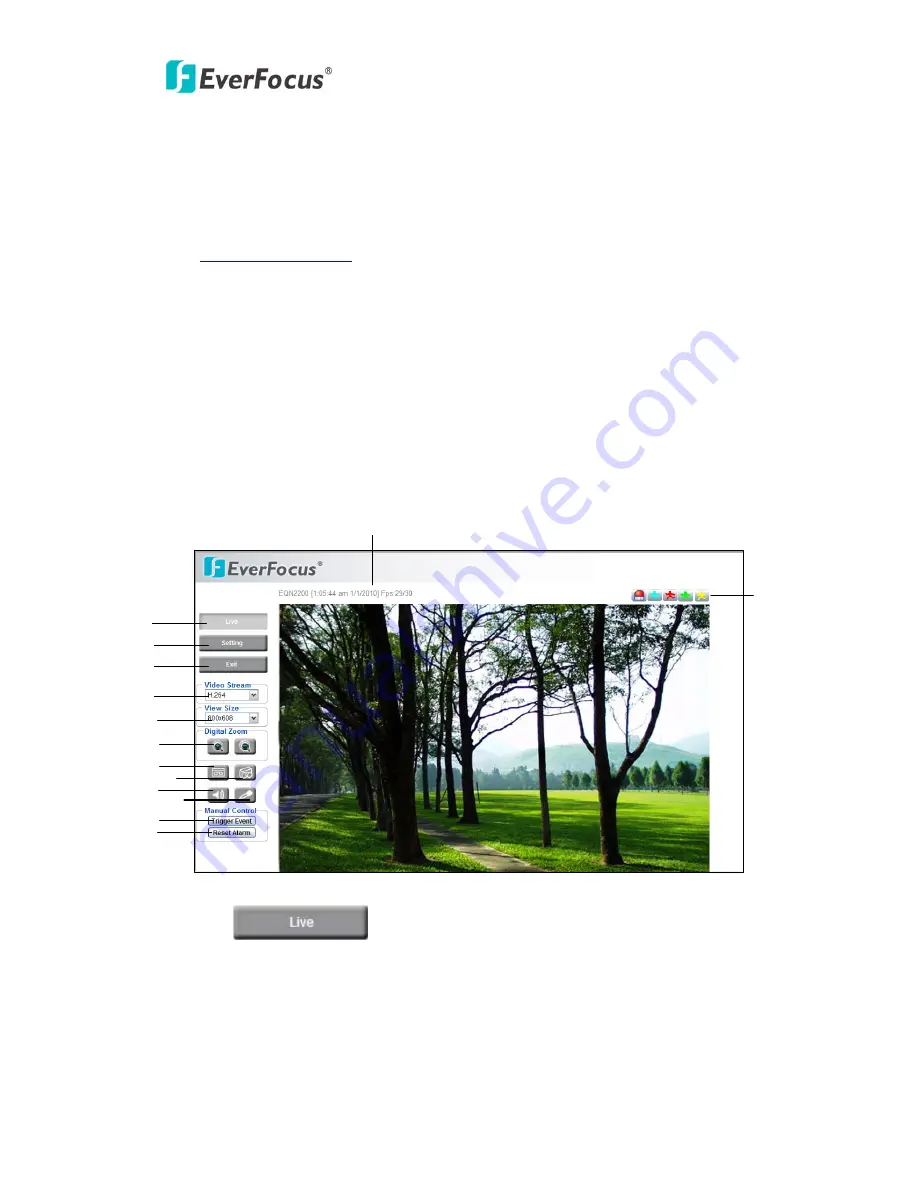
Step 6. Congratulations!! You should now


be able to see the live image. 

13


14

1


2


12


11


10


9


8


7


3


4


6


5


1

 Press 

  button to display the "Live" page.   

Double click on the image to show a full screen display, double click again or press 
ESC to return to the normal display. 


8

Содержание eqn2200

Страница 1: ...EQN2200 2201 User s Manual Copyright EverFocus Electronics Corp Release June 2010 ...

Страница 2: ...fications not expressly approved by the party responsible for compliance could void the user s authority to operate this equipment This device complies with Part 15 of the FCC Rules Operation is subject to the following two conditions 1 This device may not cause harmful interference and 2 this device must accept any interference received including interference that may cause undesired operation Th...

Страница 3: ... off and on the user is encouraged to try to correct the interference by one or more of the following measures Reorient or relocate the receiving antenna Increase these separations between the equipment and receiver Connect the equipment into an outlet on a circuit different from that to which the receiver is connected Consult the dealer or an experienced radio TV technician for help Any changes o...

Страница 4: ...ed service personnel only in accordance with the National Electrical Code or applicable local codes Terms and Trademark Ethernet Internet Explorer Linux Microsoft Windows WWW are registered trademarks of the respective holders Other product names appearing in this User s Guide may be trademarks or registered trademarks of their respective holders Java and all Java related logos and trademarks are ...

Страница 5: ... NETWORK 15 5 3 1 Network 15 5 3 2 DDNS 18 5 3 3 SMTP FTP 19 5 3 4 Network Alarm reserved for PowerCon 21 5 3 5 Wireless For EQN2201 only 22 5 4 VIDEO 24 5 4 1 Video Streaming 24 5 4 2 Camera 26 5 5 AUDIO 27 5 6 USER 28 5 7 EVENT 29 5 7 1 Event List 30 5 7 2 Motion Detection 32 5 7 3 Event Settings 33 5 7 4 Event Schedule 34 5 8 SYSTEM 35 5 8 1 Date Time 35 5 8 2 Daylight Saving 37 5 8 3 Maintenan...

Страница 6: ...oaded or recorded audio clips Using a network resolves many of the limitations that exist for installing and using conventional analogue cameras to greatly expand your business opportunities through Zero Distance Management 2 FEATURES 2 Megapixel Image Capture Max Resolution 1600x1200 Built in H 264 and M JPEG dual stream output at 720p image size with up to 30fps Integrated fix focus wide angle l...

Страница 7: ...e T 100Base TX auto negotiation RJ 45 socket Support MDI MDI X auto crossover function Built in IEEE 802 11b g WLAN for EQN2201 Supported Protocols HTTP TCP IP UDP RTP RTSP FTP SMTP DHCP DNS DDNS NTP ONVIF PSIA TERMINAL I O Alarm Input Output 1 1 EVENT MANAGEMENT Event Trigger Alarm Input Manual Trigger Motion Detection Notification Trigger alarm output Send mail notification Upload video to FTP a...

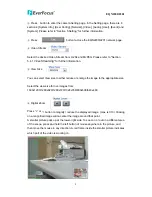
Страница 8: ...dress by using the IP Finder Step 3 At the login popup window enter Username and Password Default Username is user1 and default password is 11111111 Step 4 Click Login button Step 5 You might be required to download Active X files which are required to process camera video Please click Yes Step 6 Congratulations You should now be able to see the live image 13 14 1 2 12 11 10 9 8 7 3 4 6 5 1 Press ...

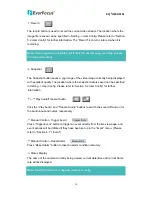
Страница 9: ...reduce or enlarge the image to the appropriate size Select the view size for live images from 1600x1200 1280x920 1280x720 1024x768 800x608 640x480 al Zoom Press or button to magnify reduce the displayed image max is X10 Clicking ified image will re n A red frame inside the smaller picture indicates button to enter t Section 5 5 View 6 Digit on a magn center the image around that point A smaller pi...

Страница 10: ...al Control Trigger Event Press Trigger Event button to trigger an event directly from the live view page and event actions will be initiated if they have been set up in the Event menu Please fer to Section 4 7 1 Event 2 Manual Control Reset Alarm f the camera currently being viewed current date time and current frame te will be displayed is configured under user config 7 T image file is saved can ...

Страница 11: ...s which differ by color correspond to the motion trigger areas set in the Motion menu Please refer to Section 5 7 2 Motion for detailed information Motion setup Alarm Motion 5 SETTING Click this button to display the camera setup menu 5 SETTING Click this button to display the camera setup menu 5 1 System Info System information and system log events can be accesse on this page via 2 tabs Informat...

Страница 12: ...EQN2200 2201 5 1 1 Information Tab System Information Firmware version MAC address and Model number this data ged in this page and is for reference only may not be chan 5 1 2 Log Tab 12 ...

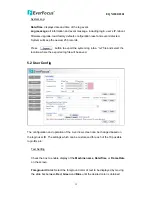
Страница 13: ...e and select the location where the exported log file will be saved 5 2 User Config The configuration and operation of the Live View screen can be changed based on the login user ID The settings which can be customized for each of the 10 possible login IDs are ext Setting T box to enable display of the Machine name Date Time or Frame Rate xt to be displayed by moving Check the on the screen Foregr...

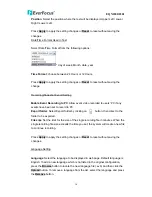
Страница 14: ...ve been set to record to PC Export folder Select Export folder by clicking on button then direct to the ding file size exceeds the time you set the system will create a new file continue recording folder to be exported File size Set the limit for the size of the single recording file in minutes When the single recor to Press Apply to apply the setting changes or Reset to reset without saving the n...

Страница 15: ...thout saving the ange 5 3 ork settings and the settings relating to DDNS Bandwidth SMTP FTP Alarm can be configured on this page Network tab the DDNS tab the MTP FTP tab the Network alarm tab and the Wireless tab 5 3 The following information is required to configure the network settings Contact the network administrator or your Internet service provider the setting changes or Reset to re ch Netwo...

Страница 16: ...T connection application the ISP us Note If PPPoE is used as IP type IP Utility software will not be able to detect the device When not using DHCP enter the IP address of the camera Avoid address conflicts do not enter an IP address already used for a PC or other network cameras Every device on an IP network must have a unique IP address Subnet Mask This field is to set the netmask for your networ...

Страница 17: ...be used Secondary DNS If your ISP provides you an IP address secondary DNS please set it here Username Enter User name of the account used only for PPPoE Password Enter Password of the account used only for PPPoE Port Settings HTTP Port Enter HTTP port number T R SP Port Enter RTSP port number Press Apply to apply the setting changes or Reset to reset without saving the change 17 ...

Страница 18: ...HCP the DDNS function is necessary To use the DDNS function s www sitelutions com www dyndns com www no ip com Enable Check the box to enable DDNS setting Service ISP If you choose EverFocus DDNS server you can easily register a DDNS name and obtain free DDNS services from EverFocus at www everfocusddns com Enter an IP Cam Account Name everfocusddns com Press button to register or update DDNS acco...

Страница 19: ...MTP FTP Set SMTP The settings relating to the mail server used to send the e mail notification from the amera to predefined addresses via SMTP can be configured MTP Server Enter the IP address or the host name of the SMTP server used to ber for SMTP Default is 25 ation user rd tion c S send e mails SMTP Port Enter the port num Authentication Check the box if the SMTP server requires Authentic pass...

Страница 20: ...s Set FTP The settings relating to an FTP server to be used to receive alarm images can be configured FTP Server Enter the IP address or the host name of the FTP server FTP Port Enter the port number for FTP server Default is 21 Recording Path Assign the recording path User Name Set FTP User name Set FTP password de Password PASV mode Check to enable Passive mode most sites normally require Passiv...

Страница 21: ...Network Alarm reserved for PowerCon Set Network Alarm his function is reserved for PowerCon software for the details regarding these the PowerCon network alarm rotocol T settings please refer to the documentation for p 21 ...

Страница 22: ...e Network Camera connect to the WLAN via an Access Point Ad Hoc makes the Network Camera connect directly to a host equipped with a wireless adapter in a peer to peer environment Channel Shows the wireless channel currently in use Default 1 Disable Security Check the box to disable Security When selecting WEP WEP Wired Equivalent Protection key should follow either one of the following rules As 5 ...

Страница 23: ...Key Double confirm network key When selecting WPA PSK WPA2 PSK WPA Wi Fi Protected Access key should follow either one of the following rules As 64 hexadecimal 0 9 A F characters As 8 to 63 ASCII characters Authentication AES or TKIP Default AES Network Key Entering a key in either hexadecimal or ASCII format Confirm Key Double confirm network key IP tatus Show IP status when wireless connection i...

Страница 24: ... 264 and MJPEG simultaneously For ach of them user can set resolution quality and frame rate individually 264 e H esolution 1600x1200 UXGA 1280x960 1280x720 HD720P 1024x768 GA 800x608 SVGA 640x480 VGA 320x240 QVGA 160x112 rame Rate 10fps 1600x1200 UXGA 15fps 1280x960 30fps 1280x720 D720P 1024x768 XGA 800x608 SVGA 640x480 VGA 320x240 VGA 160x112 it Rate The bit rate can be set as Variable Bit Rate ...

Страница 25: ...ge MJPEG Resolution 1600x1200 UXGA 1280x960 1280x720 HD720P 1024x768 XGA 800x608 SVGA 640x480 VGA 320x240 QVGA 160x112 Quality Highest High Normal Low Lowest Frame Rate 10fps 1600x1200 UXGA 15fps 1280x960 30fps 1280x720 HD720P 1024x768 XGA 800x608 SVGA 640x480 VGA 320x240 QVGA 160x112 Press Apply to apply the setting changes or Reset to reset without saving the eo Recording Settings change Vid t v...

Страница 26: ...eo images It is adjustabl Sharpness from 0 100 Camera Settings BLC Select ON or OFF for Backlight Compensation N When the background of the subject is very bright and the subject itself ter nd the lens iris will automatically set for optimum image quality E Select ON or OFF for Auto Exposure O is dark set the BLC ON The BLC will measure the light of the image cen a OFF Backlight will not be compen...

Страница 27: ...perature Off disable AWB function Mirror Select ON or OFF for Mirror ON Sets a horizontal image inversion OFF disable mirror function Flip Select ON or OFF for Flip ON Sets a vertical image inversion OFF disable flip function 5 5 Audio Th camera can transmit audio to client PCs by built in microphone and can play audio received from client PCs into built in speaker This section de conditions o OFF...

Страница 28: ...ow r high Press Apply to apply the setting changes or Reset to reset without saving the 5 6 changes USER Press Add to add a user press Modify to modify a user press Remove to remove a user User Information Account Enter account name Description Enter description Password Enter a password Authority Select authority type from Supervisor Administrator User and Guest tatus Status of the account select...

Страница 29: ...r level does not have access to the user event and Guest the page Press Apply to apply the setting changes or Reset to reset without saving the changes 5 7 EVENT An event in the camera is when an Event Type is activated and causes certain actions to be performed The event type is the set of conditions that specifies how and when which actions will be performed This table describes how to setup act...

Страница 30: ...abs Event List tab Motion Detection tab Event Settings tab and Schedule b l ck event and it will be highlighted Press Press utton to ist cli add an event condition on the To modify the event button to modify the setting of an event To remove an event from event list click on the even it t and will be highlighted Press button to remove an event Pr Note Up to 3 events can be configured in the camera...

Страница 31: ...ad to FTP as notification types 5 Check Enable Pre alarm Buffer and Enable Post alarm Buffer Press Apply pply the setting changes or Can Note 1 If Pre alarm Buffer is active the camera will provide up to 120 sec pre alarm 20 sec post alarm record to the event record timeout duration will be restarted in record additional to the event record 2 If Post Alarm Buffer is active the camera will provide ...

Страница 32: ... that rectangle Press Era the selection here are inguished by 4 ifferent c rea or each area you can set the event action in response to motion detection in that n you can set the Sensitivity level for the motion trigger separately for each area by selecting from 1 low 2 3 4 5 6 7 8 9 to 10 high ser and click on the selected rectangle to remove T 4 possible motion trigger areas which can be dist ol...

Страница 33: ...in Press Apply to apply the setting changes or Reset to reset without saving the hange c Pre Post Alarm Settings This function is used to be able to review what happened immediately before and after a trigger e g 5 seconds before or after a motion has been detected or after re Alarm Buffer Image saved internally in the camera from the time n be set up to 120 seconds motion detection ceases P immed...

Страница 34: ...ting changes or Reset to reset without saving the change Re trigger Filter Setting Re trigger Filter Set a re trigger filter time if another event is triggered during this time this triggered event will be ignored Press Apply to apply the setting changes or Reset to reset without saving the change 5 7 4 Event Schedule Schedule Settings ck The event will start at the specified schedule After select...

Страница 35: ...event schedule time bar The selected blocks will turn blue which means this blue timezone has be set to th backgroun Press Apply to apply the setting changes or Reset to reset without saving the 5 8 SYSTEM Daylight Saving SD card and Maintenance settings can be accessed e Time tab Daylight Saving tab and Maintenance tab 5 8 1 Date Time change Date Time on this page The System page has 3 tabs Dat a...

Страница 36: ...s to go previous year to go previous month to go next month and to go next year Date Click the Time Click on Hour Minute Seconds am pm then use up arrow to increase value and down arrow to decrease value Press Apply to apply the setting changes or Reset to reset without saving the change Set Date Time Sync Check Enable NTP checkbox to enable NTP server NTP server Time automatically adjusted by syn...

Страница 37: ...aylight saving time 3rd 4th Last et the end day of the week from daylight saving time Sunday Monday e January February March April ay June July August September October November December End time when daylight saving ends S Set the start day of the week for daylight saving time Sunday Monday Tuesd Wednesday Thursday Friday Saturday S May June July August September October November December Set the...

Страница 38: ...the factory default Restore Resets all parameter except the IP parameters and Daylight Saving settings to the original factory settings The unit is restarted and most current settings are r values by pressing Restore button The only settings saved are IP setting DDNS setting Default The Default button should be used with caution Pressing this button will return all of the camera s settings includi...

Страница 39: ...he saved config file see above and then click the Load button The settings will be restored to the previous configuration Upgrade Firmware Upgrade the EQN2200 2201 with the latest firmware Press the Browse button to locate the firmware file Press the Upgrade button to upgrade the firmware Note 1 Do not disconnect power to the unit during the upgrade The unit reboots automatically after the upgrade...

Страница 40: ...auppauge NY 11788 D Te F In S H C B Te Your EverFocus product is designed and manufactured with high quality materials and components which can be recycled and reused This symbol means that electrical and electronic equipment at their end of life should be disposed of separately from your household waste Please dispose of this equipment at your local community waste collection recycling centre In ...

Отзывы: