background image

13

Содержание MAGNUM 901 EB EVOLUTION

Страница 1: ...ION BASIC OPERATION MAINTENANCE TROUBLESHOOTING MANUAL EUREKA S P A VIA DELL ARTIGIANATO 30 32 35013 CITTADELLA PD ITALY TEL 39 049 9481800 FAX 39 049 9481899 INTERNET WWW EUREKASWEEPERS COM E MAIL INFO EUREKASWEEPERS COM ...

Страница 2: ......

Страница 3: ...UARD SEALING 26 HOPPER SEALING REPLACEMENT 28 FILTER REPLACEMENT 30 HYDRAULIC OIL AND HYDRAULIC COMPONENTS REPLACEMENT 32 GREASING POINTS 34 TECHNICAL DIMENSION DRAWINGS 35 TECHNICAL SPECIFICATION CHART 36 HYDRAULIC SCHEME 38 SETTING HYDRAULIC CONTROL 42 RELIEF VALVE 42 PERIODIC SERVICING 43 SUGGESTED REPLACEMENT LIST 44 MAINTENANCE SCHEDULED SERVICING 46 TROUBLESHOOTING CHART 53 FAILURES OF THE C...

Страница 4: ...al or public uses Described in this manual are various installation checking and maintenance operations necessary for keeping your sweeper in tip top condition These are normal maintenance measures that any operator will be able to carry out with implements that he or she should normally have in the company In the case of particularly demanding work please call in specialised help OUR COMPANY AIMS...

Страница 5: ...facturer are identified through three plates on the left of the drivers seat REFER TO THESE DETAILS WHEN ORDERING SPARE PARTS OR MAKING ANY OTHER ENQUIRY TO THE MANUFACTURER EUREKA sweepers conform with the EEC directives and show the CE mark 5 ...

Страница 6: ...OR TOWN AND INDUSTRIAL CLEANING OPERATIONS WITH THE COLLECTION OF MATERIAL AND ITS DISPOSAL THE USER S MANUAL IS AN INTEGRAL PART OF THE SWEEPER AND MUST ACCOMPANY IT UNTIL THE SWEEPER IS DEMOLISHED PURSUANT TO DIRECTIVE 89 392 CE PRESIDENTIAL DECREE 459 DATED 24 07 1996 AND LATER MODIFICATIONS NOTICE IS GIVEN THAT OPERATOR IS INTENDED TO MEAN THE PERSON S ASSIGNED TO INSTALL OPERATE ADJUST CARRY ...

Страница 7: ... PRODUCE AN ACOUSTIC EFFECT THAT WOULD MAKE THE WEARING OF THESE PROTECTIVE DEVICES ADVISABLE DANGER OF BURNING DUE TO VERY HOT SURFACES GLOVES MUST BE WORN SAFETY GLASSES OR GOGGLES MUST BE WORN BE CAREFUL NOT CRUSH YOUR HANDS BETWEEN PARTS IN MOTION ATTENTION DON T GET IN TOUCH WITH WATER THE DEVICES MARKED WITH THIS LABEL ARE NOT TO GET WET USUALLY THEY ARE ELECTRICAL COMPONENTS BEFORE ACCESSIN...

Страница 8: ...rrosive and are anyway suitable for electrical circuits Specialised personnel with thorough knowledge of the machine and its components must be called in to carry out maintenance operations Any maintenance and cleaning operation must be carried out with the machine off with all the mechanisms still after the hot sections have cooled down and with the battery disconnected When using compressed air ...

Страница 9: ...n the raising cylinder for any maintenance operation with the dirt container raised Do not start to perform maintenance operations with parts in movement Protect eyes and ears when using compressed air or water guns for cleaning the machine Use devices to raise the machine that are adequate to bear the weight of the machine itself Do not cause flames or sparks around the machine Disconnect the bat...

Страница 10: ...e machine The operator must care for the machine and keep it in good operating condition The operator must inform his or her superior or the technical department when scheduled maintenance is requested in the case of damage or breakage The operator must not carry people animals or objects on the machine When moving the machine observe the safety measures for circulation The machine cannot be used ...

Страница 11: ...te they must be given only to Collectors with specific authorisation to be checked at the time of consignment MATERIALS COLLECTED BY THE MACHINE The rubbish collected by the machine must be given to town cleaning agencies as it is town rubbish or similar The machine cannot be used for collecting toxic harmful materials SCRAPPING OF THE MACHINE When the machine is to be scrapped it is necessary to ...

Страница 12: ...he pallet by lifting it with a gantry crane or other suitable means providing that belts ropes and chains connected to the machine in the openings indicated in the figure are used DO NOT REMOVE THE MACHINE FROM THE PALLET WITH A FORKLIFT TRUCK THAT COULD DAMAGE IT HANDLING AND TRANSPORT When the machine is moved from one place it is used in to another you are advised to not load it on the vehicle ...

Страница 13: ...13 ...

Страница 14: ...MACHINE DESCRIPTION 1 3 2 4 8 9 10 16 15 14 13 12 11 7 25 20 19 21 22 23 17 18 24 26 5 6 ...

Страница 15: ... Power steering pump 11 Auxiliary motor 12 Lever for service brake 13 Emergency brake pedal 14 Fuse 15 Reverse pedal 16 Forward pedal 17 Operation lever for main brush 18 Operation lever for side brush 19 Lever for lifting hopper 20 Closing lever for hopper 21 Safety switch 22 Shut off vacuum lever 23 Pressure regulation knob for main brush 24 Traction electronic card 25 Pressure valve distributor...

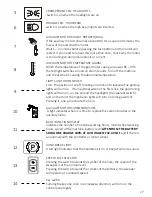
Страница 16: ...f this happens often please check the side brush GREEN LED FUNCTIONALITY OF SIDE BRUSH Switch is on when the brush is working 1 2 GREEN LED FUNCTIONALITY OF MAIN BRUSH Switch Is on when the main brush is working 3 FILTER SHAKER BUTTON Pressing it the filter shaker is activated this enables the cleaning of the filter This operation has to be done with intermission for 5 seconds for 3 to 4 times Not...

Страница 17: ...n the first click the positioning lights will turn on on the second the headlights transparent switch and on the third the high beam lights will turn on orange switch Pressing it one will activate the horn MULTIFUNCTION DISPLAY Indicates the number of machine working hours motor wheel working hours speed of the machine battery level ATTENTION THE BATTERY SHOULD BE CHARGE 100 AT A VOLTAGE OF 37 4 V...

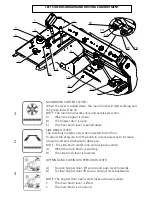
Страница 18: ...d the green led will be on NOTE The main brush works only and exclusively when A When the hopper is down B The hopper door is open C The main brush lever is pulled down LEFT SIDE DASHBOARD AND DRIVING COMPARTMENT SIDE BRUSH LEVER The side brush rotates only when lowered to the floor To adjust the pressure turn the knob in a clockwise way to increase pressure and anit clockwise to decrease NOTE The...

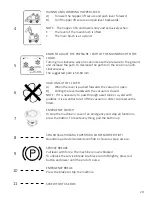
Страница 19: ...ever is pushed forwards the vacuum is open B Pulling the lever backwards the vacuum is closed NOTE If it is necessary to pass through a wet zone or a yard with puddles it is essential to cut off the vacuum in order to preserve the filters 6 EMERGENCY SWITCH To stop the machine in case of an emergency and stop all functions press the button To reset everything pull the button up 7 SPIA ROSSA CHIUSU...

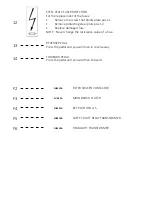
Страница 20: ...d fuse NOTE Never change the resistance value of a fuse 12 REVERSE PEDAL Press the pedal and you will drive in reverse way 13 FORWARD PEDAL Press the pedal and you will drive Forward 14 FUSE 10A F6 FUSE 15A F2 FUSE 3A F3 FUSE 25A F4 FUSE 10A F5 HEADLIGHT TRANSFORMER FILTER SHAKER CONTACTOR MAIN BRUSH CLUTCH KEY POSITION 15 SAFETY LIGHT RELAY TRANSFORMER ...

Страница 21: ...E KEY CHECK THE LEVEL OF THE FUEL TANK START ENGINE SEE PAGE 20 CHECK THAT THE LEDS ON THE DASHBOARD ARE NOT SIGNALING ALARMS OPEN THE HOPPER CONTAINER DOOR IF IT IS CLOSED LOWER THE HOPPER IF IT IS RAISED OPEN THE SUCTION WITH THE APPROPRIATE LEVER LOWER THE MAIN BRUSH AND VERIFY THE CLEANING PATH LOWER THE SIDE BRUSH IF NECESSARY PRESS THE RIGHT HAND PEDAL FOR ADVANCEMENT AND THE LEFT HAND PEDAL...

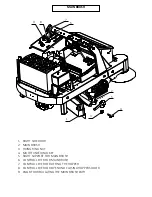
Страница 22: ...IXING RING NUT 4 MULTIFUNCTIONAL KEY 5 RIGHT SUPPORT FOR MAIN BRUSH 6 CONTROL LEVER FOR MAIN BRUSH 7 CONTROL LEVER FOR LIFTING THE HOPPER 8 CONTROL LEVER FOR OPEN AND CLOSING HOPPERS DOOR 9 KNOB FOR REGULATING THE MAIN BRUSH PATH 1 2 5 4 3 6 7 8 9 ...

Страница 23: ...the adjustment knob until one reaches an optimal path of the brush 50 60 mm wide MAIN BRUSH PRESSURE ADJUSTMENT MAIN BRUSH REPLACEMENT NOTE REMOVE THE KEY FROM THE IGNITION AND DISCONNECT THE BATTERY Abbassare la spazzola centrale leva pos 6 Open up rear hood and get appropriate key pos 4 Open right side door pos 1 Unscrew ring nut pos 3 Extract support pos 5 and the brush pos 2 Replace brush and ...

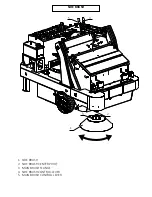
Страница 24: ...SIDE BRUSH 1 SIDE BRUSH 2 SIDE BRUSH CENTER PIVOT 3 MAIN BRUSH FLANGE 4 SIDE BRUSH CONTROL LEVER 5 MAIN BRUSH CONTROL LEVER 1 2 4 5 3 ...

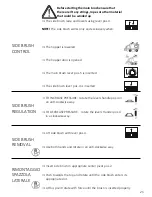
Страница 25: ...serted The hopper is lowered SIDE BRUSH REGULATION TO INCREASE PRESSURE rotate the levers handle pos 4 in an anti clockwise way TO DECREASE PRESSURE rotate the levers Handel pos 4 in a clockwise way SIDE BRUSH REMOVAL Lift side brush with lever pos 4 Use both hands and rotate in an anti clockwise way RIMONTAGGIO SPAZZOLA LATERALE Insert side brush in appropriate center pivot pos 2 Push towards the...

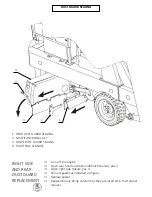
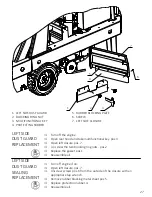
Страница 26: ...IGHT SIDE CLOSURE RIGHT SIDE AND REAR DUST GUARD REPLACEMENT Turn off the engine Open rear hood and take multifunctional key pos 2 Open right side closure pos 4 Pull out gasket as indicated on figure Replace gasket Reassemble all being careful that they are inserted in their proper manner 1 4 2 3 2 ...

Страница 27: ...s 7 Un screw the two blocking ring nuts pos 2 Replace the gasket pos 1 Reassemble all LEFT SIDE DUST GUARD SEALING REPLACEMENT Turn off engine if on Open left closure pos 7 Unscrew screws pos 6 from the outside of the closure with an appropriate tap wrench Remove rubber blocking metal sheet pos 5 Replace protection rubber 4 Reassemble all 5 RUBBER BLOCKING PLATE 6 SCREW 7 LEFT SIDE CLOSURE 27 1 2 ...

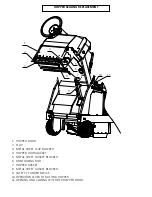
Страница 28: ...ET FLAP BLOCKER 4 HOPPER DOOR GASKET 5 METAL SHEET GASKET BLOCKER 6 REINFORCING ROD 7 HOPPER GASKET 8 METAL SHEET GASKET BLOCKER 9 SAFETY CYLINDER DEVICE 10 OPERATION LEVER FOR LIFTING HOPPER 11 OPENING AND CLOSING LEVER FOR HOPPER DOOR 1 9 2 3 4 5 6 7 8 10 11 ...

Страница 29: ...emove metal sheet pos 3 Replace flap pos 2 Reassemble all Empty hopper and keep in a lifted position lever pos 10 with the hopper door open lever pos 11 REPLACEMENT OF HOPPER DOOR GASKET Insert security cylinder device pos 9 Turn off engine Remove metal sheet pos 5 Replace hopper door gasket pos 4 and the reinforcing rod pos 6 inside of it Reassemble all Insert security cylinder pos 9 Turn off eng...

Страница 30: ...CKER SCREW 11 FILTER FIXING FRAME 12 MOTORIZED SHAKER 12 MOTORIZED SHAKER BLOCKER 13 MOBILE CONNECTOR 14 MOTOR SHAKER BLOCKING SCREWS 15 SPACER BARS 16 FILTER BAR STRETCHER 17 HOPPER HOOD 18 ELECTRICAL RUBBER PROTECTION PANEL 19 REPLACEMENT FUSE 20 FUSE HOLDER FILTER REPLACEMENT 18 15 16 12 1 2 3 4 5 11 10 9 7 6 8 17 13 14 19 20 21 ...

Страница 31: ...bars pos 16 from the filter Remove locking plates pos 11 Remove filter support pos 4 Replace filter pos 5 Reassemble all the parts by following the above phases in reverse order Check that the sealing pos 1 is in good condition and if necessary replace it Reassemble all being careful to insert connector pos 14 correctly Screw filter blocker pos 10 until spring pos 9 is compressed in a length of 25...

Страница 32: ...1 KEY SWITCH 2 HYDRAULIC OIL TANK FILLER CAP 3 OIL FILTER CARTRIDGE 4 OIL LEVEL ROD 5 BATTERY 6 OIL TANK DRAINAGE HYDRAULIC OIL AND HYDRAULIC COMPONENTS REPLACEMENT 5 1 2 3 4 6 ...

Страница 33: ... if closed the door and lower the hopper Turn off machine and remove key pos 1 Remove oil level rod pos 4 Have an adequate container and position it under the oil tank Remove the drainage cap pos 4 and empty out oil Fit cap back on drainage pos 7 Refill tank superior to the oil level rod pos 4 total tank oil plant liters 12 Insert the oil level rod Start engine with key switch pos 1 Carry out a fe...

Страница 34: ...REASER 5 SECURITY PISTON 6 LOWER STEERING COUNTERPLATE GREASER 7 UPPER STEERING COUNTERPLATE GREASER PLATFORM 8 RIGHT PIVOT HOPPER ROTATION GREASER 9 RIGHT TILTING HOPPER PIVOT GREASER 10 RIGHT HOPPER DOOR BRASS GREASER 11 MAIN BRUSH ROCK SHAFT GREASER NOTE ALL UPPER LISTED POINTS HAVE TO BE GREASED PERIODICALLY EVERY 200 HOURS 12 1 2 3 5 4 6 7 8 9 10 11 ...

Страница 35: ...TECHNICAL DIMENSION DRAWINGS 35 ...

Страница 36: ...t Side brush in 3 ranks of PPL bristles 0 8 1 2 1 2 diameter Ø 600 mm Retractable Speed of rotation 65 70 RPM Rapid replacement WEIGHT Weight MAGNUM EB without batteries 948 Kg PACKING Size of packing box 227x136x177 cm 5 5 m Weight of packing box 115 kg FILTERING SYSTEM BAG FILTER Type of filter in polyester Standard 452 KLEENTES 450 g m class L USG Eureka p n 520045 Total filtering area 6 sq mts...

Страница 37: ...apacity 10 lt Total tank content and equipment 12 lt Oil flow 15 5 l min HYDRAULIC OIL FILTER Type ARGO 30lt Pressurizzato Filtration capacity 33 micron Particle holding capacity 5 gr INSTALLABLE BATTERIES Installable batteries 36v 368 Ah heavy duty battery 1500 cycles In 5 hours Table top batteries size 762x415x505 mm Installable batteries dimensions 765x485x505 mm Weight of batteries with acid 4...

Страница 38: ...HYDRAULIC SCHEME ...

Страница 39: ...8 E Hopper gate cylinder P N 680017 F Hopper lift cylinder P N 680016 G Max pressure valve 60 bar P N 110996 H Flow control valve P N 680324 L Power steering pump P N 680421 M1 M2 Hydraulic pressure check point P N 680132 N Return oil collector P N 210694 O Max pressure valve 15 bar P N 680019 S Capacity control nipple P n 210381 39 ...

Страница 40: ...HYDRAULIC SCHEME ...

Страница 41: ... P N 680132 N Return oil collector P N 210694 O Max pressure valve 15 bar P N 680019 S Capacity control nipple P n 210381 1 Hose TH1SN06 3 8 180 bar P N 680010 2 Hose EVERGREEN 1SN 3 8 180 BAR P N 680426 3 Hose TT2TE06 3 8 63 BAR P N 680423 4 Hose TT2TE06 3 8 63 BAR P N 680007 5 Hose TT2TE06 3 8 63 BAR P N 680424 6 Hose TT2TE06 3 8 63 BAR P N 680110 7 Hose TH2SC04 1 4 400 BAR P N 680003 8 Hose TH2...

Страница 42: ...SETTING HYDRAULIC CONTROL RELIEF VALVE For setting the hydraulic control relief valve adjust the POS 1 valve to 52 55 bar ...

Страница 43: ...UT HAVING FIRST TURNED IT OFF ENGAGED THE HAND BRAKE BLOCKED THE WHEELS AND DISCONNECTED THE CONNECTOR OF THE TRACTION BATTERY ATTENTION DO NOT TAMPER WITH ANY SAFETY RELATED PART THESE CAN BE REMOVED ONLY AS PART OF THE MAINTENANCE OF AN AUTHORISED SERVICE CENTRE EXTRAORDINARY MAINTENANCE AS WELL AS THE SERVICING PROVIDED FOR IN THE SCHEDULED SERVICINGS REFERRED TO BELOW YOU SHOULD REMEMBER TO RE...

Страница 44: ...PL BLACK N 3 DIAM 1 2 PPL BLACK OPTIONAL SIDE BRUSH P N 520037 DISK BRISTLES HOLDER IN PPL BRISTLES ARRANGED IN TWO ROWS N 1 DIAM 1 5 PPL WHITE DIAM 0 6 STEEL N 2 DIAM 1 2 PPL WHITE DIAM 0 6 STEEL STANDARD MAIN BRUSH P N 520035 MOPLEN CONTAINER BRISTLES ARRANGED IN THREE ROWS N 1 DIAM 1 0 PPL BLACK SMOOTH N 2 DIAM 0 8 PPL WHITE SMOOTH N 3 DIAM 0 5 PPL BLACK OPTIONAL MAIN BRUSH P N 520038 MOPLEN CO...

Страница 45: ...360251 900583 340083 340080 340085 520040 520039 520038 520035 490073 M30225 340087 360094 340084 520037 520041 M30254 340086 ...

Страница 46: ...ach element Check the state of brush wear Check the right and left hand side rear and front and flap dust guard sealing Check the rubbish container sealing Check the dust filter efficiency Check belt tension Check the hydraulic system piping Check the functioning of all the instruments and control levers Check the good functioning of the braking system Check the hydraulic oil level Check the machi...

Страница 47: ...compressed air especially the slits at the back Clean above the brushes and the manifold TRACTION MOTOR Clean the outside of the motor with compressed air Check the motor wiring Check the battery liquid level Check the load state of each element Check the state of brush wear Check the right and left hand side rear and front and flap dust guard sealing Check the rubbish container sealing Check the ...

Страница 48: ...lits at the back Clean above the brushes and the manifold TRACTION MOTOR Clean the outside of the motor with compressed air Check the motor wiring Check the battery liquid level Check the load state of each element Check the state of brush wear Check the right and left hand side rear and front and flap dust guard sealing Check the rubbish container sealing Check the dust filter efficiency Check be...

Страница 49: ...compressed air especially the slits at the back Clean above the brushes and the manifold TRACTION MOTOR Clean the outside of the motor with compressed air Check the motor wiring Check the battery liquid level Check the load state of each element Check the state of brush wear Check the right and left hand side rear and front and flap dust guard sealing Check the rubbish container sealing Check the ...

Страница 50: ...lits at the back Clean above the brushes and the manifold TRACTION MOTOR Clean the outside of the motor with compressed air Check the motor wiring Check the battery liquid level Check the load state of each element Check the state of brush wear Check the right and left hand side rear and front and flap dust guard sealing Check the rubbish container sealing Check the dust filter efficiency Check be...

Страница 51: ...ially the slits at the back Clean above the brushes and the manifold TRACTION MOTOR Clean the outside of the motor with compressed air Check the motor wiring Check the battery liquid level Check the load state of each element Check the state of brush wear Check the right and left hand side rear and front and flap dust guard sealing Check the rubbish container sealing Check the dust filter efficien...

Страница 52: ...RRYING OUT THE SCHEDULED SERVICING AFTER 800 AS AFTER 300 DATE DAY MONTH YEAR EFFECTIVE NO OF HOURS THE SCHEDULED SERVICING WAS CARRIED OUT BY NAME SURNAME SIGN SEAL OR STAMP OF THE DEALER CARRYING OUT THE SCHEDULED SERVICING AFTER 900 AS AFTER 400 DATE DAY MONTH YEAR EFFECTIVE NO OF HOURS THE SCHEDULED SERVICING WAS CARRIED OUT BY NAME SURNAME SIGN SEAL OR STAMP OF THE DEALER CARRYING OUT THE SCH...

Страница 53: ...rn brushes Have it replaced The traction does not work 12 Dead battery Recharge it 13 Brake is engaged Disengage it 14 Key out Insert it 15 Seat safety device on Sit down 16 125A protection traction fuse is faulty Replace it 17 Motor wheel malfunctioning or blocked Have it repaired or replace it 18 Malfunctioning remote electric motor switch Have it replaced 19 Electronic check malfunctioning Have...

Страница 54: ...Disconnect 52 Main brush does not work Insert main brush 53 Main brush lever dipswitch not adjusted or malfunctioning Have it replaced 54 Dead battery Recharge it 55 Transformer 36 24V RELAY FLASHING LIGHT faulty Have it replaced 56 Fuse pos 5 TRANSFORMER faulty Replace it 57 Faulty relay 4 Have it replaced 58 Electronic check malfunctioning Have it replaced The main brush does not clean evenly 59...

Страница 55: ...replaced 94 Side flaps open Close them again 95 Suction device malfunctioning Have it repaired 96 Vacuum tubes damaged Replace them Loss of material and dust around the machine 97 Suction closed Open it 98 Dust guard sealing broken Replace 99 Suction device broken Have it replaced 100 Vacuum tubes damaged Replace them 101 Filters clogged Clean them Dust and material comes out from the front 102 Ru...

Страница 56: ...rrect assembly of the controller Check the assembly of the controller 17 Incorrect battery parameters Check the battery voltage and the connections to the battery High resistance in batteries Batteries disconnect during operation Fuse blown or contactor open Check the 125 A fuse and the contactor for the traction 18 Incorrect battery parameters Check the battery voltage and the connections to the ...

Страница 57: ...imary contactor Phases of the motor out of sync Check the connection of the power source to the motor 39 Primary contactor open Verify the condition of the primary contactor Connectors bent or oxidised Verify the condition of the connections to the contactor for the traction Fuse blown Verify the condition of the 125 A fuse 41 The signal from the pedal potentiometer high Verify the condition of th...

Страница 58: ...58 ...

Страница 59: ... the machine and or parts which have been repaired or altered outside Eureka s plant or the facility of Eureka s Authorized Sales Service Representative This warranty does not apply to routine wearable parts such as brushes flaps filters seals plugs hoses fuses or similar items Moreover this warranty does not extend to the MAGNUM EB EVOLUTION or any of its parts already repaired or replaced under ...

Страница 60: ...HAVE YOU ACCEPTED IT Eureka S p A Viale dell Artigianato 30 32 35013 CITTADELLA PD ItalyTel 39 049 9481800 Fax 39 049 9481899 INTERNET www eurekasweepers com E MAIL info eurekasweepers com USERR INFORMATION TYPE OF FLOOR CLEANING AREA m2 MACHINE INFORMATION MODEL OF THE MACHINE FRAME S NUMBER S N INSTALLATION DATE INSTALLATION FORM NECESSARY TO ACTIVATE WARRANTY Warranty claims will be evaluated o...

Страница 61: ...ziale commerciale ed industria leggera EN 61000 6 3 2001 Compatibilità elettromagnetica Parte 6 1 Norma generica di immunità per ambiente residenziale commerciale ed industria leggera EN 61000 6 1 2001 In base a quanto previsto dalle Direttive 2006 42 CEE 2014 35 UE 93 68 CEE 2014 30 UE 92 31 CEE Dichiara che la stessa è conforme ai requisiti di sicurezza e tutela della salute attualmente in vigor...

Страница 62: ......

Отзывы: