background image

Содержание 536.881121

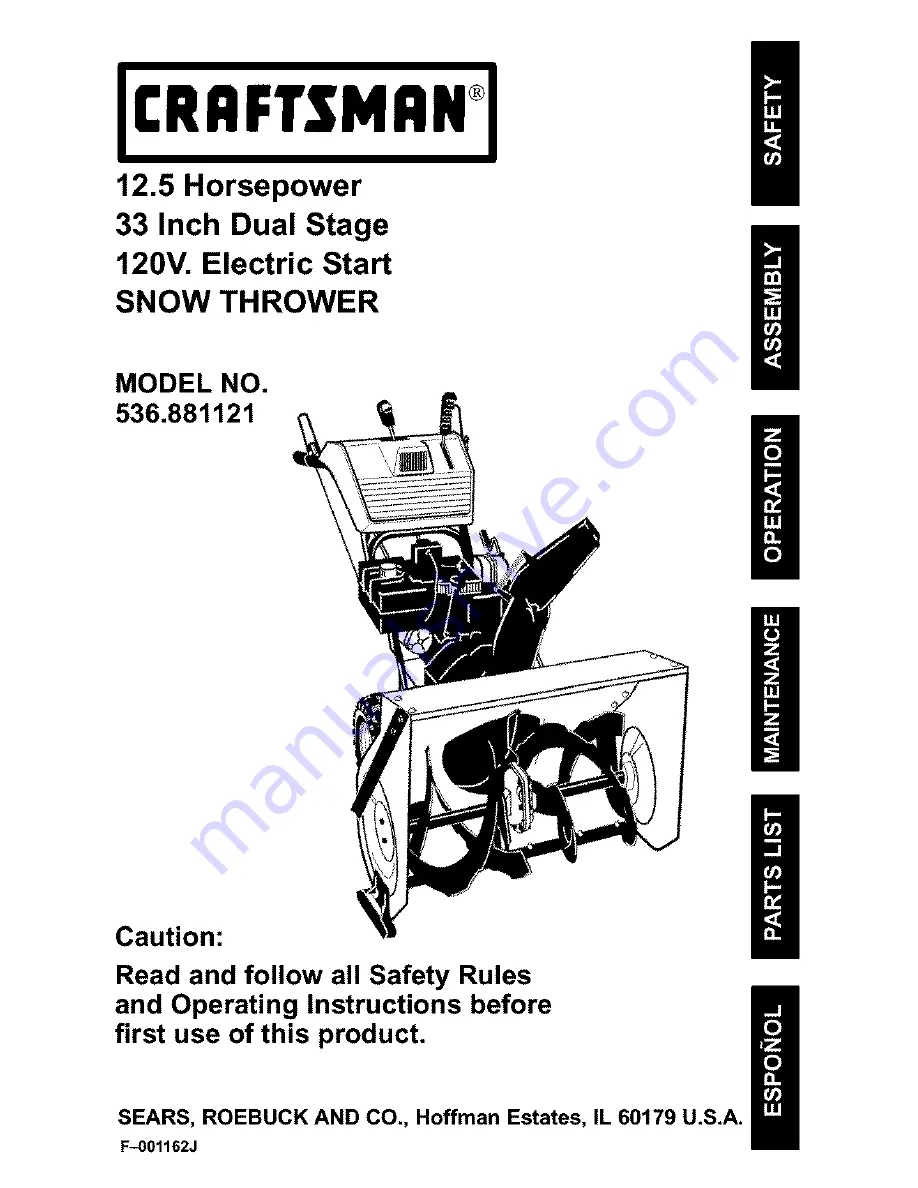
Страница 1: ...Stage 120V Electric Start SNOW THROWER MODEL NO 536 881121 Caution Read and follow all Safety Rules and Operating Instructions before first use of this product SEARS ROEBUCK AND CO Hoffman Estates IL 60179 U S A F O01162J g 0 0 a g ...

Страница 2: ...NEAREST Sears SERVICE CENTER DEPARTMENT IN THE UNITED STATES THIS WARRANTY APPLIES ONLY WHILE THIS PRODUCT IS IN USE IN THE UNITED STATES This warranty gives you specific legal rights and you may also have other rights which may vary from state to state Sears Roebuck and Co D617WA Hoffman Estates L 60179 _ _ _I_ 4 _I_ _ LOOK FOR THIS SYMBOL TO POINT OUT IMPORTANT SAFETY PRECAUTIONS IT MEANS ATTENT...

Страница 3: ...62J 3 Always wear safety glasses or eye shields during operation or while performing an ad justment or repair to protect eyes from foreign objects that may be _rewn from the snow thrower OPERATION 1 Do not operate this machine ifyou are tak ing drugs or other medication which can cause drowsiness or affect your ability to operate this machine 2 Do not use his machine if you are mentally or physica...

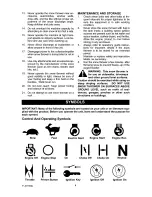
Страница 4: ...uipment is in safe working condition 2 Never store the snow thrower with fuel in the tank inside a building where ignition sources are present such as hot water and space heaters clothes dryers and the like Allow the engine motor to cool before storing in any enclosure 3 Always refer to operator s guide instruc tions for important details if the snow thrower is to be stored for an extended period ...

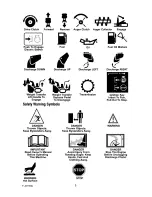
Страница 5: ...press Pedal Engage To Disengage Safety Warning Symbols Disc_RIGHT m Ignition Key Insert To Run Pull Out To Stop DANGER Thrown Objects Keep Bystanders Away O DANGER Thrown Objects Keep Bystanders Away WARNING IMPORTANT Read Owner s Manual Before Operating This Machine DANGER Avoid Injury From Rotating Auger Keep Hands Feet And Clothing Away DANGER Stop The Engine Before Unclogging Discharge Chute W...

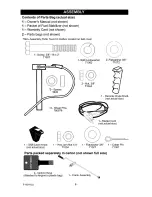
Страница 6: ...oxlocatedonbeltcover 1 Screw 3 8 16 x 2 71007 1 Split Lockwasher 71062 2 Nut 3 8 71044 2 Flatwasher 3 8 71072 1 Remote Chute Knob not actual size 1 Shift Lever Knob 1 Flatwasher 3 8 1 Cotter Pin not actual size 71071 71081 1 Hex Jam Nut 1 4 71034 Parts packed separately in carton not shown full size 2 Ignition Keys Attached to engine in plastic bag 1 Crank Assembly _ F_ 01162J 6 ...

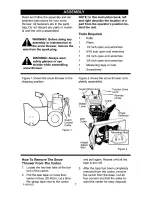
Страница 7: ...nches 3 4 inch open end wrenches 3 8 inch open end wrenches Measuring tape or ruler Screwdriver Figure 1 shows the snow thrower in the shipping position Clutch Control Cable Figure 1 Figure 2 shows the snow thrower com pletely assembled Traction Dnve Lever Remote Chute Crank Lever Drift Cutter Chute Deflector Height Adjust Skid Figure 2 How To Remove The Snow Thrower From The Carton 1 Locate the t...

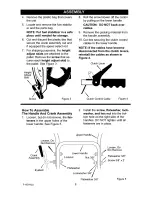
Страница 8: ...assembly 10 Cut ties securing the clutch control cables to the lower handle NOTE If the cables have become disconnected from the clutch levers reinstall the cables as shown in Figure 4 Clutch Lever Adjust Skid Screw Figure 3 Clutch Control Cable Figure 4 How To Assemble The Handle And Crank Assembly 1 Loosen but do not remove the fas teners in the upper holes of the lower handle See Figure 5 2 Ins...

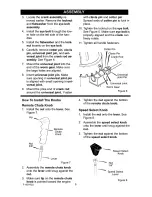
Страница 9: ...in and cotter pin Spread ends of cotter pin to lock in place 10 Tighten the Iocknut on the eye bolt See Figure 5 Make sure eye bolt is properly aligned and the crank can freely rotate 11 Tighten all handle fasteners Cotter Pin Clevis Pin Crank Rod Universal Joint Pin Universal Joint Worm Gear Figure 6 How To Install The Knobs Remote Chute Knob 1 Install the nut onto the lever See Figure 7 Rem_e Ch...

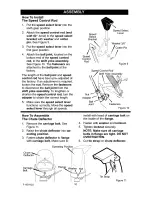
Страница 10: ... assembly To lengthen or shorten the speed control rod turn the adapter to obtain the correct length 5 Make sure the speed select lever functions correctly Move the speed select lever through all speeds Speed Select Bracket Speed Control Rod Speed Select Lever Washer 3 8 _rPin Figure 9 Speed Control Rod Figure 0 How To Assemble The Chute Deflector 1 Remove the carriage bolt See Figure 11 2 Raise t...

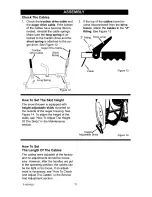
Страница 11: ...Z fitting See Figure 13 Z Fitting Drive Lever Cable Figure 13 How To Set The Skid Height The snow thrower is equipped with height adjustable skids mounted on the outside of the auger housing See Figure 14 To adjust the height of the skids see How To Adjust The Height Of The Skids in the Maintenance section Adjustable Skids Figure 14 How To Set The Length Of The Cables The cables were adjusted at t...

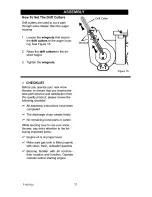
Страница 12: ...e that you receive the best performance and satisfaction from this quality product please review the following checklist _ All assembly instructions have been completed _ The discharge chute rotates freely No remaining loose parts in carton While learning how to use your snow thrower pay extra attention to the fol lowing important items _ Engine oil is at proper level _ Make sure gas tank is fille...

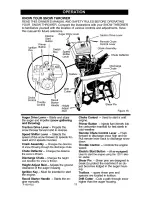
Страница 13: ... of snow throwingthroughthe dischargechute Chute Deflector Changesthe distance the snow is thrown Discharge Chute Changes the height and direction the snow is thrown Height Adjust Skid Adjusts the ground clearance of the auger housing ignition Key Must be inserted to start the engine Recoil Starter Handle Starts the en gine manually F_ 01162J Shear Pin Figure 16 13 Choke Control Used to start a co...

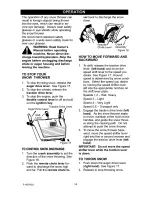
Страница 14: ... remote chute lever for ward to discharge the snow high and far Pull the remote chute le vet back to discharge the snow down Chute Lever Assembly Figure 18 HOW TO MOVE FORWARD AND BACKWARD 1 To shift release the traction drive lever left hand and move the speed shift lever to the speed you desire See Figure 17 Ground speed is determined by snow condi tions Select the speed you desire by moving the...

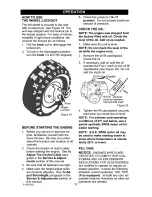
Страница 15: ...ssure 14 17 pounds Do not exceed maximum amount of pressure CHECK THE OIL NOTE The engine was shipped from the factory filled with oil Check the level of the oil Add oil as needed 1 Make sure the unit is level NOTE Do not check the level of the oil while the engine runs 2 Remove the oil fill cap dipstick Check the oil 3 If necessary add oil until the oil reaches the FULL mark on the oil fill cap d...

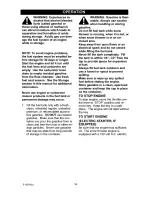
Страница 16: ...oline from is clean and free from rust or other for eign particles Never use gasoline that may be stale from long periods of storage in the container _lb ARNING Gasoline is fiam mable Always use caution when handling or storing gasoline Do not fill fuel tank while snow thrower is running when it is hot or when snow thrower is in an en closed area Keep away from open flame or an electrical spark an...

Страница 17: ...a safe place 4 Rotate choke knob clockwise to the choke ON position 5 Connect the power cord to the switch box on the engine 6 Plug other end of power cord into a three hole grounded 120 VOLT AC F_ 01162J 17 receptacle See WARNING in this section 7 Push the primer button while cov ering the vent hole as follows Re move finger from primer button between primes Do not prime if temperature above 50 F...

Страница 18: ...push the primer button if the en gine fails to start follow the Cold Start instructions FROZEN STARTER If the starter is frozen and will not turn engine 1 Pull as much rope out of the starter as possible 2 Release the starter handle and let it snap back against the starter If the engine still fails to start repeat the two previous steps until the engine starts Then continue with the direc tions fo...

Страница 19: ...f falls 3 For complete snow removal slightly overlap each path previously taken 4 The snow should be discharged down wind whenever possible 5 For normal usage set the skids so that the scraper bar is 1 8 above the skids For extremely hard packed snow surfaces adjust the skids upward so that the scraper bar touches the ground 6 On gravel or crushed rock surfaces set the skids at 1 1 4 below the scr...

Страница 20: ...buse or negli gence To receive full value from the warranty the operator must maintain the snow thrower as instructed in this manual Some adjustments will need to be made periodically to properly maintain your snow thrower All adjustments in the Service and Ad justments section of this manual should be checked at least once each season AFTER EACH USE Check_ranyloose ordamaged parts Tighten any loo...

Страница 21: ...ice and Adjustment section Figure 22 LUBRICATION EVERY 25 HOURS Lubricate Disc Drive Plate every twenty five 25 hours and at the end of the season and or before storage To Lubricate 1 Position speed selector lever in first gear 2 Stand the snow thrower up on the auger housing end 3 Remove the bottom panel 4 Turn disc drive plate clockwise by hand until grease zerk is clearly visible at front cente...

Страница 22: ...usting 2 Auger Gear Box The auger gear box is lubricated at the factory and should not require additional lubrica tion If for some reason the lubri cant should leak out have auger gear case checked by a competent repairman ENGINE LUBRICATION Check the crankcase oil level before starting the engine and after each five 5 hours of continuous use See Figure 24 Add S A E 5W30 motor oil as needed Tighte...

Страница 23: ...OTE For rocky or uneven surfaces raise the front of the snow thrower by moving the skids down _lb WARNING Be certain to maintain proper ground clearance for your particular area to be cleared Objects such as gravel rocks or other debris if struck by the impeller may be thrown with sufficient force to cause personal injury property damage or damage to the snow thrower TO ADJUST SCRAPER BAR After co...

Страница 24: ...e See Figure 27 Hold the square end of the threaded portion with pliers and ad just the Iocknut in or out until the excess slack is removed Drive Lever Z Fitting Figure 26 Figure 27 5 Pull the cable back through the spring and connect the cable Do the same for the other drive lever cable if needed NOTE Whenever the traction drive or au ger belts are adjusted or replaced the cables will need to be ...

Страница 25: ...elt if it is slipping See To Replace Belts paragraph in this section TO REPLACE BELTS The drive belts on this snow thrower are of special construction and should be replaced with original equipment belts available from your nearest Sears Store A distributor s list is supplied in the parts manual You will need the assistance of a sec ond person while replacing the belts How To Remove The Auger Driv...

Страница 26: ...e And Adjust ment section 16 Connect the spark plug wire F_ 01162J How To Remove the Traction Drive Belt If the snow thrower will not move for ward check the traction drive belt for wear or damage If the traction drive belt is worn or damaged replace the belt as follows 1 Remove the gas from the gas tank Stand the snow thrower up on the front end of the auger housing _ WARNING Drain the gasoline o...

Страница 27: ...belt guide Move the belt guide to the correct position Tighten the mounting bolt for the belt guide 6 Install the belt cover Tighten the screw See Figure 28 7 Connect the spark plug wire HOW TO ADJUST OR REPLACE THE FRICTION WHEEL How To Check The Friction Wheel If the snow thrower will not move for ward check the traction drive belt the traction drive cable or the friction wheel If the friction w...

Страница 28: ... all speeds 6 Install the bottom panel See Figure 34 7 Tighten the bolts on each side of the bottom panel 8 Install the bolts on each side of the bottom panel F_ 01162J Speed _ Control _ _ Rod Nut Adaptor_ _ Ball Joint Shift Yoke Assembly Fasteners Figure 36 How To Replace The Friction Wheel If the friction wheel is worn or damaged the snow thrower will not move forward The friction wheel must be ...

Страница 29: ...4 Make sure the hex shaft turns free ly 15 Attach the speed control rod to the shift yoke assembly See Figure 36 16 Check the adjustment of the friction wheel See How To Adjust The Friction Wheel in this section 17 Make sure the friction wheel and the disc drive plate are free from grease or oil 18 Install the bottom panel See Figure 34 19 Tighten the bottom bolts on each side of the bottom panel ...

Страница 30: ...EPLACE THE SPARK PLUG NOTE This spark ignition system meets all requirements of the Canadian Interfer ence Causing Equipment Regulations If you have difficulty starting the snow thrower adjust or replace the spark plug Replace the spark plug is the electrodes are pitted or burned or if the porcelain is cracked Follow the instruc tions below To adjust 1 Clean spark plug by carefully scraping the el...

Страница 31: ...acts water It acts on the gasoline to form acids which damage the engine F_ OlI62J 1 2 3 4 5 To remove gasoline run the engine until the fuel tank is empty and the engine stops If you do not remove the gasoline use fuel stabilizer supplied with unit or purchase Craftsman Fuel Stabi lizer No 3550 Add fuel stabilizer to any gasoline left in the tank to mini mize gum deposits and acids If the fuel ta...

Страница 32: ...ct spark plug wire Tighten all bolts and make all necessary repairs If vibration continues have the unit serviced by a Sears service repairman Unit fails to propel itself Drive belt loose or damaged Incorrect adjustment of traction drive cable Worn or damaged friction wheel Auger drive belt loose or damaged Replace drive belt Adjust traction drive cable Replace friction wheel Unit fails to dischar...

Страница 33: ...ption MODEL 143 011201 SCREW 5 16 18 WASHER GUIDE ROD BELT PLASTIC WASHER WASHER SCREW 5 16 24X 1 00 SPACER PULLEY HALF WASHER FLAT BELT V FLATWASHER SPACER SLEEVE PULLEY ENGINE BELT V WASHER FLAT WASHER SCREW 3 8 24X1 00 OWNER S MANUAL 33 319042 Part NO ENGINE 710024 71060 3949 6711 71060 910828 762291 579854 579861 302707 712120 586251 586253 761788 50677 71063 71015 F_001162J 69 ...

Страница 34: ...CRAFTSMAN 33 12 5HP SNOW THROWER 536 881121 ELECTRIC START ASSEMBLY 319051 Key No 6 7 8 9 Description MOTOR STARTER SCREW SCREW CORD STARTER Part No 762323 6216 6217 6219 F_ OlI62J 34 ...

Страница 35: ...62296 105 PIN HAIR 38DIAX1 64LG 711682 106 PIN KLIK 3 16 DIA 761761 108 ASSY SPRING ATTACH 761766 109 BEARING FL 53703 110 BOLT 3 6 16X1 25 CARR 585781 111 WASHER FLAT 711617 140 LEVER IDLER ARM TRACTION 761701 141 BOLT 625X 135 HHSH 5 16 18 329989 145 IDLER SPRING TRACTION DRIVE 53704 146 SCREW 3 6 16X1 25 761760 148 PULLEY IDLER 50793 149 NUT 3 8 16 590 160 COVER BELT 760478 161 SCREW 1 4 20X 63...

Страница 36: ... 33 12 5HP SNOW THROWER 536 881121 DRIVE COMPONENTS 192 191 191 198 195 217 196 193 215 223 221 222 256 277 246 235 230 249 244 245 243 240 223 222_ 226 275 27O 225 226 224 229 276 278 313995 REV P F_ 01162J 36 ...

Страница 37: ...3 BEARING BALL 43846 224 KEY SQUARE 2001022 225 PULLEY 580961 226 WASHER WAVE 580965 227 FLATWASHER 712123 228 WASHER SPLIT 71059 229 SCREW 1 4 20X 75 lX176 230 BEARING RETAINER 334163 231 SCREW 5 16 18X 50 780055 235 WASHER 579858 240 HEX ASSY 579897 243 RING RETEX 783002 244 FLATWASHER 71074 245 BEARING TRUNION 337029 246 WHEEL ASSY FRICTION 53830 247 SCREW 1 4 20X 63 11871 249 NUT 1 4 20 303008...

Страница 38: ...NG BALL 43846 493 SCREW 313676 499 NUT 5 16 18 710026 500 HOUSING ASSY 761879 884 509 PLUG 760040 510 BLADE SCRAPER 760666 853 F_ 01162J 38 339975 Key No Description Part No 511 BOLT 5 16 18 X 75 340720 514 NUT 5 16 18 710026 520 AUGER ASSY LH 760317 853 521 AUGER ASSY RH 760307 853 522 BOLT 578647 524 NUT 5 16 18 71391 525 BEARING 53757 527 SCREW 70984 536 BOLT 5 16 18X 75 340720 540 SKID 760192 ...

Страница 39: ... NUT 5 16 24 71100 327 WORM GEAR 53732 306 PIPE PLUG 53749 330 BEARING SLEEVE 53731 310 SEAL OIL 780151 340 IMPELLER 761609 853 311 BEARING SLEEVE 53743 350 BRACE 5524 312 WASHER FLAT 53748 351 SCREW 1441 313 SHAFT AUGER 760411 352 NUT 5 16 24 71100 314 GASKET 897 355 SCREW 302636 315 WORM GEAR 53730 356 WASHER FLAT 71071 316 KEY WOODRUFF 73905 357 WASHER 71060 320 RING QUAD 53737 358 NUT 71037 32...

Страница 40: ...CRAFTSMAN 33 12 5HP SNOW THROWER 536 881121 DISCHARGE CHUTE ASSEMBLY 582 608 607 F_ OlI62J 40 ...

Страница 41: ...W 5 18 18X 75 578088 586 WASHER 8711 587 NUT 5 16 18 HEX NYL 71038 600 LOWER CHUTE ASSEMBLY 761169 853 601 BOLT 5 16 18X1 00 586280 602 FLATWASHER 71071 603 NUT 5 16 18 71038 604 FLAP 762322 605 RIVET 760987 606 COLLAR CHUTE 585214 863 607 SCREW 1 4 20X 75 302628 608 FLATWASHER 71067 609 NUT 1 4 20 HEX NYLOCK 780029 610 RETAINER RING INNER 337227 611 RETAINER RING OUTER 585193 F_ 01162J 41 ...

Страница 42: ...CRAFTSMAN 33 12 5HP SNOW THROWER 536 881121 HANDLE ASSEMBLY 337139 J F_ OlI62J 42 ...

Страница 43: ...CREW 5 16 18 X 75 70984 770 BRACKET SHIFT 581964 771 SCREW 3 8 16X3 00 7288 772 SPRING 50786 773 WASHER FLAT 71072 774 NUT 3 8 16 HEX 71046 Key Part No Description No 775 SPACER 579183 785 NUT 1 4 20 HEX 71034 787 KNOB SHIFT 1 420 585522 790 ROD ASSY LH 578926 791 ROD ASSY RH 578924 795 BRACKET CAM 579002 796 SCREW 5 16 18X 75 313676 797 WASHER SPTLK 71060 798 NUT 5 16 18 HEX 71037 799 CAM LOCK 84...

Страница 44: ...T HUB SCREW 1 4 20X2 25 NUT 1 4 20 HEX NYLOCK BRNG FL CHAIN ROLLER FLATWASHER BUSHING WHEEL TIRE RIM SCREW 1 4 20X1 75 NUT 1 4 20 HEX NYLOCK RING RET DISC WHEEL SCREW HUB WHEEL LOCK SPRING COMPRESSION PIN LOCK KNOB PiN SCREW NUT 681 SD1022 Part No 583017 583007 73839 780029 581730 583013 712120 585591 584633 577015 780029 239 1501032 853 2001066 1501031 853 164X34 1501033 1501034 032X78 73839 7800...

Страница 45: ...iption Part No 730 CLUTCH HANDLE LH 578992 731 CLUTCH HANDLE RH 578993 760 PANEL CONTROL 579039 761 SCREW 10 X 62 316042 765 BRACKET PANEL 578866 853 766 SCREW 5 16 18 X 1 75 302900 767 WASHER HVSPTLK 71060 768 NUT 5 16 18 71037 792 BOLT 1 4 20 X 50 905531 794 NUT 1 4 20 908913 45 337139 J ...

Страница 46: ...LATWASHER 309312 856 E RING 578159 860 EYE BOLT 3 8 16X6 00 581618 861 GROMMET EYE BOLT 148 862 BOOT 308145 863 NUT 3 8 16 HEXJAM 71045 864 FLATWASHER 71072 865 ADAPTER BOOT TO HANDLE 309344 866 FLATWASHER 71072 867 NUT 3 8 16 HEXNYL 71046 870 BRACKET WORM MTG 585195 871 WORM GEAR CHUTE ROTATION 585196 872 BLOCK UNIVERSAL PIVOT 578063 873 CLEVIS PIN 578309 874 PiN UNIVERSAL JOINT 578060 875 COTTER...

Страница 47: ...OW THROWER 536 881121 HEADLIGHT 621 Key No Description Part No 621 LIGHT HALOGEN 762343 622 HARNESS HEADLIGHT 1501036 625 TIE CABLE 57444 626 BRACKET 578921 627 SCREW 8 X 50 901696 628 WASHER FLAT 901736 SD1029 F_ 01162J 47 ...

Страница 48: ...CRAFTSMAN 33 12 5HP SNOW THROWER 536 881121 REMOTE CHUTE CONTROL ASSEMBLY 342858 F_ OlI62J 48 ...

Страница 49: ...5 970 SCREW 5 16 18 X 75 313676 971 BRACKET CABLE CHUTE 780066 972 NUT 5 16 18 71391 973 TRIM 55021 974 TIE CABLE 760113 975 CABLE CHUTE CONTROL 761131 980 BOLT 5 16 18 310088 981 WIRE FORM 780220 982 NUT 1 4 10 302635 990 SCREW 3 8 16X1 75 4058 991 WASHER FLAT 71072 992 WASHER SPRING 4051 993 HANDLE ASSY SPEED CONTROL 579040 994 NUT 3 6 16 REGHEX 71044 995 HANDLE 3 8 16 MOLDED 306689 996 NUT 3 8 ...

Страница 50: ...ER 536 881121 DRIFT CUTTER ASSEMBLY NOTE THIS UNiT IS USED FOR REFERENCE PURPOSE ONLY F 0011_2J Key No Description Part No 280 BAR _3RIFT CUTTER 762348 853 28 BOLT 5_ _6 18X0 75 3407 Z_ 282 WASHER 12021 283 WINGNUT 711604 50 SD 027 ...

Страница 51: ...CRAFTSMAN 4 CYCLE ENGINE MODEL NUMBER 143 011201 396 336_ 3_8 370H 370C F OO1162J 51 ...

Страница 52: ...orx T 15 66 650990 Screw Torx T 30 19 35688 Extension Spring 69 35683 Cylinder Cover Gasket 20 35319 Oil Seal 70 35684A Cylinder Cover 25 36460 Blower Housing Baffle IncL 14 15 38 71 75 26 650561 Screw 1 4 20 x 5 8 71 35377 Crankshaft Bushing 28 30322 Lock Nut 10 32 75 35319 Oil Seal 30 37240 Crankshaft 80 35751 Governor Shaft 31 35327 Counterbalance Gear 81 35479A Washer 35 29826 Screw 10 32 x 3 ...

Страница 53: ...32 x 5 8 161A 35862 Intake Valve Seal 215 35438 Control Knob 153 35949 Push Rod Guide 216 35679 R EM Adjusting Lever 154 650945 RockerArm Stud 219 35689 Choke Rod 155 35950 Rocker Arm 220 35440 Choke Knob 157 650947 Jam Nut 222 28820 Screw 10 32 x 1 2 158 35466 Push Rod 223 650971 Screw Torx T 30 159 35952 Rocker Arm Cover Gasket 224 33515A Intake Pipe Gasket 160 35953A Rocker Arm Housing 260 3569...

Страница 54: ...40105 Carburetor Incl 184 310 35700 Dipstick 390 590749 Rewind Starter 314 650873 Screw 1 4 20 x 3 4 Note This engine could have been built with 315 611111 Alternator Coil 18 Watt 590733 starter Incl 323 396 33329E Electric Starter Motor 323 611118 Terminal Optional 327 35392 Starter Plug 400 36947A Gasket Set Incl Items 328 35593 ignition Keys Marked PK in Notes Incl part s 27896A 2 329 610973 Te...

Страница 55: ...CRAFTSMAN 4 CYCLE ENGINE MODEL NUMBER 143 011201 Ir _o il_ 2gJ_3 0 31 P_ J 28_ _ I _ 37 i 0 37 F OO1162J 55 ...

Страница 56: ...rottle Shaft Lever Assembly Bushing Throttle Return Spdng Throttle Shutter Shutter Screw Choke Shaft Lever Assembly Choke Shutter Choke Positioning Spring Fuel Fitting Throttle Crack Screw Idle Speed Screw Tension Spring Idle Restdctor Screw Idle Restrictor Screw Cap Float Bowl Assembly Incl 32 33 Float Shaft Float Float Bowl 0 Ring Inlet Needle Seat Clip Incl 31 Spring Clip Bowl Drain Assembly Dr...

Страница 57: ...CRAFTSMAN 4 CYCLE ENGINE MODEL NUMBER 143 011201 29 J 16 26 10 23 22 7 F OO1162J 57 ...

Страница 58: ... Cap Ass y Incl 7 7 35450 O Ring 8 35915 Armature 9 35451B Housing Ass y 10 35452A Brush Card Ass y 11 35911 Thrust Washer 13 590500 Thrust Washer 14 33441 Ground Screw 15 35453 Commutator End Cap Ass y Incl 7 16 35454 Switch Box Ass y 22 35455 Case Bolt 23 35456 Ground Screw 26 650819 Screw 6 32 X 2 1 2 26 651032 Screw 12 16 x 5 8 29 32450B Extension Cord 10 6 30 30063 Screw Torx T 30 1 4 20 X 1 ...

Страница 59: ... 590601 5 590678 6 590680 7 590412 8 590682 11 590750 12 590535 13 590574 DESCRIPTION Rewind Starter Spring Pin Washer Retainer Washer Brake Spring Starter Dog Dog Spring Pulley Rewind Spring Assy Starter Housing Ass y Starter Rope Length 98 x 9 64 din Mitten Grip Handle Not included with starter F 001162J 59 ...

Страница 60: ...edir servicio de reparacibn a domicilio 1 800 676 5811 For the location of a Sears Parts and Repair Center in your area Call 24 hours a day 7days a week 1 800 488 1222 gmgggg For information on purchasing a Sears Maintenance agreement or to inquire about an existing Agreement Call 9am 5pm Monday Saturday 1 800 827 6655 When requesting service or ordering parts always provide the following infor ma...

Отзывы: