background image

9

Etisalat Travel Router  USER GUIDE

Getting Started

Connecting  your  device  to 

the Router

Follow the next steps to create a Wireless Local Area Network 
(WLAN)  to  provide  Internet  access  to  802.11b,  802.11g  and 
802.11n wireless-equipped computers or smartphones.

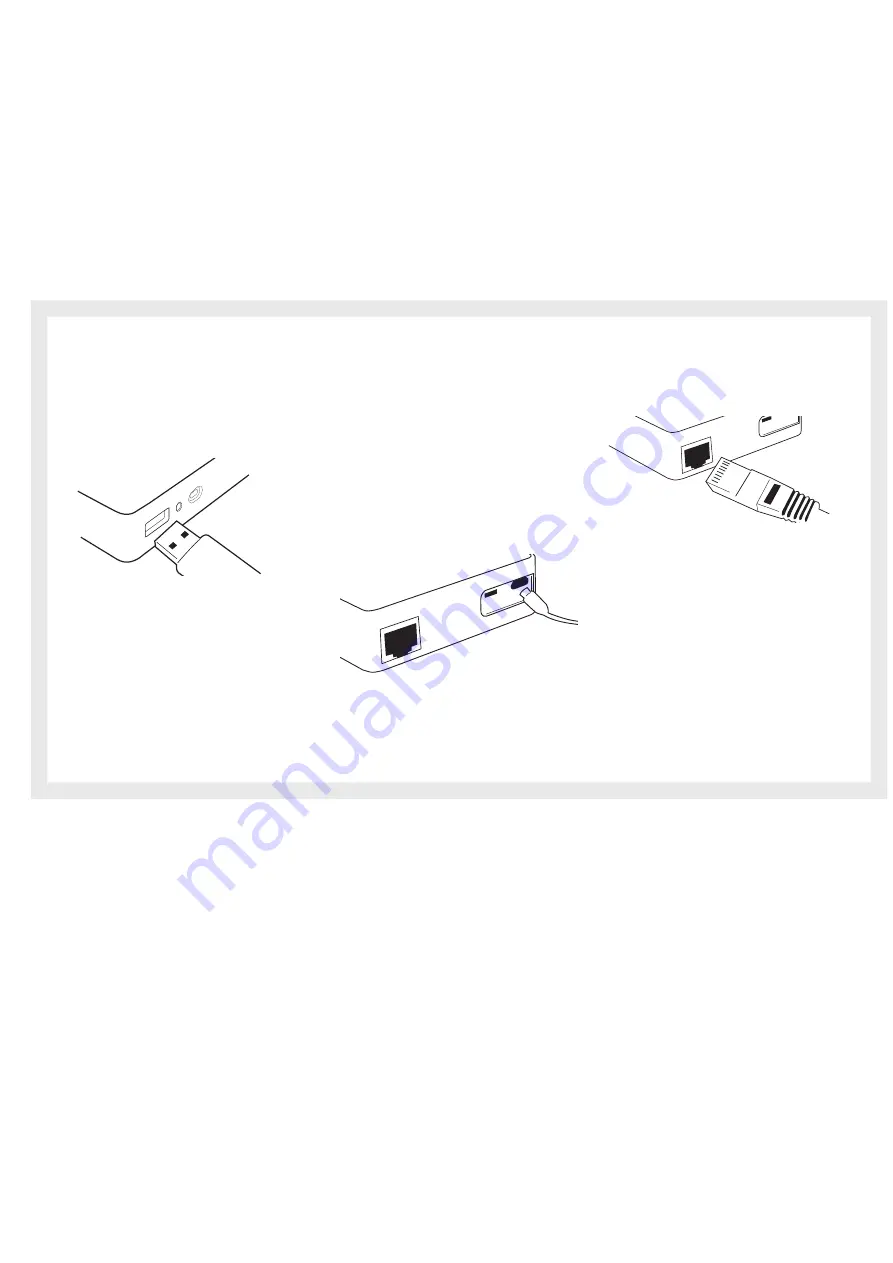
Step 1 – Connect the 3G USB Modem.

Plug the Etisalat supplied 3G USB modem into the USB port.

Charging your battery

If  you  use  the  Travel  Router  until  the  battery  has  completely 
drained,  it  will  power  off.  If  this  occurs,  let  the  unit  charge 
overnight.

Note:     The battery must be fully charged before using your Travel Router 

for the first time.

To charge your battery please complete the following steps:

1.      

With the battery inserted into your Travel Router connect 
the supplied power adapter to the wall power outlet and 
to the micro USB socket on the Travel Router.

2.   

 Leave it to charge until the power LED lights up solid  

 Green.

Step 2 – Plug in the power

Connect  the  power  adapter  to  the  port  on  the  back  panel 
of your Travel Router. Then plug the other end of the power 
adapter into a wall outlet or power strip.

Step 3a – Connect a computer or smartphone  via Wireless

Using  your  wireless  device,  scan  the  wireless  networks  in 
your  area  and  select  the  network  called  Etisalat  Travel 
Router, then click connect. When the security key prompt is 
displayed enter the security key 3GT1WNE0

Step 3b – Connect a computer via Ethernet 

Press  the  Reset  button  on  the  Router  and  connect  one  end 
of  the  Ethernet  cable  to  the  WAN/LAN  Port  on  the  back 
panel  of  the  Travel  Router,  and  the  other  end  to  the  RJ45 
Ethernet  port  of  the  laptop  or  desktop  PC  you  would  like 
to use.

Default Settings

LAN (Management)

Static IP Address: 192.168.20.1

Subnet Mask: 255.255.255.0

Default Gateway: 192.168.20.1

WAN (Internet)

WAN mode: DHCP

Wireless

SSID: Etisalat Travel Router

Channel: 11

Security: WPA-PSK

TKIP Key: 3GT1WNE0

Modem Access

Username: admin

Password: admin

Содержание Travel Router

Страница 1: ...User Guide...

Страница 2: ...HE QUIETEST CHANNEL FOR YOUR WIRELESS NETWORK 6 3 GETTING STARTED 7 3 1 CONNECTING YOUR DEVICE TO THE ROUTER 9 3 2 DEFAULT SETTINGS 9 3 3 CONFIGURING YOUR ROUTER AND SETTING UP YOUR COMPUTER 10 4 ADVA...

Страница 3: ...nnection to a network client The device also features advanced security such as VPN pass through a full complement of wireless security options and a built in firewall The setup is simple via a web br...

Страница 4: ...Placement...

Страница 5: ...f difficulties persist even at close range please contact Etisalat Technical Support Note While some of the items listed can affect network performance they will not prohibit your wireless network fro...

Страница 6: ...ur Travel Router to channel 11 See your phones user manual for detailed instructions If necessary consider switching to a 900MHz or 5GHz cordless phone Choose the Quietest Channel for your Wireless Ne...

Страница 7: ...Getting Started...

Страница 8: ...G USB Modem USB port for connecting a compatible 3G USB Modem WAN LAN RJ45 WAN Ethernet port for a Fixed Line ADSL Cable Satellite network connection factory default or LAN port for wired Ethernet cli...

Страница 9: ...until the power LED lights up solid Green Step 2 Plug in the power Connect the power adapter to the port on the back panel of your Travel Router Then plug the other end of the power adapter into a wal...

Страница 10: ...Connections icon Category mode only 3 Click the Network Connections icon 4 In the LAN or High Speed Internet window right click on the icon corresponding to your network interface card NIC and select...

Страница 11: ...3G connection details such as a special APN Please enter any other relevant information on this screen as provided by Etisalat Click Apply to save the settings If everything is configured properly the...

Страница 12: ...Advanced...

Страница 13: ...port to be changed from WAN to LAN or LAN to WAN Ethernet Port status Description Current Current port status either WAN or LAN LAN Change the current port status to LAN WAN Change the current port s...

Страница 14: ...ply press the Default button to fill the MAC address field with the MAC address of your computer NAT Configuration Allows you to enable or disable network address translation NAT for this WAN connecti...

Страница 15: ...simply dialing in a local point provided by your ISP The following screen allows client PCs to establish a normal PPTP session and provides hassle free configuration of the PPTP client on each client...

Страница 16: ...onnection APN Enter the APN for your 3G service User Name Enter your 3G username Password Enter your 3G password Click Apply to save the settings LAN This Page allows you to change the LAN Local Area...

Страница 17: ...you need to specify the following Destination Netmask if applicable select the Net range as the route type Gateway Interface ADVANCED ROUTING DYNAMIC Dynamic Routing uses the RIP protocol to allow th...

Страница 18: ...Wireless...

Страница 19: ...802 11b and 802 11g and 802 11n wireless devices are in your network Network Name SSID The SSID Service Set Identifier is the name of your wireless network Use a unique name to identify your wireless...

Страница 20: ...ose Enabled TX Power This determines the output power of the antenna WMM Capable WMM Wi Fi Multimedia if enabled supports QoS Quality of Service for experiencing better audio video and voice in applic...

Страница 21: ...re secure network connection when compared to WEP Use TKIP Encryption Type for WPA PSK and AES for WPA2 PSK After that please enter the key in the Passphrase field The key needs to be more than 8 char...

Страница 22: ...utton in the web configuration interface WPS via PIN code You have to know the PIN code of the wireless client and switch it to WPS mode then input the wireless client PIN to the wireless router web i...

Страница 23: ...Firewall...

Страница 24: ...match any rules are accepted or dropped MAC IP Port Filtering Settings Name Description MAC Address MAC address of a local computer Dest IP Address Destination IP Address for the filter rule Source IP...

Страница 25: ...y to save the settings DMZ If you have a client PC that cannot run an Internet application e g Games properly from behind the NAT firewall then you can open up the firewall restrictions to allow unres...

Страница 26: ...packets received on the WAN interface SPI Firewall Enable Disable the SPI Stateful Packet Inspection firewall to improve the security of your Travel Router Click Apply to save the settings Content Fil...

Страница 27: ...Administration...

Страница 28: ...settings System Monitor Periodic Ping Settings The Periodic Ping Reset Monitor configures the Travel Router to transmit controlled ping packets to 1 or 2 user specified IP addresses Should the router...

Страница 29: ...uter you need to download the firmware file to your local hard disk and then click the Browse button to locate the firmware file you just downloaded Once you have selected the new firmware file click...

Страница 30: ...event log of your Travel Router The System Log feature also offers the ability to send your system log information to a remote syslog computer This means the system log information will be available...

Страница 31: ...Trouble Shooting...

Страница 32: ...se try the following steps to improve the wireless signal quality Ensure the battery of your Travel Router is fully charged Try to keep the Travel Router at least 6 inches away from the wall or other...

Страница 33: ...device s web configuration using http 192 168 20 1 with username password of admin 6 What you can do if the Ethernet cable does not work properly The Travel Router s Ethernet port is a WAN port by de...

Страница 34: ...Establishing Your Wireless Connection...

Страница 35: ...E0 as the encryption key Windows XP Follow these steps 1 Open Network Connections Start Control Panel Network Connections 2 Right click on your Wireless Network Connection and select View Available Wi...

Страница 36: ...Router as the network name 3 On the new window tick on Show Password and type in the network key in the Password field This example uses 3GT1WNE0 as the key After that click on OK 4 To check the conne...

Страница 37: ...Wireless Connection 3 Choose Etisalat Travel Router 4 Tick Display Characters and type in the network security key This example uses 3GT1WNE0 Then click Connect 5 Tick on both Save this network and S...

Страница 38: ...Introduction...

Отзывы: