
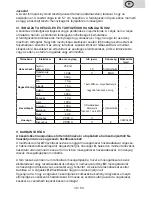
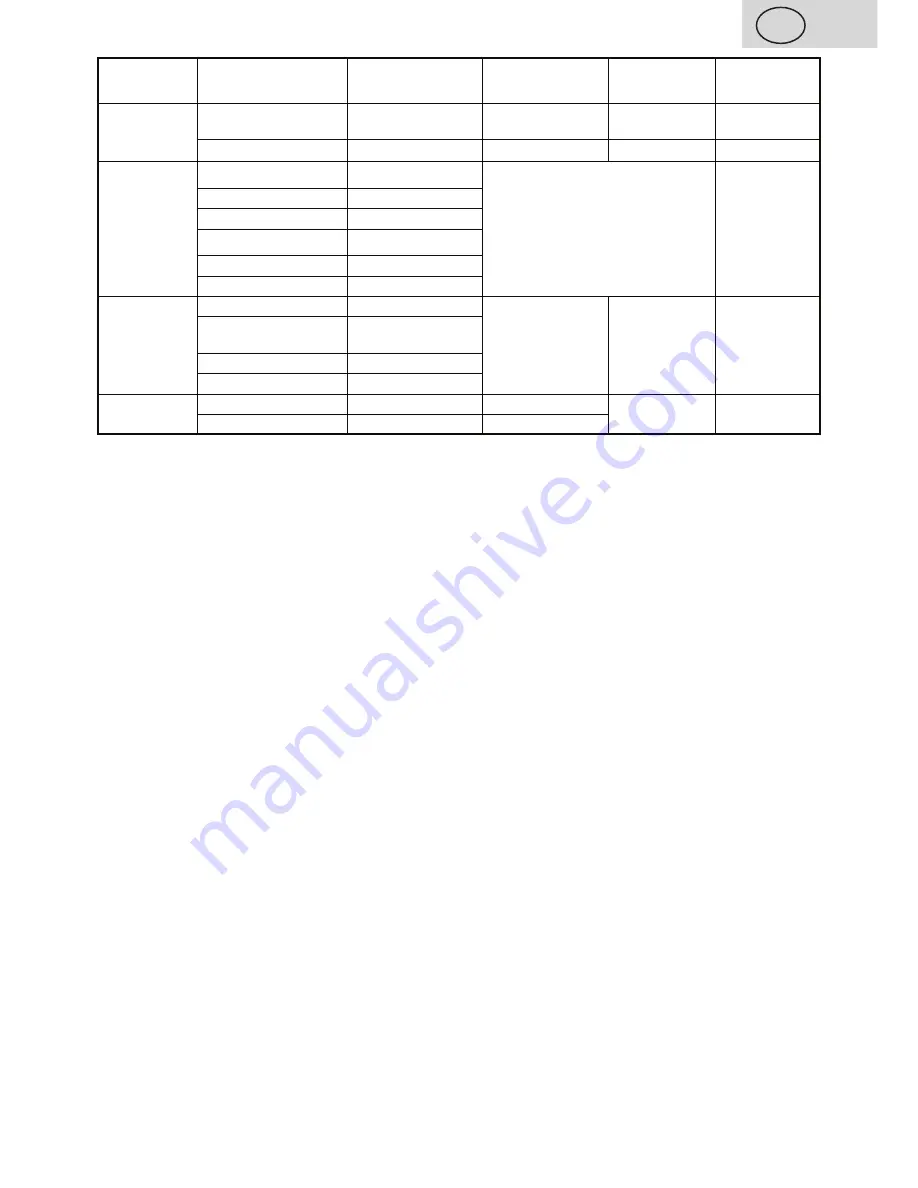
Accessories
Food
Max.amount
Time (min)
Speed
Preparation
(mm)
Whisk
Cream (including 38%
fat)
250 ml
10
5 (maximum)
-
Egg
12 pcs
3
MAX
-
Kneading
Flour
8 00 g
1 minute at MIN, then at any
-
hook
Salt
10 g
higher speed
Yeast
15 g
for 4 minutes
Sugar
5 g
Water
400 g
Lard
10 g
Beater
Flour
100 g
30 seconds
1 (maximum)
-
Powdered sugar
100 g
at any speed, 1
minute at
Margarine
100 g
Eggs
2 pcs
Meat mincer
Beef
2 000 g
3
6
30x30x30
Pork
2 000 g
3
V. MAINTENANCE
Pull out the power plug from the power socket before handling the device in any
way! Do not use abrasive and aggressive cleaning agents!
Clean the multi-function
head
A7
using a damp cloth with detergent.
Clean the beater/mixing whisks, kneading hook, meat mincer
D
, including all accessories
immediately after use in hot water with detergent. The plastic parts can be washed in
a dishwasher. However, the metal parts must not be washed in a dishwasher because the
detergents may cause them to turn dark or to rust.
When washing the stainless steel bowl
B1
do not use steel wool, a steel brush or
bleaching agents. Remove calcium stains using vinegar. When cleaning the cutting blade
D2
, work very carefully! Ensure that the cutting blades or blades do not come into contact
with hard objects, which blunt them and reduce the effectiveness. After cleaning and drying
the parts we recommend that you apply cooking oil to the blades and the interchangeable
plates. For easier cleaning of the meat mincer, finish off by grinding some hard pastry (e.g.
a bread roll, bun).
Some foods may stain the accessories in a certain way. This however has no effect
on the operation of the appliance and is not cause for a claim or complaint regarding
the appliance! After some time this staining usually goes away by itself. Never dry
plastic moulded parts above a heat source (e.g. fire stove, electric/gas stove). Store the
appliance thoroughly cleaned in a dry, dust-free location that is out of reach of children and
incapacitated persons.
Procedure for replacing a broken cog wheel
Remove the conveyor screw
D1
. Using an appropriate tool (e.g.
a screwdriver
) loosen the
screw. Remove the cog wheel
D12
from the conveyor screw. Place a new cog wheel on
the conveyor screw shaft and firmly tighten with a screw (pic. 9).
31
GB
/ 50
Содержание GRATUSSINO
Страница 2: ...A3 A4 A5 A6 A7 A1 A2 A8 A 1 B3 B2 B1 2 50...
Страница 3: ...4 3 D13 D14 3 50...
Страница 4: ...5a 5b 5c 6 7 5d 4 50...
Страница 5: ...8 9 5 50...


