


II.
DESCRIPTION OF THE APPLIANCE AND ACCESSORIES
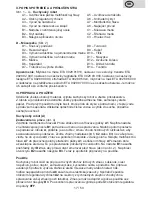
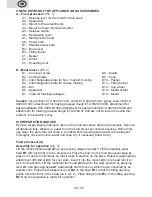
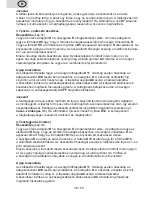
A – Food processor
(Pic. 1)
A1 – Release lever for the multi-function head
A2 – Speed dial
A3 – Mount for the attachments
A4 – Mount for meat mincer and cutter
A5 – Release button
A6 – Removable cover
A7 – Multi-function head
A8 – Power cord
B1 – Stainless steel bowl
B2 – Bowl cover
B3 – Filling funnel
C1 – Beater
C2 – Whisk
C3 – Kneading hook
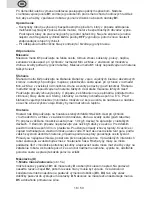
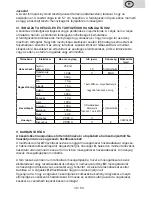
D – Meat mincer
(Pic. 2)
D1 – Conveyor screw
D8 – Mould
D2 – Cutting blade
D9 – Cone
D3 – Interchangeable plate for fine / medium mincing
D10 – Pusher
D4 – Interchangeable plate for coarse mincing
D11 – Filling funnel
D5 – Nut
D12 – Cog wheel
D6 – Separator
D13 – Mould holder
D7 – Tube for making sausages
D14 – Mould
Caution
: meat mincer ETA 0028 91 010, cutter ETA 0028 95 0x0, poppy seed mill ETA
0028 96 000, attachment for making pressed dough ETA 0028 94 000, attachment for
pasta tagliatelle ETA 0028 93 000, attachment for pasta trenette ETA 0028 92 0000 and
attachment for making pressed dough ETA 0028 97 000 are not include in box with this
product. It is possible to buy.
II
I. PREPARATION AND USE
Remove all packaging materials, take out the food processor and all accessories. Remove
all adhesive foils, stickers or paper from the food processor and accessories. Before first
use clean the parts that will come in contact with food using warm water with detergent,
thoroughly rinse with clean water and wipe dry, if necessary allow to dry.
Food processor (A)
Assembly for operation
(pic. 4)
Lift the multi-function head
A7
up by pressing release lever
A1
. Fill the stainless steel
bowl
B1
with food that is to be processed. Place the bowl on the food processor base
A
,
press on it and turn clockwise so that it locks in position on the base. Select an appropriate
attachment (
C1
,
C2
or
C3
) for your work, insert it into the mount
A3
in the head turn it to
lock it into position. Tilt the multi-function head
A7
down to the work position by pressing
lever
A1
and pressing head
A7
downwards until it locks in, which is accompanied by an
audible click. Place the transparent cover
B2
on the bowl
B1
so that the filling opening
points turned in front of the head (as in pic. 2). Place filling funnel
B3
on the filling opening
B2
. Now the appliance is ready for operation.
26
GB
/ 50
Содержание GRATUSSINO
Страница 2: ...A3 A4 A5 A6 A7 A1 A2 A8 A 1 B3 B2 B1 2 50...
Страница 3: ...4 3 D13 D14 3 50...
Страница 4: ...5a 5b 5c 6 7 5d 4 50...
Страница 5: ...8 9 5 50...


