background image

- 56 -

- 57 -

Instalación del software

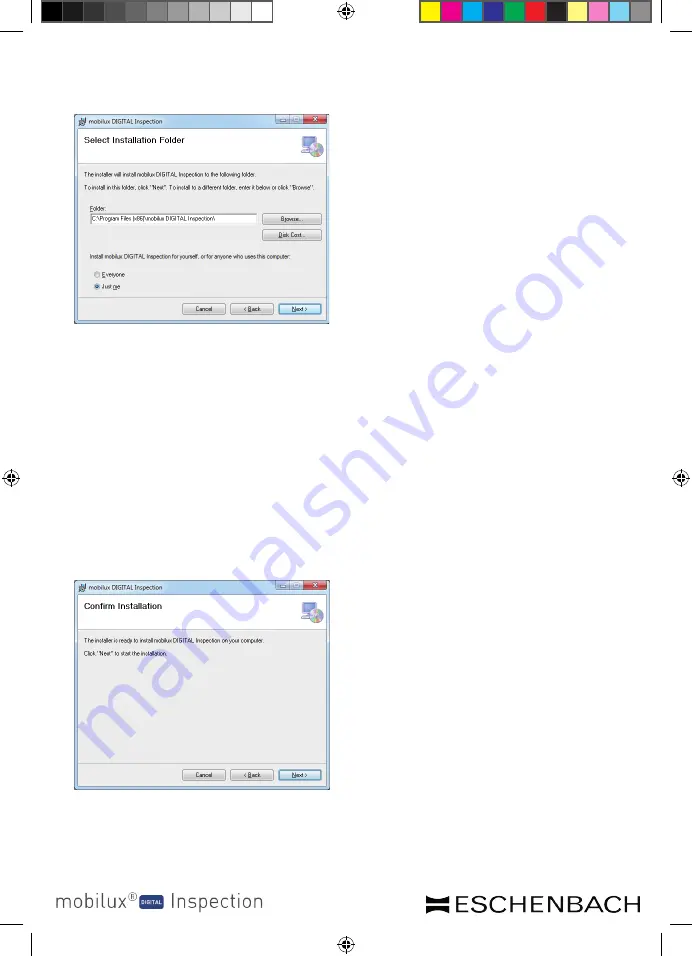
6. Selección de la carpeta de instalación: 


La carpeta para el archivo que debe instalarse ya está predeterminada. Haga clic 

en "Browse..." (examinar) si desea definir una carpeta distinta a la predetermi-

nada como ubicación para la instalación. Seleccione "Disk Cost..." para obtener 

un esquema general de las unidades disponibles y del estado de su espacio de 

memoria. Además, en esta ventana, también puede determinar si debe instalarse 

el programa exclusivamente para usted (Just me) como usuario o para cualquier 

usuario (Everyone) del ordenador. Para modificar este ajuste, haga clic en el punto 

gris situado a la izquierda de la opción deseada.

  Haga clic en "Cancel" (cancelar) si desea cancelar la instalación. 

Haga clic en "Back" (atrás) para volver al paso anterior de la instalación. 

Haga clic en "Next" (siguiente) para proseguir con la instalación.

7. Confirmación de la instalación: 


Haga clic en "Next" (siguiente) para realizar ahora la instalación. 

Según la configuración de su ordenador, es posible que ahora reciba un mensa-

je sobre la gestión de las cuentas de usuario. Para confirmar el mensaje, haga 

clic en el campo "Permitir" o "Sí" (Win 7 y 8). Se realizará la instalación y verá la 

BDA_mobilux_DIGITAL_Inspection_A5_EN_FR_ES_IT_CMYK.indd   57

11.12.2015   12:34:18

Содержание Mobilux Digital Inspection

Страница 1: ...Bedienungsanleitung Operating instructions Mode d emploi Manual de instrucciones Istruzioni d uso BDA_mobilux_DIGITAL_Inspection_A5_DE_CMYK indd 1 11 12 2015 12 24 08 ...

Страница 2: ... 2 Deutsch 3 English 18 Français 32 Español 47 Italiano 62 BDA_mobilux_DIGITAL_Inspection_A5_DE_CMYK indd 2 11 12 2015 12 24 08 ...

Страница 3: ...am Computer nutzen und steuern Sicherheitshinweise X X Blendungs und Verletzungsgefahr Nicht in die Lichtquellen an der Gehäuse unterseite blicken Risikogruppe 1 nach EN 62471 2008 Gefahrenwert der Exposition EHV 2200 Sekunden in 800 mm Der Grenzwert der Freien Gruppe wird ab 1 8 m Abstand eingehalten Netzhautgefährdung durch Blaulicht 400 nm bis 780 nm X X Lassen Sie Kinder nicht unbeaufsichtigt ...

Страница 4: ...eferung bereits eingesetzt X X Kunststoffkoffer X X Handschlaufe Funktionselemente 1 Berührungsempfindliches Display 2 Ein Aus Taste 3 USB Ladebuchse 4 Öse für Handschlaufe 5 Lade Kontroll LED 6 Abdeckung f SD Kartenschacht 7 SD Kartenschacht 8 Reset Öffnung 9 LED Beleuchtung 10 Kamera 11 Abdeckung des Stativ Standardgewindes 12 Auflageflächen Bedienung Laden des internen Akkus Bevor Sie mobilux D...

Страница 5: ... den zuletzt eingestellten Ver größerungsfaktor und die Displayhelligkeit an Akku voll geladen Kapazität 75 Kapazität 50 Kapazität 25 Akku erschöpft Zum Ausschalten halten Sie die Ein Aus Taste eine Sekunde lang gedrückt Die aktuellen Einstellungen von Vergrößerung Darstellungsmodus und Displayhelligkeit werden gespeichert Um den Ladezustand des internen Akkus zu schonen schaltet sich mobilux DIGI...

Страница 6: ...angezeigt tippen Sie auf das Display und anschlie ßend wiederholt auf das Symbol um in die Aufnahme hineinzuzoomen Nach Errei chen der maximalen Vergrößerung kehrt die Anzeige zur normalen Darstellung zurück Einen vergrößerten Bildausschnitt können Sie mit den Schaltflächen innerhalb des Displays verschieben Tippen Sie auf das Symbol um jeweils eine Menüebene zurückzukehren Tippen Sie auf das Symb...

Страница 7: ...e diese Schaltfläche an um zwei Schaltflächen einzublenden über die Sie die Lichtleistung der beiden LEDs an der Unterseite des Prüfgeräts getrennt voneinander einstellen können Tippen Sie wiederholt um die Lichtleistung jeweils auf 100 50 oder 0 einzustellen Messskala ein ausschalten Um eine Messskala auf dem Display ein oder ausschalten tippen Sie auf diese Schaltfläche Diese Skala wird auch in ...

Страница 8: ...aktivierter Funktion sehen Sie hier das Symbol Zum Anpassen der Schablone wählen Sie auf der zweiten Seite der Geräteeinstellun gen die Schaltfläche oder halten Sie im Live Bild das Display 3 Sekunden lang gedrückt um in das Menü zu gelangen Tippen Sie auf das Symbol oder auf das Symbol um das Menü zu schließen und zur Anzeige des Live Bildes zurückzukehren Tippen Sie auf das Symbol um die zweite ...

Страница 9: ... Tippen Sie anschließend auf das Display um die X Achse mit den Schaltflächen und die Y Achse mit den Schaltflächen wie gewünscht zu verschieben In diesem Modus wechselt die Farbe des Koordinaten kreuzes auf rot Durch gleichzeitiges Antippen der oberen beiden Icons kann die Skala wieder in die Grundposition zentriert auf dem Display gesetzt werden Tippen Sie wieder auf das Display um die Einstellu...

Страница 10: ...e zweite Seite der Geräteeinstellungen aufzurufen Tippen Sie auf die Schaltfläche um die aktuell verwendete Software Version anzu zeigen Tippen Sie auf das Symbol um die Aktualisierung abzubrechen und zur vorheri gen Seite zurückzukehren Tippen Sie auf das Symbol um die Aktualisierung durchzuführen Nach dem er folgreichen Update schaltet sich mobilux DIGITAL Inspection automatisch ab Schal ten Sie...

Страница 11: ...erringern Sie die jeweils weiß dargestellten Parameter Tippen Sie auf die Schaltfläche um zum nächsten Parameter zu springen Tippen Sie auf 24H um von der 24 Stundenanzeige auf die im englischen Sprachraum gebräuchliche 12 Stundenanzeige umzuschalten bzw umgekehrt Über die Schaltfläche gelangen Sie zurück in die zweite Ebene der Geräteeinstel lung Tippen Sie auf die Schaltfläche um das Menü zu sch...

Страница 12: ...al sind Computer auf denen eines der folgenden Betriebssysteme installiert ist Windows Vista 7 8 10 Möglicherweise ist mobilux Digital auch auf anderen Windows Plattformen lauffähig dies kann allerdings nicht garantiert werden Bei Installation unter anderen Betriebssystemen als den hier genannten übernehmen wir keinerlei Haftung für die Datenintegrität des Computers Software Installation Zur Insta...

Страница 13: ...t um eine Übersicht der verfügbaren Laufwerke und deren Speicherplatzsituation zu erhalten Darüberhinaus können Sie in diesem Fenster festlegen ob das Programm nur für Sie Just me als Benutzer oder für jeden Benutzer Everyone des Computers installiert werden soll Zum Wechseln dieser Einstellung klicken Sie auf den grauen Punkt links von der ge wünschten Option Klicken Sie auf Cancel wenn Sie die I...

Страница 14: ... Konfiguration Ihres Computers erhalten Sie nun eine Meldung zur Benut zerkontensteuerung Bestätigen Sie diese mit einem Klick auf das Feld Zulassen bzw Ja Win7 8 Die Installation wird durchgeführt und Sie sehen folgende Anzeige 8 Abschluss der Installation BDA_mobilux_DIGITAL_Inspection_A5_DE_CMYK indd 14 11 12 2015 12 24 11 ...

Страница 15: ...zuvor gegebenen Informationen für die Bedienung direkt am Gerät mit Ausnahme der folgenden Funkti onen Klicken Sie auf diese Schaltfläche um a über About mobilux DIGITAL Inspection die Software Version anzeigen zu lassen b über Open help document eine PDF Datei zu öffnen in der Sie erfahren wel che Tasten der Computertastatur den einzelnen Funktionen zugeordnet sind Klicken Sie auf diese Schaltflä...

Страница 16: ...er ca 3 Stunden Ladezeit ca 2 Stunden Unterstützte Kartenformate SD SDHC max 32 GB Netzspannung des Ladegeräts 100 V 240 V 50 60 Hz Temperaturbereich 10 C 40 C Gewicht 230 g Gerät entspricht der UVC Spezifikation Diese Anleitung ist auch im Internet verfügbar unter http www eschenbach optik com USB ist ein eingetragenes Warenzeichen von USB Implementers Forum Inc Microsoft Windows und Windows Vist...

Страница 17: ... in den normalen Hausmüll Dieses Produkt unterliegt der europäischen Richtlinie 2012 19 EU X X Entsorgen Sie das Produkt oder Teile davon über einen zugelassenen Ent sorgungsbetrieb oder über Ihre kommunale Entsorgungseinrichtung Beachten Sie die aktuell geltenden Vorschriften Setzen Sie sich im Zwei felsfall mit Ihrer Entsorgungseinrichtung in Verbindung Führen Sie alle Verpa ckungsmaterialien ei...

Страница 18: ...roup 1 according to EN 62471 2008 Exposure hazard value EHV 2200 seconds at 800 mm The limit values of the exempt group are complied with at a distance of 1 8 m Retinal danger due to actinic light 400 nm to 780 nm X X Do not allow children to handle electronic devices without supervision X X Charge the testing device only with the supplied mains adapter or a USB con nection X X Check your mobilux ...

Страница 19: ... time you must fully charge the internal battery To charge the device plug the mini USB plug of the charging cable into the USB charging socket e on the mobilux DIGITAL Inspection Then connect the charger with the plug appropriate for the operating location and plug the charger into a power outlet Charging takes about 2 hours The charging indicator LED t will light up red during the charging proce...

Страница 20: ...ing device again after this time switch it on again Testing with the device Switch the mobilux DIGITAL Inspection on and then place the device so that its con tact surfaces d are resting on the item to be tested Start the test Saving the live image as a file If you briefly tap the display when the testing device is switched on three icons will appear on the right hand edge of the screen icon for t...

Страница 21: ...To delete an image tap the image preview to display the relevant image at full size Tap the display to show the buttons on the screen and then the button which is then shown Acknowledge the security prompt by tapping the icon The file will then be deleted and the previous image is displayed Tap the icon to cancel the delete process Tap on the icon to go back one menu level Tap the icon to return t...

Страница 22: ...hide automatic aperture control You can use this button to switch the automatic aperture control on or off If auto matic aperture control is activated the device will optimise illumination of the images automatically if automatic aperture control is deactivated no automatic regulation will take place This is necessary if you also want to investigate dark areas better on test objects with very diff...

Страница 23: ... the exposure correction Tap this button to configure a set value for the exposure correction Values of and result in images with lower exposure Values of and result in images with higher exposure Tap the value shown in the centre of the display each time to select the next lowest value each time After value the screen changes to value Select the value for an exposure without correction Adapting m...

Страница 24: ...sing the Update software button If you register your mobilux DIGITAL Inspection you will be informed about any available software updates To install an updated software version proceed as follows 1 Connect the mobilux DIGITAL Inspection to a PC using the USB cable supplied Ensure that the SD card is located in the card slot u 2 Switch on the mobilux DIGITAL Inspection and tap the icon for the SD c...

Страница 25: ...ally be dimmed down to 75 Switching between right hand and left hand use This function is only relevant for use with a PC If you tap this button the monitor image on the PC will be rotated appropriately for right handed use and left handed use The image is not rotated on the testing device display Setting the confirmation signal To select the required confirmation signal tap the or icons Tap on if...

Страница 26: ...n tap bottom left on the icon for the current USB mode in order to re display the selection of 3 icons as described above Then tap the icon for the required USB mode You can transfer the live image from the testing device onto your computer screen To do this you must first install the supplied software mobilux Digital Inspection onto the computer The following operating systems are required for ru...

Страница 27: ...lation folder for the file is preset Click Browse if you want to specify a folder other than the preset folder as the installation location If you select Disc Cost you will see an overview of the available drives and their memory capac ity In addition you can specify whether the program is to be installed exclusively for your own use Just me or for every user Everyone on the computer in this windo...

Страница 28: ...ser Account Control Confirm this by clicking the Allow or Yes fields Win 7 8 The installation will be carried out and you will see the following screen 8 Concluding the installation Once you see this window installation has been successfully completed Click Close to close the window and complete the process BDA_mobilux_DIGITAL_Inspection_A5_EN_FR_ES_IT_CMYK indd 28 11 12 2015 12 34 10 ...

Страница 29: ...t mobilux DIGITAL Inspection b to open a PDF file using Open help document which will explain which keys on the computer keyboard are allocated to which individual functions Click this button if you do not want to save images under the consecutive number which is automatically generated but you wish to use a specific name and a certain location if required Click this button to open an image you ca...

Страница 30: ...complies with UVC specification This manual is also available on the Internet on http www eschenbach optik com USB is a registered trademark of USB Implementers Forum Inc Microsoft Windows and Windows VistaTM are registered trademarks or trade marks of the Microsoft Corporation in the United States and or other countries System requirements mobilux DIGITAL Inspection Operating systems Microsoft Wi...

Страница 31: ... waste This product is subject to the European directive 2012 19 EU X X Dispose of the product or parts of the product via an approved disposal facility or your municipal disposal facility Please comply with all applicable regulations In case of doubt contact your disposal facility Dispose of all packaging materials in an environmentally responsible manner Warranty Within the parameters of the app...

Страница 32: ...et d accident Ne regardez pas directement dans les sources lumineuses situées au bas du boîtier Groupe à risques 1 selon EN 62471 2008 Valeur de danger de l exposition EGW 2200 secondes à 800 mm La valeur seuil du groupe libre est respectée à partir d une distance de 1 8 m Danger pour la rétine causé par la lumière bleue de 400 nm à 780 nm X X Ne laissez pas les enfants jouer sans surveillance ave...

Страница 33: ...cran tactile 2 Bouton Marche Arrêt 3 Prise de charge USB 4 Anneau pour la dragonne 5 LED de contrôle de charge 6 Cache du logement de carte SD 7 Logement de carte SD 8 Reset Ouverture 9 Éclairage par LED 10 Caméra 11 Cache du filetage standard de trépied 12 Surfaces d appui Commande Chargement de l accu Avant d utiliser le mobilux DIGITAL Inspection pour la première fois vous devez charger entière...

Страница 34: ...ntenez la touche Marche Arrêt appuyée pendant une seconde Les réglages actuels pour le grossissement le mode de représentation et la luminosité de l écran sont enregistrés Pour ménager l état de charge de l accu interne le mobilux DIGITAL Inspection s éteint automatiquement lorsqu il n est pas déplacé pendant plus de 5 minutes Si vous souhaitez continuer à utiliser l appareil de contrôle une fois ...

Страница 35: ...revient en mode normal Vous pouvez déplacez un cadrage grossi à l intérieur de l écran avec les touches Appuyez sur l icône pour revenir un niveau de menu en arrière Appuyez sur l icône pour revenir à l affichage de l image Live Supprimer l alarme Pour supprimer une alarme appuyez dans la visualisation d image sur l illustration correspondante pour l afficher en plein écran Appuyez ensuite sur l é...

Страница 36: ...re à l écran appuyez sur cette touche Cette échelle est également enregistrée dans les enregistrements Lorsque la fonction est désactivée vous voyez l icône Activer désactiver la mise au point automatique Cette touche vous permet d activer de désactiver la mise au point automatique Lorsque la mise au point automatique est activée l appareil optimise automatique ment l exposition des enregistrement...

Страница 37: ...evenir à l affichage de l image Live Appuyez sur l icône pour ouvrir la seconde page des réglages de l appareil Sélectionner les unités Appuyez sur cette touche pour passer alterner entre l échelle de mesure en millimètre et en pouces Régler la correction d exposition Appuyez sur cette touche pour régler une valeur fixe pour la correction de l exposition Les valeurs et entraînent des enregistremen...

Страница 38: ... précédent Le calibrage se fait avec la touche Pour le calibrage la loupe doit être réglée sur l échelle livrée Sinon l indication suivante apparaît sur le bord supérieur de l écran Calibration not successful échec du calibrage Appuyez à nouveau sur la touche pour alterner entre deux échelles de graduation différente Pour supprimer cette sélection appuyez sur l icône Appuyez sur l icône pour enreg...

Страница 39: ...n risque d être irrémédiablement endommagé Un tel dommage n est pas couvert par la garantie Coupure automatique activer désactiver Par défaut le mobilux DIGITAL Inspection s éteint automatiquement au bout de 5 minutes sans mouvement ou autre action Ceci vise à ménager l état de charge de l accu Appuyez sur l icône pour désactiver la coupure automatique L icône de la touche se change en Régler la l...

Страница 40: ... vous attribuez à l ordinateur la carte SD placée dans l appareil de contrôle comme nouveau lecteur amovible ESCHENBACH et le contenu de la carte SD s affiche dans une fenêtre Windows Explorer Si la fenêtre ne s ouvre pas automatiquement sélectionnez dans le gestionnaire de fichiers de votre ordina teur le fichier ESCHENBACH Poursuivez alors les opérations de fichier souhaitées Appuyez sur l icône...

Страница 41: ...t pour installer le logiciel mobilux DIGITAL Inspection 1 Assurez vous que la carte SD livrée soit insérée dans le logement à carte de l appareil de contrôle à la livraison Allumez l appareil de contrôle 2 Connectez l appareil de contrôle à la prise USB d un ordinateur adapté en utilisant le câble USB livré 3 Appuyez sur l icône de la carte SD 4 Une fenêtre Windows Explorer portant le nom ESCHENBA...

Страница 42: ...r Everyone de l ordinateur Pour modifier ce réglage cliquez sur le point gris à gauche de l option souhaitée Cliquez sur Cancel si vous souhaitez interrompre l installation Cliquez sur Back pour revenir à l étape d installation précédente Cliquez sur Next pour poursuivre l installation 7 Confirmation de l installation Cliquez sur Next pour exécuter maintenant l installation En fonction de la confi...

Страница 43: ...rmer la fenêtre et clôturer l opération Remarque Si durant l installation s affiche le message d erreur indiquant que le fichier mfc100u dll manque le paquet Microsoft Visual C 2010 SP1 Redis tributable Package doit être installé avant toute nouvelle tentative d installation BDA_mobilux_DIGITAL_Inspection_A5_EN_FR_ES_IT_CMYK indd 43 11 12 2015 12 34 15 ...

Страница 44: ...sont affectées à quelles fonctions sur le clavier de l ordina teur Cliquez sur cette touche lorsque vous ne souhaitez pas enregistrer un enregistre ment sous le numéro continu attribué automatiquement mais sous un nom précis et le cas échéant aussi à un endroit précis Cette touche permet d ouvrir un enregistrement effectué précédemment ou un autre fichier image en format JPEG Cette touche permet l...

Страница 45: ...re 10 C 40 C Poids 230 g L appareil est conforme à la spécification UVC Cette notice est également disponible sur Internet sur http www eschenbach optik com USB est une marque déposée de USB Implementers Forum Inc Microsoft Windows et Windows VistaTM sont des marques déposées ou des marques deMicrosoft Corporation aux États Unis et ou dans d autres pays Conditions système requises mobilux DIGITAL ...

Страница 46: ...ns les déchets ménagers ordinaires Ce produit est soumis aux impératifs de la directive européenne 2012 19 CE X X Mettez l appareil au rebut en le confiant à une entreprise de traitement des déchets agréée ou au service de recyclage de votre commune Respectez la réglementation en vigueur En cas de doutes contactez votre organisme de recyclage Procédez à une élimination des matériaux d emballage re...

Страница 47: ...cos de luz situa dos en la parte inferior de la carcasa Grupo de riesgo 1 según la norma EN 62471 2008 Valor del riesgo por exposición EHV 2200 segundos en 800 mm El valor límite del grupo libre se mantiene a partir de una distancia de 1 8 m Peligro para la retina debido a una luminiscencia azul de 400 nm a 780 nm X X No permita que los niños utilicen aparatos eléctricos sin vigilancia X X Cargue ...

Страница 48: ... de mano 5 LED de control de carga 6 Tapa de la ranura para la tarjeta SD 7 Ranura para la tarjeta SD 8 Apertura de restablecimiento RESET 9 Iluminación LED 10 Cámara 11 Cubierta de la rosca estándar del trípode 12 Superficies de contacto Manejo Carga de la batería interna Antes de usar mobilux DIGITAL Inspection por primera vez debe cargarse com pletamente la batería interna Para cargarla enchufe...

Страница 49: ...Capacidad del 50 Capacidad del 25 Batería agotada Para apagar el aparato mantenga pulsado el botón de encendido apagado durante un segundo Se guardarán los ajustes actuales de aumento modo de visualización y brillo de la pantalla Para conservar el estado de carga de la batería interna mobilux DIGITAL Inspection se apaga automáticamente si no se mueve al transcurrir unos cinco minutos Si desea util...

Страница 50: ...e nuevo el símbolo para aumentar el zoom de la imagen Tras alcanzar la ampliación máxima la visualización vuelve a la representación normal Con los botones puede desplazar dentro de la pantalla un recorte ampliado de la imagen Pulse el símbolo para retroceder un nivel de menú cada vez Pulse el símbolo para volver a la visualización de la imagen en vivo Eliminación de imágenes Para eliminar una ima...

Страница 51: ...ón de la escala de medición Para conectar o desconectar una escala de medición en la pantalla pulse este botón Esta escala también se guardará con las imágenes Si la función está desactivada verá el símbolo Conexión y desconexión del diafragma automático Con este botón puede conectar o desconectar el diafragma automático Si el dia fragma automático está activado el aparato optimiza la exposición d...

Страница 52: ... símbolo para acceder a la segunda página de los ajustes del aparato Selección de unidades Pulse este botón para cambiar la unidad de medida de la escala de medición entre milímetros y pulgadas Ajuste de la corrección de exposición Pulse este botón para ajustar un valor fijo para la corrección de exposición Los valores y generan imágenes con exposición reducida Los valores y generan imágenes con e...

Страница 53: ...to Vuelva a pulsar el botón para cambiar entre dos escalas con distinta división Para desechar la selección pulse el símbolo Para aceptar la selección pulse el símbolo Actualización del software Si pulsa el botón Actualizar software verá la versión de software que se encuentra actualmente en su aparato de comprobación Si registra su mobilux DIGITAL Inspec tion le informaremos de actualizaciones de...

Страница 54: ...e el símbolo para desactivar el apagado automático El símbolo del botón cambia a Ajuste del brillo de la pantalla Pulse este botón para ajustar el valor del brillo de la pantalla en o La visualización del brillo que se acaba de ajustar se representa de forma inversa Pulse el botón deseado para modificar el brillo de la pantalla Indicación Si mobilux DIGITAL Inspection está conectado al PC el brill...

Страница 55: ...do anteriormente El programa no arranca de forma automática Abra el programa en el ordenador para establecer la comunicación con el aparato de comprobación Pulse el símbolo para utilizar el aparato de comprobación mientras se carga la batería interna a través del cable USB Para cambiar al modo USB pulse brevemente la pantalla para que se muestren los símbolos A continuación pulse el símbolo del mo...

Страница 56: ...lo de la tarjeta SD 4 Se abre una ventana del explorador de Windows llamada ESCHENBACH Ejecute el archivo mobilux DIGITAL Inspection msi para iniciar la instalación Si la venta na no se abre de forma automática seleccione en el administrador de archivos de su ordenador la unidad de disco ESCHENBACH para ejecutar el archivo mobilux DIGITAL Inspection 5 A continuación se abre la ventana del asistent...

Страница 57: ...uario Everyone del ordenador Para modificar este ajuste haga clic en el punto gris situado a la izquierda de la opción deseada Haga clic en Cancel cancelar si desea cancelar la instalación Haga clic en Back atrás para volver al paso anterior de la instalación Haga clic en Next siguiente para proseguir con la instalación 7 Confirmación de la instalación Haga clic en Next siguiente para realizar aho...

Страница 58: ...lose cerrar para cerrar la ventana y finalizar el proceso Indicación Si durante la instalación aparece el mensaje de error que indica que falta el archivo mfc100u dll debe instalarse el paquete Microsoft Visual C 2010 SP1 Redistributable Package antes de intentar realizar de nuevo la instala ción BDA_mobilux_DIGITAL_Inspection_A5_EN_FR_ES_IT_CMYK indd 58 11 12 2015 12 34 18 ...

Страница 59: ...rdar una imagen no con el número consecu tivo asignado automáticamente sino con un nombre específico y si lo desea tam bién en un lugar específico Con este botón se puede abrir una imagen realizada anteriormente o también otro archivo de imagen en formato JPEG Con este botón se envía la imagen mostrada a una impresora Haga clic en este botón para activar la división de la pantalla Así se mostrará ...

Страница 60: ...ajusta a la especificación UVC Estas instrucciones también están disponibles en Internet en el sitio http www eschenbach optik com USB es una marca registrada de USB Implementers Forum Inc Microsoft Windows y Windows VistaTM son marcas registradas o marcas co merciales de Microsoft Corporation en Estados Unidos y otros países Requisitos del sistema de mobilux DIGITAL Inspection Sistemas operativos...

Страница 61: ... la basura doméstica Este producto está sujeto a la directiva europea 2012 19 UE X X Elimine el producto o sus piezas a través de una empresa de eliminación de residuos autorizada o a través del servicio de eliminación de residuos municipal Respete las normativas en vigor En caso de duda póngase en contacto con su servicio de eliminación de residuos Elimine todo el material de embalaje de manera r...

Страница 62: ...sioni Non guardare direttamente le sorgenti luminose situate sul fondo dell apparecchio Classe di rischio 1 ai sensi della norma EN 62471 2008 Valore di rischio dovuto all esposizione EHV Exposure Hazard Value 2200 secondi in 800 mm Il valore limite della Classe Libera viene mantenuto a partire da una distanza di 1 8 m Pericolo per la retina dovu to alla luce blu 400 nm 780 nm X X Non consentire a...

Страница 63: ...rtura dello slot per scheda SD 7 Slot per scheda SD 8 Apertura di reset 9 Illuminazione LED 10 Fotocamera 11 Copertura della filettatura standard dello stativo 12 Superfici di appoggio Utilizzo Caricamento della batteria interna prima di utilizzare mobilux DIGITAL Inspection per la prima volta occorre caricare completamente la batteria interna Per caricare inserire la mini spina USB del cavo di ca...

Страница 64: ...dimento della modalità di rappresentazione e della luminosità del display vengono salvate Per non consumare inutilmente la carica della batteria interna il mobilux DIGITAL Inspection si spegne automaticamente se non viene mosso per più di 5 minuti Se si vuole utilizzare l apparecchio di prova oltre questo tempo occorre riaccenderlo Verifica con l apparecchio Accendere mobilux DIGITAL Inspection e ...

Страница 65: ...re una sezione d immagine ingrandita usare i tasti all interno del display Per tornare indietro di un livello nel menu toccare nuovamente il simbolo Per ritornare alla visualizzazione dell immagine live toccare il simbolo Cancellazione delle registrazioni Per cancellare una registrazione toccare l anteprima immagine corrispondente per visualizzarla a tutto schermo Toccare poi il display per visual...

Страница 66: ...Per accendere o spegnere la scala di misurazione sul display toccare questo pulsante Questa scala viene salvata anche nelle registrazioni Con la funzione disattivata appare il simbolo Accensione Spegnimento regolazione automatica del diaframma Con questo pulsante si accende o spegne la regolazione automatica del diaframma Con la regolazione automatica del diaframma attivata l apparecchio ottimizza...

Страница 67: ...o il simbolo per chiudere il menu e tornare alla visualizza zione dell immagine attuale Toccare il simbolo per richiamare la seconda pagina delle impostazioni dell appa recchio Selezionare le unità Toccare questo pulsante per commutare tra millimetri e pollici l unità di misura per la scala di misurazione Impostare la correzione dell illuminazione Toccare questo pulsante per impostare un valore fi...

Страница 68: ... eseguita tramite il pulsante Per la calibratura occorre impo stare la lente di ingrandimento sulla scala in dotazione Altrimenti sul bordo superiore dell immagine appare l avviso Calibration not successful calibrazione non riuscita Toccare ripetutamente il pulsante per spostarsi tra due scale con diversa suddivi sione Per rifiutare questa selezione toccare il simbolo Per accettare la selezione to...

Страница 69: ...GITAL Inspection si spegne come standard dopo 5 minuti Questo permette di risparmiare lo stato di carica della bat teria Per disattivare la funzione di spegnimento automatico toccare il simbolo Il simbolo del pulsante passa a Impostare la luminosità del display Toccare questo pulsante per impostare il valore della luminosità del display su o La visualizzazione della luminosità appena impostata vie...

Страница 70: ... si apre automaticamente selezionare il lettore ESCHENBACH nel file manager del computer Proseguire poi con le operazioni file desiderate Per consentire la comunicazione tra l apparecchio di prova e il software mobilux Di gital Inspection precedentemente installato toccare il simbolo Il programma non parte automaticamente Aprire il programma sul computer per creare la comunicazio ne con l apparecc...

Страница 71: ...ia nello slot dell apparecchio di prova Accendere l apparecchio di prova 2 Con il cavo USB fornito in dotazione collegare l apparecchio di prova alla porta USB di un computer idoneo 3 Appoggiare il dito sul simbolo della scheda SD 4 Si apre una finestra di Windows Explorer chiamata ESCHENBACH Eseguire il file mobilux DIGITAL Inspection msi per iniziare l installazione Se la finestra non si apre au...

Страница 72: ...er qualsiasi utente Everyone del computer Per modificare questa installazione cliccare sul punto grigio a sinistra dell opzione desiderata Per interrompere l installazione cliccare su Cancel Per tornare alla fase d installazione precedente cliccare su Back Cliccare su Next per proseguire l installazione 7 Conferma dell installazione cliccare su Next per eseguire adesso l installazione A seconda de...

Страница 73: ...er chiudere la finestra e terminare l operazione Avvertenza Se durante l installazione appare il messaggio di errore che segnala l assenza del file mfc100u dll prima di un nuovo tentativo di installazione occorre installare il pacchetto Microsoft Visual C 2010 SP1 Redistributable Package BDA_mobilux_DIGITAL_Inspection_A5_EN_FR_ES_IT_CMYK indd 73 11 12 2015 12 34 23 ...

Страница 74: ...almente anche in una data posizione Con questo pulsante si apre una registrazione precedentemente effettuata oppure si può anche aprire un altro file d immagine nel formato JPEG Con questo comando viene riprodotta su una stampante l immagine visualizzata Cliccare su questo pulsante per attivare la suddivisione dello schermo Nella metà sinistra dello schermo appare l immagine aperta per ultima con ...

Страница 75: ...om USB è un marchio registrato di USB Implementers Forum Inc Microsoft Windows e Windows VistaTM sono marchi registrati o marchi di Micro soft Corporation negli Stati Uniti e o in altri paesi Requisiti di sistema mobilux DIGITAL Inspection Sistemi operativi Microsoft Windows Vista 7 8 10 Altri software Microsoft Visual C 2010 SP1 Redistributable Package Spazio di memoria necessario per installazio...

Страница 76: ...on smaltirlo insieme ai normali rifiuti domestici Questo prodotto è soggetto alla Direttiva europea 2012 19 UE X X Smaltire il prodotto o i sue componenti tramite un azienda di smaltimento autorizzata o tramite l ente di smaltimento comunale Rispettare le leggi vigenti In caso di dubbi mettersi in contatto con l ente di smaltimento competente Smaltire il materiale di imballaggio in modo ecocompati...

Страница 77: ... 77 BDA_mobilux_DIGITAL_Inspection_A5_EN_FR_ES_IT_CMYK indd 77 11 12 2015 12 34 24 ...

Страница 78: ... 78 BDA_mobilux_DIGITAL_Inspection_A5_EN_FR_ES_IT_CMYK indd 78 11 12 2015 12 34 24 ...

Страница 79: ... 79 BDA_mobilux_DIGITAL_Inspection_A5_EN_FR_ES_IT_CMYK indd 79 11 12 2015 12 34 24 ...

Страница 80: ...BDA_mobilux_DIGITAL_Inspection_A5_EN_FR_ES_IT_CMYK indd 80 11 12 2015 12 34 24 ...

Отзывы: